How to Take Scrolling Screenshots on iPhone.
Taking a screenshot on an iPhone is fairly straightforward, you maintain the Volume Up and Side buttons collectively till you see a preview of what’s in your display. But what do you do whenever you wish to seize one thing past the scale of your display – possibly a webpage that you simply’re scrolling by way of or a doc that you simply’re studying?
Fortunately, Apple presents a local software on iOS to take scrolling screenshots and you may set off it the identical means you’d take a traditional screenshot in your iPhone. In this put up, we’ll clarify how one can seize scrolling screenshots on an iPhone and the place you’ll be able to entry them.
When and the place can you are taking scrolling screenshots?
You can take scrolling screenshots on an iPhone whenever you’re viewing a webpage, doc, or electronic mail in your display. You can take screenshots of webpages on each Safari and Google Chrome, however this performance is but to help Firefox and different net browsers.
Similarly, you’ll be able to take scrolling screenshots for emails in Apple Mail but it surely doesn’t work inside Gmail or different mail apps. As for paperwork, scrolling screenshots might be taken on any vertical loading recordsdata and graphics together with Pages, Numbers, Keynote, and different natively supported apps from Apple. You can not take scrolling screenshots inside the Settings app on iOS.
: How to Make iPhone Keyboard Bigger: 5 Ways Explained
How to take scrolling screenshots on an iPhone
Apple enables you to take screenshots longer than the display measurement of your iPhone in the identical method as you’d take another screenshot on the device. Before you begin, go to the display or web page the place you wish to seize a scrolling screenshot.
- To take scrolling screenshots, first set off a traditional screenshot by following these directions:

On iPhone with Face ID: Press the Side button and Volume Up button concurrently and launch till you see the screenshot thumbnail seem within the backside left nook.
On iPhone with Touch ID: Press the Side button and Home button concurrently and launch till you see the screenshot thumbnail seem within the backside left nook. - When the preview of the screenshot seems on the backside left nook, faucet on it.

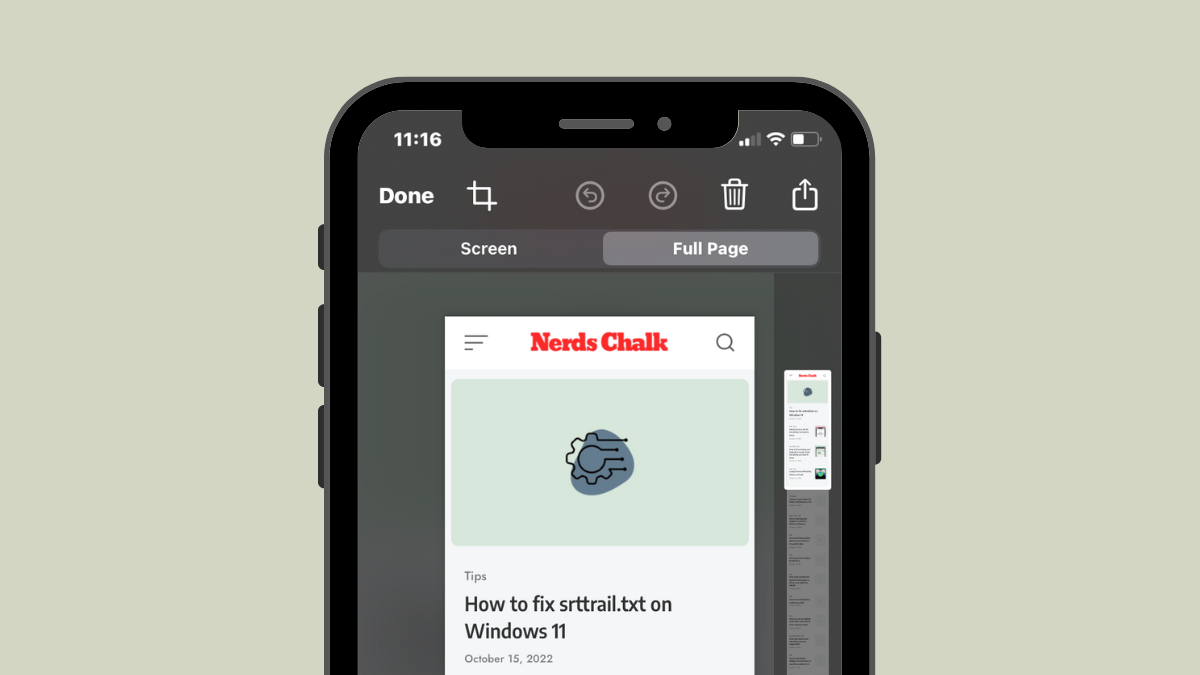
- The screenshot will now open up in fullscreen view. On this display, faucet on the Full Page tab on the prime.

- When you try this, the screenshot will broaden to the complete web page or doc you have been viewing on the display. On the right-hand aspect, you will note a vertical search bar, part of which shall be highlighted to point out you the seen portion of the complete web page.

- You can drag round this highlighted field to scroll by way of the lengthy screenshot and examine the elements which might be out there within the screenshot.

- If you want to save the complete web page or doc in a single screenshot, you’ll be able to skip this step. If you want to embody just some portion of the screenshot, you’ll be able to crop it by tapping on the Crop icon on the prime left nook.

- When you employ the Crop software, you’ll now solely see the elongated preview of the scrolling screenshot.

- Unfortunately, you can’t zoom into the web page when cropping it, so you need to be sure to have situated your required crop space earlier than using the Crop software.
- You can use the Crop software to chop parts of the web page each vertically and horizontally. To crop the screenshot vertically, drag the highest and backside edges (marked by sq. brackets) of the screens. To crop it horizontally, drag the left and proper edges (marked by small white bars within the center).

- When you drag it to the specified measurement, the preview will resize to the cropped space. If you want to make changes to the cropped portion, you’ll be able to faucet on Reset on the prime proper nook to crop the image once more using the above step.

- If you’re happy with the cropped screenshot, faucet on Done on the prime left nook.

- The cropped model of the scrolling screenshot will now be seen on the primary preview with a smaller vertical search bar on the fitting because the undesirable parts of the screenshot have been eliminated.

- From right here, you need to use the Markup instruments to focus on or annotate the screenshot as desired.

- Once you’re carried out making all adjustments, faucet on Done on the prime left nook.

- You will now see a popup menu on the backside portion of the display. Here, faucet on Save PDF to Files.

- On the subsequent display, go to the situation the place you wish to save the screenshot. You also can rename the screenshot by tapping on the identify bar on the backside. After you’re carried out naming and choosing the vacation spot inside Files, faucet on Save on the prime proper nook.

The screenshot shall be saved at your chosen location contained in the Files app.
: What is Safety Check on iPhone
How to entry scrolling screenshots on an iPhone
While the mechanism of taking regular and scrolling screenshots stays the identical, they’re not saved in the identical location in your iPhone. Normal screenshots get saved in PNG format and are accessible inside your Camera roll whenever you open the Photos app in your iPhone. Scrolling screenshots, however, are saved as PDFs as a result of PNG format doesn’t help prolonged images. Since PDF recordsdata are accessible contained in the Photos app, the one means you’ll be able to entry scrolling screenshots in your iPhone is by opening them contained in the Files app.
- To open the scrolling screenshot you simply took, open the Files app in your iPhone.

- Inside Files, go to the situation the place you saved this screenshot. Once you’ve discovered the PDF file of your screenshot, faucet on it to open it.

- The scrolling screenshot will now open in fullscreen from the place you’ll be able to edit it using the native Markup software or you’ll be able to share it with different apps in your device.

That’s all you want to learn about taking scrolling screenshots on an iPhone.
Check out more article on – How-To tutorial and latest highlights on – Technical News