
10 Ways to Pair iPhone and Mac.
Apple’s ecosystem merges a lot of the apps and options that you just use in your iPhones, iPads, Macs, and Apple Watches right into a single cohesive expertise that works collectively and behaves equally. For instance, you may get your calls on different gadgets should you don’t have your iPhone round, begin a mail draft in your Mac, and end it up in your iPhone or iPad.
There are a great deal of prospects and it’s exhausting to disagree that the iPhone and Mac are the 2 Apple gadgets that profit probably the most from this ecosystem. If you personal each an iPhone and a Mac and wish to pair them with one another, then this put up ought to clarify every little thing that you must learn about what could be finished and the way to get these two gadgets paired up.
: How To Delete iTunes Backup On Windows 11
Pair iPhone and Mac: What to know
Pairing an iPhone with a Mac (or Macbook) could be finished in varied methods. The most elementary means of linking the 2 gadgets occurs once you initially arrange the 2 gadgets. Yes, the minute you register to your Apple ID out of your iPhone and Mac, each gadgets are by some means related by Apple iCloud. With iCloud, you possibly can backup footage from an iPhone, and sync passwords, addresses, delicate info, and all different information from different apps in your iPhone and Mac. When enabled and arrange correctly, you’ll have the ability to entry the identical content material on any app you utilize on both of your gadgets.
Besides syncing through iCloud, customers can switch information and different content material by a USB-to-Lightning cable or over Wi-Fi or use AirDrop to pull and drop the identical gadgets immediately. Apple’s ecosystem additionally permits folks to get and make iPhone calls instantly on a Mac and you can even configure it to obtain and ship SMS messages on a Mac with out using an iPhone.
Another option to pair a Mac and an iPhone is using Handoff, a function that permits you to begin one thing on one Apple device and decide it up on one other device seamlessly. The identical function is what’s behind the Universal Clipboard device that lets customers copy texts, footage, and movies from an iPhone onto a Mac and vice versa. Apple additionally lets its Music subscribers sync their audio library throughout all their gadgets using Sync Library.
: How to Backup iPhone on Mac
Requirements
To pair your iPhone with a Mac, that you must be sure you have the next issues prepared earlier than you arrange the pairing:
- An iPhone working the newest model of iOS
- A Mac working the newest model of macOS
- A working Apple ID account
- A wi-fi network that each the iPhone and Mac can connect with.
- A USB-A-to-Lightning cable or USB-C-to-Lightning cable that got here together with your iPhone
Setup: Ensure each iPhone and MacEbook are using the identical Apple ID
Before you possibly can pair any Apple gadgets with each other, that you must make sure that they’re using the identical Apple account, i.e., logged in with the identical @iCloud.com e-mail deal with. This is vital as a result of no information will sync between the 2 gadgets in the event that they’re using two separate iCloud accounts as iCloud is the platform that’s appearing because the bridge between the 2 gadgets.
That is why that you must first log in to the identical Apple ID on each gadgets to pair them collectively. Note the iCloud e-mail and your Apple account password that you just actively use earlier than continuing additional down this information.
On iPhone
- If you haven’t signed in to any Apple ID in your iPhone but, you are able to do so by opening the Settings app and tapping on the Sign in to your iPhone card on the prime.

- Now, enter your Apple ID and password on the following display and if prompted, kind the six-digit verification code that ought to be despatched to your telephone or every other Apple device.

- In case you might have already logged in to an Apple account however need to use one other account to pair your iPhone with a Mac, then you definately’ll must signal out of it. To signal out of an Apple account, open the Settings app and faucet on your identify on the prime.

- Inside the Apple ID display, scroll all the way down to the underside and faucet on Sign Out.

- On the following display, enter your Apple ID password and faucet on Turn Off on the prime proper nook.

You will now be logged out of the prevailing Apple account. You can now comply with the preliminary steps on this part to register to the right Apple account.
On Mac
- If you haven’t signed in to any Apple ID in your Mac but, you are able to do so by opening System Preferences in your Mac from the Launchpad, Dock, or Finder.
- When the System Preferences window seems, click on on the Sign In choice on the prime proper nook.
- Next, enter your Apple ID and password in addition to a six-digit verification code if prompted.
- If you have already got signed into an Apple account however need to change it to a distinct iCloud deal with, you are able to do so by opening System Preferences and clicking on Apple ID.

- On the following window, choose the Overview tab from the left sidebar after which click on on Sign Out on the backside.

You will now be logged out of the prevailing Apple account. You can now comply with the preliminary steps on this part to register to the right Apple account.
: 10 Ways to Easily Find Safari Tabs On Your iPhone and iPad
How to pair an iPhone and a Mac
Having been designed to work intently with different gadgets within the ecosystem, Apple’s iPhone and Mac could be paired in numerous alternative ways, most of which work with out even using a cable to attach the 2 gadgets.
Method 1: Pair using a wired connection
Before you possibly can synchronize your iPhone with a Mac, you will have to first set up a wired connection between the 2 gadgets.
With each the iPhone and Mac powered ON, join them using a USB-to-Lightning cable that comes together with your iPhone.
Which cable must you use?
Some current Macs include a USB-C port whereas older fashions use a USB-A port to attach the gadgets. If you personal an iPhone 12 or a more moderen mannequin, you should have a USB-C-to-Lightning cable that ought to be appropriate with fashionable MacBooks. If you personal an iPhone 11 or older device, you should have a USB-A-to-Lightning cable which might work properly with older technology Macs. If you personal a brand new Mac or an older iPhone or vice versa, you would want to seek out an adapter that connects the 2 gadgets.
Sync iPhone with Mac
- Once you’ve related the iPhone to the Mac, you may get issues began on the Mac by opening the Finder app.

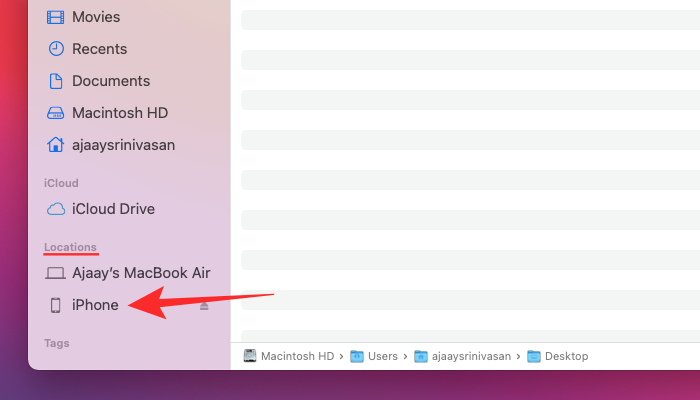
- Inside the Finder app, your iPhone ought to seem within the left sidebar. If not, it’s going to seem when you click on on the Locations part. When your iPhone seems related, click on on it.
- If that is the primary time you’re connecting your iPhone to the Mac, click on on Trust in your Mac within the “Trust iPhone” immediate that seems on the display.

- Similarly, you’re going to get a “Trust This Computer” dialog in your iPhone to verify your reference to the Mac. To proceed, faucet on Trust.

- Now, you’ll must enter your device passcode to approve.

- Once all that’s finished, it is possible for you to to see your iPhone and all its particulars inside Finder.
- To sync all the information out of your iPhone to the Mac, click on on Sync contained in the General tab.

- To sync chosen information and information out of your Mac to the iPhone, you possibly can choose the respective tabs on the prime and when you’re within it, test the Sync <content material> onto iPhone field on the prime.

- To save backups of your iPhone onto the Mac, choose Back up the entire information in your iPhone to this Mac underneath “Backups” and click on on Back Up Now.

: How To Inspect Element on iPhone
Method 2: Pair iPhone and Mac over Wi-Fi
If you’ve established a wired connection using technique 1, then you definately’ll have the ability to pair your iPhone with a Mac wirelessly for all future makes use of. This works when your iPhone and Mac are related to the identical Wi-Fi network by which case your Mac will have the ability to sync information with the iPhone with no bodily connection.
- To arrange wi-fi syncing using Wi-Fi, join the iPhone to a Mac using the USB-to-Lightning cable like in Method 1.
- Now, open the Finder app as you probably did earlier and choose your iPhone from the left sidebar.

- When your iPhone reveals up, scroll down the display with the General tab and test the Show this iPhone when on Wi-Fi field. After turning on this selection, click on on Apply on the backside proper.

- Once enabled, your iPhone will proceed to point out up contained in the Finder app even should you disconnect its cable from the Mac.
If each your Mac and that iPhone are related to a Wi-Fi network, you need to use backup or sync choices on the display to retailer your iPhone backups on the Mac or synchronize your Mac information and content material with the paired iPhone.
: How to Access iCloud Keychain Passwords Instantly on Mac and that iPhone
Method 3: Pair using iCloud
Perhaps the most straightforward and simple option to completely pair an iPhone and a Mac is using iCloud. When each gadgets are signed in to the identical Apple account, you possibly can share all of your consumer information between the 2 gadgets wirelessly, even when they’re related to totally different networks. When you allow iCloud and configure it to sync chosen content material over a number of gadgets, the information on all these gadgets keep the identical, thus serving to you proceed the place you left off from one device on one other device.
On iPhone
- To allow iCloud and set it up on an iPhone, open the Settings app and faucet on your Apple ID card on the prime.
- Inside Apple ID, choose iCloud.

- On the following display, you possibly can activate iCloud for all of the apps and providers listed on the display by turning on the toggles adjoining to the apps/providers.

- If you solely need to allow iCloud for sure apps, you possibly can disable the toggle for apps and providers you don’t must be synced throughout different gadgets.
- If you need your Mac and different Apple gadgets to recollect the passwords and different delicate info you save in your iPhone, you possibly can faucet on Keychain on this display. On the following display, activate the iCloud Keychain toggle to pair your iPhone and Mac for password retention.

On Mac
To ensure your entire content material will get synced between your iPhone and Mac, additionally, you will must allow iCloud on macOS and choose which options you need to be synced up.
- Go to Apple () menu > System Preferences.

- Inside System Preferences, choose Apple ID.
- When your Apple account hundreds up, click on on the iCloud tab from the left sidebar.

- On the right-hand panel, you need to see a listing of providers that you could sync through iCloud. To choose which providers or apps keep synced together with your Mac, test the field next to them.

- Some apps may also provide customization choices to let you choose what a part of the app will get synced. To configure them in your most popular method, click on on Options on the right-hand facet of the chosen app and comply with the on-screen directions to customise additional.

Method 4: Make and obtain iPhone calls on Mac
Being part of the Apple ecosystem, you can also make and obtain telephone calls out of your Mac instantly should you pair it together with your iPhone. This means, you possibly can obtain vital telephone calls on the Mac with out having bodily entry to your iPhone. This function requires that each gadgets use the identical Apple ID, are signed in to FaceTime using the identical Apple ID, and are related to the identical Wi-Fi network.
On iPhone
- To pair your iPhone with a Mac to make telephone calls, open the Settings app and choose Phone.

- Inside Phone, faucet on Calls on Other Devices.

- On the following display, activate the Allow Calls on Other Devices toggle on the prime.

- Once enabled, find your MacEbook or Mac from the record of gadgets that seem underneath “Allow Calls On” and activate the toggle(s) adjoining to the macOS device you need to allow telephone requires.

- You can now make calls instantly in your Mac with out using your iPhone. Apple additionally permits customers to port ongoing calls from the iPhone to Mac or vice versa. If you want to swap gadgets in the course of a name, you are able to do so by tapping on the Audio tile inside the decision display after which deciding on your MacEbook from the record of obtainable gadgets.

- At any time, you possibly can swap back to your iPhone once more by tapping on the identical Audio tile and deciding on iPhone from the menu.

On Mac
While the above technique ought to allow it on the Mac, you possibly can select this step to both make sure that the telephone calls function has been turned on or to allow the function instantly in your Mac with out consulting the iPhone information above.
- To pair your Mac with an iPhone for telephone calls, open the FaceTime app on the Mac. Once open, click on on FaceTime from the menu bar and choose Preferences.

- When the Preferences window opens, choose the Settings tab on the prime and test the Calls From iPhone field.

- This ought to route all of your incoming calls out of your iPhone to the Mac and additionally, you will have the ability to provoke calls from the FaceTime app on this device.
- To make a telephone name on a Mac, open the FaceTime app, hover over the particular person you need to name inside your Recents record and click on on the Phone icon on the suitable facet of the particular person’s identify. You may also make calls by deciding on a quantity from Contacts, Calendar, Safari, or every other app out there in your Mac.

- When you obtain telephone calls, you will note a banner seem on the prime proper nook of your Mac’s display. You can click on on Answer to let the decision come by in your Mac.

Method 5: Turn on Text Message Forwarding to Mac
Macs have a Messages app much like one on an iPhone however by default, you’ll have the ability to ship and obtain solely iMessage texts. However, like with telephone calls, you can even pair your iPhone with a Mac to obtain all SMS messages that you just get in your iPhone and likewise reply to them in textual content kind. This is feasible by a function that Apple calls Text Message Forwarding which when enabled will allow you to ship and obtain SMS messages instantly on a Mac.
On iPhone
- To allow Test Message Forwarding, open the Settings app in your iPhone and choose Messages.

- Inside Messages, scroll down and faucet on Text Message Forwarding.

- On this display, activate the toggle adjoining to your Mac.

This ought to route all of your SMS messages out of your iPhone to the Mac.
On Mac
While the above information is sufficient to activate Text Message Forwarding, your Mac’s Messages app should be configured to obtain messages from all of your telephone numbers.
- Open the Messages app in your Mac and go to Messages > Preferences from the menu bar on the prime.

- To be sure you obtain messages from the iPhone, click on on the iMessage tab on the prime and test the bins adjoining to all of the telephone numbers underneath “You can be reached for messages at”.

- In the identical window, choose your main telephone quantity from the record of choices underneath “Start new conversations from”.

This will ensure any reply you ship out of your Mac is shipped through your telephone quantity and never your iCloud e-mail deal with.
Method 6: Enable Handoff on iPhone and Mac
Apple affords a Handoff function to allow you to begin somebody on one Apple device and resume it on one other device seamlessly. The function can be utilized for a large number of functions like drafting an e-mail on an iPhone and persevering with the place you left off on a Mac. The Handoff function ties collectively most Apple gadgets like an iPhone, Mac, iPad, or Apple Watch and works on Mail, Maps, Safari, Reminders, Calendar, Contacts, Pages, Numbers, Keynote, and even some third-party apps.
Before you allow Handoff on the iPhone and Mac, that you must type this stuff:
- Both iPhone and Mac are signed in to the identical Apple ID.
- Wi-Fi and Bluetooth are enabled on each gadgets.
On iPhone
- To pair your iPhone with a Mac using Handoff, open the Settings app on iOS and choose General.

- Inside General, faucet on AirPlay & Handoff.

- On the following display, activate the Handoff toggle.

- When switching from a Mac to an iPhone, you will note Handoff choices as a banner on the backside of your iPhone’s display once you entry the App Switcher.

On Mac
- To pair your Mac with an iPhone using Handoff, go to the Apple () icon > System Preferences. You may also open System Preferences from the Dock, Launchpad, or Finder.

- Inside System Preferences, choose General.

- At the underside of the window, test the Allow Handoff between this Mac and your iCloud gadgets field.

- This ought to allow Handoff on each your iPhone and Mac. Once enabled on each gadgets, you need to use Handoff to modify from iPhone to Mac by clicking the app’s Handoff icon from the Dock.

Method 7: Connect iPhone and Mac through Bluetooth
You can pair your iPhone with a Mac using a Bluetooth connection to share information, share mobile information, use AirDrop, Handoff, and different continuity options. For this to work, that you must allow Bluetooth on each iPhone and Mac.
On iPhone
- To pair your iPhone with a Mac, open the Settings app on iOS and choose Bluetooth.

- On the following display, activate the Bluetooth toggle on the prime.

- You will now see a listing of gadgets you related to through Bluetooth lately. If you haven’t related your Mac to the iPhone, you’ll have to pair it manually by deciding on your Mac from underneath “Other Devices”.

On Mac
- To pair your Mac with an iPhone, go to the Apple () icon > System Preferences. You may also open System Preferences from the Dock, Launchpad, or Finder.
- Inside System Preferences, choose Bluetooth.

- On the window that opens, click on on Turn Bluetooth On.

- Your Mac’s Bluetooth will now activate and it’ll connect with all of the out there gadgets within the neighborhood mechanically supplied they’re on as properly. If you need to join the Mac to your iPhone, look forward to the display to point out your iPhone and when it seems, click on on Connect.

- You will now see an authentication code on the Mac which that you must confirm with the one which reveals up in your iPhone. You might also must approve the connection on the iPhone to proceed. When the connection is profitable, your iPhone will seem contained in the Devices field and shall be labeled as “Connected”.
Method 8: Connect Mac to iPhone’s cell hotspot
Apple affords an Instant Hotspot function that permits you to join a Mac to an iPhone’s mobile information by a private hotspot. When paired efficiently, the Mac will have the ability to join and browse the web using your iPhone cell information with out requiring a cable to connect with both device. For this function to work, each your iPhone and Mac ought to be signed in to the identical Apple ID.
Start a Personal Hotspot on iPhone
Before you pair your Mac to an iPhone’s hotspot, that you must first activate cell information on the latter after which allow its hotspot.
- Open the Settings app in your iPhone and choose Mobile Data.

- On the following display activate the Mobile Data toggle on the prime.

- Once enabled, return to the earlier display, i.e., the Settings display, and faucet on Personal Hotspot.

- Inside Personal Hotspot, activate the Allow Others to Join toggle on the prime.

- In the immediate that seems, choose Turn on Wi-Fi and Bluetooth to allow the cell hotspot wirelessly.

You have efficiently enabled Personal Hotspot on the iPhone. Now it’s time to attach the Mac to this hotspot.
Connect your Mac to the hotspot
After a private hotspot has been established, you possibly can join your Mac to it.
- Click on the Wi-Fi icon from the Menu bar, and within the menu that seems, activate the Wi-Fi toggle.

- Your iPhone ought to now seem underneath “Personal Hotspot” amongst different networks. To connect with its hotspot, click on on it.
- When your Mac is related to the iPhone’s hotspot, you need to see the hotspot icon next to your iPhone flip blue.

The Wi-Fi icon within the Menu bar may also swap to the Personal Hotspot icon.
Method 9: Use AirDrop to share information between iPhone and Mac
If you need to pair your iPhone with a Mac for the only real function of file switch, then AirDrop ought to be the right reply. With AirDrop, you possibly can share something that’s shareable between your Apple gadgets and even with others’ iPhones, iPads, and Macs. You can use the function to share footage, movies, paperwork, hyperlinks, notes, voice memos, areas, contacts, and different gadgets that may be shared from apps.
To use Airdrop, that you must guarantee that:
- Wi-Fi and Bluetooth on the iPhone and Mac are enabled.
- iPhone’s Personal Hotspot function is disabled.
- iPhone and Mac are saved inside 30 ft of one another to permit the profitable switch of information.
On iPhone
Enable AirDrop to obtain information
- To allow AirDrop in your iPhone, launch the Control Center and faucet and maintain on the Wi-Fi icon or Bluetooth icon.

- When you try this, the network menu within the Control Center expands to point out more choices. To allow AirDrop, faucet on the Airdrop icon contained in the overflow menu.

- Choose both Contacts Only or Everyone to verify your iPhone is discoverable by folks whose contact particulars you might have saved or by everybody round you.

- You have efficiently enabled Airdrop in your iPhone. The directions above are for once you need to obtain information from a Mac or one other Apple device.
Use AirDrop to ship information
- To ship information from an iPhone to a Mac through Airdrop, find the file or app merchandise in your iPhone and open it. Once opened on full display, faucet on the Share icon (typically current on the backside of the display).

- In the Share menu, choose AirDrop.

- On the following display, you need to see all of the Apple gadgets which can be enabled with AirDrop. Here, faucet in your Mac.

The switch will start as soon as the Mac approves this file and when it begins you’ll hear a chime. Once full, you’ll hear one other chime.
On Mac
Enable AirDrop to obtain information
- To allow AirDrop in your Mac, click on on the Control Center icon from the Menu bar on the prime. In the overflow menu that seems, click on on the Airdrop icon to show it on.

- When enabled, your Mac’s Bluetooth may also be turned on and their icons will now flip blue. After Airdrop has been enabled, click on on the arrow icon on its right-hand facet.

- Select both Contacts Only or Everyone to verify your iPhone is discoverable by folks whose contact particulars you might have saved or by everybody round you.

You have efficiently enabled Airdrop in your Mac. The directions above are for once you need to obtain information from an iPhone or one other Apple device.
Use AirDrop to ship information
- To ship information from a Mac to an iPhone through Airdrop, find the file or merchandise you need to share and right-click on it. To share gadgets from an app, you possibly can entry this menu by clicking on File from the Menu bar on the prime. In the menu that seems, go to Share > AirDrop.

- If the iPhone’s AirDrop has been enabled, you need to see it contained in the AirDrop window that seems next. Here, click on in your iPhone to ship the file out of your Mac.

You will hear two totally different tones – one when AirDrop begins sending the file and one other when the file switch is full.
▶ How to Airdrop Between Mac and that iPhone
Method 10: Enable Apple Music Sync Library on iPhone and Mac
If you’re somebody who makes use of Apple Music for streaming songs and podcasts, you possibly can entry your total music library in addition to the songs you’ve downloaded using the Sync Library function. This will guarantee that no matter songs or playlists you hearken to in your iPhone stay synced with the Apple Music app on the Mac and vice versa.
The function requires that you just’re subscribed to Apple Music and its apps on the iPhone and Mac are all signed in to the identical Apple ID.
On iPhone
- To allow Sync Library in your iPhone, open the Settings app and choose Music.

- Inside Music, activate the Sync Library toggle underneath “Library”.

This ought to take some time on your iPhone to add your library to iCloud, particularly in case your library is huge. Once uploaded, you’ll have the ability to entry your music tracks (as much as 100,000 songs) from any Apple device together with your Mac.
On Mac
- You can allow Sync Library in your Mac by opening the Apple Music app. Once the app is open, go to Music > Preferences from the Menu bar on the prime.

- When the Preferences windows open, click on on the General tab on the prime and test the Sync Library field to allow it. If you would like on your Mac to obtain the songs in your library as quickly as they’re added, test the Automatic Downloads field on the identical display.

- To affirm your resolution, click on on OK on the backside proper nook of the Preferences window.

You must wait some time on your library to get uploaded and synced. Once finished, it is going to be accessible from all of your Apple gadgets together with your iPhone.
Why must you pair your iPhone with a Mac?
If you’re questioning what you possibly can achieve from pairing your iPhone with a Mac, then the next causes ought to enable you make up your thoughts:
- Transfer information between your iPhone and Mac swiftly and effortlessly
- Sync all or chosen content material from Mac to iPhone each wired and wirelessly
- Sync an ongoing process or work between the 2 gadgets in such a means that you just begin engaged on one device and proceed on the opposite.
- Make and obtain iPhone calls instantly in your Mac
- Get SMS out of your iPhone forwarded to the Mac and likewise ship replies from it using the identical telephone quantity.
- AirDrop information and app gadgets immediately and wirelessly with out hassles.
- Back up photos out of your iPhone and entry them in your Mac using iCloud.
- Use Handoff to repeat and paste content material from iPhone to Mac or vice versa.
- With Continuity Camera, you possibly can scan paperwork out of your iPhone and transfer them on to an e-mail, webpage web page, or an app on a Mac.
- Track your iPhone on the Mac or vice versa using Find My.
- Connect your Mac to your iPhone’s mobile network using Personal Hotspot.
- Sync your music library between Mac and that iPhone.
FAQs
Will you lose your information should you pair the iPhone with the Mac?
No. The complete thought behind pairing the 2 gadgets is to allow you to entry all of the information and content material from each of your gadgets. If you unpair the 2 gadgets, your information could get deleted from any one in all your gadgets however ought to keep intact on the device the place you initially saved them.
Can information be despatched through Bluetooth to Mac?
Since the 2000s, now we have been aware of sending music and photos through Bluetooth. But when using Apple gadgets you need to use AirDrop to share information and the switch occurs immediately with out taking a lot time. AirDrop makes use of each WiFi and BlueTooth applied sciences to ship gadgets to any Apple gadgets in your neighborhood.
Can your music sync by iTunes?
If you hearken to songs with Apple Music, all content material shall be synced between gadgets so long as the Sync Library function is enabled on each your iPhone and Mac. Check technique 10 within the information above to discover ways to allow the function. If you might have numerous native audio content material and also you don’t subscribe to Apple Music, you possibly can sync your music using strategies 1 and a couple of.
How do you switch iPhone textual content messages to a Mac pc?
By default, Apple reveals all of your iMessage texts out of your iPhone to the Mac. To see your common SMS messages from the iPhone, that you must allow the Text Forwarding function using technique 5.
That’s all that you must learn about pairing your iPhone with a Mac.
Check out more article on – How-To tutorial and latest highlights on – Technical News