
How to make use of Kdenlive on Windows: Step-by-step information.
So you’ve put in Kdenlive on Windows and wish to begin using it to edit your movies. But studying how to navigate a brand new app is less complicated stated than executed, particularly in the case of video modifying apps that are inclined to have a steep studying curve.
Kdenlive is without doubt one of the best open-source (free!) video modifying instruments out there on the market. If you don’t wish to dole out a subscription charge that goes together with most of the premier video modifying apps corresponding to Adobe Premiere Pro and Sony Vegas, studying how to make use of Kdenlive may also help clear up all of your video modifying woes for a very long time to return.
With that in thoughts, let’s check out how one can begin using Kdenlive and its options with a primary Kdenlive tutorial.
How to make use of Kdenlive: Basic tutorial
Firstly, open Kdenlive from the Start menu.

1. Create a brand new venture
As quickly as you open Kdenlive, you’ll routinely be on a brand new venture with default venture settings. To view and alter your venture settings, click on on Project within the prime toolbar.

Then choose Project settings.

On the opposite hand, if you wish to create a brand new venture from scratch, click on on File.

Then choose New.

And then choose your venture settings.

You can select from the out there venture settings with the default venture location or have a customized setting. In our instance, we’re choosing the Vertical HD 30 fps underneath “Custom” as our video is shot with vertical framing.
Click on OK when you’ve chosen the venture settings.

2. Import information
Now, let’s import some media information to your venture. This could be achieved in a few other ways.
Click on Project within the toolbar.

Then choose Add Clip or Folder…

Navigate to your information, choose them, and click on on OK.
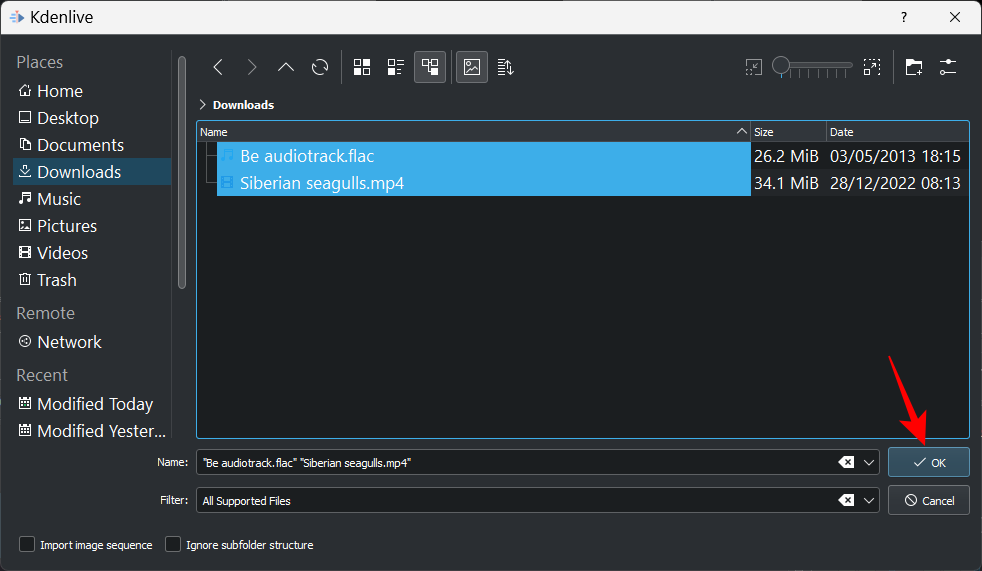
If there are any information that should be transformed for simple modifying, you’ll get a immediate for a similar. Click on Transcode, if relevant.

Once executed, you will note your information within the “Project bin”.

Another method to import information is to easily drag and drop them into the venture bin.

Adding tracks to timeline
Next, we’re going to add our imported information to the timeline. This is as simple as dragging the media file from the venture bin to the timeline, like so:

Your video file can be added to a video channel and, if it has accompanying audio, that can be added to an audio channel.

With default settings, Kdenlive will present you two preview screens. The first one is named Clip Monitor – a preview display to your media within the venture bin. The second preview display is named the Project Monitor and that previews your media within the timeline.

If you’ve got extra audio and video information, they will also be added individually in the identical method – movies within the video channel, and audio within the audio channel.
Quick tip: If it’s essential to zoom in or zoom out the video within the timeline, use the slider within the backside proper nook.

3. Trim information
Now, let’s trim the information and be sure that solely related materials makes it to the ultimate output. To accomplish that, take both fringe of the clip and drag it inward.

And identical to that, your information are trimmed.
Quick tip: If two information are grouped collectively, modifications made to one among them can be made to each. If you wish to ungroup a file, merely right-click on it and choose Ungroup Clips.

Alternatively, to group information within the timeline, maintain down the Shift key and choose them, then right-click and choose Group Clips.
4. Split information
To accomplish that, firstly, choose the clip within the timeline by clicking on it. Then choose the razor device (scissor icon) from the timeline toolbar.

Now click on on the spot the place it’s essential to trim the file.

The information will now be cut up on the spot the place you clicked with the razor device. To delete a section of the clip, mark the start and ending with the razor device. Then click on on the Selection device.

Select the part you wish to delete and press Delete.

5. Use the Spacer device to shift a number of information
Kdenlive has a “Spacer” device that may shift your information left or proper collectively within the timeline. This can are available fairly helpful when there’s an area between two information on the identical channel and also you don’t wish to shift them individually. To begin using it, click on on the spacer device (to the best of the razor device).

Then drag a file in the direction of the left to shift it and watch the opposite information shift with it.

The spacer device received’t work in the event you’re dragging the file on the best as that’s seen as a separate entity. So, you probably have a number of gaps between your information, use the spacer device on the file from the place you wish to begin shifting the information. The one on the left will keep instead whereas the remaining transfer.

6. Add textual content titles
Next, allow us to see how we are able to add some textual content to our video. Click on Project within the toolbar above.

Then choose Add Title Clip…

This will open up the Title clip window. Here, click on in the course of the tile to begin typing.

Feel free to take a look at the instruments that the title clip window has to supply. These will allow you to change the colour of the textual content, its place, font, measurement, background, and so forth., and add results to it. Use them to customise the title as you would like.
Quick tip: If you’re not sure about an possibility, use your cursor to hover over the choice and get a brief description of what it does.

Once executed, click on on Create Title.

The title will seem within the venture bin. Drag it to the timeline so as to add it to your video.

Preview the video to see the way it appears. If you wish to edit it, merely double-click on the title clip and you can begin modifying once more. You may shorten or lengthen the title clip by dragging its edges left or proper.
7. Add results to Video
Now, let’s improve the Video with results and changes. Here are a number of video impact choices that you could be end up using time and time once more:
Effects
Click on Effects underneath the venture bin.

Now choose the Video tab (reel icon) to filter the video results.

Here you will note a bunch of impact classes to select from. Expand one class to take a look at the consequences in it. For our instance, we’re selecting “Motion”.

Then drag and drop the impact to a video file within the timeline.

Preview your video to see how the impact appears in motion.
Transform
Although technically an impact, “Transform” is sweet to know individually as it could actually enable you change the scale, velocity, and rotation of a clip and even enable you add picture-in-picture (PIP).
To add the rework impact, right-click on a video clip, choose Insert an impact, after which click on on Transform.

You will see a crimson border seem across the video clip on the venture monitor.

You can drag these crimson borders to vary the scale of the clip or the center marker to vary its place.
Alternatively, you possibly can enter the coordinates for the X/Y axis for place change, and width/peak values for measurement change.

If you’ve got one other video on a unique channel, you possibly can change the scale of the present video with “transform” and find yourself with a PIP impact.
Note: You might want to insert a video channel to the timeline if there are not any extra channels out there. To accomplish that, right-click within the “Master” part and choose Insert monitor.

In the “Add Track” window, choose what number of tracks you need, and whether or not you need the monitor to be inserted above or beneath one other monitor. Then click on OK.

If you’re including a video with audio, you’ll need so as to add an audio monitor as properly (in any other case you received’t be capable of add both monitor). Then, add the rework impact (to the video on prime) to get the PIP impact as proven earlier than.

Adjust Speed
Kdenlive has a fast and straightforward approach of adjusting the velocity of a monitor. To accomplish that, maintain down Ctrl after which drag the sides of the monitor. You will see the change in velocity mirrored on the backside.

8. Add results to Audio
Now that you recognize the fundamentals of video modifying, let’s transfer on to the audio. Adding results to an audio monitor is just like what we did with the video.
Click on the Effects tab underneath the venture bin.

Then click on on the Audio tab (speaker icon).

Here, click on on a class to broaden it.

Then drag the impact of your alternative and drop it onto the monitor.

To edit the impact, click on in your audio monitor, after which make the modifications from inside the “Effects” tab to the best of the timeline.

Each impact could have totally different edit choices so there’s room sufficient to combine and match and tinker with the sound as a lot as you want.
9. Change Audio ranges
To alter the quantity ranges of the totally different tracks, change to the Audio mixer tab to the best of the timeline.

Here, you possibly can alter the quantity of particular person audio tracks in addition to the grasp monitor with the assistance of the vertical sliders.

You additionally get different typical audio mixer choices corresponding to muting, soloing, monitoring, and panning channels (horizontal sliders).

10. Color and Image correction
Color stability is essential to make your video look inviting and constant. This is particularly true in the event you’re working with two or more movies from totally different sources. Everything from lighting to results makes a distinction right here and it’s good to know how one can add and work with coloration and image correction results.
To begin, click on on Effects tab underneath the venture bin.

Under the video tab, click on on Color and Image correction.

Here, you will discover a lot of coloration correction choices to select from. Go by way of the record and discover one which your movies want, then drag and drop one to a video within the timeline.

Then click on on the video and the impact will come up for modifying within the “Effects” tab to the best of the timeline. Adjust the numbers right here to your liking and preview the video to see the modifications.

Quick notice: If you’ve got cut up a file in a channel, you’ll have to add the identical impact and alter the values to all sections of the clip. Generally talking, additionally, you will wish to add the identical to video clips in all channels to make sure coloration consistency all through your video.
11. Render or Export video
Though there are a bunch of different superior choices, results, transitions, and so forth. that you need to use in Kdenlive, for functions of this tutorial, and for many video modifying functions, these primary instruments are greater than sufficient.
So now it’s time to export or render your video. This is a comparatively easy factor to do.
Click on Project within the toolbar above and choose Render.

The location to your “Output file” can be given in the direction of the highest. Click on the icon next to it to vary location.

Then, select from the out there render presets to find out the video settings and configuration.

If you need extra choices, click on on More choices on the backside.

The extra choices assist you to render the video at preview decision, rescale the video, change velocity, add your personal customized video high quality, and even get audio information individually, amongst different choices.

Once you’re glad along with your render settings, click on on Render to File within the backside left nook.

Wait for the render course of to complete.

Once executed, your last output file can be saved in your chosen location.

List of primary Kdenlive shortcuts
As you’re employed with Kdenlive and get a dangle of the software program, you’ll begin to rely upon shortcuts to fast-track the method. Here is a quick record of vital shortcuts that it’s best to learn about:
- Ctrl + N – Create new venture.
- Ctrl + O – Open saved venture.
- Ctrl + S – Save present state of venture.
- Ctrl + Shift + S – Save present save venture with a brand new identify/location.
- Ctrl + Z – Undo final motion.
- Ctrl + Shift + Z – Redo final motion.
- Del – Delete chosen merchandise
- Ctrl + C – Copy choice
- Ctrl + V – Paste copied merchandise
- Ctrl + Mouse wheel up – Zoom in
- Ctrl + Mouse wheel down – Zoom out
- Ctrl + G – Group information
- Ctrl + Shift + G – Ungroup information
- X – Razor device
- S – Selection device
- M – Spacer device
- Ctrl + Enter – Render
For a listing of each conceivable Kdenlive shortcut key, check with Kdenlive’s shortcuts doc.
FAQs
In this part, we reply a number of generally requested queries about Kdenlive as a video editor.
Is Kdenlive good for novices?
There positively are less complicated video modifying software program on the market than Kdenlive, corresponding to Clipchamp which can also be Windows’ native video editor app. But with the best steering, you possibly can stand up and working with Kdenlive very quickly. Refer to the tutorial above to know the way to get began with primary modifying in Kdenlive.
What is Kdenlive used for?
Kdenlive is a video modifying device, not not like Adobe Premiere or Sony Vegas, and others of comparable ilk. But what separates Kdenlive from the remaining is that despite the fact that it’s wealthy with options and instruments, it is usually utterly open supply, which implies it’s free, and is comparatively mild for it to run on low finish PCs as properly.
Do professionals use Kdenlive?
Yes, professionals do use Kdenlive. Given the number of modifying instruments and choices that it presents, Kdenlive is skilled sufficient for many creators.
We hope you discovered this tutorial helpful in studying how to make use of Kdenlive. Feel free to delve deeper into Kdenlive to study more, edit higher, and create content material that could be a delight to look at.
Check out more article on – How-To tutorial and latest highlights on – Technical News