How to Fix “This PC Doesn’t Currently Meet All the System Requirements for Windows 11” Error.
Windows 11 has simply been launched to the general public and it appears to be engaging a whole lot of new customers. Many customers have jumped the ship and have upgraded to Windows 11 whereas others want to take the leap immediately. If you might be in the identical boat, then sadly, you might need realized that Windows 11 nonetheless has its TPM and Secure Boot necessities.
What’s more, is {that a} new bug going round with the media creation device and Windows update is stopping suitable customers from updating to the brand new Windows 11. If you’re going through the identical problem then right here’s how one can repair it in your PC.
This PC doesn’t presently meet all of the system necessities for Windows 11″ error: Why are you seeing this on a suitable system?
If you’re going through this problem on a system that passes the PC Health test app take a look at from Microsoft then you might be doubtless using the media creation device or Windows update to update your PCs.
This is a recognized problem that has been acknowledged by Microsoft and a repair for a similar is underway. Users are randomly affected by this error on Windows 10 when using both the Windows Update device or the Meda Creation device to immediately update your PC out of your native storage.
In such instances, you should utilize the fixes talked about under to resolve your problem.
5 Ways to repair the “This PC doesn’t currently meet” error when putting in Windows 11
You can use the next methods to repair this error on a suitable PC. We suggest you strive the primary repair as that appears to repair the problem for many customers.
If using a unique improve device doesn’t remedy your problem, then you’ll be able to transfer to the following fixes talked about on this information. Let’s get began.
Fix #1: Make positive you might be assembly all the necessities
- Ensure that you’re on Windows 10 v2004 or increased.
- Ensure that you simply meet the fundamental necessities for putting in Windows 11 in your system.
- Ensure that you’ve got no less than 9GB of free disk house in your system so to obtain Windows 11 in your native storage using the Assistant.
- Ensure that you simply run the Installation Assistant as an administrator.
- Processor: 1GHz or sooner with 2 or more cores.
- RAM: 4GB or increased
- Graphics: DX12 suitable with WDDM 2.0 driver
- Disk Space: 64GB free house on the drive you wish to set up Windows 11 on
- System: UEFI, with Secure Boot
- TPM: 2.0 or increased
- Display: 720p @ 8bits or increased
Why is that this necessary? Well, as a result of small points might stay unattended generally.
See the screenshot under for instance.
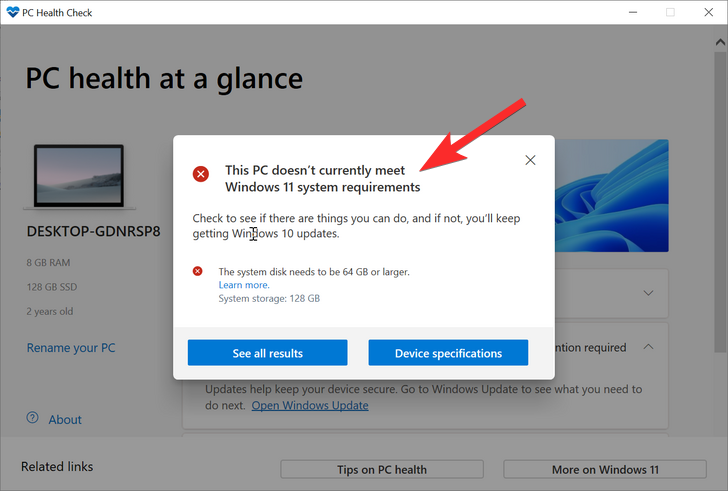
The drive on which we have been putting in Windows 11 had solely 53 GB of whole house. This didn’t meet Windows 11 requirement. Once we elevated the dimensions of that disk, we have been capable of repair this problem.

So, do evaluation the Windows 11 necessities once more.
Fix #2: Use another approach of improve

As the problem is prevalent when using the Media Creation device or Windows update, the recognized repair is to easily use one other improve methodology from Microsoft.
We suggest you begin with the brand new Installation Assistant from Microsoft which is a devoted utility developed that can assist you simply improve from Windows 10 to Windows 11.
You can use this complete information from us to make use of the Installation Assistant to update your OS immediately. You will want a working web connection to update using the identical.
Read: How to Use Windows 11 Installation Assistant to Upgrade From Windows 10
If Update Assistant doesn’t appear to suit your necessities or if it presents you with the identical error, then we suggest you utilize a Windows 11 ISO as a substitute. Microsoft has additionally launched devoted ISOs for the brand new OS and you may improve using the identical by following this information.
Read: How to Download and Install Official Windows 11 ISO
CSM or compatibility assist module is a BIOS atmosphere that helps your OS talk along with your {hardware} when using older Operating Systems that don’t assist UEFI.
CSM creates a suitable legacy atmosphere the place your OS can correctly function in your new {hardware}. However, should you’re putting in Windows 11 then this received’t give you the results you want as you’ll need to have UEFI enabled in your system.
An enormous problem with such programs is the truth that you’ll be able to’t boot into your presently put in OS with UEFI enabled in your system. Hence in case you have such a system, then we suggest you create a bootable USB for Windows 11 using this information after which allow UEFI in your system. Once enabled, boot into your USB drive after which improve your PC to Windows 11.
Read: How to Disable CSM to put in Windows 11
Fix #4: Install Windows 11 on Unsupported programs using MCT.bat script
You can even set up Windows 11 on an unsupported system. We suggest you utilize the .bat script in case you are unable to fulfill any necessities nonetheless, should you handle to fulfill the fundamental necessities then we suggest you utilize the registry hack as a substitute. This is the official approach beneficial by Microsoft to get previous the Windows 11 necessities and get it put in in your PC. Follow one of many guides that most accurately fits your present wants and necessities.
A brand new script has been launched for the group which makes upgrading, updating, and putting in Windows 11 on unsupported {hardware} a lot simpler. All processes to bypass checks are robotically carried out within the background and the script has a nifty GUI that can assist you by the method.
Lately, Microsoft blocked the unique workarounds used to bypass checks for Windows 11 however this script nonetheless works as supposed, and right here’s how you should utilize it to your benefit relying in your state of affairs.
4.1 – Download the script
You will want the MediaCreationTool.bat archive that comprises all the mandatory instruments that can assist you improve. You can obtain the identical by visiting the hyperlink under in your favourite internet browser.
Once the Github web page is open in your display, click on on ‘Code’ in your left and choose ‘Download ZIP’. The archive will now be downloaded to your PC and we suggest extracting it in a handy location that most accurately fits your wants. Once finished, you’ll be able to comply with one of many related guides under relying in your present state of affairs.

Note: While the script is creating new media or upgrading your PC, it’s going to want the official Windows 11 ISO which shall be robotically downloaded within the background. However, it will take a while and also you might need to attend for an hour or so relying in your network speeds.
4.2 – Bypass checks when updating to Windows 11 from Windows 10
Open the MCT.bat folder that we extracted earlier and run the ‘MediaCreationTool.bat’ file by double-clicking on the identical.

Click on ‘Run’ as soon as you might be prompted.

A command window, in addition to a Powershell-based GUI, will now launch in your system. Click and choose ’11’ from the OS listing in your display.

Now click on on ‘Auto Upgrade’.

And that’s it! You can now sit back and loosen up as the method is carried out within the background. The script will robotically obtain the mandatory ISO in your system and launch the setup whereas making use of the mandatory patches within the background. You can then merely proceed with the setup as supposed and robotically improve your PC to Windows 11.
4.3 – Bypass all checks on Windows 11 ISO
Here’s how one can create an already patched ISO for Windows 11 that may bypass all set up checks so to set up the OS on unsupported {hardware}.
Launch ‘MediaCreationTool.bat’ by double-clicking on it from the archive we extracted earlier.
Now click on on ’11’.
Select ‘Make ISO’.

Let the method proceed and the background and the script will robotically create a patched ISO for you within the ‘Downloads’ folder.
4.4 – Bypass all checks on Windows 11 USB drive
If you want to create a Windows 11 USB then use the information under to get you began.
Plug in your required USB and format it as soon as to delete all the info saved on it. Now launch the ‘MediaCreationTool.bat’ script from the archive we extracted earlier by double-clicking on the identical.
Click on ‘Run anyway’ when prompted’.
Now click on on ’11’.
Click on ‘Make USB’.

Note: Ensure that you’ve got solely the involved USB related to your PC or the device can find yourself deciding on the opposite one in your system.
Now merely sit back, loosen up and let the method proceed within the background. You can monitor the progress for a similar within the command window in your display.
4.5 – Bypass checks on an already created USB or ISO for Windows 11
If you may have already downloaded the ISO or created a bootable USB for the Windows 11 setup, then we suggest you utilize the information under as a substitute. This approach you received’t need to obtain the ISO once more when using the MediaCreationTool.bat script in your PC. Let’s get began.
Navigate to the archive we extracted earlier and open the folder named ‘bypass11’.

Now double click on and run the ‘Quick_11_iso_esd_wim_TPM_toggle.bat’ file.

You will now be proven a command window that’s unable to seek out your ISO or USB stick. Do not fret, we would have liked to open this window so as to add the script to your right-click context menu.

Now navigate to the specified ISO and right-click on it. If you may have a Windows 11 USB drive, then open the drive, open the Sources folder, and right-click on ‘install.wim’ as a substitute. Click on ‘Show more options’.

Now choose ‘Quick_11_iso_esd_wim_TPM_toggle.bat’ from the ‘Send to’ context menu.

The script will now robotically patch the chosen ISO or USB drive. Once patched, you’ll be able to launch the Windows 11 setup as supposed and proceed with the improve to your PC.
4.6 – Bypass checks when putting in characteristic updates in Windows 11
If you already bypassed checks and put in Windows 11 in your PC then you definitely is likely to be disillusioned to know that new characteristic updates are actively blocked by Microsoft on unsupported {hardware}. Thankfully you should utilize this script to bypass these checks as effectively and set up characteristic updates to your system. You can use the information under to get you began.
Navigate to the extracted archive and open the folder named ‘bypass11’.

Now double click on and launch the script ‘Skip_TPM_Check_on_Dynamic_Update.cmd’.

Confirm your option to get previous UAC.

Hit a key in your keyboard when the PowerShell window launches and you might be prompted for a similar. The disclaimer on the high needs to be inexperienced in shade whenever you first run the script.

The adjustments will now be robotically utilized to your PC. You can now improve your system as supposed. We suggest you revert the adjustments made by this script after you have up to date your system.
To revert the adjustments, double click on on ‘Skip_TPM_Check_on_Dynamic_Update.cmd’ once more. This time the disclaimer needs to be in pink on the high. Simply hit a key in your keyboard to revert the adjustments made to your system.

The script will robotically shut as soon as the mandatory adjustments have been reverted to your system.
And that’s it! You can now proceed using your PC as supposed with none points.
Fix #5: Install Windows 11 on Unsupported programs using the registry bypass hack
If you meet all the fundamental necessities for Windows 11 then you’ll be able to set up Windows 11 by bypassing TPM and Secure Boot necessities.
Windows means that you can do that formally whereas warning you that you’ll be weak to safety threats.
Not a lot data is on the market for a similar however for now, evidently you’ll miss out on all safety and privacy updates from Microsoft sooner or later should you choose to take action.
To do that, youneed to disable the system test within the refgistry for TPM and Secure Boot.
Note: This hack entails enhancing your registry values which is why we suggest backing up the identical earlier than continuing with the information.
Now, let’s see how to do that.
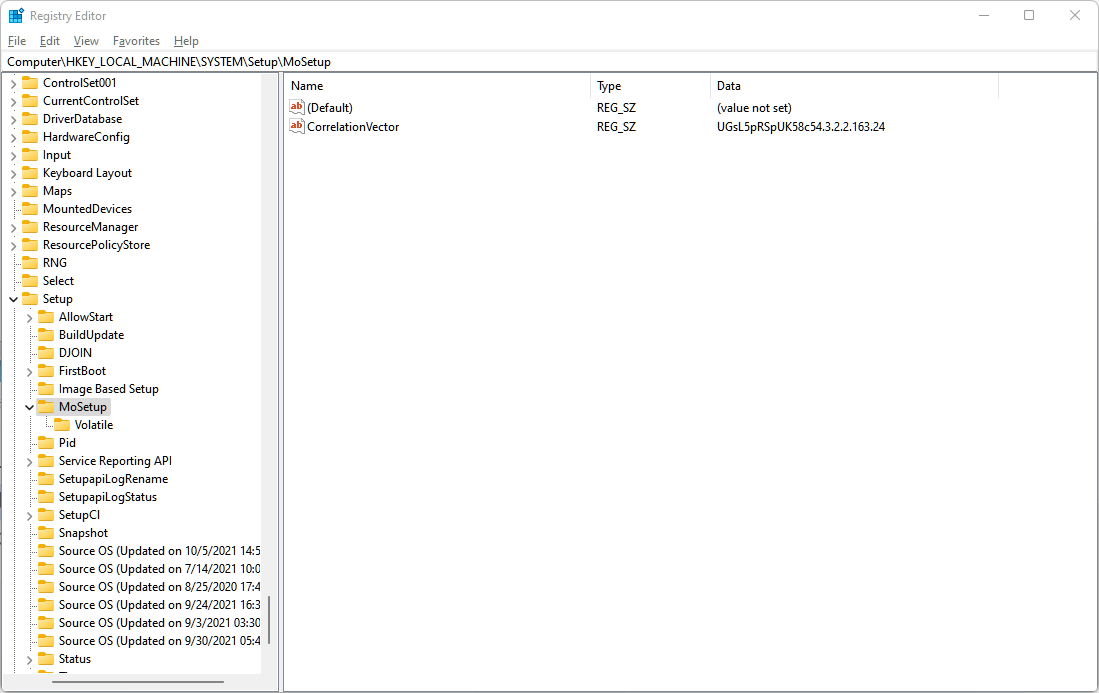
Open the Registry Editor and go to this tackle:
HKEY_LOCAL_MACHINESYSTEMSetupMoSetup
Here, create a brand new DWORD (32-bit) Value known as AllowUpgradesWithUnsupportedTPMOrCPU. Now, double-click on the brand new Value to edit it, and exchange Value information from 0 to 1 after which click on OK to put it aside. Check out the GIF under for assist.
Next, restart your PC after which attempt to set up Windows 11 now using the Windows 11 Installation Assistant. Else, you may also use the Windows 11 ISO file.
The methodology above is the very best one actually, as even Microsoft themselves advised it. However, should you worry enhancing a registry file, then you definitely tweak the Windows 11 ISO file to disable it from checking the Secure Boot and TPM necessities and set up the Windows 11 improve immediately.
All it’s essential do is set up Windows 11 using the ISO file supplied by Microsoft however eradicating the appraiserres.dll first inside it.
See the hyperlink under.
: Install Windows 11 on Unsupported PC Without TPM and Secure Boot
We hope this information helped you get conversant in the brand new incompatibility error confronted when putting in Windows 11. If you may have any more questions, be at liberty to drop us a remark under.
:
Check out more article on – How-To tutorial and latest highlights on – Technical News