How to Disable TPM and Secure Boot in Rufus When Creating Windows 11 Bootable USB Drive.
Microsoft lets you set up Windows 11 through a registry hack however that isn’t the one technique to bypass the necessities checks like TPM 2.0, Secure boot, and more. You can merely take away the appraiserres.dll file within the Windows 11 ISO file to make the Setup keep away from these checks and set up Windows 11 on any unsupported {hardware} too. That technique requires you to edit the ISO file to take away the appraiserres.dll file, which isn’t laborious, however due to Rufus, you will have a better manner to do that.
Read on to seek out how one can disable the Windows 11 necessities like TPM 2.0, Secure boot, RAM, and many others. to put in Windows 11 on an in any other case not supported PC.
How to create Windows 11 bootable USB drive with TPM, Secure Boot, and RAM checks disabled
Step 1: Disable Secure Boot
Before you may proceed with the information beneath, we implore you to verify your system for Secure Boot. If you will have Secure Boot enabled in your system then you have to disable the identical earlier than you may set up Windows 11 using the strategy beneath. If Secure Boot is enabled through the set up course of then Windows 11 will mechanically verify for TPM 2.0 and fail the method if it’s not current.
Secure Boot is normally disabled from the BIOS menu and we advocate you verify your producer’s web site for detailed steps to disable the identical. Once disabled, you need to use the steps beneath to create a boot media with disabled Windows 11 checks. Let’s get began.
Step 2: Create Windows 11 bootable USB drive with TPM and Secure Boot checks disabled
Download the Windows 11 ISO file from Microsoft from right here.

Plugin a USB pen drive into your PC.
You want Rufus v3.17 or larger for this to work out of the field. Rufus first launched this performance with the discharge of v3.16 Beta2. Use the hyperlink beneath to obtain the most recent model of Rufus to your system.
Download the most recent model of Rufus from the above hyperlink. With the file saved in your disk, double-click on it to run Rufus. (Grant admin entry when it asks for it in a pop-up.)

You will see Rufus v3.17 within the title bar.

Rufus will detect your USB device mechanically. If you will have multiple exterior storage device linked, you may choose your USB device from the primary drop-down menu.

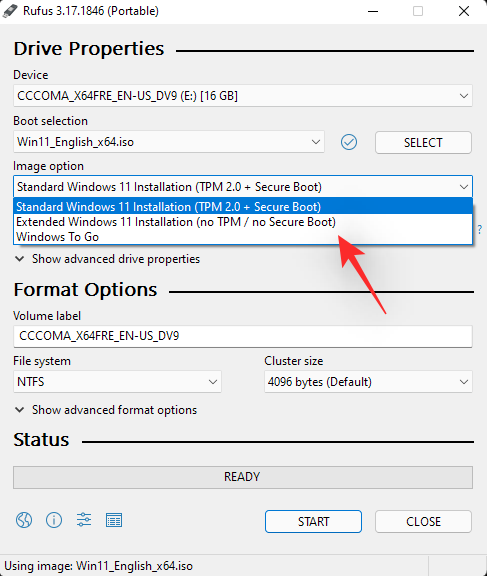
Now, click on SELECT below Boot choice to pick the Windows 11 ISO file.

Browse for the downloaded Windows 11 ISO and click on Open.

Once the ISO file is loaded, Rufus will configure the remainder of the choices mechanically.
Now, a very powerful and distinctive a part of this information. Click the dropdown below the Image choice to pick the “Extended Windows 11 Installation (no TPM/no Secure 800t/8G8- RAM)” choice. Yes, change from Standard set up to Extended set up.
Now, make it possible for the Partition scheme is about to GPT and the Target system is about to UEFI (non-CSM).

[Optional] Change the label of your Pen Drive below “Volume label” when you want to.
Now, we’re able to create a bootable USB drive that can have the checks for TPM, Secure boot, and RAM disabled. When prepared, click on Start.

When prompted, click on Yes.

The course of will take a while. Once it’s accomplished, you will notice the “Ready” standing message flip inexperienced.

You have now created a Windows 11 bootable USB device.
Step 3: Install Windows 11
You want to start out your PC in boot mode first.
For this, shut down your PC first. Make certain you will have saved any unsaved work. Then, flip it back on and press F8 on the splash display to restart the PC into boot mode.
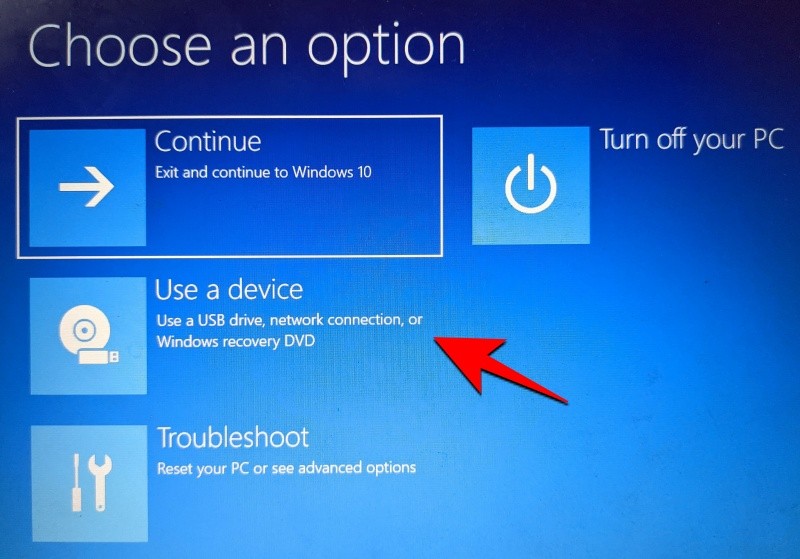
Once you’re in Boot mode, click on on Use a tool.
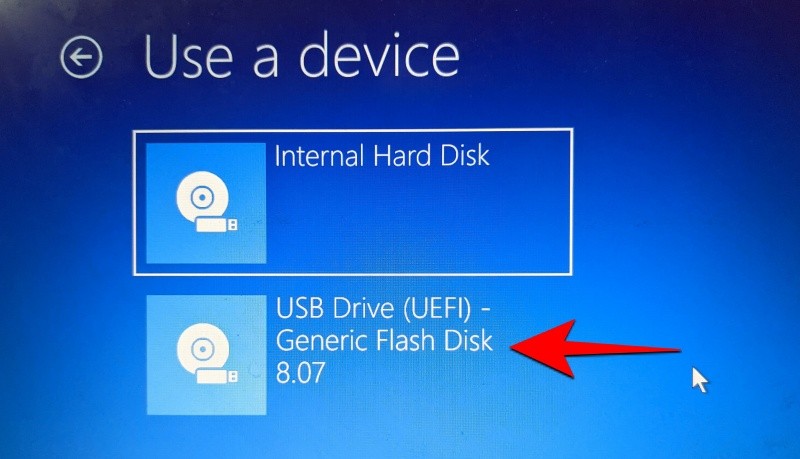
Then choose your USB Drive.
The Windows 11 setup ought to begin. Click Next to proceed.

Click on Install now. Enter your product key. If you don’t have one, click on on I don’t have a product key on the backside.
Select the model of Windows that you simply wish to set up and click on Next. Accept the phrases and agreements and click on Next.
Here’s that alternative once more – to improve or to start out afresh. The alternative is yours, however we’re going to go for a clear set up and are thus deciding on the Custom: Install Windows solely.
Select your partition and click on Next.
Now, that is the place you’ll get the brand new out-of-box setup expertise. Select your nation and click on Yes.
Choose the enter technique and click on Yes.
For a primary, Windows now allows you to identify your PC from the setup itself. Enter a reputation and click on on Next.
Link your Microsoft account and click on Next.
As such, undergo all of the on-screen directions till you come to the ultimate set up course of. You’ll see the steps remaining and the share markers on the backside.
Once the method is full, your pc will restart and also you’ll have Windows 11 working in your PC.
Check out more article on – How-To tutorial and latest highlights on – Technical News