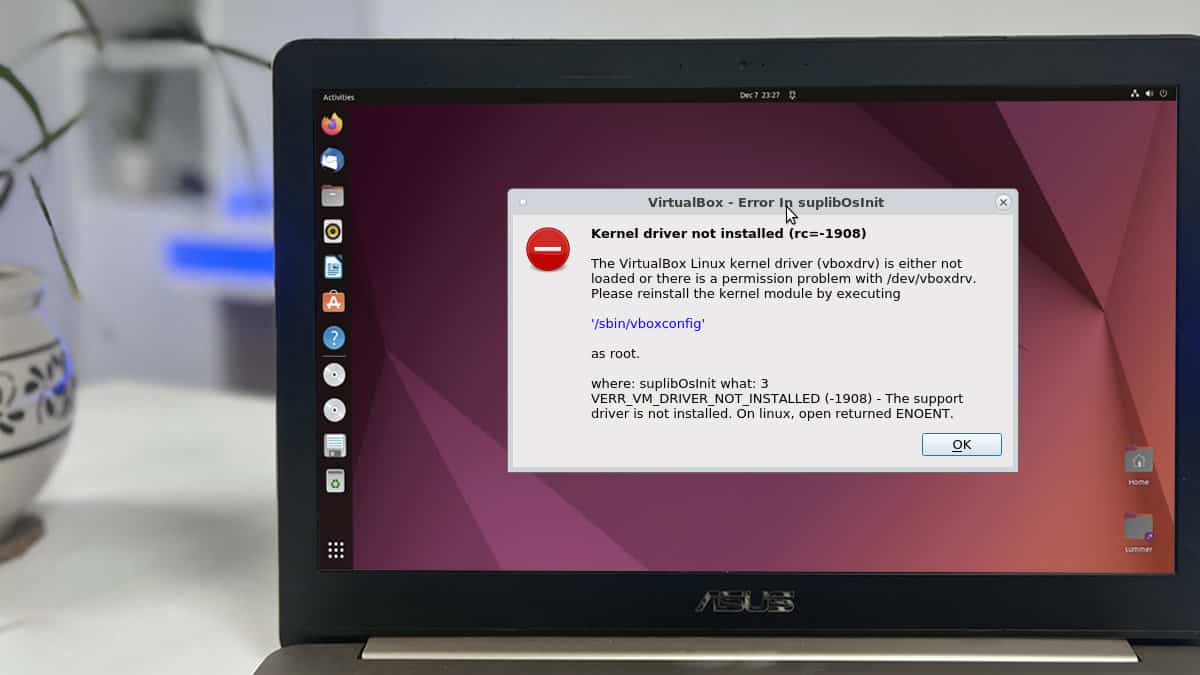
VirtualBox Kernel Driver Not Installed (rc=-1908).
One of the methods Secure Boot maintains system safety is by solely permitting trusted kernel extensions to load. You should intervene if you wish to run third-party modules just like the VirtualBox Kernel Driver (vboxdrv).
On macOS, that is very simple to do as you’ll be able to enable the module to load from System Preferences.
On Linux methods, you need to make sure the kernel and GCC variations are suitable with the vboxdrv module. You can even manually signal the module using mokutil.
If such strategies fail otherwise you don’t care about Secure Boot, you’ll be able to all the time disable Secure Boot to resolve this error.
How to Fix This Error on MacOS
Allow Module to Load
Users should manually enable the loading of kernel extensions (KEXTs) on macOS 10.13 and newer variations. To do that,
- Click on the Apple Menu and go to System Preferences > Security & Privacy.
- Press the Allow button in direction of the underside.
 1")
 1")
Note: The enable choice is barely out there for half-hour after making the load request. So, for those who don’t see it, strive loading the module first.
Restart VirtualBoxStartup Service
Use the next one-liner within the terminal to restart the startup service for loading the kernel module.
sudo /Library/Application Support/VirtualBox/LaunchDaemons/VirtualBoxStartup.sh restartRepeat the steps from the earlier part and reboot. Then, test if you can begin your VM in VirtualBox.
Register the vboxdrv Module
Registering the VirtualBox kernel extension instantly through the terminal can even assist. Enter the next one-liner within the terminal to do that:
sudo kmutil load -p '/Library/Application Support/VirtualBox/VBoxDrv.kext'Reboot and test for those who can launch the VM now.
Approve Oracle’s Dev ID
If manually loading vboxdrv doesn’t work, add Oracle’s developer ID to the safety evaluation policy. This will enable applications from Oracle (i.e. VirtualBox) to entry the kernel.
Enter the next command within the terminal to do that:
spctl kext-consent add VB5E2TV963Also, strive the identical in Recovery Mode.
- Restart your Mac and maintain Command + R in addition into recovery mode.
- Click on Utilities and choose the Terminal.
- Add the dev ID like so:
spctl kext-consent add VB5E2TV963 - Restart your Mac and test if the VM works now.
Install VirtualBox Extension Pack
The VirtualBox Extension Pack is often put in so as to add further performance like digital USB 3.0 units. In this case, putting in it’s price it as that may probably resolve the kernel driver problem.
- First, obtain the extension pack from the VirtualBox downloads web page.
 2")
- Launch VirtualBox and choose Tools > Extensions.
 3")
- Click on the Install button and open the extension pack.
 4")
 2")
 3")
 4")
Flush Kernel Extension Cache
Use the next command within the terminal to clear the kernel extension cache:
sudo kextcache --clear-stagingCheck if the VM works now. If it doesn’t, restart your Mac and take a look at the command as soon as more.
Try Another VirtualBox Version
Reinstalling VirtualBox is among the best methods to resolve this error. Specifically, strive completely different variations of VirtualBox (the most recent one, in addition to older secure variations). To do that,
- Open the VirtualBox set up file and click on on
VirtualBox_uninstall.software. 5")
- Enter Yes to substantiate that you just need to uninstall VirtualBox and all its packages.
- Restart your Mac. Now, obtain and set up the most recent VirtualBox model.
- If this model doesn’t work, repeat the steps to take away VirtualBox and take a look at a unique model.
 5")
Set Kernel Extension Flag Correctly
If the restricted flag is just not set in opposition to KernelExtensionManagement, this may have an effect on how System Integrity Protection (SIP) interacts with directories. This can finally result in the VirtualBox Kernel Driver Not Installed error. To resolve this:
- Uninstall Virtualbox.
- Restart your Mac and maintain Command + R in addition into recovery mode.
- Select Utilities > Terminal and enter the next command:
chflags restricted /Volumes/Macintosh HD/non-public/var/db/KernelExtensionManagement - Restart your Mac, reinstall VirtualBox, and test for those who can launch the VM now.
Disable Secure Boot
If nothing else works, you’ll be able to disable Secure Boot because the final resort. With Secure Boot disabled, you’ll haven’t any issues loading unsigned KEXTs like vboxdrv. To do that:
- Boot into recovery mode once more (maintain Command + R whereas turning in your Mac).
- Select Utilities > Startup Security Utility.
- In the Secure Boot window, choose No Security.
- Restart your Mac and test if VirtualBox works now.
How to Fix This Error on Linux
I’ll present instructions for Debian-based distros for demonstration. Remember to change the instructions (like apt to dnf) in keeping with your distro.
Restart your PC
Linux distros often obtain minor kernel updates, which may result in incompatibility between vboxdrv and the up to date kernel. Rebooting your PC is commonly the best technique to resolve this drawback.
Resolve Kernel Version Problems
Sometimes, there gained’t be a vboxdrv model suitable with the most recent kernel. Other instances, you’ll should manually set up the headers and set up VirtualBox afterward. You’ll encounter the error until you do that on this particular order.
To resolve such issues, first strive reinstalling VirtualBox and the kernel headers:
sudo apt purge virtualbox dkms linux-headers-$(uname -r)
sudo apt set up linux-headers-$(uname -r)
sudo apt set up virtualbox
If the error persists, reinstall the vboxdrv kernel module. Then, reconfigure the VirtualBox package deal and load the module like so:
sudo /and so on/init.d/vboxdrv setup
sudo dpkg-reconfigure virtualbox-dkms
sudo modprobe vboxdrv
Roll Back Kernel
Oracle could take a short time to launch a vboxdrv model suitable with the most recent kernel model. This is particularly possible for those who’re operating a customized or obscure kernel.
In such circumstances, you’ll be able to strive rolling back to an older supported kernel model to resolve this error.
 6")
Download the kernel information out of your distro’s kernel archive and set up them. After rebooting with the newly put in kernel, the error must be resolved.
Change GCC Version
Users additionally face this error as a result of the present GCC model is completely different from the one which was used to compile the module. In such circumstances, switching to the identical compiler ought to resolve the issue.
For instance, to alter the GCC model to GCC 8:
- First, take away VirtualBox and its config information with the next command:
sudo apt purge virtualbox - Install the GCC model you need (8 on this case):
sudo apt set up gcc-8 g++-8 - Set the default GCC to GCC 8:
sudo update-alternatives --install /usr/bin/gcc gcc /usr/bin/gcc-8 800 --slave /usr/bin/g++ g++ /usr/bin/g++-8 - Finally, reinstall VirtualBox and test if the difficulty is resolved.
sudo apt set up virtualbox
Fix Module Signature Issues
DKMS modules are usually configured at set up to work with Secure Boot. But generally modules gained’t be allowed to load as a consequence of signature points.
In such circumstances, you’ll be able to signal the modules your self using the mokutil software. I like to recommend checking this GitHub submit by reillysiemens because it covers this course of intimately.
Turn Off Secure Boot
The important drawback with manually signing modules is that it’s a must to resign them after every kernel update. And kernel updates on Linux are very frequent. So, my most well-liked resolution is to easily disable safe boot:
- Execute the
sudo mokutil --disable-validationcommand. - Enter a momentary password and ensure it.
 7")
- Reboot your system and press any key on the MOK Management display.
 8")
- Select Change Secure Boot State. Enter the desired character of the momentary password (e.g., seventh character).
 9")
- Select Yes > OK to disable Secure Boot.
 7")
 8")
 9")
Note: You can use sudo mokutil --enable-validation to re-enable Secure Boot later if you’d like.
Check out more article on – How-To tutorial and latest highlights on – Technical News