
Windows 11 essential course of died? Here’s how to repair it.
The blue display of demise (BSOD) conjures up a variety of dread inside Windows customers, particularly when it’s accompanied by unrecognizable cease codes and error messages resembling “Critical Process Died”. Though we’re not a lot to pine for lifeless processes, the concern of a devastated PC could make even one of the best of us reel underneath the load of apprehension and what-ifs.
But, as is usually the case, that concern is essentially inflated. BSOD doesn’t robotically equate to a system crashing towards its imminent demise. In this text, we dispel a couple of myths in regards to the ‘Critical Process Died’ BSOD error and information you out of the blue display mire back to a functioning laptop.
What is the ‘Critical Process Died’ cease code on Windows 11 BSOD
The cease code – Critical Process Died – that accompanies the BSOD offers greater than a sign of what has gone incorrect. As the cease code suggests, the error highlights that a number of processes which are essential to your system have failed. Depending on the place the issue lies, the repair that you’ll want to use will differ.
But it’s nigh unimaginable to inform which potential trigger is actual until you check out the fixes and experiment. Nevertheless, essentially the most easy strategy is to be aware of while you encounter the Critical Process Died error. If it occurs whereas taking part in a sport, it’s presumably to the graphics driver; a {hardware} problem if it occurs when connecting an exterior device; or file corruption to your not too long ago put in program or update. But that’s not an exhaustive listing by any stretch.
Causes of the ‘Critical Process Died’ error
Here are a couple of widespread explanation why a system might find yourself with a BSOD and the essential course of failure cease error:
- Hardware failure – Whether it’s a laptop computer or desktop PC, the failure of inside parts for no matter motive (usually simply neglect and misuse) can disrupt functioning and minimize off assets to essential system processes.
- Bad exhausting drive sectors – System processes, identical to different recordsdata, are saved on drive sectors. If these go unhealthy, your system doesn’t have entry to these processes and, due to this fact, will throw up the BSOD.
- Corrupt or outdated drivers – Bad drivers are the reason for many issues. But the overarching thought for all such issues, together with BSOD and significant course of failure is identical – there’s no dependable hyperlink between the {hardware} and the software program when driver recordsdata are corrupt or out of date.
- Corrupted packages and Windows updates – Third-party apps in addition to some Windows updates which are both not downloaded correctly or are downright corrupt can have an effect on system processes from executing correctly.
- Viruses or malware – Another widespread motive for not simply BSOD errors however quite a lot of different undesirable phenomena that you could be not have management over till you seek out and exterminate them.
- Overclocking – Anytime you overclock your processor, you run the chance of placing undue stress on the system and inflicting the dreaded BSOD to indicate up with course of failure messages.
What to do while you get ‘Critical Process Died’ on Windows 11
At the second while you obtain the ‘Critical Process Died’ cease code, there’s nothing you are able to do besides restart your PC with a tough reboot (maintain down the facility button till the system shuts off after which flip it on once more). Afterward, you may strive using the fixes given in later sections to resolve the problem and forestall BSOD from recurring.
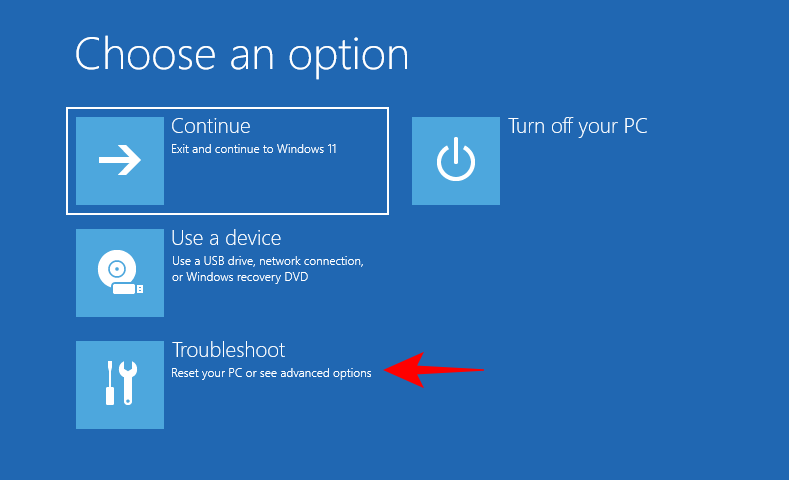
But for those who’re caught in a boot loop, these fixes may not develop into out there to you till you by some means get entry to the working system. There are a few issues that you are able to do in such a situation:
1. Run Startup Repair
Startup Repair is a Windows Recovery Environment (WinRE) instrument that fixes points stopping your PC from booting up. Reaching WinRE is straightforward for those who’re already booted up. But if the system is just not booting up, you’ll need to depend on exhausting reboots to get there.
Hard rebooting two or 3 times inside a span of a few minutes will load up WinRE. Here’s how to take action:
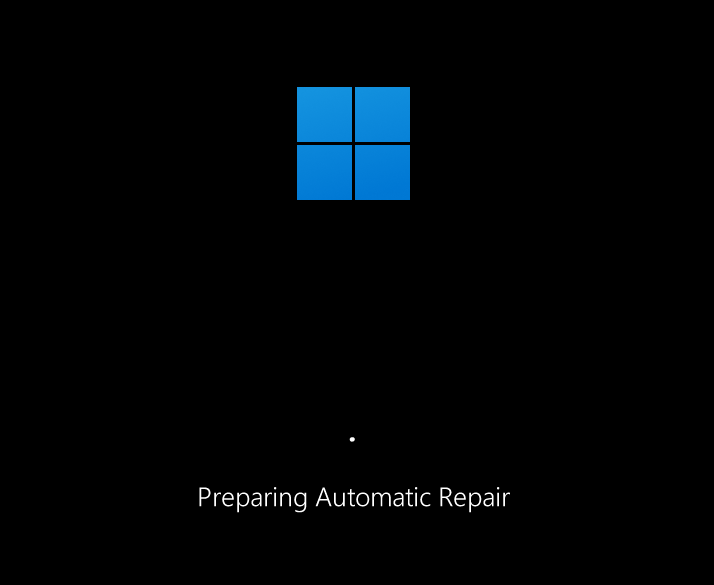
- Press and maintain the facility button till the pc turns off. Press it once more to show it on. At the primary indicators of your laptop beginning up, press and maintain the facility button once more to show it off. Then flip it back on. After 2-3 failed makes an attempt at booting up, as an alternative of making an attempt as well to Windows, you will note Windows “Preparing computerized restore“.
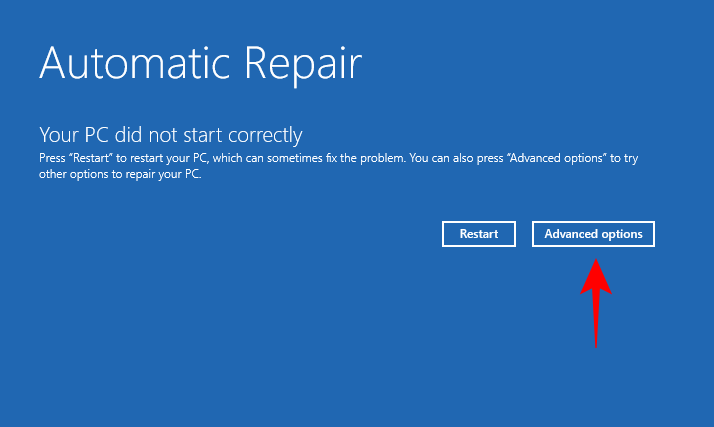
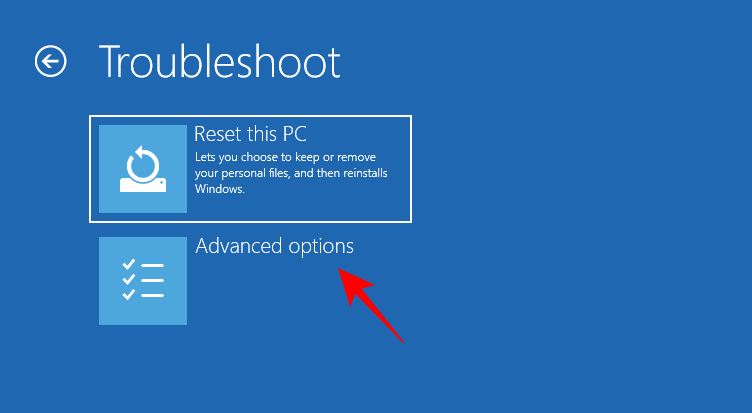
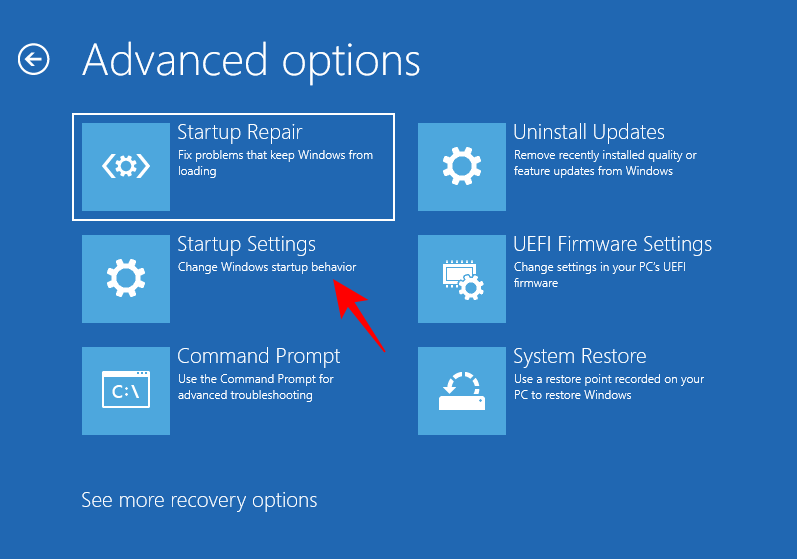
- On the following display, click on on Advanced choices.
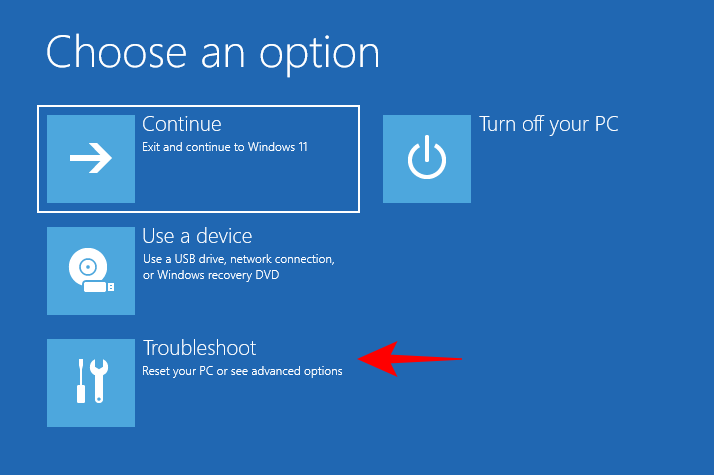
- Click on Troubleshoot.
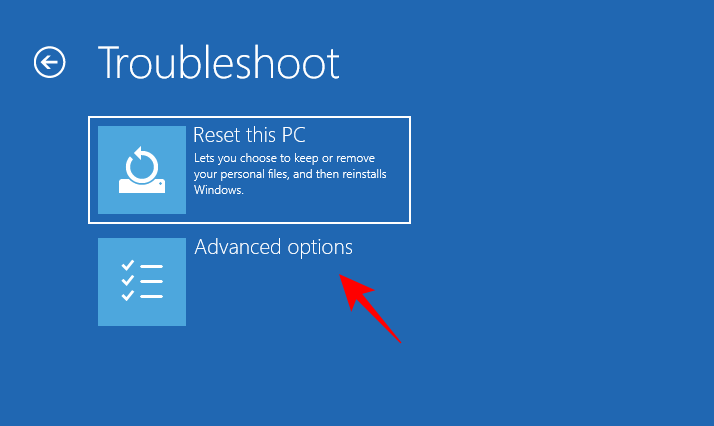
- Select Advanced choices.
- Click on Startup Repair.
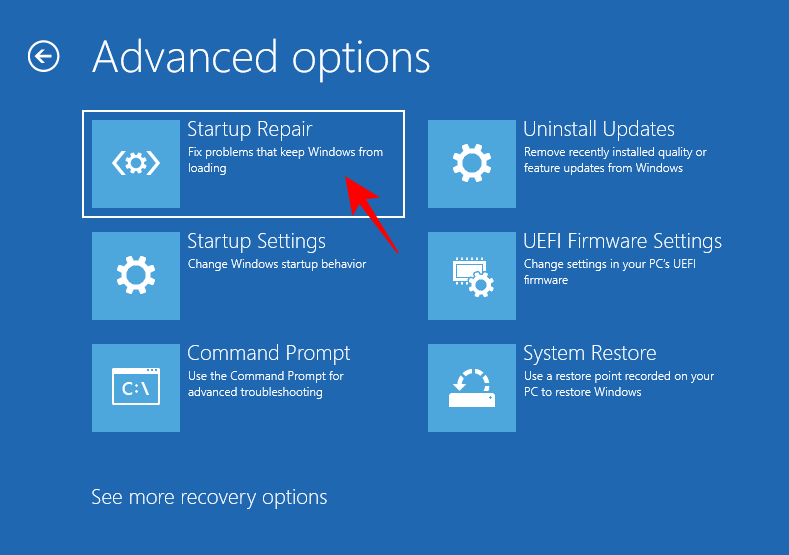
- Wait for the pc to restart and for the startup restore to do its factor.
If startup restore isn’t capable of restore your PC, you have to to entry secure mode after which apply the fixes from there.
2. Access Safe Mode
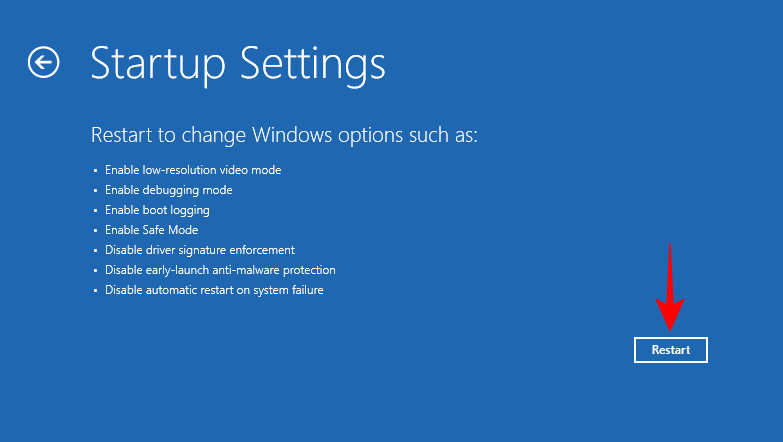
- WinRE will also be used to entry secure mode. To accomplish that, click on on Troubleshoot.
- Then Advanced choices.
- Then choose Startup Settings.
- Click on Restart.
- Press the quantity 4 as well to Safe Mode.
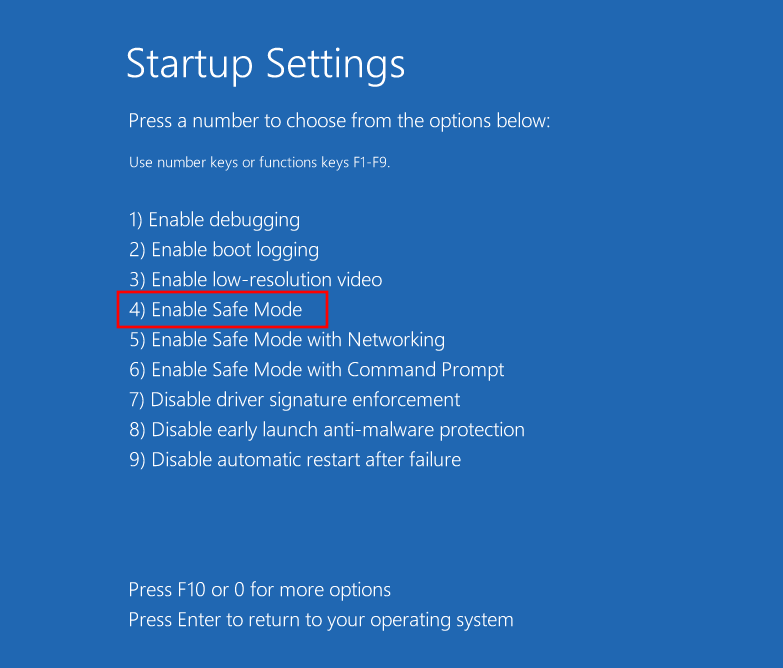
- Once you’re in secure mode, you will note a black display with the phrases “Safe Mode” on the 4 corners of the display.

From right here on out, you can begin making use of the fixes given within the following part.
How to repair the Critical Process Died BSOD error
The following fixes may be utilized with ease no matter whether or not you’re in Safe Mode or booted up correctly to Windows. In truth, in sure conditions, it’s higher to be in secure mode because it’s simpler to use them from a stripped-down model of Windows. So, for those who’re being prevented from working a repair for no matter motive, apply the identical from Safe Mode.
With that out of the way in which, let’s have a look at the doable fixes to the underlying downside that’s ensuing within the failure of essential processes.
Method 1: Disconnect defective exterior units
Oftentimes, the reason for the issue lies outdoors your PC, with defective exterior units, resembling USBs. If the exterior device is broken in such a method that it may additionally doubtlessly harm your PC, as quickly because the system tries to entry it, it is going to obtain a return sign that may trigger the BSOD “critical process died” error. This might not all the time occur with defective drives. But unhealthy drives are identified to be chief among the many causes that result in BSODs.
In brief, strive unplugging any and all exterior units, USB cables, keyboards, mice, and many others. to test if Windows boots and features correctly with out them. If so, the issue almost certainly lies with the device and it’ll have to be changed.
Method 2: Update or Reinstall drivers
Incompatible, corrupt, or outdated drivers are widespread causes of a variety of points, together with essential course of failure and the resultant BSOD. To repair this, you have to to update the drivers which are inflicting bother, or reinstall them. To know which drivers to update, test in the event that they’re talked about within the BSOD crash logs. Or if drivers have been not too long ago up to date, take away them out of your system. Here’s how to go about it:
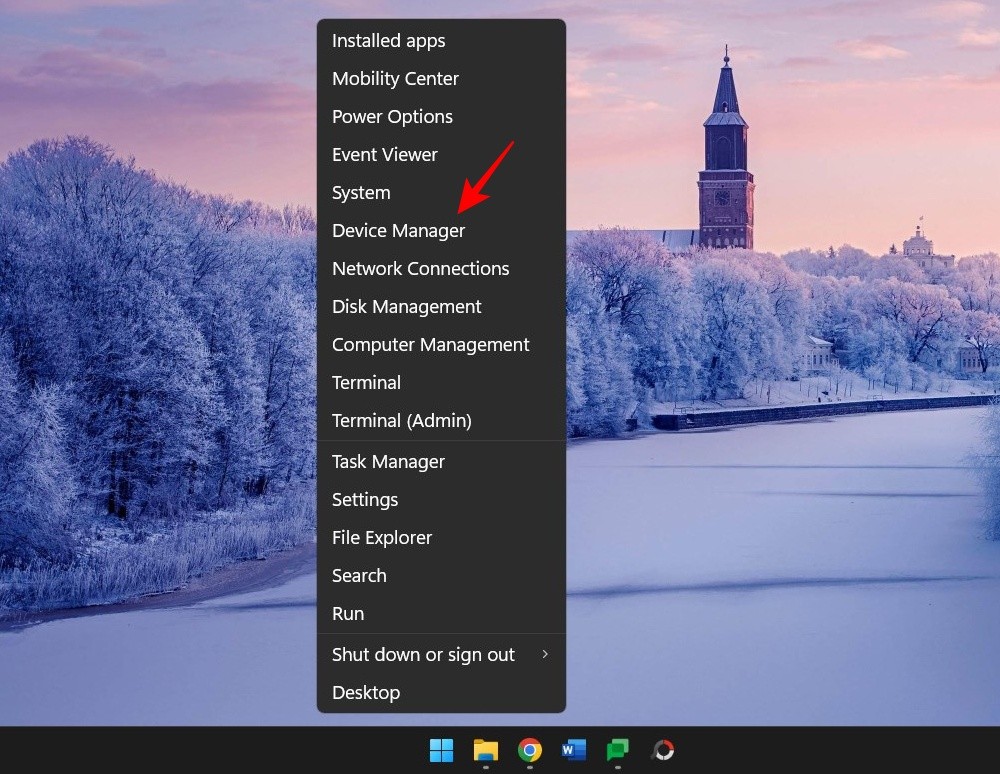
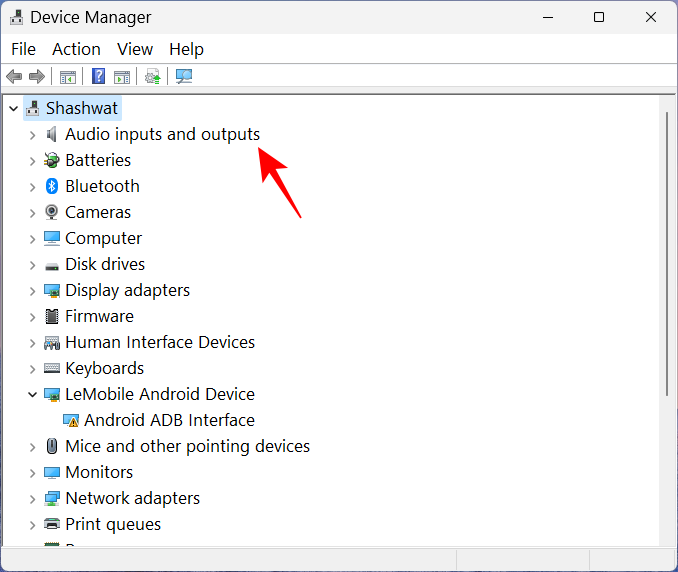
- Right-click on Start and choose Device Manager.
- Now choose a tool class to develop it.
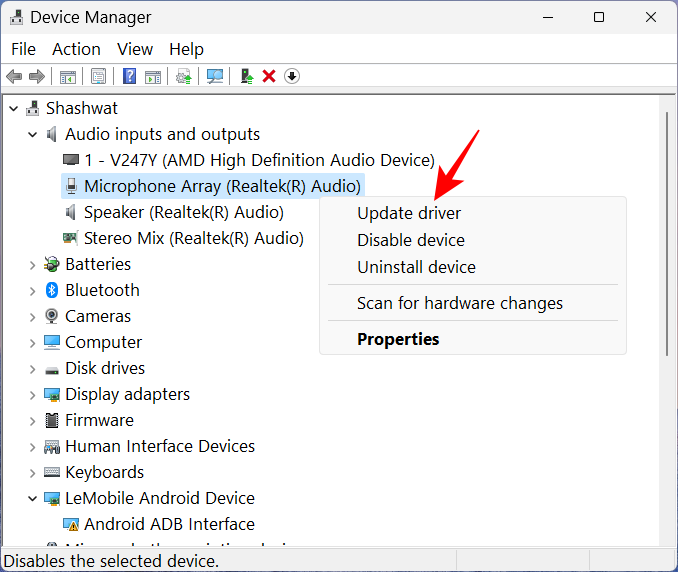
- Right-click on the driving force you watched is the foundation reason behind the problem, and choose Update driver.
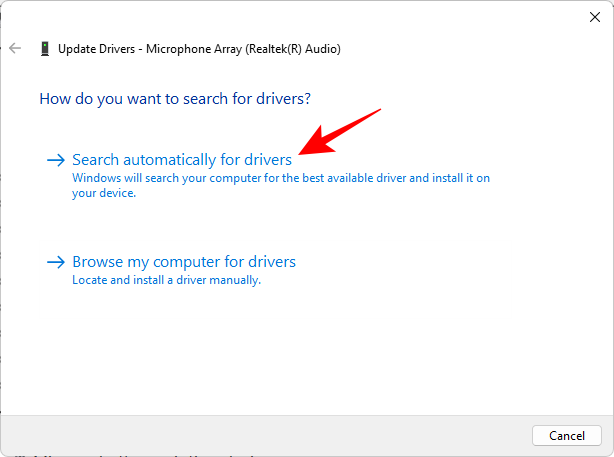
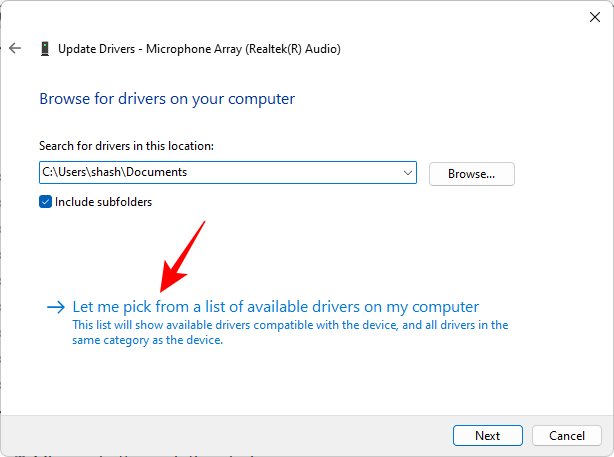
- Here, you may both let Windows seek for the precise drivers, or choose one your self. To let Windows take over, click on on Search robotically for drivers.
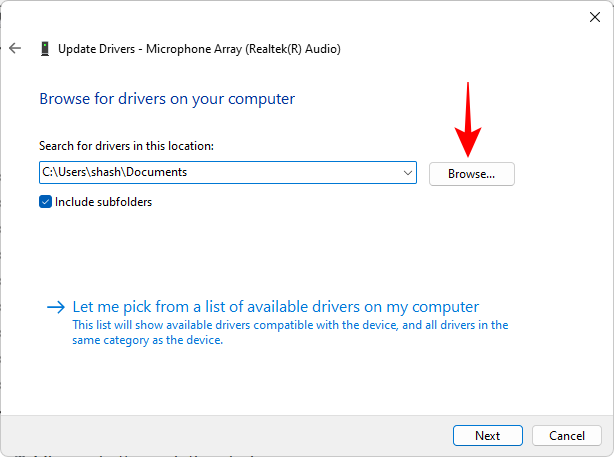
- Alternatively, click on on Browse my laptop for drivers.
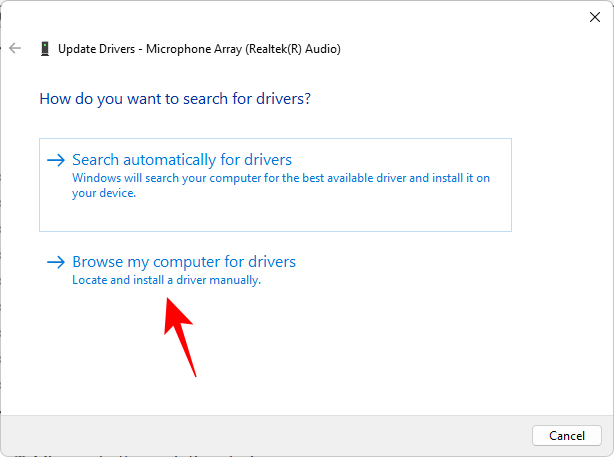
- If you’ve downloaded the driving force file out of your producer’s web site, you may browse for it by clicking on Browse.
- Or select Let me choose from a listing of obtainable drivers on my laptop.
- Pick from the out there suitable {hardware}. Then click on Next.
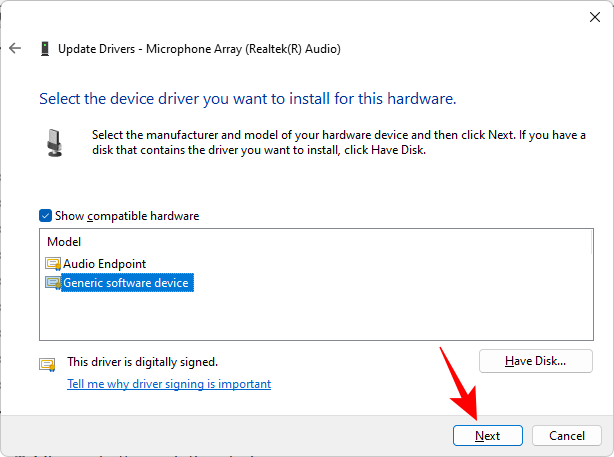
- The driver will get up to date immediately.
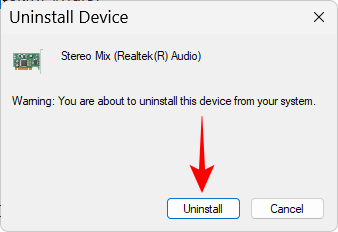
- You may also uninstall the driving force after which let Windows set up one robotically. To accomplish that, right-click on the device in Device Manager and choose Uninstall device.
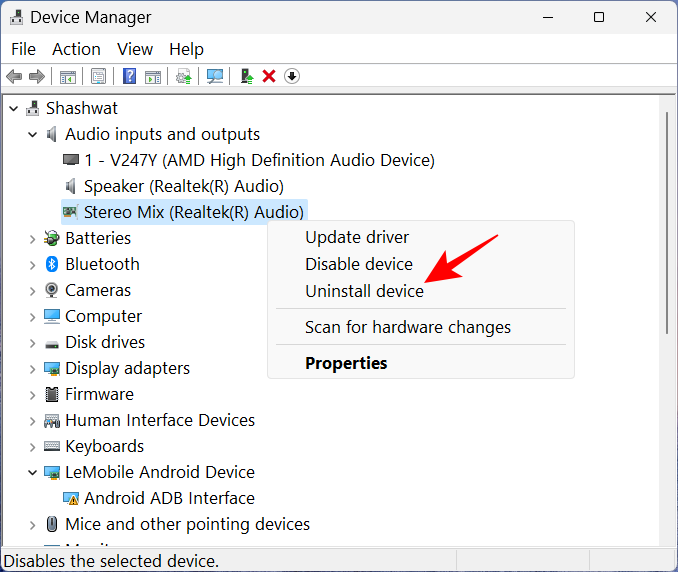
- When prompted, click on Uninstall.
- Now restart your PC. Upon startup, Windows will test for out there drivers and set up them robotically.
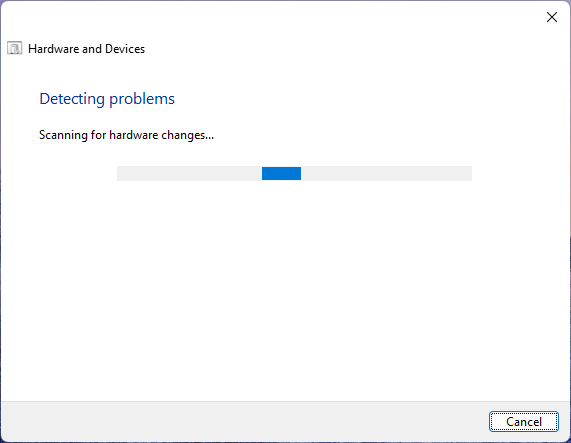
Method 3: Run Hardware and Device troubleshooter from Settings
When you’re seeking to repair the underlying reason behind frequent BSOD crashes and system course of failure, it’s best to not go away any stone unturned. Running the in-house troubleshooters may also assist diagnose and repair points to your {hardware} and linked units, and it’s important that you just tick this field off, lest you miss a simple repair mendacity in plain sight.
- Press
Win+Rto open the RUN command field. Then sort the next and hit Enter:msdt.exe -id DeviceDiagnostic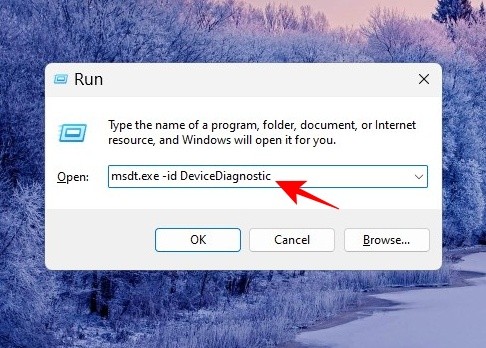
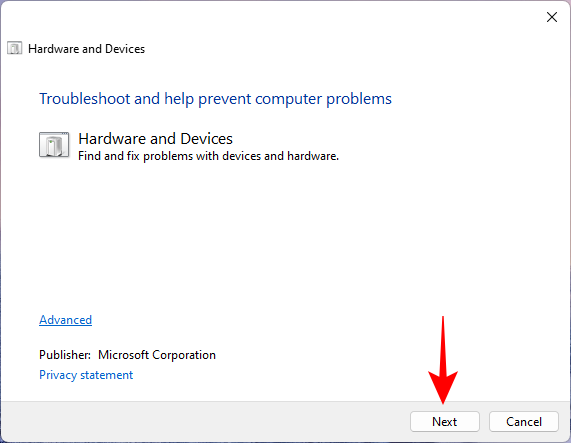
- This will open the troubleshooter for Hardware and Devices. Click on Next.
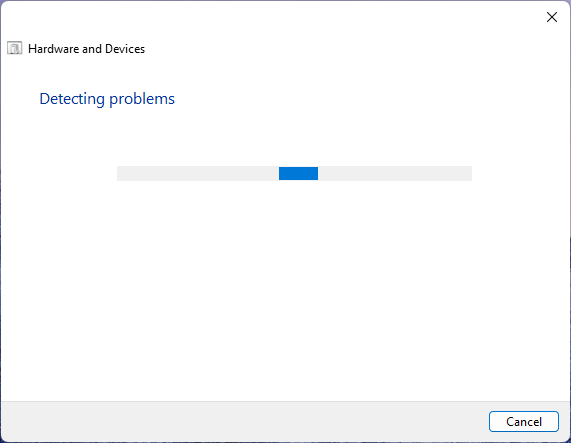
- Wait for the method to complete figuring out.
- If a tool is identified as having errors, troubleshoot it by deciding on it.
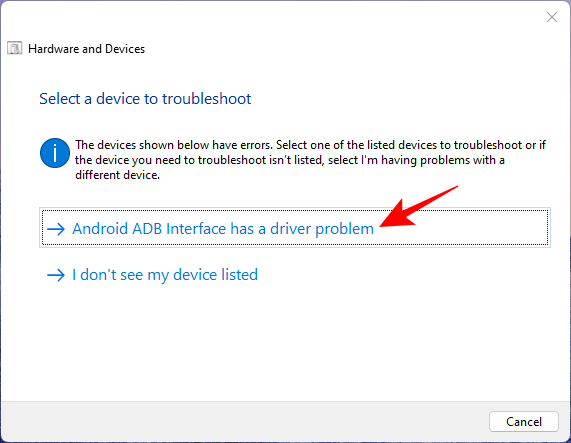
- Wait for the troubleshooter to do its factor.
- Apply any instructed adjustments.
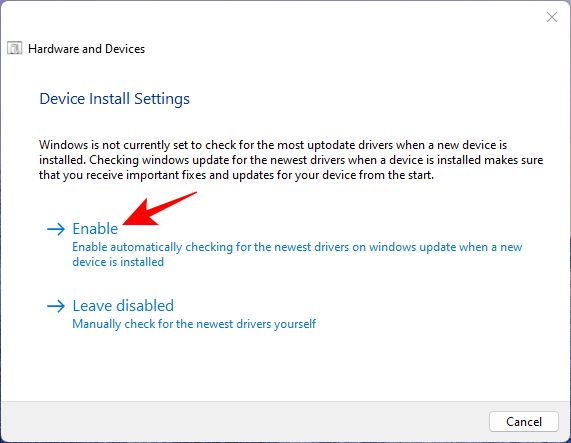
- Once finished, shut the troubleshooter.

Method 4: Scan for viruses and malware
To guarantee there are not any viruses or malware messing with essential system recordsdata and processes, you have to to run a full system scan. Most anti-virus packages have the choice to run full scans from the app dashboard or the house web page.
But for many who don’t have any such program put in, Windows Security is one of the best wager. Here’s how to make use of it to run a full scan and take away viruses and malware:
- Press Start, sort “security”, and choose Windows Security.
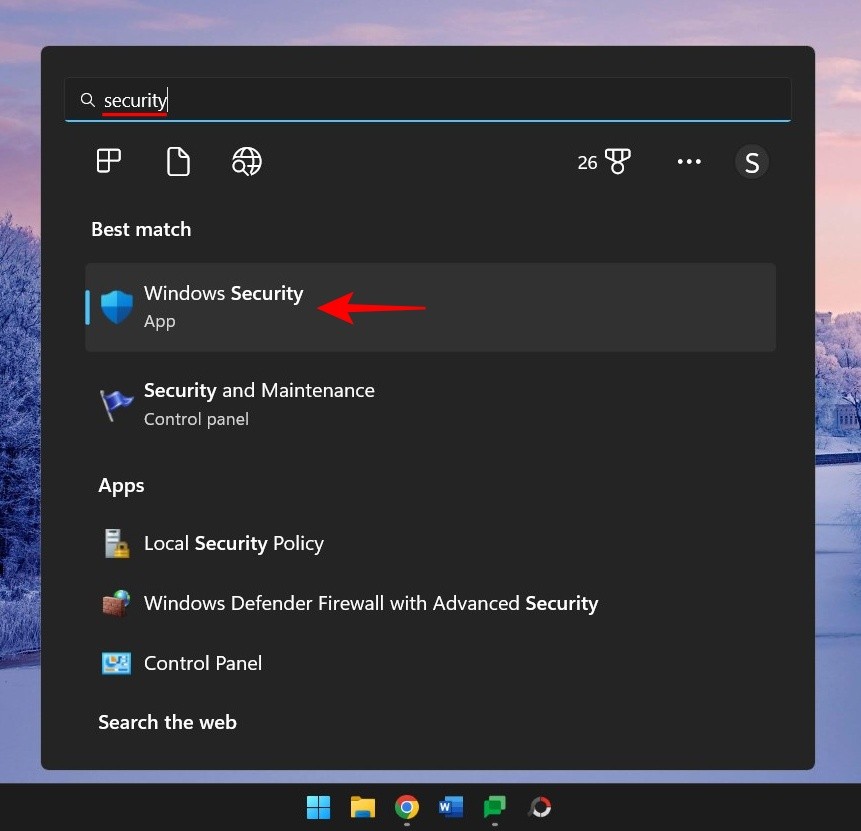
- Click on Virus & risk safety.
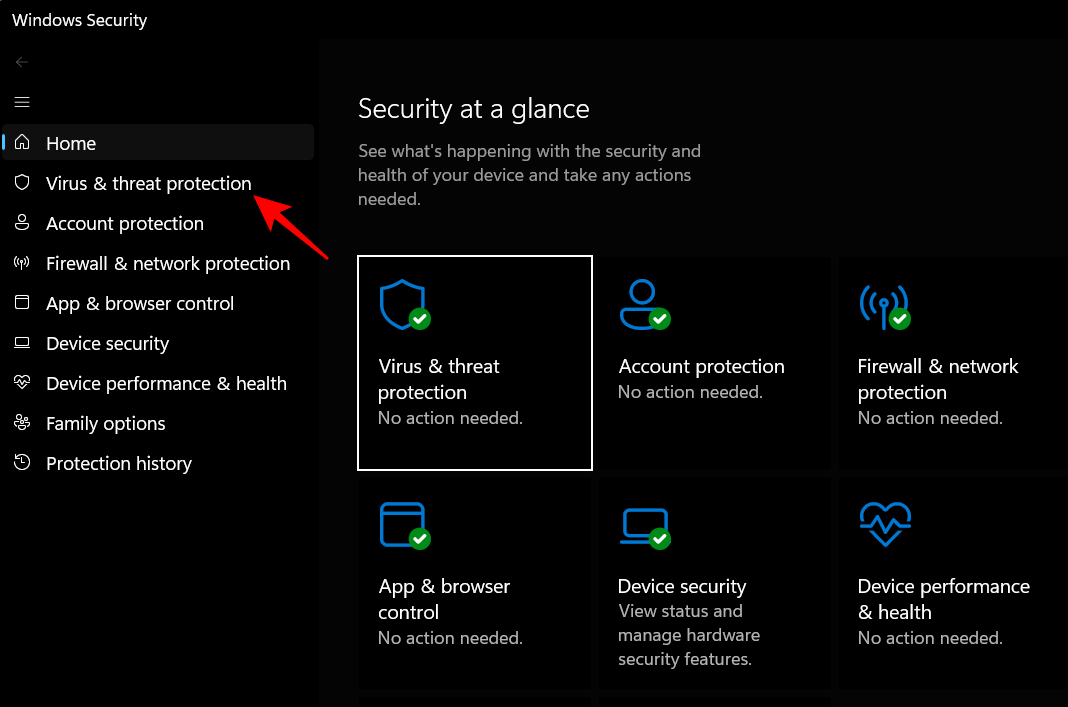
- Click on Scan choices.

- Select Full scan and click on on Scan now on the backside to begin scanning.
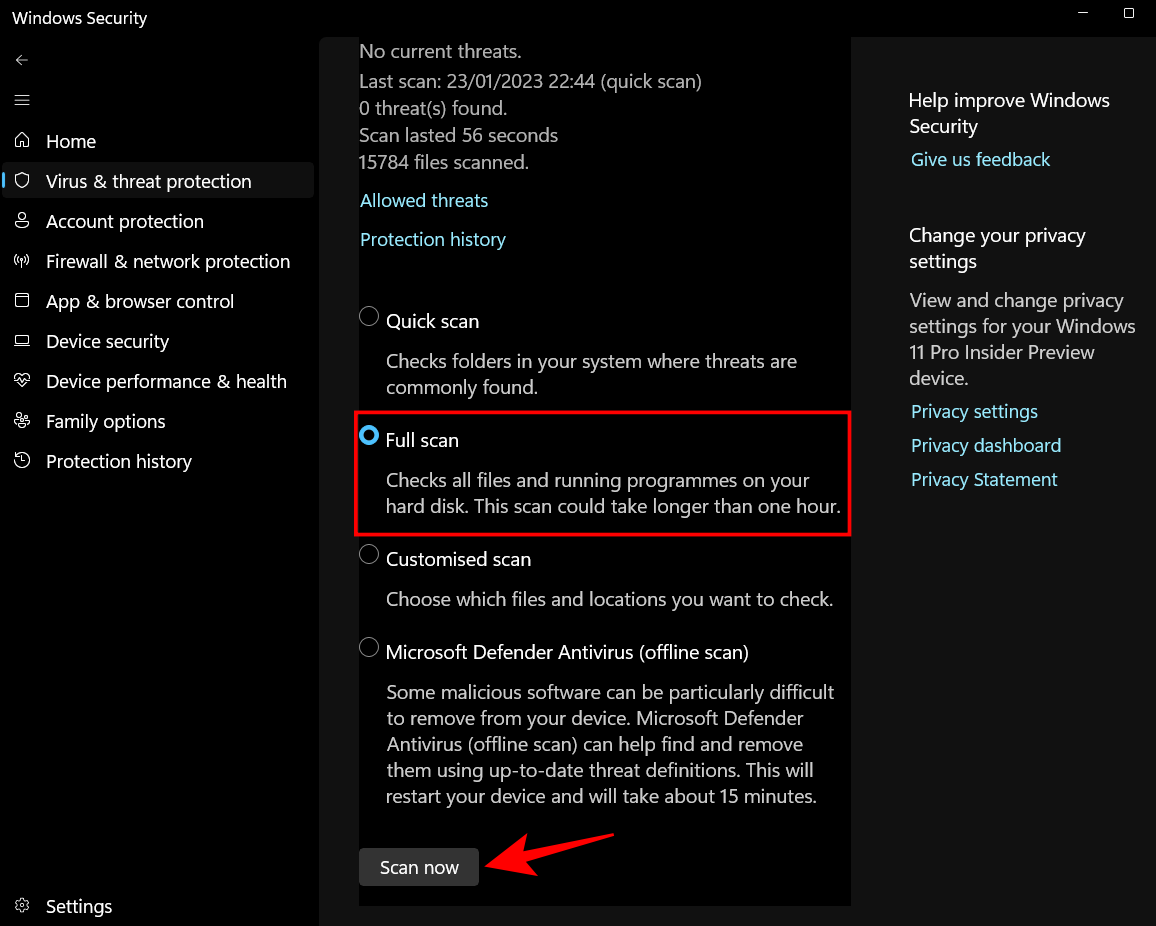
- Wait for the scan to complete. This can take a while however it’s vital that you just see it by.
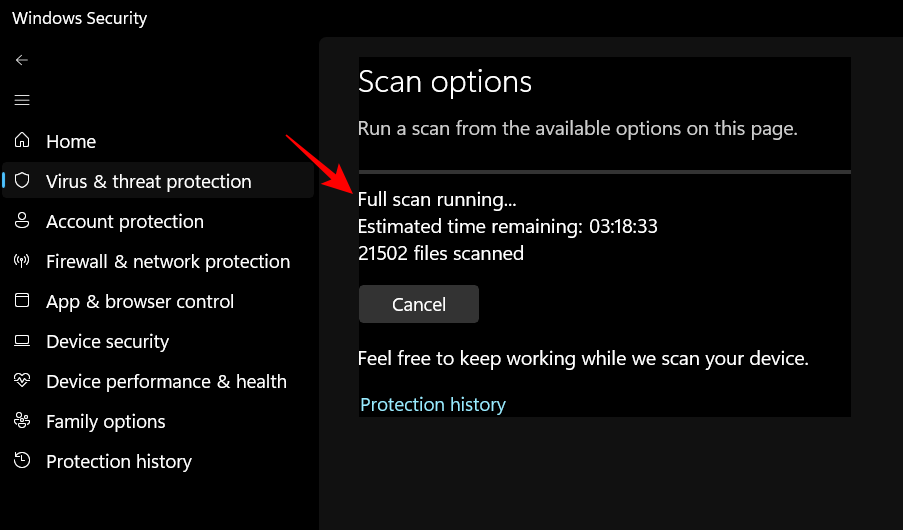
- Remove any viruses discovered and try to be good to go.
Method 5: Run SFC, DISM, and CHKDSK scans
The next smartest thing to do is to run native file scans that test for system image, file, and disk corruption. Any considered one of these might result in essential course of failure so it’s crucial that you just run three command-line instruments – System File Checker (SFC), Deployment Image Servicing and Management (DISM), and the Checkdisk (CHKDSK) scan – and apply the fixes robotically. Here’s how to go about them:
- Press Start, sort cmd, then right-click on it and choose Run as administrator.

- Now, firstly, run the SFC scan with the next command:
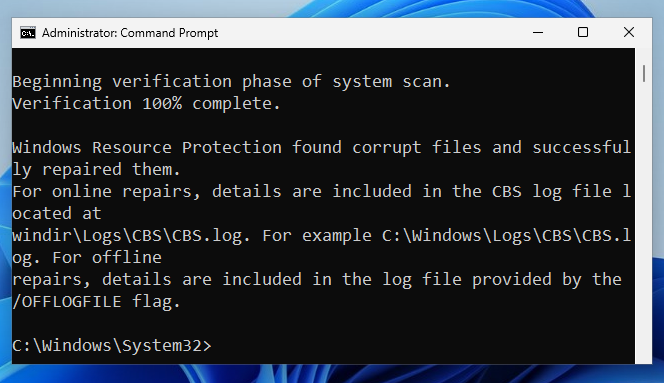
sfc /scannow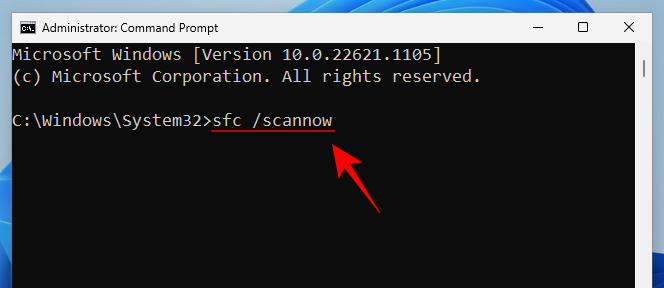
- Hit Enter and look ahead to the scan to complete.

- If there are any errors discovered and glued, restart your laptop.
- Next is DISM. Here are the three instructions that it is advisable enter one after the other:
dism /on-line /cleanup-image /checkhealth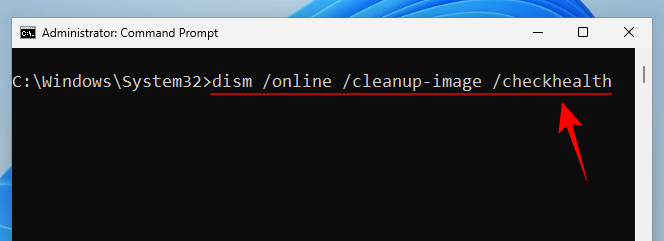
- Hit Enter. Now sort this:
dism /on-line /cleanup-image /scanhealth
- Then hit Enter once more.
dism /on-line /cleanup-image /restorehealth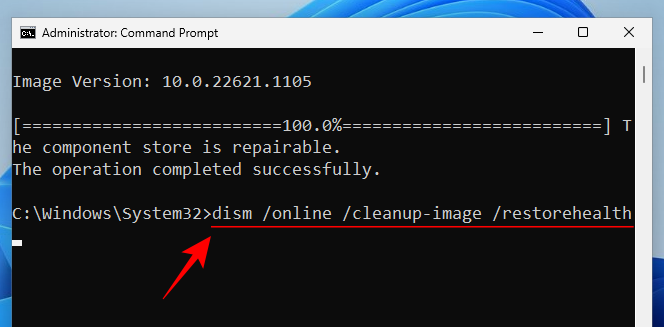
- Hit Enter and wait until every scan is full.
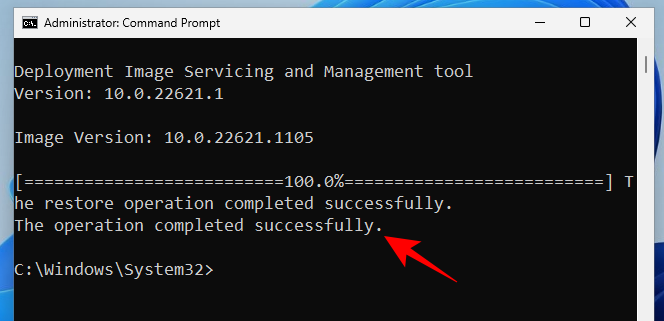
- Restart your laptop for good measure.
- Lastly, test for errors in your system disk with the CHKDSK scan:
chkdsk C: /f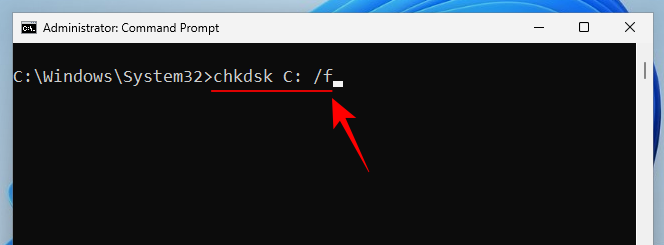
- Here, ‘C’ is the letter of the drive you wish to test, which is the system drive on this case. Hit enter.
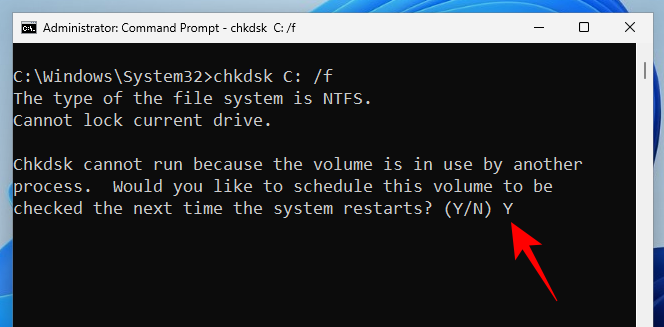
- When prompted, enter
Yfor Yes, and schedule the disk test on the restart.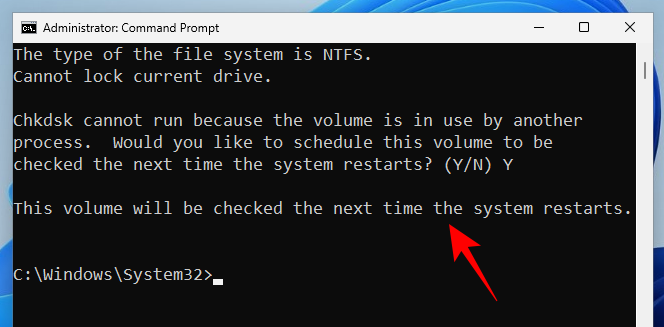
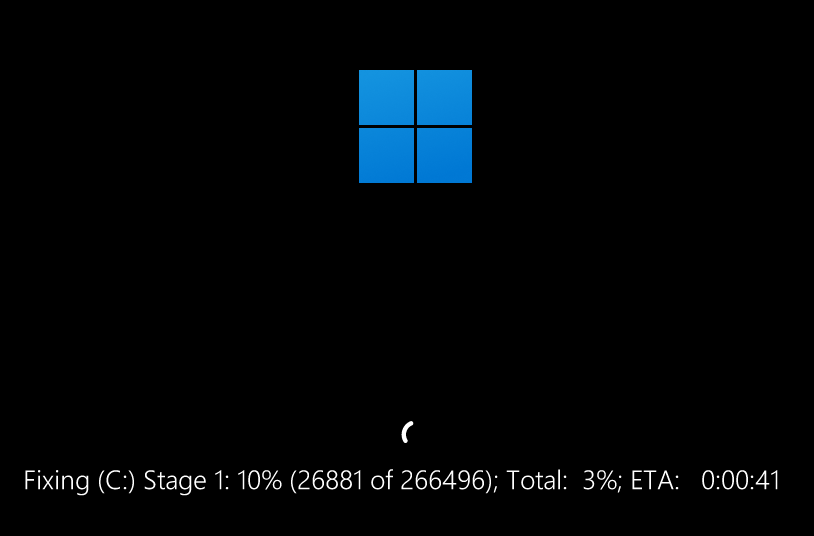
- Now restart your laptop for the test disk scan to start diagnosing and fixing any points current.
Method 6: Uninstall not too long ago put in packages
If the “critical process died” message got here up after not too long ago putting in a program, it’s extremely seemingly that that’s the reason for the BSOD crash. Third-party packages can generally introduce problematic recordsdata that interrupt system processes and drivers. You will wish to uninstall these functions.
- To uninstall an software, press
Win+Iand open Settings. Then click on on Apps within the left pane.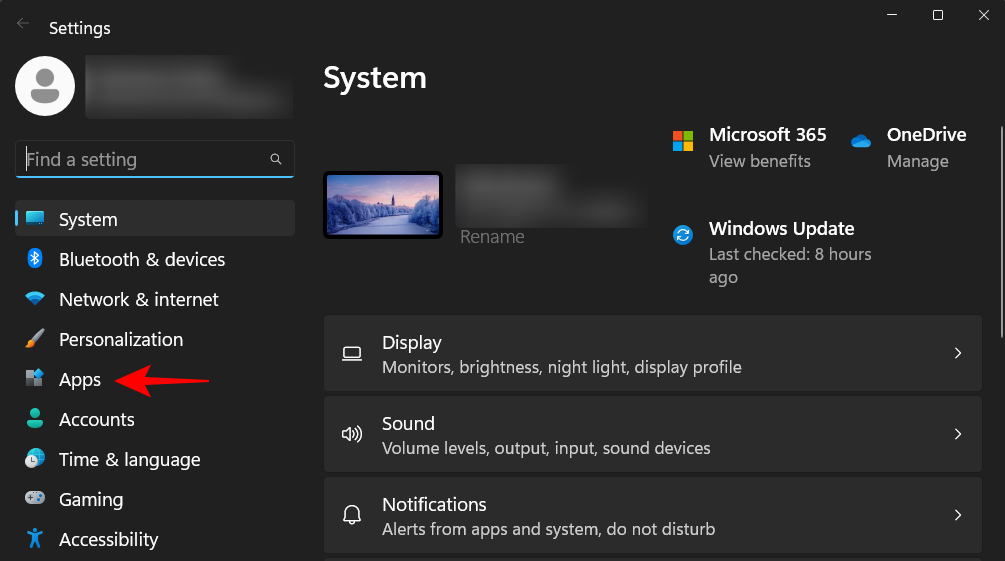
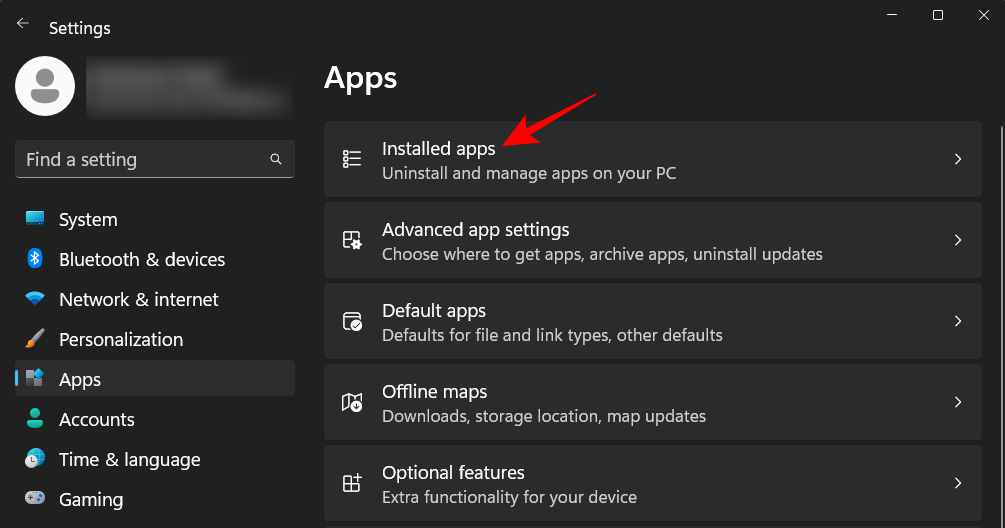
- Select Installed apps.
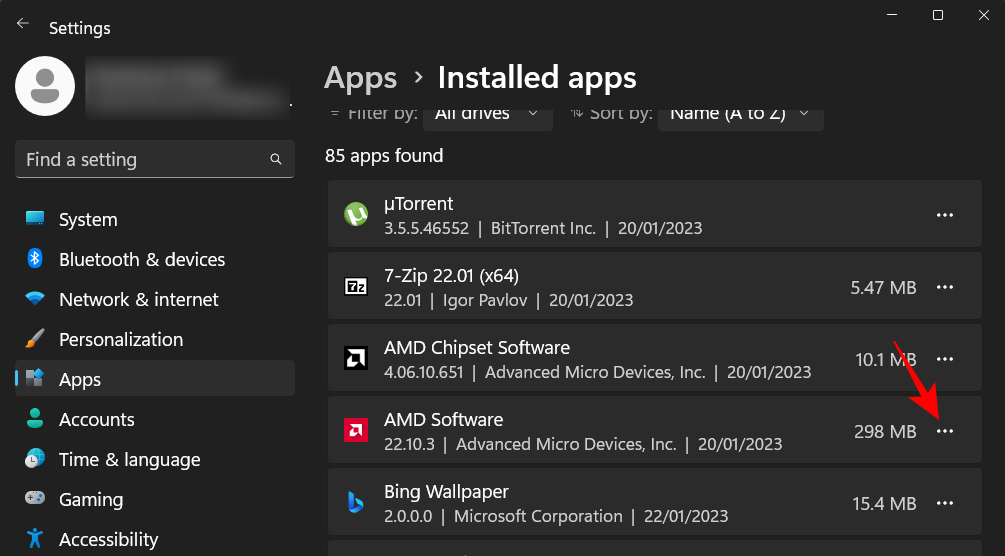
- Scroll down the listing of apps and discover the applying you wish to take away. Click on the three-dot icon next to it.
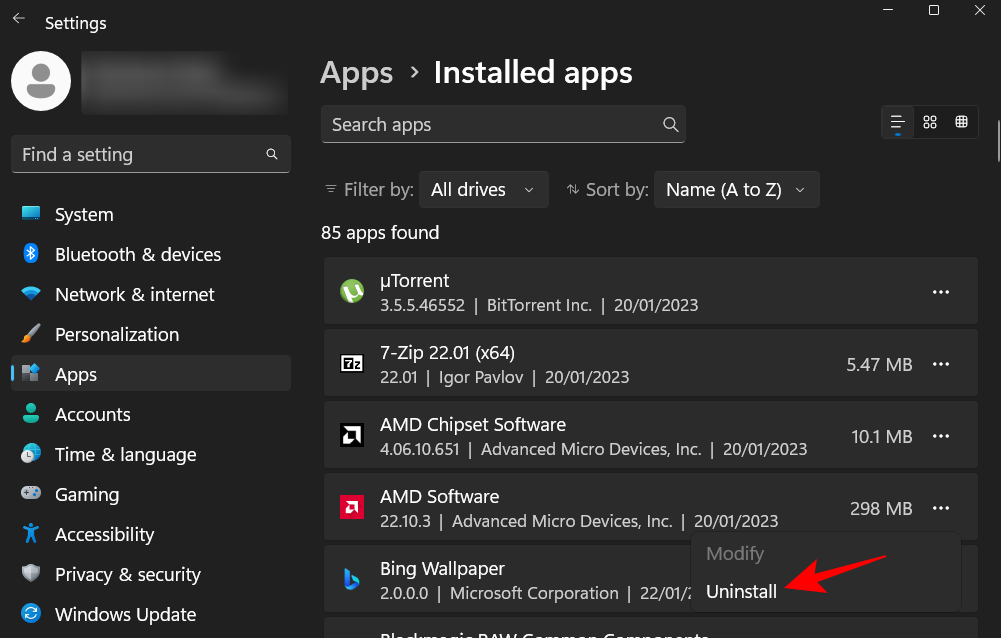
- Select Uninstall.
- Click on Uninstall once more.
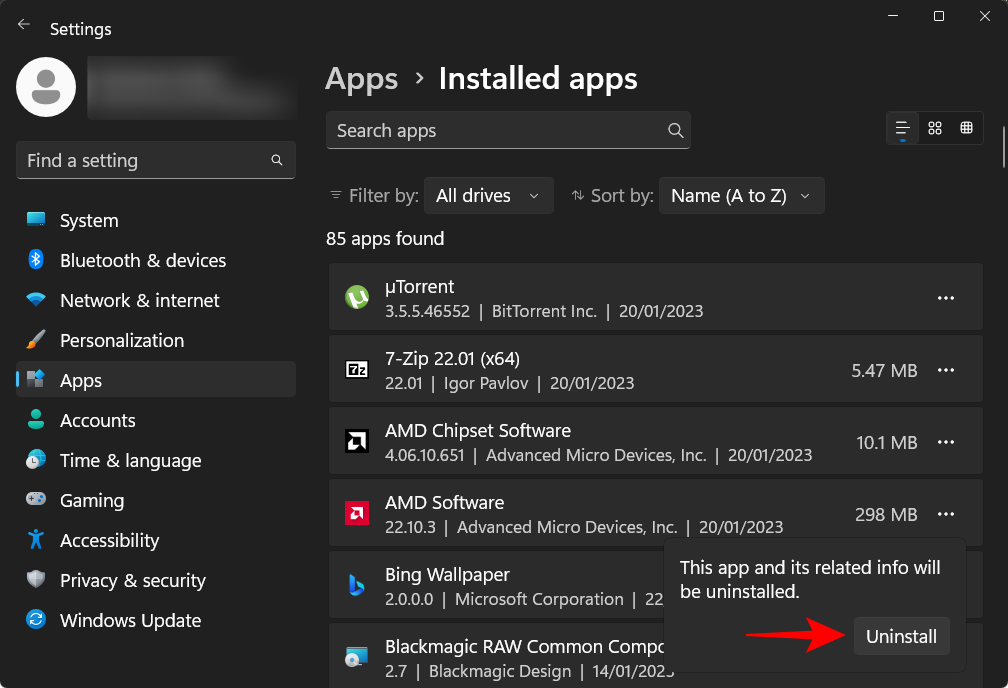
- Once you might have eliminated all doubtlessly problematic functions, restart your laptop for good measure.
Method 7: Uninstall Windows updates
Just like packages, Windows update recordsdata may also result in a system crash, particularly if the bundle wasn’t correctly downloaded and put in. When seeking to repair the foundation reason behind the ‘critical process died’ error, that is one other potentiality to look into. If a Windows update was not too long ago put in on the time of the crash, uninstall the update, like so:
- Press
Win+Iand open the Settings app. Then click on on Windows Update within the left pane.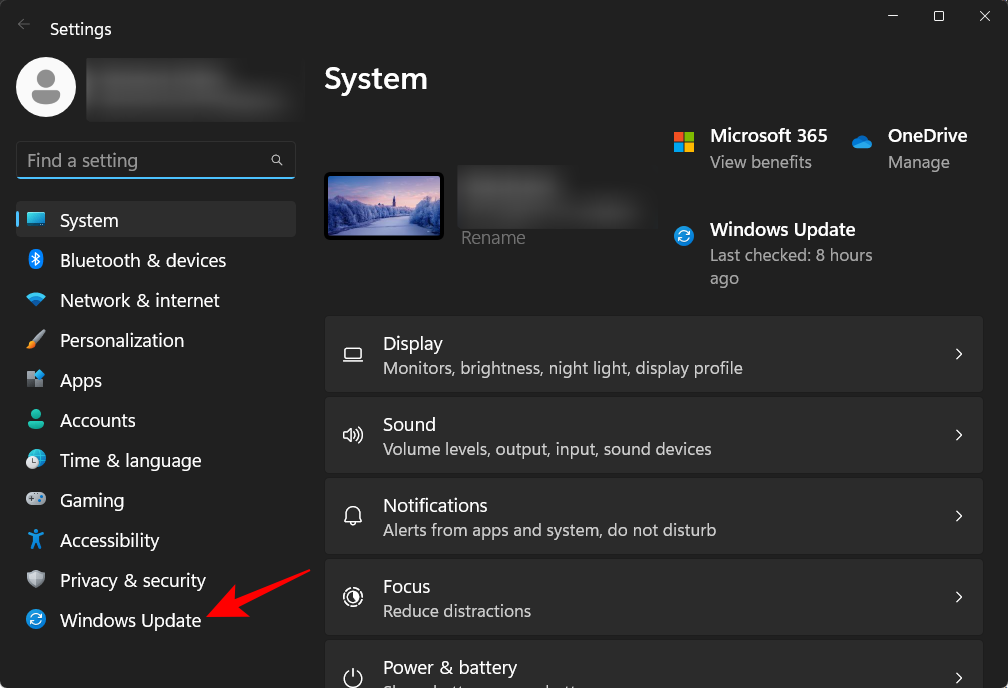
- Click on Update historical past on the precise.
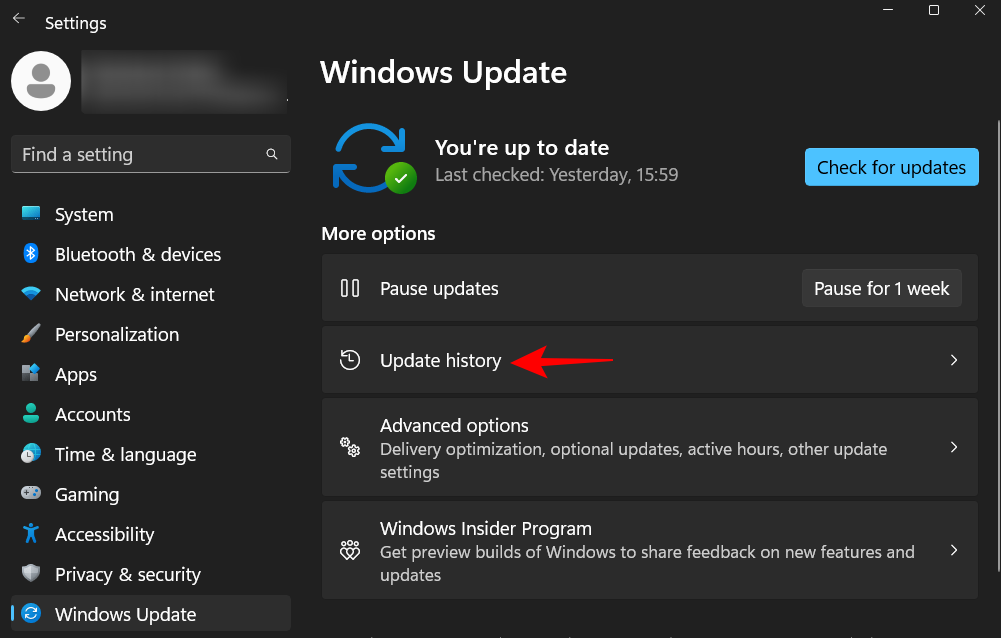
- Then scroll all the way down to the underside and click on on Uninstall updates underneath “ settings”.
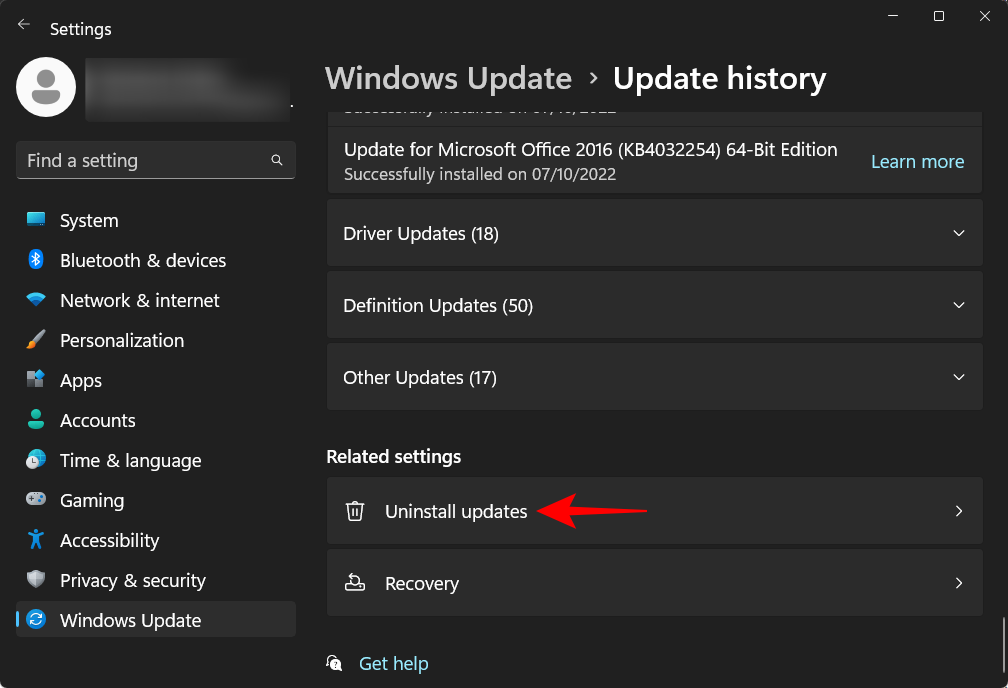
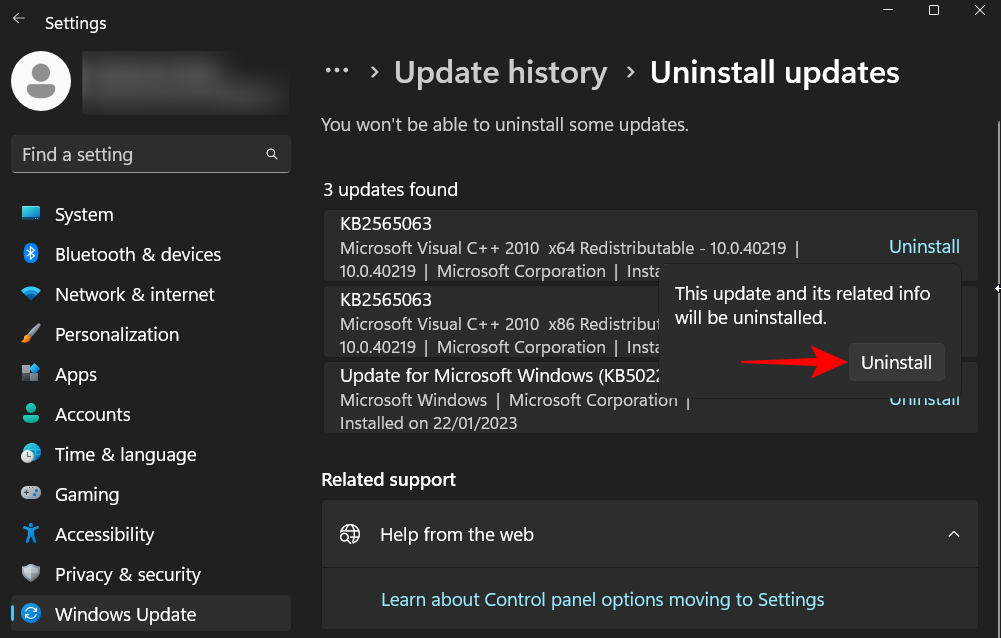
- Click on Uninstall for the most recent update.
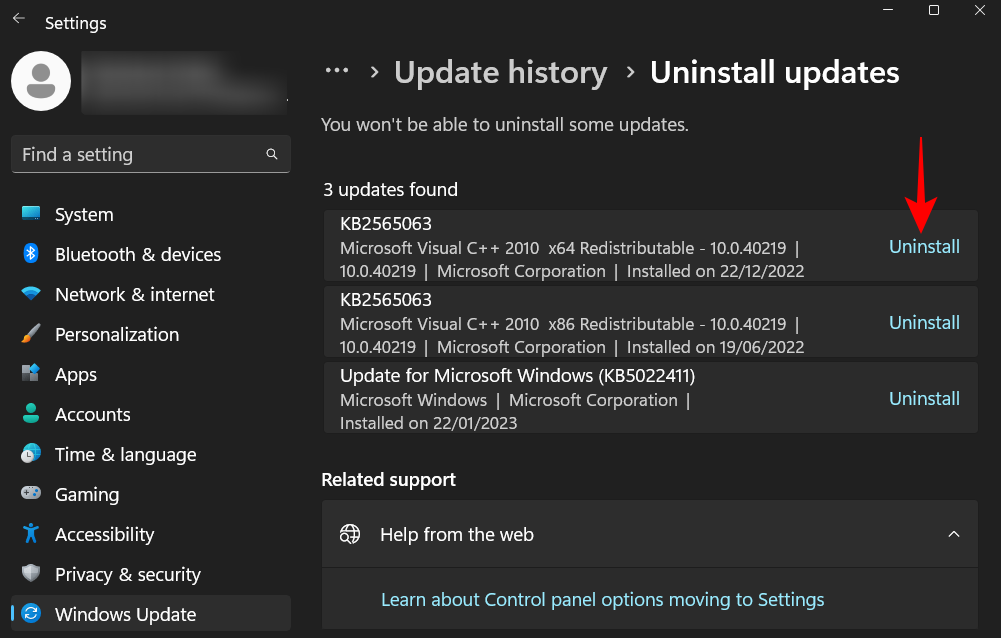
- Click on Uninstall once more.
- Your laptop will restart as soon as the Windows update is eliminated.
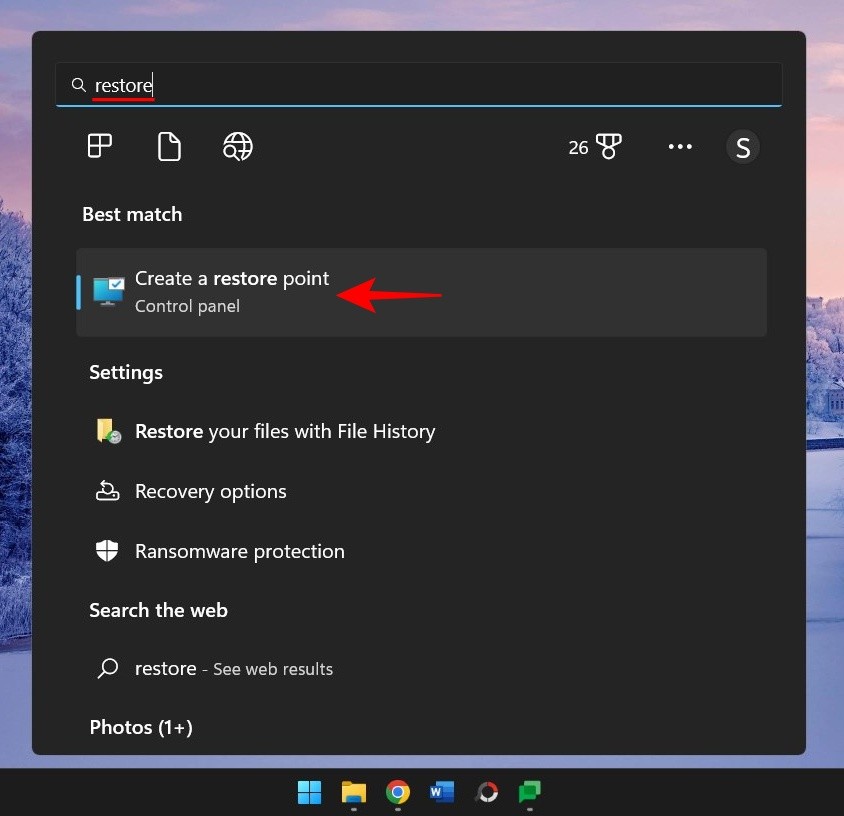
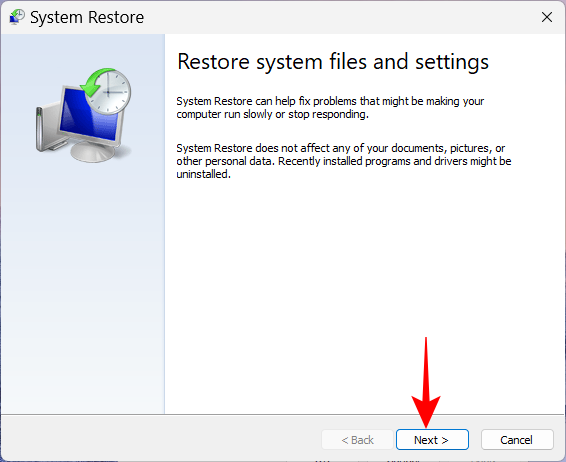
Method 8: Use System Restore
If you proceed to get the identical BSOD crashes and significant course of died error messages, you’ll have to resort to some drastic measures. The easiest of those entails restoring your system and its configuration to a earlier cut-off date. Here’s how to take action:
- Press Start, sort “system restore”, and choose Create a restore level.
- Now click on on System Restore.
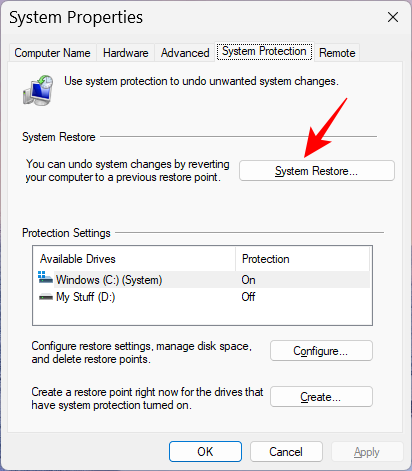
- Click Next.
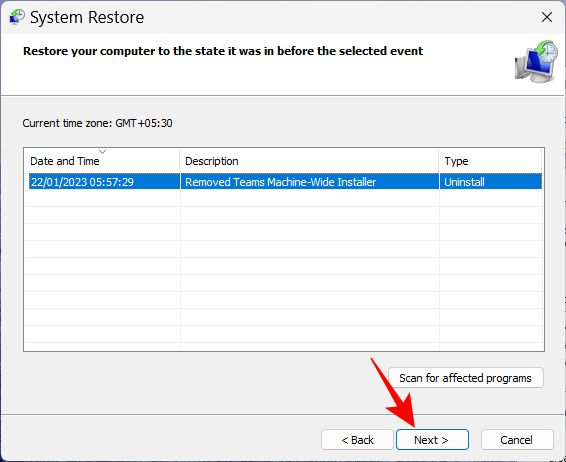
- Select the occasion earlier than which you need the system to revive to.
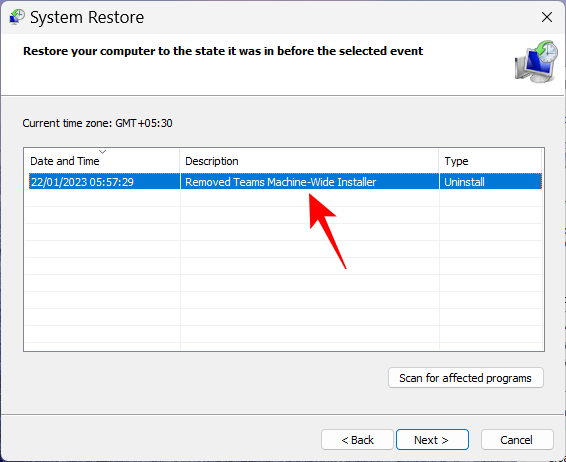
- To know more about this system and driver adjustments that your system will undergo with the restore, click on on Scan for affected packages. Or, merely click on on Next to proceed.
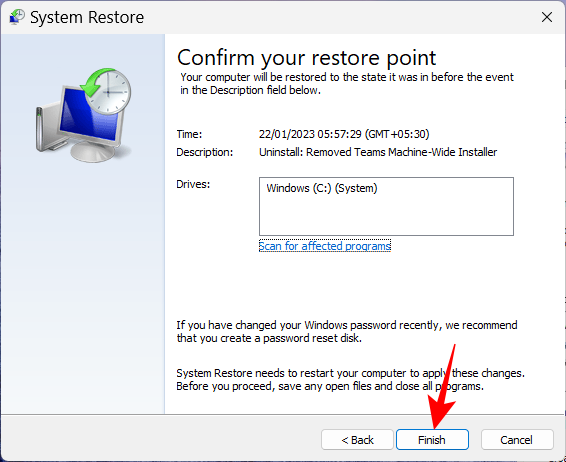
- Finally, click on on Finish to begin restoring.
Method 9: Repair Boot recordsdata
If the reason for your troubles lies with the boot recordsdata, chances are you’ll find yourself with a boot loop. To repair this, comply with the steps given beneath:
- Hard reboot your PC two or 3 times consecutively (as proven earlier). Once your system boots to Startup Repair, click on on Advanced choices.
- Then choose Troubleshoot
- Select Advanced choices once more.
- Then click on on Command Prompt.

- Now sort the next command within the command immediate: diskpart
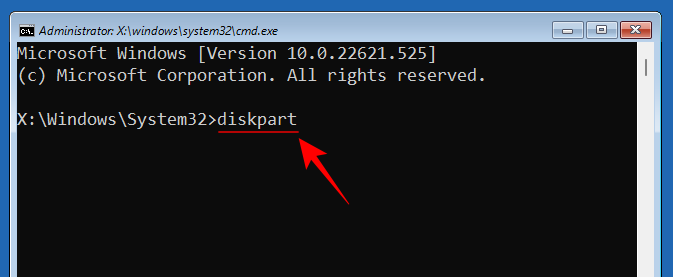
- Hit Enter. Wait for the command to execute. Then sort this:
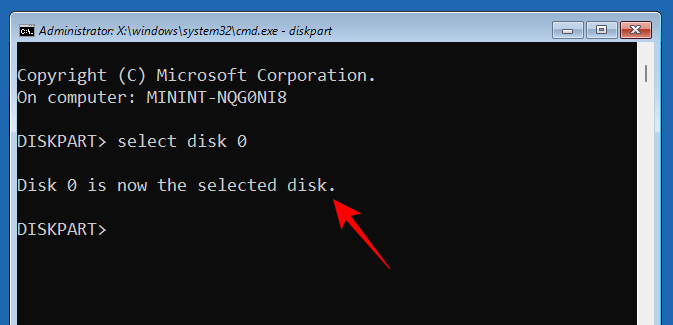
choose disk 0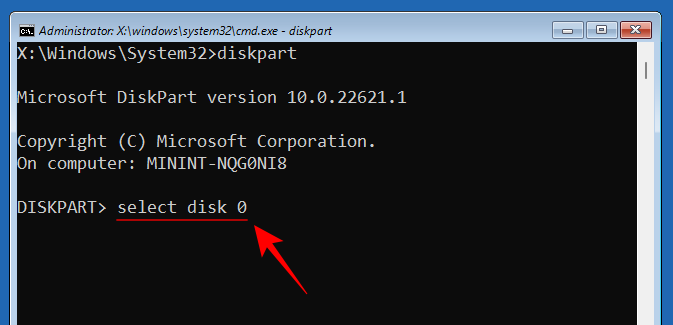
- Hit Enter.
- Now sort the next:
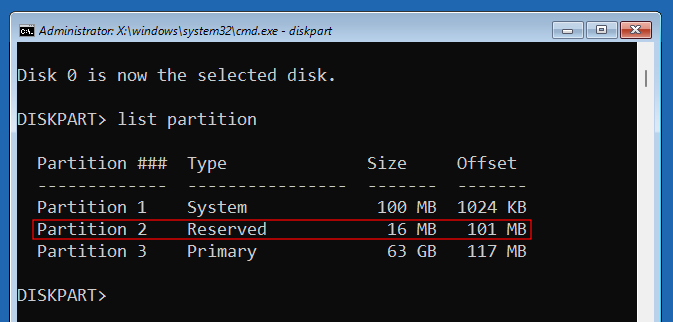
listing partition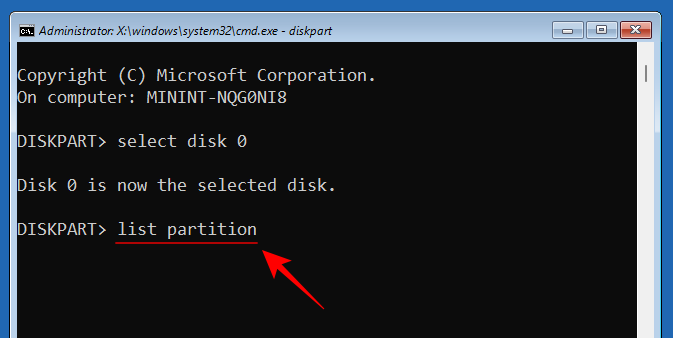
- Take notice of the “System” partition sort and its measurement (often 100 MB).
- Next, discover out the amount variety of this method partition, in addition to the drive letter the place your Windows is put in, by typing the next:
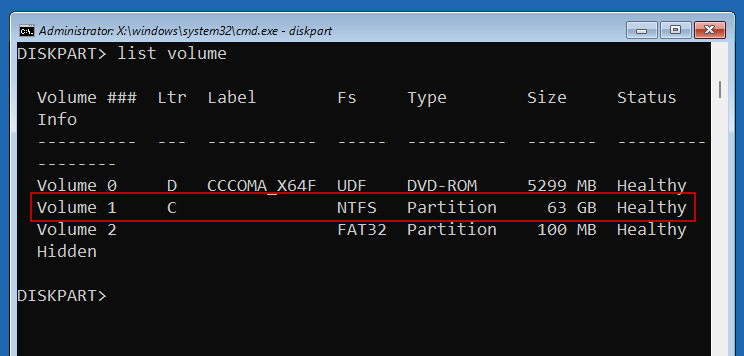
listing quantity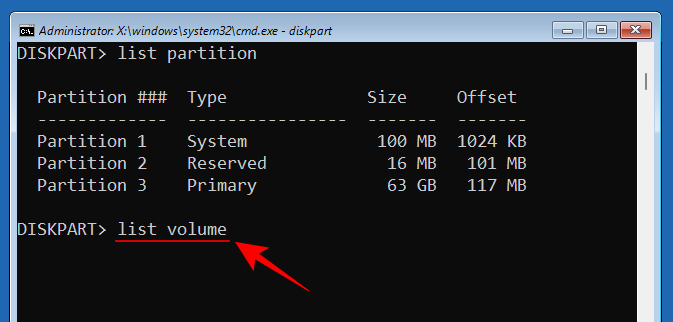
- And hit Enter. Find the amount that’s 100 MB in measurement. That is the system partition quantity.

- The quantity the place Windows is put in is usually assigned the letter C.
- Now, sort the next command along with your system partition’s quantity quantity (2 in our case):
choose quantity 2
- Hit Enter. Once it’s chosen, assign it a brand new drive letter (for instance Z) with the next command:
assign letter=Z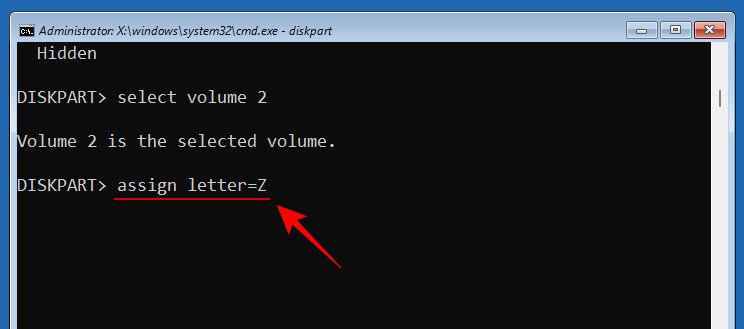
- Hit Enter. Once it’s assigned, sort
exit, hit Enter, and exit Diskpart.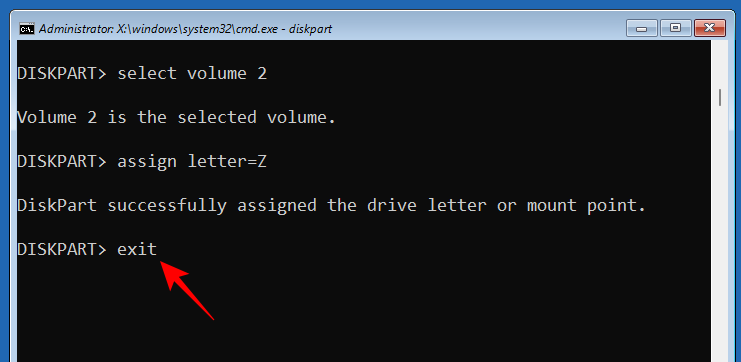
- Lastly, sort the next command:
bcdboot C:windows /s Z: /f UEFI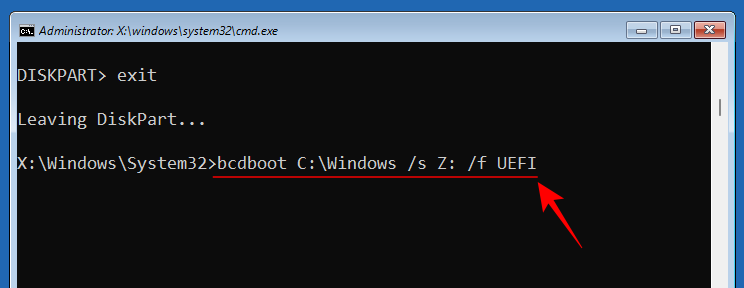
- Hit Enter.
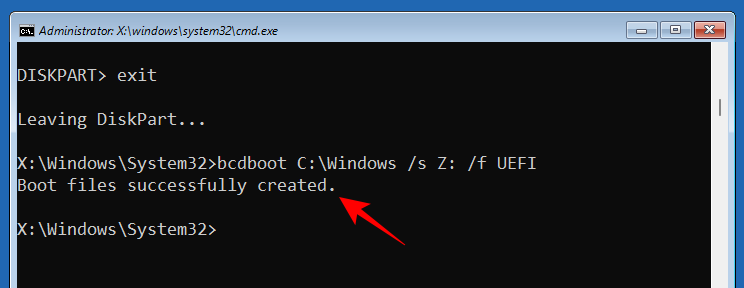
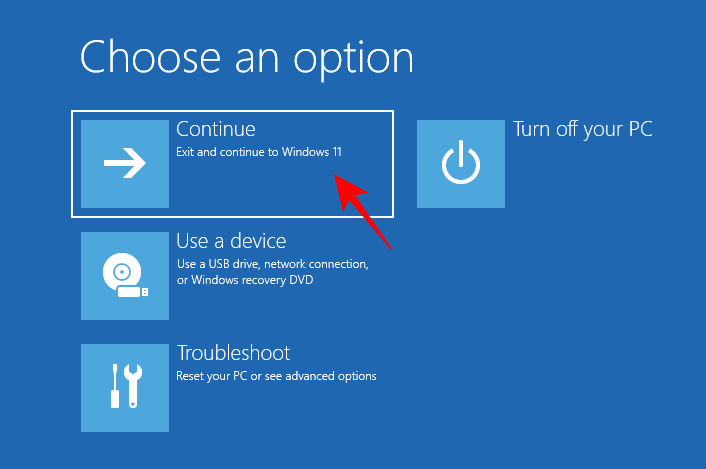
- Once boot recordsdata are efficiently created, shut the command immediate and click on on Continue to restart your PC usually.
Method 10: Apply fixes in Safe Mode
If any of the aforementioned fixes don’t work as proven, chances are you’ll want to modify to Safe Mode and take a look at them there. Fewer processes and providers will interrupt your actions in Safe Mode, permitting you to run the fixes with none trouble. To boot into Safe Mode, entry WinRE and choose Safe Mode from Startup Settings as beforehand proven.
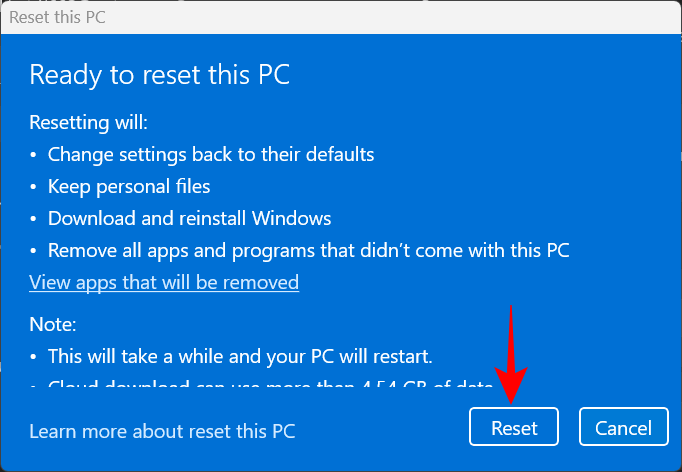
Method 11: Reset Windows
When every thing else fails to curb essential processes from failing frequently, resetting Windows is the final resort open to you.
- Make certain to back up vital recordsdata. Then press
Win+Ito open the Settings app. Scroll down on the precise and choose Recovery.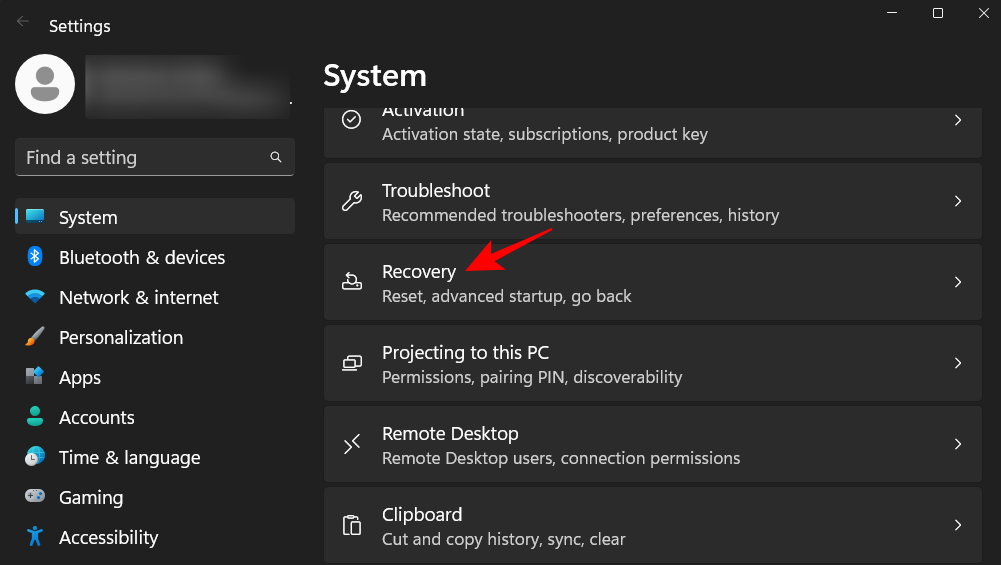
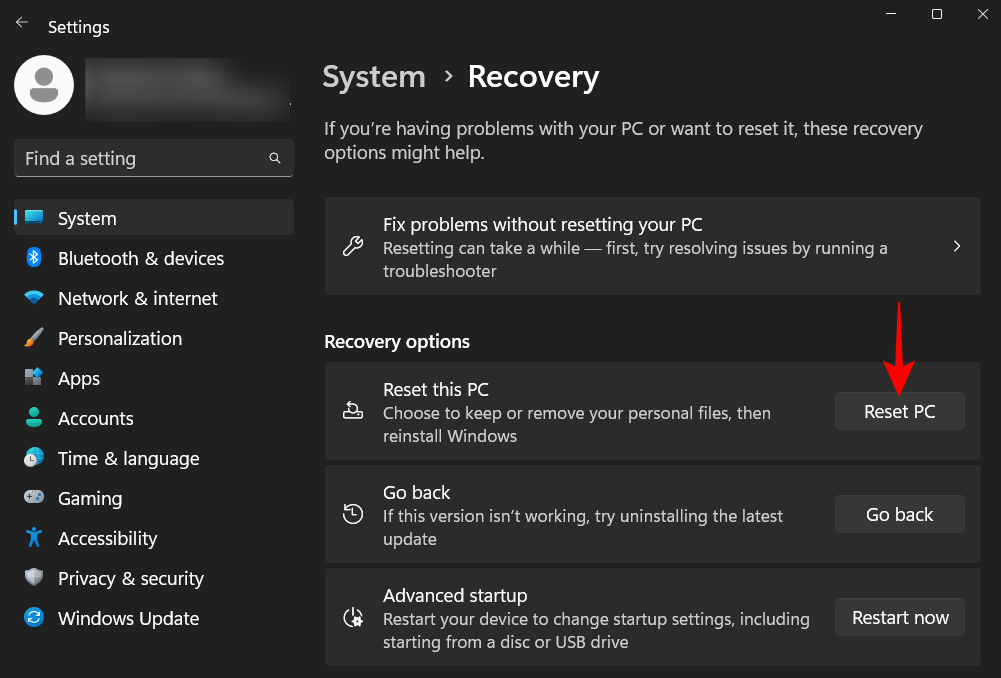
- Then choose Reset PC next to “Reset this PC”.
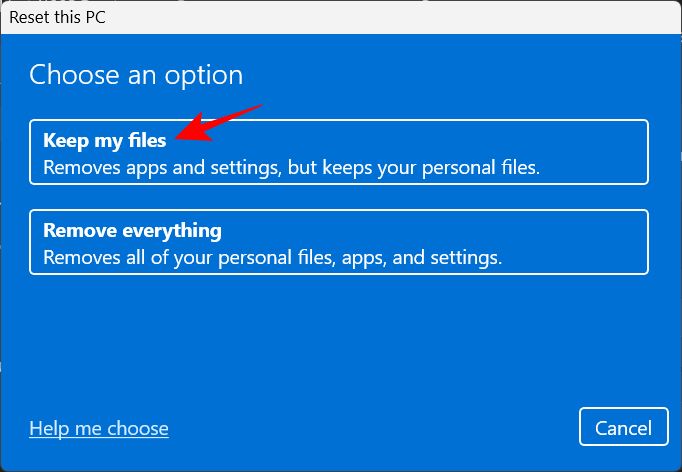
- When requested to decide on, choose Keep my recordsdata.
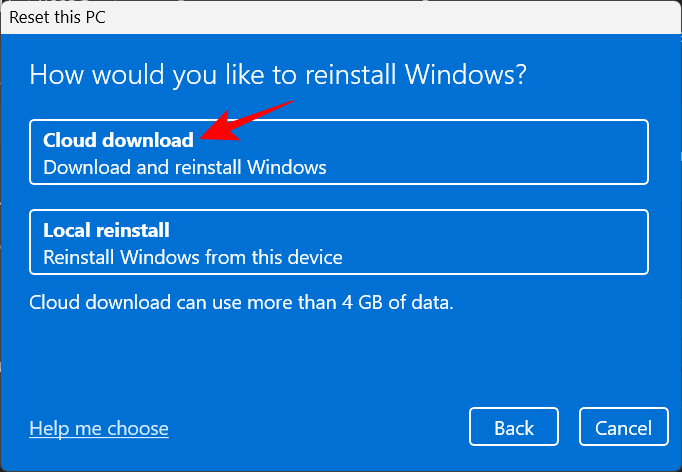
- Select whether or not you wish to “Cloud download” (from the web) or do a “Local reinstall” (if in case you have a Windows 11 set up disk). We’ve chosen the previous.
- Review your selections and click on Next.
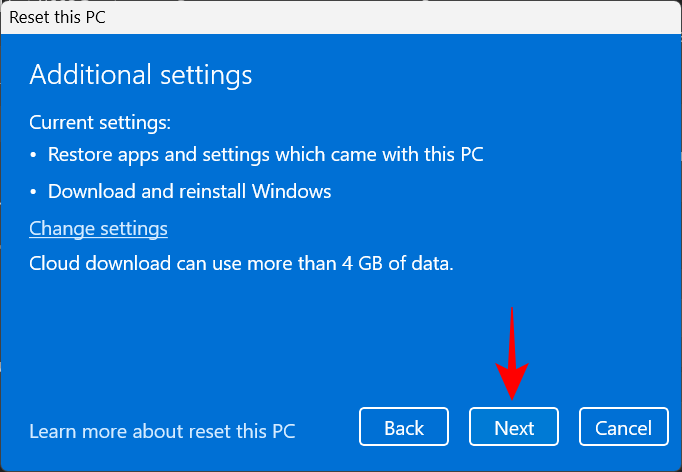
- Finally, click on Reset to start resetting Windows.
FAQ
In this part, we reply a couple of generally requested questions in regards to the Critical Process Died cease code.
Why do I keep getting essential course of died?
If you retain getting the Critical Process Died error and the accompanying blue display, it implies that no matter’s inflicting it, be it defective drivers, malware, or corrupt processes, received’t go away with out guide intervention. However, with various doable root causes, zeroing in on it’s simpler stated than finished. Which is why, to make sure that you’re thorough find the precise answer, we suggest making use of all of the doable fixes out there to you. Refer to our information to get a step-by-step breakdown of those.
Can BSOD errors harm my laptop?
Although the BSOD in itself isn’t damaging to the pc, the exhausting restart required to get out of it may presumably harm your PC’s exhausting disk (not SSD). The BSOD errors themselves solely point out that your system bumped into an issue. The accompanying error message is of rather more significance because it offers a clue as to what might have gone incorrect.
How do I repair essential course of died boot loop?
If you exhausting reboot your laptop to get out of the essential course of died error solely to be introduced back to the identical error display, you’re within the unlucky situation of a boot loop. To even start fixing it, you’ll first have to get to Safe Mode. This may be accessed from Windows Recovery Environment. Doing two-three consecutive exhausting reboots will robotically ship the system to “Startup Repair” from the place you may attain WinRE simply. Refer to our information above to know more.
Where are BSOD crash logs saved?
Windows retains a log of each time your laptop crashes. This may be accessed from C:WindowsMinidump.
A blue display of demise isn’t a very good signal. But relying on the error message displayed, its trigger would possibly range. We hope you have been capable of get out of the “Critical Process Died” error display and repair the issue at its roots.
Check out more article on – How-To tutorial and latest highlights on – Technical News