
How to make use of Snipping software in Windows 11 [AIO].
What to know
- Windows Snipping Tool is a feature-rich display seize and screenshot app.
- With Snipping Tool, you may seize screenshots in numerous modes, document your display, and even add sounds from the microphone or the system whereas doing so.
- Its modifying skills are fairly diverse because it helps you to annotate, spotlight, crop, extract and redact textual content from screenshots, add shapes, and way more.
Snipping Tool is Windows’ native screenshot app. The software lets you seize your display in numerous methods and comes bundled with Windows 11 out of the field. So in case you usually take screenshots, Snipping Tool is the proper match for you. You can seize areas, windows, customized areas, and even document your display.
Like ShareX, which is our favourite software program for capturing and annotating screenshots, you may as well annotate the screenshots with Snipping Tool software program. Here is a complete information that can assist you benefit from the Snipping Tool in your PC.
How to make use of the Snipping Tool in Windows 11
You can use the Snipping Tool to seize your display or document it. Use the related part under, relying in your present necessities, that can assist you use the Snipping Tool to your benefit.
How to take screenshots using the Snipping Tool
You can take screenshots using both the keyboard shortcut or the devoted possibility within the Snipping Tool app. Use the related part under that can assist you seize your display using Snipping Tool, relying in your most well-liked methodology.
Method 1: Using the keyboard shortcut
You can use the Windows + Shift + S keyboard shortcut to activate the Snipping Tool. This will robotically set off a brand new snip so you may instantly seize your display. When using this keyboard shortcut, be sure that to pick the ‘Camera’ icon.
You get the next numerous methods of taking a screenshot on the high of your display.
- Rectangular mode: You can click on and drag to create rectangular areas to be captured in your display when using this mode.
- Freeform mode: This mode will let you draw an space manually in your display that you just want to be captured.
- Window mode: This mode will let you choose a window open in your desktop that you just want to be captured.
- Full-screen mode: This mode will seize your total display.
- Click and choose a mode you like.

- You can then click on and drag in your display to pick the specified space you wish to seize.

An exception right here is the Full-screen mode. When you click on its icon on the high, your total display can be robotically captured and saved in your PC. - By default, all screenshots are robotically saved to the next folder in your PC, the place [USERNAME] is your present person account title:
C:Users[USERNAME]PicturesScreenshots
How to make use of Print Screen to open Snipping Tool
Snipping Tool additionally offers you the choice to make use of the Print Screen key as effectively to set off the software. If you’re used to using Print Screen Key, then you may customise and set it as the popular shortcut within the Snipping Tool. Here’s how one can change the keyboard shortcut utilized by the Snipping Tool.
- Open the Start menu and seek for Snipping Tool. Click and launch the identical out of your search outcomes.

- Now click on the 3-dot (
) menu icon.

- Select Settings.

- Click Change in Windows settings beside Print Screen key shortcut on the high.

- Now scroll down in your proper and activate the toggle for Use the Print Screen button to open display snipping.
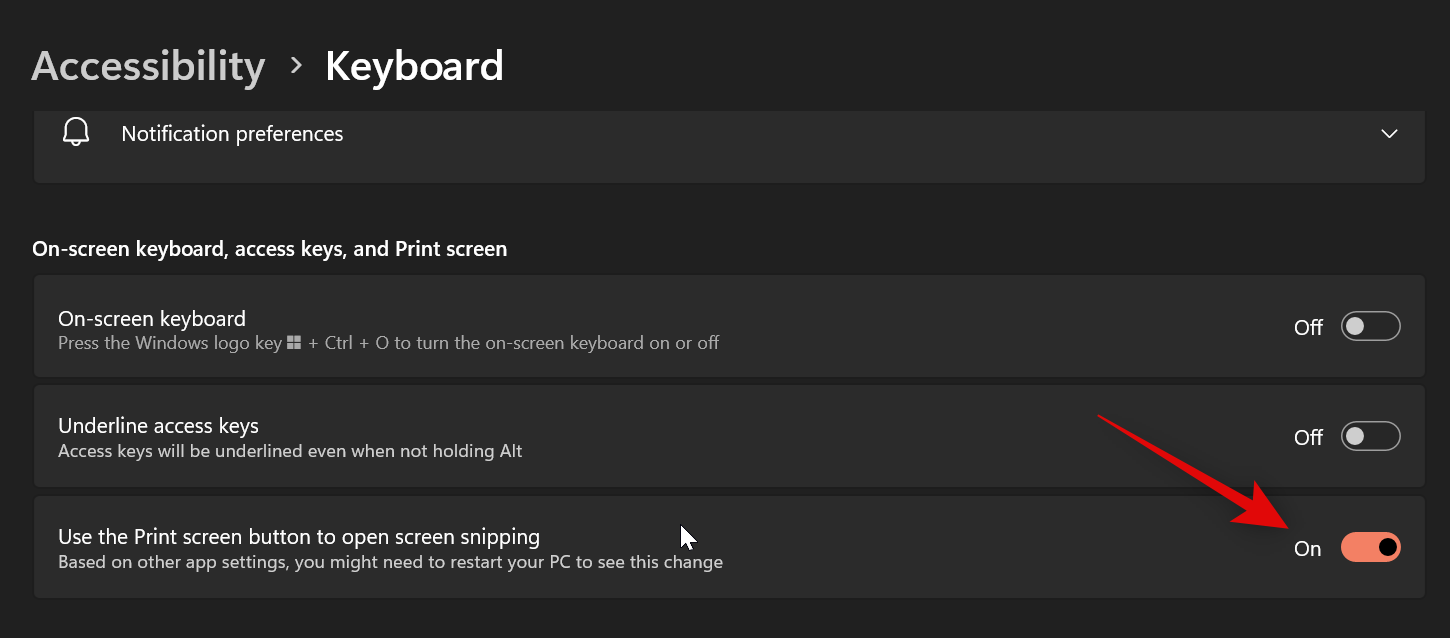
And that’s it! Every time you press the Print Screen key sooner or later, it’s going to now open the Snipping Tool in your PC.
: Where Do Windows 11 Screenshots Go? [Windows 10, too]
Method 2: Using the Snipping Tool app
You can even seize your display from the Snipping Tool app correct. This lets you annotate and edit your screenshots immediately within the app as soon as captured. Here’s how one can seize your display using the Snipping Tool app.
- Launch your Start menu, seek for Snipping Tool and launch it out of your search outcomes.
- Now click on New.

- Make positive to pick the ‘Camera’ or ‘Snip’ icon, after which select the popular seize mode from the alternatives on the high of your display.

- Now click on and drag to seize your display.
If you choose Full-screen seize, then your display can be captured as quickly as you click on the icon. - Once captured, the screenshot can be displayed within the Snipping Tool app so that you can edit.
How to document your display using Snipping Tool
You can even document your display using the Snipping Tool. Follow the steps under that can assist you together with the method.
- Open the Snipping Tool using the Start menu search.
- Now click on Record on the high.

- Click New.

- Now click on and drag in your display and choose the realm you want to document.

- You can regulate the realm by dragging the marker on both fringe of your choice.
- While recording, if you wish to add narration or sounds out of your microphone, click on on the microphone icon and select your enter.

- You can even select so as to add or take away ‘System sounds’.

- Once set, click on Start on the high.

- Snipping Tool will now document the chosen space after a delay of three seconds. You can be proven a countdown for a similar in your chosen space.
- Once you might be achieved recording your display, click on the Stop icon on the high.
- You can even click on the Bin icon to delete the recorded footage and begin over once more.
- Once you cease recording, it’s going to robotically open within the Snipping Tool app. Switch to the app to view your recorded footage. You can now preview the footage using the Play icon.

- If all the things appears as much as mark, click on the Save icon within the high proper nook to avoid wasting the recorded footage.

- You can even press Ctrl + S in your keyboard to avoid wasting your recording. Select the specified location in your PC within the pop-up in your display and click on Save as soon as achieved.

And that’s how one can document your display using the Snipping Tool in Windows 11.
How to vary the Snipping mode
There are two methods to vary your snipping mode.
- You can change it when capturing your display using the icons on the high, as proven under.
- You can even change seize modes within the app. Click the drop-down menu for Snipping Mode.

- Select your most well-liked Snipping mode from the alternatives obtainable to you.

- Now while you click on New, your most well-liked Snipping Mode can be robotically chosen.
The perk of choosing your most well-liked mode within the app is that it’s preselected each time you seize your display.
How to delay snipping in Snipping Tool
You can delay your captures using the Snipping Tool app. Unfortunately, you may’t configure delay when using the keyboard shortcut.
- Open the Snipping Tool app out of your Start menu search.
- Now click on the drop-down menu for Delay snip on the high.

- Select your most well-liked delay.

- You can now click on New and seize your display with the delay you chose.

Delaying your captures will help seize parts which are dismissed while you click on or work together together with your PC. And that’s how one can delay captures when using the Snipping Tool app.
How to annotate and edit screenshots using Snipping Tool
Snipping Tool offers a number of modifying and annotation choices. Here’s how:
Crop screenshots
- Once the screenshot is captured using the Snipping Tool, it’s going to robotically be added to the canvas.
- Click on the Image Crop possibility to begin cropping.

- Use the handlebars across the image to crop your image.

- Click on the tick mark on the high to substantiate.

Annotate using a ballpoint pen and highlighter
- Click on the ‘Ballpoint pen’ possibility.

- Select the colour and thickness of the pen.

- Then merely annotate as you want.

- If you want to spotlight sure sections, click on on the ‘Highlighter’ icon.

- Choose the colour and dimension of the highlighter.

- Then spotlight the content material of the image.

- Use the ‘Eraser’ in case you make any errors and must appropriate them.

- You can even use Touch write in case you have a suitable enter peripheral.

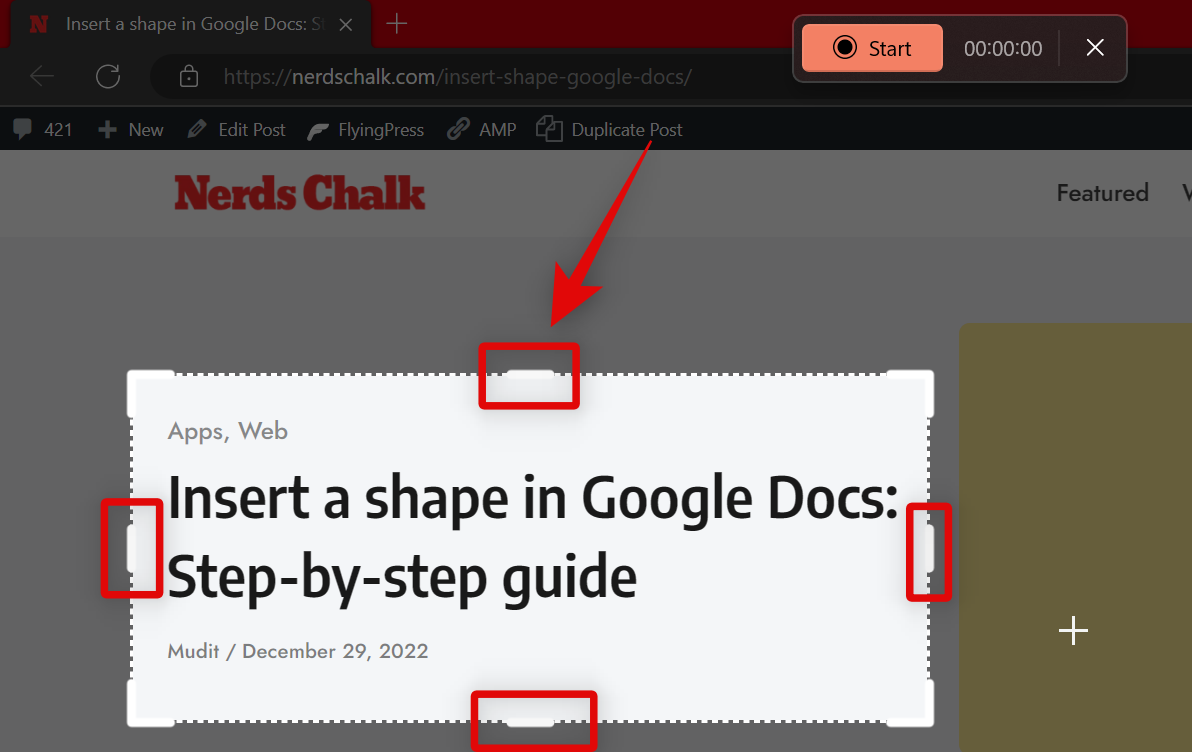
Add shapes
This is among the more moderen options to reach within the Snipping Tool. Here’s how to make use of it so as to add shapes, arrows, and contours to your image.
- Click on the ‘Shapes’ icon in the primary toolbar.

- Choose from the obtainable shapes – sq., circle, line, or arrow.

- Draw the form and resize, transfer, or regulate its placement to your liking.

- To fill in a circle or a rectangle, draw the form after which click on on Fill.

- Then select a fill colour.

- To change the define colour, click on on Outline.

- Then select a colour.

- To change the thickness of the form define, click on on Outline after which drag the slider to vary the scale.

- To delete a form, merely use the Eraser possibility in the primary toolbar and click on on the added form to take away it.
Snipping Tool additionally helps you to extract or redact textual content from screenshots that include textual content. Here’s how:
- Click on the ‘Text Actions’ button in the primary toolbar.

- This will spotlight all of the textual content in your screenshot.

- Click on Copy all textual content to repeat all of the textual content to the clipboard.

- Alternatively, if you wish to copy a selected part of the textual content, spotlight it, then right-click on it and choose Copy textual content.

- On the opposite hand, if you wish to redact and conceal textual content, click on on the ‘Text Actions’ possibility and select Quick redact.

- Phone numbers and emails can be redacted.

- To change what parts are redacted, click on on the down arrow next to ‘Quick redact’.

- And select which parts you wish to keep.

- You can even redact textual content in your screenshots by choosing it, right-clicking, and choosing Redact textual content.

- To delete all present redactions, choose Remove all redactions from ‘Text Actions’.

How to customise Snipping Tool (Settings to know)
Snipping Tool lets you customise numerous settings so you may management its conduct based on your liking and workflow. Here’s how you are able to do that in your PC.
- Open the Snipping Tool and click on the 3-dot(
- Select Settings.
- You can now customise the next settings for the Snipping Tool. Turn every toggle on or off primarily based in your preferences.
- Automatically copy adjustments: This possibility will robotically copy any edits you make to your captured screenshot in Snipping Tool on to the screenshot copied to your clipboard. This lets you make the edits after which robotically paste the screenshot wherever you want.
- Automatically save screenshots: This possibility will robotically save all of your captures to the Screenshots folder in your Pictures library.
- Ask to avoid wasting edited screenshots: This possibility will immediate you to avoid wasting a captured screenshot or discard it every time you employ the Snipping Tool.
- Multiple windows: This possibility will open a number of captures in separate windows so as to edit all of them later in a single go.
- Add a border to every screenshot: As the title suggests, enabling this feature will add a border round every screenshot you seize using the Snipping Tool.
- Include microphone enter by default when a display recording begins – This will allow ‘microphone’ each time you document your display.
- Include system audio by default when a display recording begins – This will allow system sounds each time you document your display.

Changes you make to Snipping Tool settings can be robotically utilized to the app.
And that’s how one can customise Snipping Tool settings to higher fit your workflow.
We hope this publish helped you get conversant in and simply use Snipping Tool in your PC. If you face any points or have any questions, be happy to drop them within the feedback under.
Check out more article on – How-To tutorial and latest highlights on – Technical News