Understanding Power Supply Connectors: All Types Explained.
Whenever you might be putting in a PSU, you would possibly really feel a bit overwhelmed by a bunch of cables rising out of it. Plus, the design of the connectors look so related that it’s onerous to determine which one goes the place.
It is all the time essential to be acquainted with the ability provide connectors to make sure secure and environment friendly energy supply to every of the PC parts. Although the obtainable connectors differ relying upon your PSU mannequin and producer, there are some widespread ones you’ll all the time discover.
In this text, I’ll be discussing the ATX energy connector that provides energy to your essential board and the CPU energy connector that offers energy to the CPU. Besides, you’ll additionally find out how the PCIe and SATA connectors energy up your GPU and storage disks respectively. By the top, you’ll additionally get some insights on a Molex connector, which is, nevertheless, fairly much less used nowadays.
24 Pin ATX Power Connector

It is the most important connector on a PSU that provides energy to the primary board, together with RAM, chipsets, and onboard storage units (like a NVMe SSD.)
If you observe these connectors carefully, you can see that it has 24 pins organized in 2 rows, 12 on every.
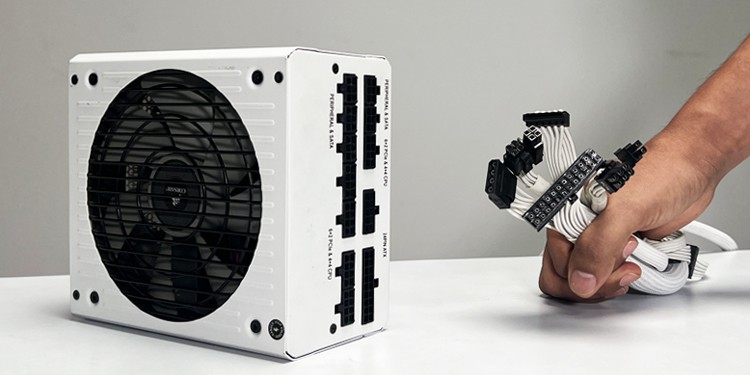
For instance, you may see the ATX energy connector that got here with my CORSAIR RM850X PSU. It could be simply plugged into the motherboard that has a 24-pin ATX header.

However, you might also discover some connectors which can be divided into two blocks of 20 pins and 4 pins. The (20+4) pin setup was launched for enhanced compatibility, permitting you to make use of the identical connector whatever the pin setup in your essential board.
For instance, when you’ve got an older motherboard with a 20-pin ATX header, you may merely connect the 20 pins block and let go of the 4 pins block.
Coming to the PSU facet, you will notice a “24PIN ATX” label to attach the ATX energy connector. However, the ATX port on the PSU could not all the time have a 24-pin setup.

For instance, my CORSAIR RM850X PSU has a 28-pin configuration, in a set of (18+10.) The further 4 pins are built-in to sense voltage drop within the element finish, if any, and report it back to the PSU.

Now that you recognize the fundamentals of an ATX energy connector, let me present you the way to attach it to your essential board.
The ATX header is usually discovered within the rightmost a part of a motherboard, normally with an ATX or ATX_PWR1 label. Below is my ATX header on a GIGABYTE TRX40 AORUS MASTER.

You can merely find it in your board and plug within the connector. For simplifying the connection course of, the connectors are notched and keyed one facet, making it virtually unimaginable to insert the cable incorrectly.

12V CPU Power Connector

As you might need guessed, the CPU energy connector is the one which powers your CPU.
Referring back to the ATX energy connector, it does provide some energy to the CPU. However, not sufficient that it will possibly function appropriately. Your system can’t boot with out the 12V CPU energy connector put in.
Therefore, PSU producers present a devoted energy connector to make sure correct voltage provide and stability to the CPU.
Coming to the pin configuration, the CPU energy connector both has a 4-pin, 8-pin, (8+4) pin, or an (8+8) pin setup. Among all, the 8-pin setup is extensively used nowadays and regarded a normal. The 8-pin setup is removable into two blocks of (4+4) as you may see in my CORSAIR RM850X PSU connectors.

While the 8-pin configuration is backward suitable with the 4-pin ones, the 4-pin ones usually are not. To be more exact, you may plug the 8-pin connector to the 4-pin header in your motherboard, leaving one-half disconnected however not vice-versa.
However, irrespective of the setup, you may merely join it to the ATX_12V header that lies close to the CPU socket in your motherboard.

Some high-end boards could even embrace two ATX_12V headers, like in my GIGABYTE TRX40 AORUS MASTER. Generally, the second is supplied to accommodate a 4-pin or 8-pin auxiliary connector that gives additional energy and stabilizes the overclocked CPU. As such, that you must seize two CPU energy connectors and plug them into every header.

Coming to the PSU facet, you can see a devoted port with 8 pins to plug the CPU connector. They are typically labeled as “CPU” that can assist you join effortlessly.

PCIe Connector
The next connector in our listing is the PCIe connector which is usually used to energy up the GPUs.

In normal, when you’ve got a low-end GPU rated beneath 75W, the ability delivered from the PCIe x16 slot is adequate to function it. To be more exact, you don’t want to attach your GPU to PSU in such circumstances. However, when you’ve got a power-hungry GPU, it does require a reference to the PSU.
You typically get a number of PCIe connectors together with your PSU in a daisy chain trend making it simpler to attach multiple PCIe element.

Similar to the usual 12V CPU energy connector, the PCIe connector additionally has an 8-pin configuration. However, not like the CPU ones, these are divided into two removable blocks of 6-pin and 2-pins respectively. There are additionally different variants like one with the 12 or 16 pins.

While the (6+2) pins PCIe connector is adequate to provide energy to the mid-range GPUs, you’ll require 12 pins or 16 pins to feed the power-hungry GPUs. For instance, you can see two 8-pin ports (16 in complete) on a GeForce GTX 1080 Ti GPU.
Similarly, when you’ve got a high-end GPU that requires a single 16-pin connector, you must go for PCIe 5 suitable ATX 3.0 PSUs like MSI MPG A1000G PCIE 5 & ATX 3.0 Gaming Power Supply. Such PSUs have a devoted 16-pin port (+12VHPWR) to accommodate these connectors and supply as much as a whopping 600W.
Additionally, the high-end GPUs are bulkier in dimension, making it troublesome to plug the PCIe connector into it, typically if you end up using a smaller PC case. In such circumstances, you need to use a PCIe 90 Degree Adapter to get the job executed.
Coming to the PSU facet, they’ve the identical 8-pin configuration that resembles the CPU ones.
While you may see separate 8-pin ports for CPU and PCIe (VGA) in some PSUs like in my EVGA Supernova 550 G3, a few of them could have the identical port for each of them.

So, be sure to examine the label and insert the connectors accordingly. If the labels usually are not clear, it’s possible you’ll check with the guide of your PSU to establish the respective ports.
SATA Connector

As the identify suggests, this connector is used to energy SATA interface units in your system. It can both be storage media like a tough disk drive and Solid State Drive (SSD,) or different supplementary parts like a RGB and fan controller device.
Talking concerning the pin configuration, it has a single block of 15 pins enclosed in a flat L-shaped housing. The distinctive form of the connector helps you join it to a SATA interface device effortlessly. Below you may see the SATA connector that got here with my CORSAIR RM850X PSU.

Coming to the PSU facet, the connector has a set of 6 pins and a corresponding port labeled “PERIF” or “PERIPHERAL & SATA” to connect with. If you might be having any issues with the connector, you can too check with our complete information on how to attach the SATA energy cable.

Molex Connector
The newer requirements like PCIe and SATA have virtually changed using Molex connectors nowadays. However, for those who acquired one, you need to use it to energy the Molex interface units like a CD/DVD drive, floppy disk drive, or a PATA interface onerous drive.
Additionally, you can too pair Molex connectors with the SATA adapters. It could be useful to energy a number of SATA disks if the present connectors are inadequate.

These connectors typically have a 4-pin configuration in a single row. But you may additionally discover ones which have 4 pins, two on every row. Some of them also have a Berg connector on the finish to energy a couple of variants of floppy drives.

Coming to the PSU facet, these connectors are fairly much like the SATAs and have a set of 6 pins.

While some PSUs present a devoted “PERIF” port for Molex connectors like in my EVGA Supernova 550 G3, some could have the identical port for SATA and PERIF like in CORSAIR RM850X PSU.

You ought to all the time learn the label in your modular or semi-modular PSU and insert the connector accordingly. However, you don’t want to fret a lot when you’ve got a non-modular PSU.
Further, I additionally suggest you solely use the proprietary connectors (that got here bundled together with your PSU.)

For instance, you may see above how the pin configuration of a Molex connector differs between my CORSAIR RM850X and EVGA Supernova. The distinction in pinouts could even find yourself damaging your device for those who swap the cables.
Check out more article on – How-To tutorial and latest highlights on – Technical News