
How to arrange and use TreeSize [2023].
Storage area is like time: there simply isn’t sufficient. I’m not large on cloud providers and can’t depend on staying on-line simply to entry my very own recordsdata, which is why I desire having them regionally. But that has its personal points. Every time an app is put in, or a file is introduced in, the space for storing will get eaten up. Even if I’m not doing something it appears to expire of its personal volition. And simply as time is a treasured useful resource that I attempt to handle as best I can, so is my system’s disk area.
Though Windows has its personal disk and space for storing administration instruments, they go away rather a lot to be desired. But there’s a program for every thing underneath the solar, and for space for storing administration, TreeSize is pretty much as good as they arrive.
Figuring out a brand new app with none reference, nonetheless, may be tough. Below I share my views on TreeSize, how to set it up, and the way to start out using it so it can save you your self a while, in addition to disk area.
: How to Find Large Files on Windows 11
What is TreeSize
TreeSize is a disk administration device by JAM Software constructed just for Windows. It is free to make use of although there’s a paid model as effectively for private {and professional} use. They can be found for comparability on JAM Software’s web site in the event you’d prefer to know the distinction between them.
Briefly, the paid model has extra options reminiscent of a reproduction file finder, more export choices, in addition to command line choices (skilled solely). But for all intents and functions, the free model has every thing I would like, and that’s what I’ll relate under.
TreeSize Free Features
TreeSize isn’t the one disk area administration device on the market which is why it’s essential that its options and choices align with my (and your) wants. Fortunately, one look on the fundamental options listed on the web site is sweet sufficient to have me attain for the obtain button.
Quickly discover out which recordsdata are hogging area, monitor free area and file data, scan and export outcomes, and get a File Explorer-like tree view of no matter you’ve received in your system – I couldn’t ask for something more.
On high of that, TreeSize additionally permits for smartphone and cell device scanning through MTP which is one thing else to look out for.
How to arrange TreeSize Free in your PC
TreeSize is accessible to obtain freely. Follow the hyperlink to get it in your system:
> TreeSize Free: Download Link
Once you’re on the web site, click on on the Free Download button on the high proper nook.

On the subsequent display, you’ll be able to choose whether or not you need the installer or the moveable zipped file. Then click on on Download.

TreeSize will ask you if you wish to attempt the Pro model as a substitute. But after 30 days of trial, you’re going to have to change anyway. So simply click on on Continue with TreeSize Free on the backside.

Once downloaded, double-click on the setup to start out the set up.

Click OK.

Accept the settlement and click on Next.

Click Next to proceed putting in on the default location.

Click Next once more.

That’s it! Click on Finish to complete.

Now open TreeSize Free (as Administrator).

: How to delete non permanent recordsdata in Windows 11
How to make use of TreeSize Free
I’ll rapidly run down the steps to put in and arrange TreeSize Free on Windows so we are able to take a deeper look into the options and the way to make use of them to handle area on a pc.
1. Select your listing for file scanning
Once you’ve TreeSize in entrance of you, the very first thing to do is choose a listing and begin scanning for file information. Click on Select Directory on the high left.

Then choose the drive or the folder to scan. It’s best in my view to scan the C: drive first as a result of that’s the place a lot of the essential recordsdata usually are. But you’ll be able to go forward with any folder you want. TreeSize will robotically begin scanning the chosen drive.

Once the scan is completed, you’ll discover the folders and recordsdata in a tree-like view, much like File Explorer which makes it fairly intuitive to make use of.

To take a look at the subfolder and recordsdata inside a given folder, simply click on on the small arrow earlier than it to develop it.

2. View used area by measurement, allotted area, p.c, and file depend
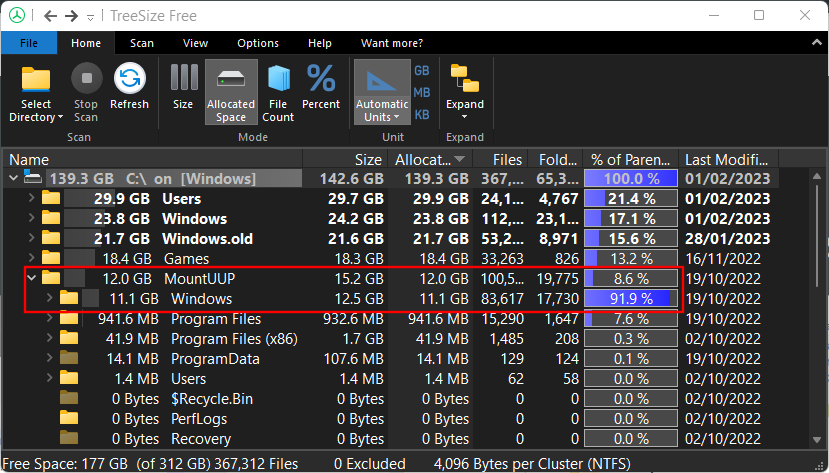
To the left of each folder, you will notice how a lot area that folder is taking over. But the odds given to the suitable is usually a bit complicated at first.

At first look, I requested myself: Why does TreeSize present 100% on the ‘C’ drive? After all, I had greater than half of the disk free. But once I expanded a folder, the logic grew to become clear.
These percentages present how a lot a given folder is taking over the general used area of its mum or dad folder/disk, not the entire disk. And since I had chosen ‘C’ to scan, that will be its personal mum or dad folder and would have one hundred percent of its personal recordsdata, naturally.
So when a distinct folder is expanded, you will notice, as a proportion, the share of area the subfolders inside it are using up. In my instance, the ‘Windows’ subfolder is using 91.9% of the entire area of its mum or dad folder ‘MountUUP’ which in flip is using up 8.6% of the entire used area of C (see image under).
Besides viewing the allotted area and its percentages relative to the mum or dad folder, there’s additionally a “File Count” viewer.

This offers a precise depend of the variety of recordsdata there are in every folder (and subfolder) and, on the suitable, the share of recordsdata in that folder out of the entire recordsdata in its mum or dad folder.

Similarly, there are “Size” and “Percent” view choices as effectively. As far as I can inform, these will primarily change what you see next to the folders.

The “% of Parent (Size)” and “file count” view choices are major. However, you’ll want to mess around with all 4 choices relying on the way you wish to view your recordsdata and folders.
3. Delete a file to unencumber area
Say you wish to delete just a few recordsdata in TreeSize. After all, what good is all this visible illustration in the event you can’t delete recordsdata, proper? No good in any respect. And deleting is a cinch with TreeSize. Simply right-click on a file or folder, as you’ll in File Explorer, and choose Delete.

That’s just about it. No affirmation prompts or pop-ups. And it’s good that it’s that easy.
Apart from the fundamentals that I’ve talked about, you’ll do good to mess around with the opposite choices accessible in TreeSize. Go via the totally different tabs and experiment with the totally different viewing and sorting types, take a look at the person interface choices (darkish, gentle, and contact optimization), the scale items (view in TBs, GBs, MBs, or KBs), and the search operate.
All these choices assist simplify the duty additional so do ensure to examine them out and see what all you’ll be able to work with.
4. Delete recordsdata completely when you should
Normal ‘Delete’ will ship the recordsdata to recycle bin. If you wish to delete a file completely, then you should use the shift+Delete mixture. For this, merely choose the file in TreeSize by clicking on it, after which press shift+delete.
On the immediate, choose Yes.

This is especially useful in case you are certain that you just gained’t want the recordsdata. When a file could be very large in measurement, TreeSize will robotically ask you to substantiate the everlasting deletion.
5. Using the Treemap chart
Perhaps probably the most helpful of all options that I’ve discovered is the Treemap Chart. This possibility is accessible within the toolbar underneath the “View” tab.

The Treemap Chart will show your recordsdata and folders based mostly on their respective sizes and the way deep they’re inside the mum or dad folder.

You may also have the Treemap Chart seem on the backside by clicking “Show at bottom” underneath the “Chart Options” tab, which is how I desire it.

Now earlier than I’m going on, let’s make clear the format of this Treemap Chart. The space of a given folder field is proportional to its measurement. The bigger the scale, the larger its field will probably be. In my case, the “Games” folder is barely smaller than the “Windows” folder as a result of it makes use of up lesser disk area.

As I’ve already mentioned, the degrees point out how deep a subfolder/file is inside the mum or dad folder, indicated by totally different shades of blue. For instance, the “Virtual Machine” subfolder is round degree 5 (gentle blue), whereas the first folder ‘C’ is degree 0 (darkest blue).

Of course, all that is in relation to the scanned folder. The fundamental folder will at all times be at degree 0 whereas every thing inside it would have totally different shades of blue relying on what number of subfolders deep it’s.
But that’s not all! The Treemap Chart can be seen in 3D, the choice for which is given underneath the “Chart Options” tab.

I discover this a fair higher technique to view the recordsdata and subfolders inside the principle scanned folder. The degree colours will change, which is sweet for straightforward viewing. But inside every folder, you’ll additionally see ‘bubbles’ of recordsdata and folders.
No matter how small or large they’re, or what number of there are, you’ll be able to actually get entry to each file right here simply by hovering over them or right-clicking on them.

The ‘Windows Explorer’ possibility will work because the context menu.

6. Export Scan outcomes
All the details about storage allocation is kind of helpful, and never least to determine which file/folder is hoarding how a lot area, and the place. But what I discovered notably helpful was that I can share this data with others with a fast export.
Sure, generally I don’t fairly perceive all of the technical issues about disk administration. But I’ve received mates who do and it’ll be simpler for them to recommend what I can do as soon as they’ve details about my disk utilization.
Exporting the scan outcomes is simple. Click on the “File” tab within the high left nook, choose Export, and select the “PDF File” possibility (exporting as Excel is reserved for paid skilled customers).

Find a spot to avoid wasting your pdf and click on on Save.

FAQs
There are just a few continuously requested questions that I’d prefer to shed some gentle on.
What does TreeSize do?
TreeSize is a disk administration device by JAM Software. It offers a tree-like view of the recordsdata and folders in your system by arranging them in simply viewable layouts based mostly on allotted area, measurement, file depend, and many others.
How do you run a TreeSize?
To view your recordsdata and folders in a tree-like trend, choose a folder to scan and look ahead to the outcomes to be displayed. Refer to the information above to know more.
How do I export TreeSize to excel totally free?
Exporting TreeSize scan outcomes for excel is reserved for the paid model of this system. You can, nonetheless, use the trial model (free for 30 days) and export your scan outcomes as an excel file. To achieve this, merely click on on the “File” tab, choose “Export”, after which choose “Excel”.
TreeSize is likely one of the higher disk administration instruments that I’ve come throughout and it’s straightforward to see why it’s gained in recognition. The depth at which it analyzes the recordsdata, how they’re saved, and the totally different presentation choices make it a program price having. I hope you discovered this device as helpful as I did and are capable of higher perceive how space for storing is allotted to your recordsdata and folders in your PC. Until next time, keep protected!
Check out more article on – How-To tutorial and latest highlights on – Technical News