
How to Repair Windows 11 [15 Ways].
Operating programs are the lifeline of any PC as, with out them, it might change into not possible to ship emails, watch cat movies, or chat with our pals. But each on occasion, each working system comes throughout issues like sluggish bootups, app crashes, glitchy show, wonky sound, and whatnot.
If you are feeling that your copy of Windows 11 has additionally been behaving oddly these days, we expect it’s time to take issues into your personal arms and restore Windows 11.
Now earlier than you rush to the closest PC restore tech, let’s check out the various strategies obtainable at your disposal that may enable you restore a corrupted set up of Windows 11.
Method #1: Use a Windows Troubleshooter
Windows troubleshooters have come a great distance and so they can now repair most of your points with a easy click on. Most troubleshooting instructions and checks that have been usually carried out by way of CMD and PowerShell are actually bundled inside Troubleshooters which makes them rather more usable when encountering points. If you might be nonetheless unable to repair and restore your Windows 11 set up, then the troubleshooter is perhaps value a shot. Use the information under to get you began.
Press Windows + i in your keyboard to open the Settings app. Ensure ‘System’ is chosen in your left after which click on on ‘Troubleshoot’ in your proper.

Click on ‘Other Troubleshooters’.

Now discover the involved troubleshooter on your present problem relying on the problem you might be having together with your set up. Click on ‘Run’ beside the troubleshooter.

The troubleshooter will now do its factor and repair any points it finds with the involved element or characteristic.

Method #2: Uninstall and re-install all latest Windows updates
If you might be going through random crashes, sluggish efficiency, jitters, or bugs out of the blue after a latest Windows update then you may strive uninstalling latest updates to unravel your problem. These updates ought to be reverted with a system restore using the information on the high however in case you don’t have a restore level then you should use the information under to manually uninstall Windows Updates out of your Windows 11 system.
Press Windows + i in your keyboard to open the Settings app. Now click on on Windows Update in your left.

Click on ‘Update History’.

Scroll to the underside and click on on ‘Uninstall Updates’.

You will now be taken to the management panel the place you’ll get an inventory of all of the latest main updates put in in your system. You received’t get safety updates listed on this checklist as they can’t be uninstalled for safety causes. Click and choose the update you want to uninstall.

Now click on on ‘Uninstall’ on the high.

Note: If you don’t get the Uninstall choice then it’s probably as a result of you are attempting to uninstall an important Windows element that might break the performance of your present set up.
Click on ‘Yes’ to verify your alternative.

The chosen update will now be uninstalled out of your system. We suggest you restart your system and verify if the problem that you just have been going through has been fastened. If not, proceed uninstalling Windows Updates till you discover the perpetrator.
Method #3: Restoring to an older System Restore Point
Note: This technique assumes that you’ve got a useful copy of Windows 11 that you would be able to boot into.
You can consider System Restore Points as pathways to revive your system to an earlier state of Windows (when the Restore Point was created) together with the apps and settings that your PC had back then.
Windows 11 robotically creates system restore factors at common intervals. If you wish to, you may also create restore factors.
They’re additionally created when a brand new software or a Windows update is put in.
Here’s how one can attempt to restore Windows 11 using restore factors.
Open the ‘Start’ menu and kind in “Create a restore point”. Then click on on the choice proven under.

A popup menu ought to now be open with the title ‘System Properties’ and you need to be capable to see System Restore choices as proven under.

If your popup menu appears an identical to ours with ‘Protection’ turned off for all of your drives, we’ve dangerous information for you. Due to the shortage of earlier system restore factors, there’s no level in continuing additional with this technique as there isn’t any restore level to roll back to.
At this level, we suggest making an attempt out the following technique.
Tip: If you’re studying this simply to see how issues work, we propose you activate safety on your system drive (highlighted under), the one which incorporates Windows 11, and create a restore level proper now.

Here’s how you are able to do it.
Select the drive labeled ‘System’ and click on on ‘Configure’.

Then click on on ‘Turn on System Protection’ button, and allocate some house for system restore factors by transferring the slider under. We have allotted a mere 4% of our system drive, which is near 4.5GB.
Should the restore factors improve in quantity or dimension, older ones can be robotically deleted to make room for brand new ones.
Click on ‘Apply’ after which ‘OK’.

The drive you chose earlier ought to now have ‘Protection’ turned on, and you need to now be capable to create system restore factors.

While you’re on the identical popup menu, click on on the ‘Create’ button to create your PC’s first ever System Restore Point.

There ought to now be a popup asking on your restore level’s title, be at liberty to kind in something you need. For your comfort, your PC’s present system time and information are robotically added to make this restore level distinguishable from others. For now, we’re typing “Fresh Install” as we just lately re-installed Windows 11.
Once performed, click on on ‘Create’.

After a short time, your restore level ought to be prepared. You ought to now be capable to verify it by clicking the ‘System Restore’ button.

Click on Next.

And your newly created system restore level ought to be right here.

Selecting the restore level and clicking the (then enabled) ‘Next’ button ought to take you thru restoring your PC to the second the restore level was created.
Method #4: Using SFC command immediate instrument
System File Checker (SFC) and Deployment Image Servicing and Management (DISM) are two command-line instruments which might be more generally utilized by the IT techs in companies to service Windows machines.
If that is the primary time you’ve heard about these instruments, then there’s nothing to fret about, as these are typically thought of energy instruments and never lots of people learn about them.
Let’s begin with SFC first and see how one can restore Windows 11.
SFC can be utilized to scan and confirm protected information (Windows Files). If it finds {that a} file has been broken and can’t be verified, it makes an attempt to revive a recent copy from the under folder in your PC.
C:WindowsHere’s how one can give this feature a strive.
Click the ‘Start’ button, kind in “command prompt”, and ensure to run the app as Administrator, as highlighted under.

Once in Command Prompt, kind within the following command or just copy and paste it. Then hit ‘Enter’.
sfc /scannowThe above command begins a scan immediately, which roughly takes a couple of minutes for an entire verify.

If the scan finds that every one your information are in fine condition, it’ll be proven as under.

But if there are some broken Windows information in your PC, SFC ought to be capable to repair them with a recent copy.
Method #5: Using DISM command immediate instrument
DISM is one other command-line instrument that’s way more highly effective than SFC. It can work with a number of kinds of Windows 11 images in each .wim and .esd codecs, handle drivers earlier than deploying images to PCs and a lot more.
Let’s check out how you should use DISM to restore Windows 11.
Open Command Prompt as Administrator using the steps we simply talked about for SFC.
Then paste the under command to scan your Windows 11 set up for errors and press Enter.
Dism /Online /Cleanup-Image /ScanWell beingYou ought to see one thing like this.

Once completed, the instrument ought to report its findings. Here’s how our display appears like.

Then run this command to see if any points have been detected and the way repairable your drawback is.
Dism /Online /Cleanup-Image /CheckWell beingAs our PC was working nice, the above command reported zero points. Yours could also be totally different.

If DISM reported points together with your PC, the following command you need to run is talked about under. Paste it and hit ‘Enter’.
DISM /Online /Cleanup-Image /RestoreWell beingThe above command will request legitimate copies of corrupted information from Windows Update. Here’s how the command appears in motion.

And right here’s the way it appears as soon as it’s performed processing.

All you might want to do is reboot your PC.
If you take into account your self somebody who understands command-line instruments and their parameters, and wish to know more about SFC and DISM together with the vary of parameters that can be utilized with them, right here’s the full documentation about SFC, and right here’s the full reference for DISM. Feast on the data!
Tip: If your Windows 11 processes crash typically, restart a number of seconds later and present an alert with a bunch of numbers and alphabets (aka error codes), we extremely suggest placing them in a search engine like Google and understanding what they imply. This technique of troubleshooting is extraordinarily efficient in opposition to particular errors and issues, and might typically show to be a lifesaver.
Method #6: Using Windows 11 Startup Repair
Windows 11 comes geared up with a built-in startup restore instrument that’s designed to detect and restore frequent startup issues chances are you’ll be going through. Let’s check out how you should use Startup Repair to repair Windows 11.
Open the ‘Start’ menu and click on on the ‘Power’ button.

Hold the ‘Shift’ Key and click on on ‘Restart’.

Your PC ought to boot right into a blue display with a bunch of choices. Click on ‘Troubleshoot’.

Click on ‘Advanced Options’.

Click on ‘Startup Repair’.
Soon after, Windows ought to now be scanning and diagnosing your PC for any points that could be stopping it from functioning correctly. Let it work its magic and after a while, your copy of Windows 11 ought to be freed from all the issues.
Tip: If ‘Startup Repair’ fails and also you see the display proven under, there could possibly be two potential causes for this. Either Windows 11 did not establish the problems or there may be merely no problem together with your PC.
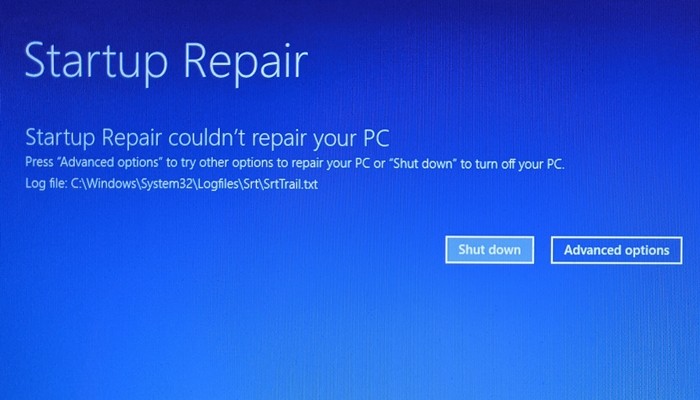
At this level, you could possibly attempt to comply with technique #3’s choice 2 to provoke a restore of Windows 11. You may additionally attempt to reinstall Windows 11 by utilizing the “Upgrade” choice in Windows 11 setup, as an alternative of going for a clear set up and wiping your drive.
This set up technique ought to reinstall Windows 11 whereas conserving all of your information, apps, and settings.
Method #7: Using Windows 11 installer ISO file
Did you realize that the information you used to put in Windows 11, may be used to restore a broken copy of Windows 11?
Not lots of people know this however it could actually simply be performed and doesn’t take too lengthy in any respect.
To make this technique work, you want entry to Windows 11 set up information (ISO) or the installer USB drive you will have used earlier to put in Windows 11.
Option 1: Using the setup file from the Windows 11 ISO
See if in case you have the Windows 11 ISO saved someplace in your PC. If you do, good! No have to obtain something.
In case you don’t have the Windows 11 ISO round, we propose you comply with this information to obtain the newest obtainable ISO.
Before continuing, ensure you can boot into Windows 11 and entry the ISO. If you may, let’s transfer to the following step.
Locate the Windows 11 ISO and double-click it.

The ISO ought to now be mounted on a digital disk drive in your Windows 11 PC and will look much like this

Double-click the digital drive. Once inside, there ought to be a file named ‘setup’, double-click it.

Tip: Alternatively, you may also extract the ISO someplace in your laptop, which in fact would take a little bit of time however ought to provide the similar outcome.
Wait for the Windows 11 setup to begin. Once performed, you need to see a display much like under. Click on ‘Next’.

Accept the Terms & Conditions.

Choose the choice that most closely fits you right here and click on ‘Next’. We wish to keep our information, therefore we’ve chosen ‘Keep personal files and apps’.

Click on ‘Install’ to begin the set up.

After a number of seconds, setup ought to begin making ready your PC for an in-place improve, which is able to restore and refresh all of the information wanted to run Windows 11 in your PC.

Your PC might reboot a number of occasions to finish the restore.
Once setup has completed, your copy of Windows 11 ought to be utterly repaired and able to use.
Option 2: Using a bootable USB drive
If for some motive, your PC fails besides into Windows 11 or just reboots repeatedly resulting from a corrupt Windows file, then this feature will probably be good for you.
Before we begin, see for those who nonetheless have the Windows 11 USB set up stick you will have used to put in Windows 11 in your PC. If you do, then there’s nothing to fret about.
In case you don’t, right here’s how one can create a Windows 11 USB installer inside a few minutes. Do take into account that it requires one other useful PC with web to obtain Rufus and Windows 11 ISO. Simply join the USB drive to your PC and restart your system. Press any key in your keyboard when prompted besides from the recovery media and subsequently proceed to restore Windows with the on-screen directions. You could have the choice to reinstall Windows, repair lacking information, repair boot order and even use CMD to carry out your personal checks. If you want any assist, then you may this information to reset Windows from inside your recovery media setup and more.
Check this information: How To Install Windows 11 From USB
Method #8: Repair or Fix Drivers
Many occasions you may face points together with your Windows set up resulting from incompatible, outdated, or conflicting drivers put in in your system. Drivers are important packages that enable your elements to speak together with your CPU and GPU for the right functioning of your system. Having incompatible or conflicting drivers could cause points with Windows and even take a major influence in your efficiency. If a few of your elements appear to be misbehaving otherwise you really feel that your system is drastically slower than anticipated then it might be a good suggestion to verify your drivers and carry out any repairs if wanted.
1. Check for conflicting or outdated drivers
Let’s verify for conflicting or outdated drivers in your system. Windows robotically reveals you a warning signal for misbehaving elements or outdated drivers in Device Manager. Use the information under to search for driver points in your set up of Windows 11.
Press Windows + X in your keyboard and click on on Device Manager.

Look for elements within the checklist with a warning aspect beside them. If any are discovered, use the strategies under to troubleshoot driver points in your system. However, if none are discovered then let’s verify for brand new elements in your system to establish misbehaving elements.
Click on the ‘Scan for hardware changes’ button on the high of your display.

Windows will now scan for {hardware} modifications and set up any new elements or drivers discovered in your PC.

2. Fix driver points
If you want to repair driver points in your system then you have to to reinstall drivers for the involved element in your system. This will be performed via Windows and manually as nicely. We suggest manually pressure eradicating drivers solely if you’re unable to take away the driving force via Device Manager in Windows. Force eradicating the improper drivers could cause critical points in your system and even pressure you to reinstall Windows altogether. Hence, make sure that you establish and correctly pressure take away drivers out of your system just for the malfunctioning element. Use one of many guides under relying in your present wants and necessities.
Note: If you might be using a laptop computer or a pre-built system then we suggest you obtain particular drivers for the involved element out of your OEM help aspect beforehand. This will let you set up the required drivers simply after you have eliminated the malfunctioning driver.
Read: 6 Ways to Update Drivers on Windows 11
Option 1: Remove and reinstall a element via Device Manager
Press Windows + X in your keyboard and click on on ‘Device Manager’.
Right-click on the element for which you want to take away the driving force and choose Properties.

Now click on and change to the Driver tab on the high.

Click on ‘Uninstall device’.

Check the field for ‘Attempt to remove the driver for this device’.

Finally, click on on ‘Uninstall’.

The device driver will now be eliminated and the device will probably be uninstalled out of your system. You will now be prompted to restart your device. Restart your device as quickly as potential after which reinstall the involved drivers out of your OEM’s help website. If you wouldn’t have the involved drivers in your OEM website, then merely scan for {hardware} modifications using the information above and the required drivers will probably be robotically put in in your system.
Option 2: Manually pressure take away a driver and reinstall it
You also can manually pressure take away a driver using a third-party utility. This shouldn’t be advisable as if Windows shouldn’t be permitting you to take away a driver then it’s most likely an integral part that might trigger points in your system. We suggest you correctly establish the involved drivers earlier than eradicating them out of your system. Additionally, you need to keep the newest alternative drivers useful in an effort to reinstall them as quickly as potential. Use the information under to manually pressure delete involved drivers out of your system.
We will probably be using Driver Store Explorer to manually pressure take away the involved drivers out of your system. Driver Store Explorer is an open-source utility used to establish and take away all of the drivers put in in your system. It is hosted on GitHub and will be compiled natively too in case privacy is a priority.
Download Driver Store Explorer to your native storage using the hyperlink above. Extract the archive to a handy location after which launch the app using Rapr.exe.

The app will now launch and scan all of the drivers put in in your system. Once the checklist reveals up, you may kind it based mostly on the assorted columns obtainable to you. We suggest you kind your drivers by ‘Provider’ as this can make it simpler so that you can search the involved driver based mostly on the producer. Click on Provider on the high to rearrange all of the drivers ascendingly based mostly on their supplier’s title.

Scroll the checklist and establish the involved driver. Once discovered verify the field beside it.

You can now additionally click on on ‘Select oid drivers’ in your proper to robotically establish and choose different outdated drivers put in in your system. However, we wouldn’t suggest this on pre-built programs and laptops that may generally get defective driver updates sooner or later because the device will get older which degrade total efficiency in return.

Check the field for ‘Force Deletion’ in your proper.

Finally, click on on ‘Delete Driver(s)’. This will pressure delete all the chosen drivers out of your system. We extremely suggest you restart your system after this and set up the brand new up to date drivers you downloaded as quickly as potential.

If defective drivers have been the reason for your points with Windows 11, then a handbook reinstall ought to assist repair this normally.
Method #9: Resetting your PC
Like Windows 10, Windows 11 additionally comes with a nifty characteristic referred to as ‘Reset this PC’. This could be a lifesaver if you might want to clear your PC and begin over with Windows 11. Once initiated, the method will roll back Windows 11 to its manufacturing facility settings.
Here’s how one can proceed with it.
Open the ‘Start’ menu and kind in “reset this pc”. You ought to get a outcome much like what’s proven under. Click on ‘Reset this PC’.

You ought to now be in your PC’s Recovery part throughout the Settings app. To proceed with the reset, merely click on on the ‘Reset PC’ button.

The next display ought to ask you for those who’d prefer to keep your information or take away them completely. Pick the suitable choice to begin resetting your Windows 11.

Your choice ought to be adopted by a reboot or two and in a couple of minutes, your PC ought to boot right into a refreshed Windows 11.
Method #10: Fix boot points with Windows 11
If you might be having boot points with Windows 11 then we are able to use bootrec.exe instrument to repair most boot points. Use the information under to run bootrec.exe in your system. You might want to boot into Windows Recovery after which use CMD to execute these instructions although. Use one of many strategies above besides into recovery mode in Windows by way of Settings or a recovery media after which use the information under to execute bootrec instructions and repair boot points with Windows 11.
When on the recovery display press Shift + F10 to deliver up the CMD at any level throughout the recovery course of.
Type within the following command to run bootrec.exe and press Enter in your keyboard to execute it.
bootrec.exe
Enter the next command first and press Enter in your keyboard to execute it.
Bootrec /fixmbr
Now enter the one under and execute it.
Bootrec /fixboot
Finally, enter the command under to rebuild your boot device order.
Bootrec /rebuildbcd
And that’s it! We suggest you restart your system for good measure or exit the recovery display and check out booting into Windows once more. If you have been going through boot points, then this can have most certainly fastened the problem for you.
If you’ve gotten been going through begin menu points inside Windows 11 then there are various fixes that you would be able to strive. The new begin menu appears to be a hit and miss with customers and lots of have tried to customise it in their very own manner. This has been recognized to interrupt begin menu performance with latest updates and if you’re going through points after a latest update then that is probably the trigger for you as nicely.
You can use this complete information by us to repair all types of Start menu points in your Windows 11 system. You will even discover methods to revive the older begin menu and new methods to get the beginning menu back up and working in your system very quickly.
: How to Fix ‘Windows 11 Start Menu Not Working’ Issue? [17 Ways]
Method #12: Fix random app crashes
Random app crashes have been a recognized problem since Windows 11 was first introduced and the primary insider construct hit the cabinets. This is especially resulting from some core modifications to Windows that now break performance for beforehand appropriate packages with Windows 10. This is perhaps heartbreaking for a lot of customers which might be unable to get their favourite packages and apps back up and working inside Windows 11. There are a few issues you are able to do to repair this problem and essentially the most outstanding ones have been lined by us on this complete information. If you might be going through random app crashes then this can most certainly enable you resolve nearly all of crashes in your system.
Read: How To Fix Software Crashing on Windows 11 Dev Build
Method #13: Fix corrupt registry
Registry modifications, incorrect values, and deleted or lacking registry entries also can trigger quite a lot of points together with your system. Chances are that for those who modified your registry with a registry hack or used a third-party instrument to scrub your registry then the values have been tousled throughout this course of.
Due to the core modifications in Windows 11, the registry values, places, and entries are totally different from those on Windows 10. Additionally, those that have been okay to be deleted earlier is perhaps important to the functioning of Windows within the latest model.
Hence using a appropriate cleaner or restore instrument for the registry can take away important values that might trigger points together with your system. You can use the information under to try to repair the registry in your Windows 11 set up. But because the OS is pretty new, this won’t give you the results you want and in case it doesn’t you’ll have to reset your Windows to revive your registry values to their default entries.
By this level, the registry ought to have been fastened in your system as you should have already run SFC and DISM scans in your system (as given above). However in case your registry nonetheless appears to be corrupted, then you should use a third-party app to repair it.
We suggest you employ CCleaner’s free utility which will be downloaded using the hyperlink above. Once downloaded, run the .exe file and set up CCleaner in your system. Then launch the app and comply with the on-screen directions to repair your registry.
We suggest you don’t clear your registry or momentary information using CCleaner till it has been formally up to date to help Windows 11. As for fixing the registry, the app didn’t produce any points on our finish regardless of a number of tries so try to be protected to repair your registry using CCleaner.
Method #14: Fix lack of space for storing
If you appear to be lacking space for storing to random information in your system and are unable to establish giant information in your system then it’s probably that momentary information have began to take a toll in your native storage. Windows 11 is designed to clear most momentary information by default however this could choice can generally bug out which might trigger a lot of momentary information to build up in your system.
You can use our information to delete the momentary information out of your system. Once deleted, you need to be capable to acquire back some vital space for storing particularly after clearing earlier Windows set up information and downloaded Windows Updates.
Method #15: Boot into protected mode to establish third celebration culprits
Lastly, it may be that your problem is being attributable to a third-party app. As Windows 11 is pretty new and most up-to-date updates to well-liked apps are using compatibility layers to work, it’s probably that you’re going through a bug with a third-party app. Third-party apps can create large conflicts and points within the background relying on what they do and it could actually find yourself being fairly robust to establish the perpetrator.
Thankfully, Windows comes with a protected mode to troubleshoot precisely this drawback. Safe mode helps disable all third-party apps, companies, and duties within the background. You can then confirm the functioning of Windows in protected mode and begin eradicating the suspected culprits one after the other.
Once you discover the perpetrator, you may restore your beforehand eliminated apps and proceed using the OS till a repair is launched by the involved developer.
Unfortunately, it is a tedious course of and there’s no manner round it, but when a third-party app is inflicting points in your system, protected mode can assist you establish and take away the perpetrator simply. You can use this information that can assist you navigate and activate protected mode in Windows 11.
You also can use this trick to instantly restart your system within the superior recovery choices state. Click on the ‘Start’ menu icon in your taskbar.
Now click on on the ‘Power’ icon.

Hold down the ‘Shift’ key in your keyboard after which click on on ‘Restart’.

Your Windows 11 PC will now robotically reboot into the Advanced recovery choices.
Click on ‘Troubleshoot’ to get began. Now, click on Advanced choices > See more recovery choices > Startup Settings > Restart.
You will now get an inventory of all of the methods your pc can begin up with elevated settings or restricted companies. You could have the next choices for Safe modes.
- F4: Enable Safe mode
- F5: Enable Safe mode with networking
- F6: Enable Safe mode with command immediate
Press the specified key in your keyboard and your system will robotically restart within the desired Safe mode.
Well, these are all of the confirmed strategies that you would be able to attempt to restore corrupted Windows 11. Some of those strategies are pretty straightforward to make use of, whereas some could appear superior for a median joe.
If you ever really feel caught at any level whereas following our strategies, drop us a remark and we’d be completely satisfied to kind out the confusion.
:
Check out more article on – How-To tutorial and latest highlights on – Technical News