
How to Remove Microsoft Account From Windows 10.
It’s nearly a on condition that account removing tends to be a tougher course of and typically even quite convoluted relying on the explanations you wish to take away it. In the case of Microsoft and Windows, this course of understandably includes more steps due to how inter-dependent the 2 are on one another.
Of course, this relationship is essential to the graceful functioning and nicely being of a Windows system, however it might probably create minor roadblocks when it is advisable to take away your Microsoft Account from Windows 10 for no matter causes you could have.
Here’s every thing it is advisable to learn about how to go about this course of.
: How to Change User Folder Name in Windows 10
Performing an account removing from the Settings is the simplest and quickest strategy to take away your Microsoft Account from Windows 10. Here’s the way you go about it.
Type Settings within the Start Menu search bar and click on on the Settings choice when it seems to open it. Another strategy to open Settings is to easily press the Windows button on the keyboard, or clicking the Windows button within the backside left of your display screen, after which choosing Settings. You may use Windows + X key combo to entry settings.
Once the Settings menu is open, click on on the Accounts Section.
In the Accounts part, click on the Email & accounts part on the left panel. Now, you will notice your Microsoft ID on the appropriate, click on on it to broaden it.
Click in your Microsoft ID to broaden it. You will see a Remove button, click on on it.
You have now efficiently eliminated your Microsoft Account from Windows 10.
: How to Stop Discord From Opening on Startup on Windows 10
What to do when you may’t see the Remove button
There are two situations while you will be unable to see the Remove button, as an alternative, all you’ll find yourself seeing is the Manage choice. One of those situations pertains to the dearth of a neighborhood account. If you don’t present another within the type of a neighborhood account, then eradicating your Microsoft Account is inconceivable. There are two options that you could be must observe when this occurs relying on what notification you’re seeing.
Solution #1
In Solution #1, you’ll discover ways to create a Local Account which is able to then allow you to take away your Microsoft Account
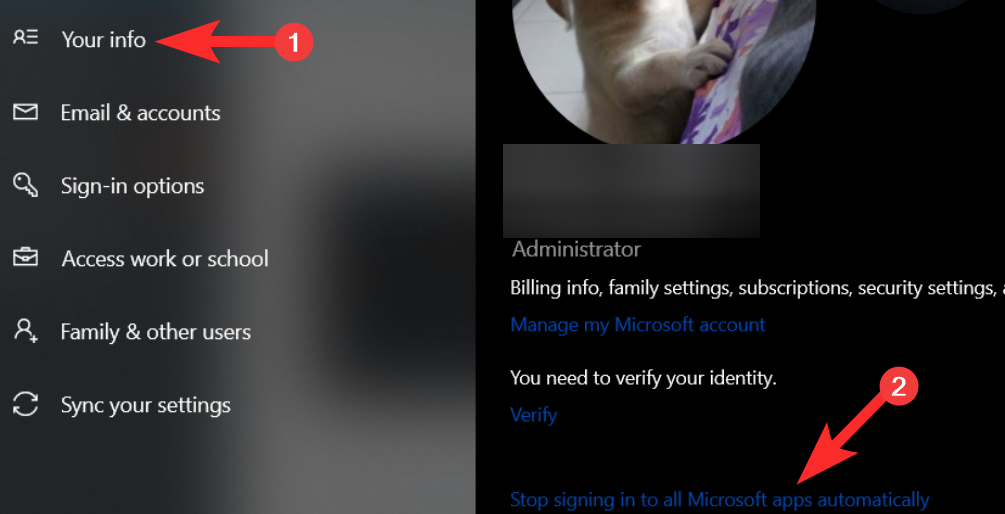
Go to Settings > Accounts as we confirmed you within the earlier part. From the Left menu panel, go to the Your Info part. On the appropriate, click on on the Sign in with a neighborhood account choice.
Note: If as an alternative of seeing the Sign in with a neighborhood account choice you see Stop signing in to all Microsoft Apps robotically, confer with Solution #2.

Windows will start the method of Sign In. On a brand new dialog field, it should ask you to proceed along with your present account verification. Click on Next on this field.

Now, confirm your account by typing within the password/pin.

You will now be prompted to sort within the particulars for a neighborhood account. Here, present a substitute Google or Outlook Account info and password.

After including the knowledge, click on on Next.

After clicking Next, your PC/Laptop will robotically Sign Out of the Microsoft account and restart your entire system. Once your system is back on once more, observe the steps from the earlier part. Now, you will notice the Remove button seem next to Manage. Click on it and also you’re executed.

Solution #2
If as an alternative of the Sign in to a neighborhood account choice, you will see your self with the Stop signing in to all Microsoft Apps robotically choice as an alternative. Click on it.
Your account Settings will now change robotically. Once that is executed, ideally, you must have the ability to see the Remove button after following the steps that we’ve got elaborated within the earlier part. However, if the Remove button continues to be lacking, then observe the steps in Solution #1 to create a neighborhood account. After implementing this answer, it is possible for you to to see the Remove button as nicely. Go forward and click on on it.
How to take away a Microsoft Account from the Control Panel
If for any purpose, you’re unable to entry your Settings or are unable to take away the Microsoft account using the Settings in your system, you may take away the account from the Control Panel. Here’s what it is advisable to do.
Search for Control Panel and open it from the Start Menu.

In the Control Panel, click on on User Accounts and open it.

In User Accounts, you will notice the Remove person accounts choice proper underneath the heading, click on on the choice.

Now, choose the Microsoft Account that you simply wish to take away from Windows.

Click on Delete the account.

Your Microsoft Account will now be faraway from Windows 10.
: How to Remove Quick Access on Windows 10
How to create a neighborhood account using the netplwiz command
Certain customers won’t have the ability to create a Local Account using the #Solution 1 or we offered earlier as a result of technical difficulties or points to Settings and even due to a problematic Microsoft Account. This poses a giant drawback as a result of Microsoft Accounts can’t be eliminated until another native account choice has been made obtainable. Here’s an alternate answer to creating a neighborhood account.
Simultaneously click on the Win button + R keys collectively to open the Run menu. Copy netplwiz and paste it into the command field. Then press Enter or click on on OK.

From the User Accounts menu, click on on the Add button.

Next, add the e-mail tackle of your non-Microsoft account after which click on Next.

Click on Finish and your account might be added as a neighborhood account.

Perform a Factory Reset
A Factory Reset will not be beneficial, nonetheless, if not one of the strategies above are working, then take into account a Factory Reset your final resort. Performing a Factory Reset is not going to simply take away your Microsoft Account but additionally all different information, info, and customised settings in your system. It is advisable that you simply backup something you want in an exterior exhausting drive earlier than proceed with performing a Factory Reset.
From the Settings menu, click on on the Update & Security choice.

From the left panel, click on on the Recovery menu.

Click on the Get began button that you will notice underneath the Reset this PC part.

Select from the 2 choices on the way you wish to protect your information.

Choose the way you wish to reinstall Windows.

Finally, click on on the Reset button.

Your system will now undergo a Factory Reset.
We hope you discovered this text useful. Take care and keep secure!
Check out more article on – How-To tutorial and latest highlights on – Technical News