
How to Fix ‘Windows 11 Start Menu Not Working’ Issue?.
For years, Windows has been touting its host of recent options and enhancements claiming they’re only a click on of the Start menu away. But what if the Start menu stops opening for you? Well, it might occur that the Start menu on Windows 11 all of the sudden stopped working for you, thereby making doing common duties a bit taxing.
If the Start Menu just isn’t opening for you on Windows 11, then there are as many fixes as we may consider that can assist you remedy the issue.
: How to Uninstall Apps on Windows 11
NOTE: If the 17(!) common fixes given under fail for you, then do attempt Fix #18 given under beneath the ‘Last Resorts’ part which talks about creating a brand new person by way of command line. This helps you create a brand new person using CMD, thus without having to entry the Settings app or the Start menu, which might not be working for you. That stated, the Fix #1 in regards to the problem brought on by ‘Windows Update KB5004300’ is a brand new addittion, so perhaps test this primary.
We have included a complete 20 (!) fixes to unravel the issue with Start Menu on Windows 11 under. 3 of them are common fixes that ought to to be tried solely after you’re certain that the 17 main fixes should not of assist.
17 Primary Fixes
Try these fixes first earlier than making an attempt the three common fixes (additionally given under).
Fix #1: Uninstall and reinstall Windows Update KB5004300
A current repair found by eagle-eyed customers appears to simply repair the beginning menu on new Windows 11 upgrades. The Windows Update launched beneath the identify KB5004300 appears to be inflicting this problem. Uninstalling and reinstalling the identical in your PC will repair the Start menu and Taskbar for you. Follow the information under to get you began.
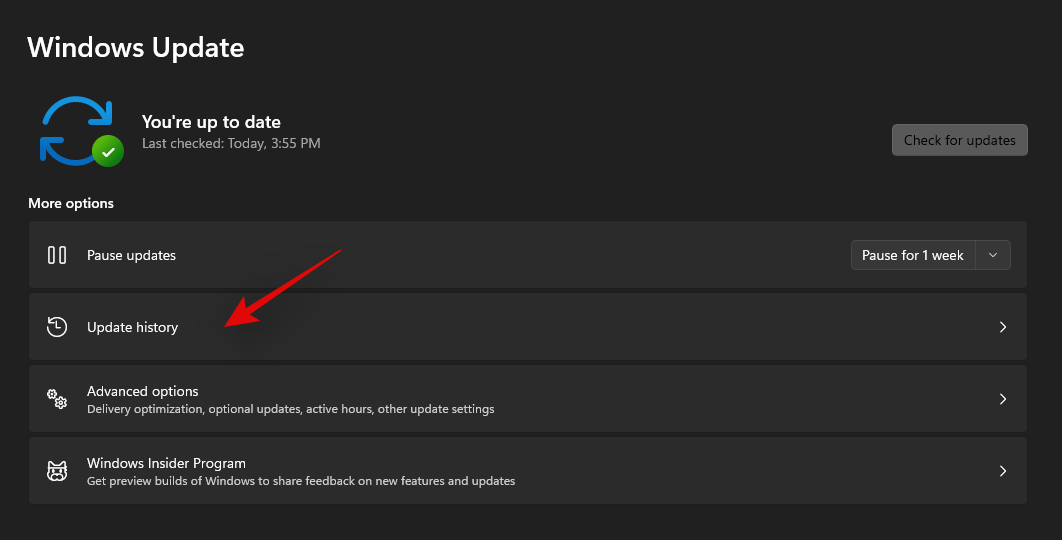
Press Windows + i in your keyboard to open the Settings app. Click on ‘Windows Update’ in your left.

Now click on on ‘Update History’.
Click on ‘Uninstall Updates’.

You will now be redirected to the Control Center. Find the involved KB5004300 update within the record and click on and choose it.

Now click on on ‘Uninstall’ on the high.

Follow the on-screen directions to take away the update out of your PC. Once up to date, restart your PC for good measure.
Now press Windows + i once more as soon as your PC restarts and choose Windows Update once more.
Check for updates and you must now have the choice to put in Windows Update KB 5004300 in your PC once more.

Download and set up the update and Taskbar & Start menu performance ought to now be restored inside Windows 11.
Fix #2: Force restart Iris Service
A current update to the insider builds from Microsoft has triggered main points with the taskbar and Start menu for a lot of customers. If you too are subscribed to the Insider channel and have been going through points upon updating to construct quantity 22449 or increased then you should utilize the repair talked about under.
This methodology will delete the registry worth for the Iris Service which ought to pressure reinstall it upon a restart. A reinstall appears to assist repair this problem for many customers. Even in case you are not on the identical builds, this repair is value a shot. Follow the information under to get you began.
Note: This command will instantly restart your PC. If you may have any ongoing work within the background, be certain that you reserve it earlier than continuing with this information.
Press Windows + S in your keyboard and seek for CMD. Click on ‘Run as administrator’ or press Ctrl + Shift + Enter in your keyboard.

Enter the next command and press Enter in your keyboard.
reg delete HKCUSOFTWAREMicrosoftWindowsCurrentVersionIrisService /f && shutdown -r -t 0

Your PC will now reboot. Login to your PC as ordinary and the Start menu performance ought to now be restored in your system.
Fix #3: Restart your PC
This is by far probably the most easy methodology that involves thoughts whereas making an attempt to repair most issues on a Windows 11 PC. Normally, while you do a system restart, you basically pressure all of the processes, Windows together with, to restart all their companies and processes. This additionally restarts the Start menu’s course of that shall assist repair the problem with it.
If it isn’t apparent, listed here are the steps to restart your PC.
Make certain that each one your apps and recordsdata are closed. Or, merely go to the Desktop display by urgent Windows key + D collectively. Now, press the Alt + F4 keys collectively in your keyboard to get the “Shut Down Windows” display.

Click on the dropdown, choose ‘Restart’, and press the ‘OK’ button.

Once your PC restarts, you must have the ability to use the Start menu back once more. If you continue to can’t, attempt the following methodology.
Fix #4: Restart Windows Explorer using Task Manager
The next simple repair for a frozen Start menu makes use of Task Manager. The Task Manager will be the proper instrument to handle any operating course of on a Windows PC.
If you may have a Start menu that doesn’t need to reply to your clicks, observe the steps talked about under to see if it fixes your drawback.
Press the Ctrl + Shift + Esc keys to set off Task Manager. If your Task Manager appears like this, click on on the ‘More details’ button to get entry to the detailed view.

Once contained in the Task Manager, scroll via the Processes record to seek out the ‘Windows Explorer’ course of. Right-click on the method and click on on the ‘Restart’ choice.

Once clicked, Windows ought to restart the Windows Explorer course of straight away, and that ought to repair your begin menu.
Restarting the Windows Explorer course of is fairly just like restarting your PC. The solely distinction is that right here, you’re solely restarting a single course of, whereas, with a restart, you restart all of the processes. Plus, lots of people prior to now have had success fixing their Start menu with this methodology, which makes this value a attempt.
Fix #5: Check for updates to Windows
If you continue to can’t get the Start menu to open, you must give Windows Update a attempt. The drawback could also be more widespread than you assume and Microsoft could have launched a hotfix to patch the unresponsive Start menu.
Here’s how you are able to do that.
Open the Settings app with Win key + i keys collectively. Once opened, click on on the ‘Windows Update’ choice.

Click on the massive ‘Check for updates’ button to start out checking for any out there updates to Windows on your PC. If out there, let Windows set up all of the updates.

When Windows is finished updating your PC, merely give it a restart and check out opening the Start menu. If you continue to can’t open the Start menu, we predict it’s time to go for the more superior fixes.
Fix #6: Run DISM and SFC
DISM (Deployment Image Servicing and Management) and SFC (System File Checker) are two of probably the most potent instruments for figuring out and repairing corrupt Windows installations. These instruments can be utilized with both Command Prompt or Windows EnergyShell. For this information, we’ll be using them with Command Prompt.
Let’s begin with DISM. DISM can be utilized to seize recent copies of corrupted Windows recordsdata.
Press Win key + r to open the Run field, sort in cmd after which press Ctrl + Shift + Enter collectively (as a substitute of urgent enter) to open an elevated Command Prompt.

Once you’re inside Command Prompt, paste the under code and hit enter.
DISM /Online /Cleanup-Image /RestoreHealthDISM will now attempt to restore the corrupted recordsdata (if any) out of your present set up by requesting a recent copy of that file from Windows update. The complete course of will take some ~15-20 minutes. Here’s how the command appears in motion.

Once the command has restored all of the broken recordsdata, you must see one thing like this.

Once you’re carried out with this step, keep the Command Prompt window open to run the following command.
The next step is to confirm the integrity of all of your Windows 11 recordsdata to verify they’re in fine condition. For this, we’ll use the SFC instrument.
Here’s how.
Paste the under code within the Command Prompt window, and hit enter.
sfc /scannowHere’s how the command appears like.

The above command will solely take a few minutes to complete scanning the integrity of your Windows recordsdata. Once carried out, the consequence ought to seem like this.

Tip: Make certain your PC has a secure web connection for this methodology to work.
It’s now time for a reboot.
Still caught with a damaged Start menu, it’s time to attempt the following methodology.
: 6 Ways to Update Drivers on Windows 11
Fix #7: Rebuild Search Index
The Start menu and Windows Search are intently built-in. Issues with search and indexing could have crept into the Start menu and affected it. So, let’s rule out this chance as nicely.
Let’s check out the steps to do it.
Open the Run field by urgent Win key + r. Then paste the under textual content within the Run field and hit enter.
management /identify Microsoft.IndexingOptions
You ought to see a popup titled ‘Indexing Options’ open up. Click on the ‘Modify’ button.

Click on the ‘Show all locations’ button.

On this display, uncheck all of the areas and click on on the ‘OK’ button. Ours had just one location ticked, so we unticked only one location on this record.

Click on the ‘Advanced’ button.

Click on the ‘Rebuild’ button.

Windows will now begin rebuilding the Search Index. Rest assured, your entire course of will now be dealt with by Windows and doesn’t actually require any person enter, though it does take fairly a little bit of time to finish.
When Windows has rebuilt your Search Index, restart your PC. Once you’re inside Windows once more, attempt opening the Start menu. If it nonetheless doesn’t work, we predict it’s time to go for a more resilient methodology.
If you may have put in any third-party applications to change the look or capabilities of your begin menu then we suggest eradicating all such applications. Likely, considered one of these applications just isn’t appropriate with the brand new Windows 11 begin menu which is why you’re going through points along with your system. If you may have one of many following apps talked about under, then we suggest you revert their settings and uninstall them as quickly as doable. Most of those apps had been designed for Windows 10 and are incompatible with the Windows 11 Start menu code to a sure extent. A current Windows 11 update probably broke their compatibility inflicting the beginning menu to glitch out in your system.
Open Shell
Classic Start
WinAero Tasbar
TaskbarX
And more. If eradicating a third-party app that modifies your begin menu helps restore its performance then you’ll be able to watch for a appropriate update to make use of the app once more.
Did you utilize a registry hack to get the older Windows 10 begin menu on Windows 11? If so then it’s probably that this registry hack’s performance broke with a current Windows 11 update. In such instances, you should utilize the information under to revert the adjustments in your system.
Press Windows + R in your keyboard and kind within the following within the Run dialog field.
regedit
Press Enter in your keyboard as soon as you’re carried out to launch the registry editor. You also can click on on ‘Ok’ as a substitute.
Now copy and paste the handle given under within the handle bar on the high of the registry editor and press ‘Enter’ in your keyboard.
ComputerHKEY_CURRENT_USERSoftwareMicrosoftWindowsCurrentVersionExplorerAdvanced
Look for ‘Show_StartClassicMode’ in your proper and right-click on it.
Select ‘Modify’.
Change its worth knowledge to ‘0’ and click on on ‘Ok’. Do not shut the registry editor simply but.
Press Ctrl + Shift + Esc in your keyboard to launch the Task Manager. Now click on and swap to the ‘Details’ tab on the high.
Click and choose Explorrer.exe from the record and press Delete in your keyboard.
Confirm your alternative by clicking on ‘End Process’.
Now click on on ‘File’ within the high left nook and choose ‘Run new task’.
Type in ‘Explorer.exe’ and press Enter in your keyboard. You also can click on on ‘Ok’ as a substitute.
Explorer will now be restarted in your system. Switch back to the registry editor and click on and choose ‘Start_ShowClassicMode’.
Press Delete in your keyboard and ensure your option to delete the registry worth.
Restart your system for good measure now.
If your Start menu wasn’t working resulting from a registry hack to get the older begin menu then it needs to be mounted by now. You can test for a similar by clicking on the Start menu icon in your taskbar.
Windows 11 has come a great distance when in comparison with its predecessors. Background processes, duties, and apps are more streamlined now and varied options and components appear to have their very own devoted packages. These devoted packages make it simpler so that you can troubleshoot issues with sure options of Windows and even reinstall them in worst-case eventualities. If the beginning menu continues to be not working for you then you’ll be able to reinstall fundamental components of Windows 11 which may also reinstall the Start menu module in your system. This ought to assist repair any background conflicts and get the Start menu back up and operating in your system. Follow the information under to get you began.
Press Windows + S in your keyboard and seek for EnergyShell. Click on ‘Run as administrator’ as soon as the app exhibits up in your search outcomes.
Now sort within the following command and press ‘Enter’ in your keyboard. Get-appxpackage -all *shellexperience* -packagetype bundle |% {add-appxpackage -register -disabledevelopmentmode ($_.installlocation + “appxmetadataappxbundlemanifest.xml”)}
Ignore any warnings that you simply get and proceed with the method. Once full, restart your system for good measure.
Now that the Start menu and different fundamental options have been reinstalled in your system, let’s rebuild your system’s index to get every thing back up and operating once more. Press Windows + R in your keyboard to open the Run dialog field.
Type within the following command and press Enter in your keyboard.
management /identify Microsoft.IndexingOptions
Click on ‘Modify’ and choose ‘Show all locations’.
Uncheck all of the containers within the present record.
Click on ‘Ok’.
Click on ‘Advanced’ now.
Select ‘Rebuild’ beneath troubleshooting.
Click on ‘Ok’ as soon as the warning pops up in your display.
Once the method finishes, we extremely suggest you restart your system.
You can now attempt clicking on the Start icon as soon as your system restarts. Reinstalling the Start menu ought to assist repair any points with the Start menu on most techniques.
Fix #11: Install any pending driver and Windows updates
This may be a bit apparent however you must positively set up any pending driver updates or Windows update in your system. This will assist get you up and operating on the most recent drivers and assist your system be appropriate with all of the {hardware} put in in your system. While drivers not often trigger points with Windows options, you’ll be able to by no means be too certain. Hence we suggest you put in the most recent out there drivers in your system. You can use the hyperlink under to go to our detailed information for updating drivers on Windows 11. If you’re using a pre-built system or a laptop computer, then we suggest checking your OEM assist web page for devoted driver updates as nicely.
There is a registry worth that if modified, can disable your Start menu altogether. If you may have been using registry modifiers, cleaners, and more, then it’s probably that this registry worth was modified which ended up disabling the Start menu in your system. Additionally, the Start menu’s performance was moved to a Xaml course of as soon as Windows 10 was launched. This course of is thought to glitch out
Use the information under to test if the beginning menu is disabled in your system and re-enable it if wanted.
Press Windows + R in your keyboard and kind within the following command given under.
regedit
Now press Enter in your keyboard or click on on ‘Ok’.
Copy and paste the next handle within the handle bar on the high of your registry editor.
HKEY_CURRENT_USERSoftwareMicrosoftWindowsCurrentVersionExplorerAdvanced
Now right-click in your proper tab and choose ‘New’.
Select ‘DWORD (32-bit value)’.
Enter the identify as ‘EnableXamlStartMenu’.
Enter the worth as ‘0’.
Restart your PC now.
Once restarted attempt activating the Start menu now. If the Xaml course of was going through conflicts, then they need to be mounted now and the Start menu needs to be back up and operating in your system once more.
Fix #13: Restart Windows background companies
If the Start menu nonetheless fails to launch then it’s time to restart all background Windows companies. Usually restarting the ‘ShellExperienceHost.exe’ is sufficient but when that doesn’t give you the results you want, you’ll be able to attempt restarting all of the companies listed under. This normally will get the Start menu back up and operating on most techniques.
Press Ctrl + Shift + Esc in your keyboard to open the ‘Task Manager’. Now click on on ‘Details’ on the high to change to the Details tab.

Find ‘StartMenuExperienceHost.exe’ within the record and click on and choose it.

Press Delete in your keyboard or click on on ‘End Task’ within the backside proper nook. Click on ‘End Process’ once more to verify your alternative.

ShellExperienceHost.exe will now be killed. The course of ought to robotically restart inside a number of seconds. Once restarted, attempt activating the Start menu in your system. If the menu begins working then you’re good to go. However, whether it is nonetheless not working then use the information above to restart the next companies in your system as nicely.
- SearchIndexer.exe
- SearchHost.exe
- RuntimeBroker.exe
And that’s it! If a background course of was stopping you from accessing the Start menu then the problem needs to be mounted for you by now.
Fix #14: Run a Windows Troubleshooter
During a Windows 1909 function update back in 2019, the Start menu was basically damaged resulting from a background battle. To repair this problem for the plenty, a troubleshooter was launched by Microsoft to assist repair this problem. If the Start menu continues to be not working for you then you’ll be able to attempt operating this troubleshooter in your system. Use the information under to obtain and run the troubleshooter in your system.
Download the archive linked above to a handy location in your native storage and extract its contents.

Now copy and paste the ‘startmenu.diagcab’ file in your desktop.

Double click on and run the file out of your desktop. Click on ‘Advanced’.

Check the field for ‘Apply repairs automatically’. Click on ‘Next’ as soon as you’re carried out.

The troubleshooter will now do its factor and attempt to repair the Start menu in your system. Any errors or points discovered might be robotically mounted and the Start menu’s performance ought to now be restored in your system.

However, if the troubleshooter fails to repair the Start menu then this would possibly point out a more severe problem in your system. In such instances, let’s confirm if Windows is definitely in a position to entry and provoke the method for the Start menu in your system. Use the checks under that can assist you together with the method.
We now have to test if the Start menu is definitely out there inside your set up of Windows 11. Let’s create a brand new native account that may allow you to confirm its performance. If the Start menu is working within the new account then it’s probably a difficulty along with your present person account.
Press Windows + i in your keyboard and click on on ‘Accounts’ in your left.
Click on ‘Family & other users’.
Now click on on ‘Add account’ beneath different customers.
Click on ‘I don’t have this particular person’s sign-in info’.
Click on ‘Add a user without a Microsoft Account’.
Now enter a username for the brand new account, and a password if wanted.
Click on ‘Next’ as soon as you’re carried out.
The new person account will now be created. Sign out of your present account and register to the brand new account.
Try to activate the Start menu now within the new momentary native account. If it’s working then this is a matter particular to your person account. However, in case the Start menu fails to open, then this would possibly point out a more severe problem along with your Windows 11 set up.
It’s now time to test if the Start menu is working in Safe mode. In case it’s, then a third-party app is probably going interfering with the Start menu’s performance. You can take away any third-party apps used to change the Start menu to try to repair this problem. Follow the information under to activate Safe mode on Windows 11.
Press Windows + i in your keyboard and choose ‘Windows Update’.
Now click on on ‘Advanced options’.
Click and choose ‘Recovery’.
Now click on on ‘Restart now’ beside ‘Advanced startup’.
Click on ‘Restart now’ once more.
Your PC will now restart to the recovery display. Click and choose ‘Troubleshoot’.
Now click on on ‘Advanced options’.
Click on ‘Startup Settings’.
Press ‘F4’ to start out your PC in protected mode now.
Once your PC restarts, the protected mode needs to be lively in your system. Now attempt to activate the beginning menu. If the menu prompts, then it’s probably {that a} third-party app is inflicting points in your Windows 11 system. You can attempt eradicating apps used to customise the Start menu one after the other to seek out the wrongdoer in your system.
Fix #17: Run a malware and antivirus scan
We suggest you try to run a malware scan earlier than choosing the final resort. If any malware or malicious service is inflicting points with the Start menu, then a scan will assist remedy these points. Use the information under to run a malware scan via Windows Defender.
Press Windows + S in your keyboard and seek for ‘Windows Security’. Click and launch the app as soon as it exhibits up in your search outcomes.

Click on ‘Virus & threat protection’.

Click on ‘Scan options’.

Select ‘Full Scan’.

Finally, click on on ‘Scan now’.

Windows Defender will now scan your complete PC for malware and malicious software program. In case any are discovered, they are going to be robotically quarantined, and you may be prompted to take the required motion as quickly as doable.
3 General Fixes: Last Resort choices
Fix #18: Create a brand new person by way of command immediate
If you’re going through a difficulty the place you’re unable so as to add a neighborhood account by way of Settings to your PC then you should utilize the command immediate (CMD) for a similar. Once added you’ll be able to try to test if the Start menu is working for you. If it’s, you’ll be able to attempt the fixes under to revive it in your unique account. However, if not one of the fixes give you the results you want then you should utilize the newly created account as a substitute. The new account might be created with administrator privileges so that you shouldn’t have issues transferring your recordsdata and Settings. More on this under.
Press Windows + R to carry up the Run dialog field and kind within the following. Press Ctrl + Shift + Enter in your keyboard as soon as you’re carried out.
cmd

Type within the following command and press Enter in your keyboard. Replace ‘USER’ along with your desired username for the brand new account. Similarly, exchange ‘PASSWORD’ along with your desired password.
internet person /add USER PASSWORD

Now execute the next command as nicely and use the identical username as above.
internet localgroup directors USER /add

The person will now be added to your PC. Simply restart and log into the brand new account when the PC restarts.
The begin menu ought to work alright now within the new person account. You can copy your recordsdata from the outdated person account to the brand new account.
To discover your knowledge within the outdated person account, open Windows Explorer and go to the User folder beneath the C Drive (or whichever drive you may have put in Windows in).

Click on the outdated person account. Now, copy all of the recordsdata from right here to your new person account that you may additionally discover within the Users folder.
An simple methodology to switch recordsdata from one person account (outdated one) to a different person account (new one) is to repeat the profile. Read more about it right here.
Fix #19: Perform a Windows Reset
If you had zero luck with the entire earlier strategies, we predict you must attempt a Windows Reset. It has been identified to unravel a bunch of issues in Windows 11 whereas protecting your private recordsdata intact. Moreover, resetting Windows to its manufacturing unit settings can provide your PC a recent begin.
Here are the steps.
For this methodology, you’ll want an elevated EnergyShell instance.
Press Win key + r to open the Run field, then sort in ‘EnergyShell and press Ctrl + Shift + Enter to open EnergyShell as administrator.

When opened appropriately, you must already be contained in the C:Windowssystem32 folder.

Now sort in ‘system reset and press enter. You should be presented with two options, to either keep all your files or to remove everything. Click on ‘Keep my files’.

Within a couple of minutes, Windows ought to offer you an inventory of apps that’ll be eliminated out of your PC after the reset. Here’s how our record appears.
Once you’ve scrolled via the record of apps, merely click on on the ‘Next’ button.

Windows ought to now begin the reset course of. Simply observe the directions and your PC needs to be reset inside a few minutes. The Start menu needs to be working now.
Fix #20: Re-install Windows from scratch
Well, in case you’re actually contemplating this methodology, it’s protected to imagine that not one of the different strategies labored for you. At this level, we predict it’s now time to go for a clear set up of Windows 11, which can in all probability wipe your present Windows partition (in case you select to).
Note: Before continuing with this methodology, we suggest making an entire backup of all of your recordsdata saved inside folders on the Windows drive, corresponding to in Downloads, Documents, and the likes.
Once you may have backed up all of your recordsdata from the Windows drive, let’s check out the belongings you’ll want.
- A USB stick of 8GB or more (no exterior exhausting drives, until you need to lose all of your treasured knowledge)
- Rufus
Next, observe our information on downloading and putting in the Windows 11 ISO.
Read: How to Download and Install Official Windows 11 ISO
We hope that after following this information, you had been in a position to repair the annoying and unresponsive Start menu in Windows 11 and convey it back to life.
If you end up caught at any level on this information, tell us within the feedback under.
:
Check out more article on – How-To tutorial and latest highlights on – Technical News