
5 Ways to Easily Mount ISO in Windows 11.
If you may need tried to supply one thing initially printed on a CD, you then may need come throughout ISOs. ISOs are virtualized disk images which you can mount and dismount on digital drives for the same expertise. But how do you mount an ISO on Windows 11? Do you want any further third-party instruments? Let’s discover out!
Why mount an ISO in Windows 11?
Mounting an ISO is at all times more helpful than extracting its contents. Not solely it’s tremendous quick, it additionally helps you save disk too whereas giving fast entry to its recordsdata and helps save the time spent extracting ISO images.
Mounting an ISO (or every other image file, for that matter) additionally has the benefit of gaining access to Operating Systems and different boot drives which you can take a look at beforehand to make sure they’re working as meant.
: How to Run Old Games on Windows 11
How to mount an ISO in Windows 11
You can simply mount an ISO in Windows 11 using the next strategies. Follow both of the sections beneath relying in your present preferences.
Method 1: Using double click on
Windows File Explorer has now full help for ISO images. This means which you can merely double-click an ISO image to mount the identical to a digital disk in your PC.

Once mounted, yow will discover the identical within the This PC part of your system within the file explorer.

: How to Screen Record on Windows 11 With Audio
You may select to mount an ISO on Windows 11 using the right-click context menu.
Locate the involved ISO in your native storage and right-click the identical.
Click and choose Mount.
Once mounted, it is possible for you to to seek out the digital disk within the Devices and drives part of your PC.
Method 3: Using the toolbar
The Windows 11 File Explorer has acquired a serious overhaul since its introduction. You can now discover often used choices within the Ribbon menu on the high. You can use the identical to mount an ISO image in your Windows 11 system. Follow the steps beneath that will help you together with the method.
Open the File Explorer and navigate to your required ISO file. Click and choose the identical.

Click Mount on the high within the Ribbon menu.

The chosen ISO ought to now be mounted to a digital drive in your system. You will discover the identical within the This PC part of your file explorer.
Method 4: Using EnergyShell
You may use EnergyShell to mount drives on Windows 11 relying in your present wants and necessities. Follow the steps beneath that will help you together with the method.
Open the File Explorer and navigate to the specified ISO file. Right-click on the identical as soon as discovered.

Click Copy as Path.

Press Windows + R in your keyboard to launch Run.

Now sort within the following and press Ctrl + Shift + Enter in your keyboard.
powershell

Use the next command to mount your ISO. Simply change PATH with the trail to the ISO we copied earlier.
Mount-DiskImage -ImagePath "PATH"

Note: The path shall be pasted with quotes mechanically when using Copy as Path. However, if that doesn’t occur, be certain that you add quotes to your Path.
Press Enter when you’re performed.

And that’s it! The chosen ISO will now be mounted to a digital drive in your system.
Method 5: Using third-party instruments
There are tons of third-party instruments on the market that assist you to manipulate ISO images. These instruments additionally come bundled with the power to mount your ISOs in Windows 11 simply. You can use the identical to your benefit and mount your ISOs. Follow both of the sections beneath relying in your choice.
Option 1: Using WinCDEmu
WinCDEmu is an open-source instrument that may assist you to mount ISO images on Windows 11. Follow the information beneath that will help you together with the method.
Click the hyperlink above after which click on Download to obtain WinCDEmu to your PC. Once downloaded, double click on and launch the identical.

Check the field for Customize set up choices.

Choose an set up listing for WinCDEmu as wanted in your PC.

Additionally, test the field for Require administrator rights (UAC) to mount images when you want to safeguard in opposition to unauthorized customers mounting ISOs in your system.

Once performed, click on Install.

Once set up completes, click on OK.

Now navigate to the involved ISO within the File Explorer and Shift + Right-click on the identical.

Click Select drive letter & mount.

Use the drop-down menu on the high and select the specified letter on your digital drive.

Use the following drop-down menu to pick your disk sort if relevant. This would be the emulated disk sort on Windows 11.

Check the next containers relying in your preferences.
- Disable autorun for this time: The disk gained’t use its autorun performance when you test the field for this selection.
- Keep drive after restart: The digital drive along with your mounted ISO will persist after a restart.

Click OK when you’re performed.

And that’s it! The chosen ISO image ought to now be mounted to a digital drive in your PC.
Option 2: Using PowerISO
PowerISO is one other long-standing utility that may enable you mount ISO recordsdata in your system. Use the information beneath that will help you together with the method.
Click the hyperlink above and select one of many obtain hyperlinks relying in your CPU. The obtain ought to mechanically provoke in your browser. Simply put it aside to your native storage. Double click on and launch the identical as soon as performed.

Click I Agree.

Click Browse and select a customized set up listing for PowerISO if wanted.

Click Install when you’re performed.

Click Next.

Select the extra file associations on the left when you want to open further file varieties with PowerISO. ISO shall be chosen by default on the high.

Use the drop-down menu to decide on the variety of digital drives you want to add to your PC.

Additionally, test the containers for the next choices relying in your preferences.
- Autostart on boot up: This will launch PowerISO within the background every time your PC activates.
- Automount on boot up: This choice will mechanically mount the final mounted ISOs to your digital drives every time your PC activates.
- Integrate PowerISO into Shell: This will add PowerISO choices to your File Explorer together with the right-click context menu.
- Check for updates mechanically: This choice will enable PowerISO to test for brand spanking new variations and pending updates within the background mechanically.

Click Close when you’re performed.

Restart your system at this level. This is a crucial step to put in PowerISO digital drives in your system as wanted.
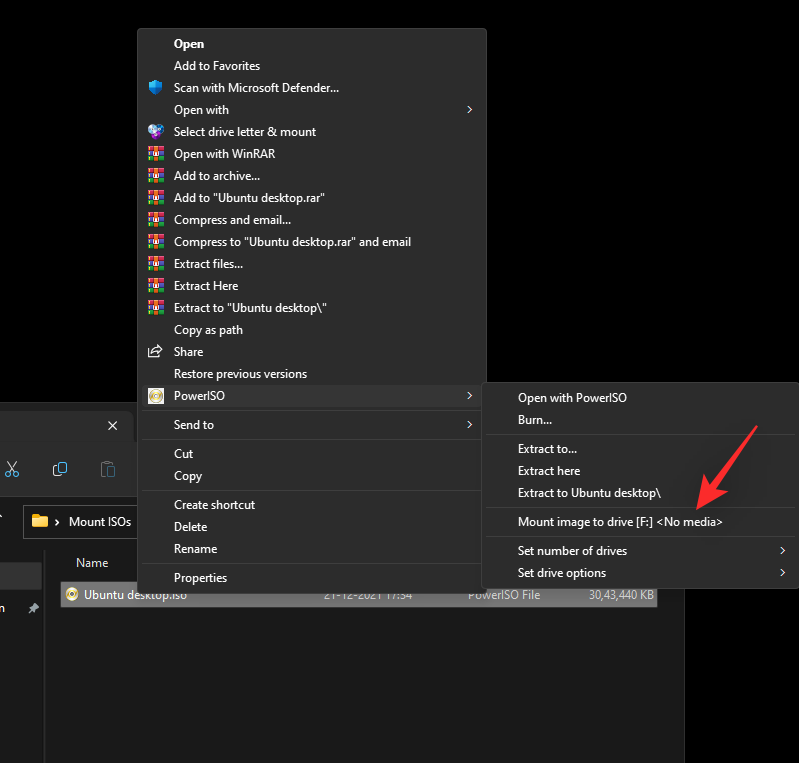
Once performed, navigate to the involved ISO file within the File Explorer and Shift + Right-click on the identical.
Hover over PowerISO within the context menu.

Select Mount image to drive [N:] <No Media> the place N is the drive letter you assigned to your digital drive.
The chosen ISO will now be mounted to your PowerISO digital drive. You can entry the identical within the This PC part of Windows 11 File Explorer.
How to unmount an ISO
Unmounting an ISO is sort of easy in Windows 11 due to its in-built choices. Simply right-click in your digital drive and click on Eject. This will work for all of the native strategies above that don’t use a third-party instrument.

If you used a third-party instrument to mount your ISO as a substitute, then you will want to make use of its devoted part within the context menu to unmount the identical out of your system. The choice shall be named Eject or Unmount relying on the instrument you used.
We hope this put up helped you simply mount ISOs in Windows 11. If you’ve any more questions, be happy to drop them within the feedback beneath.
Check out more article on – How-To tutorial and latest highlights on – Technical News