How To Install Intel CPU On Motherboard Safely.
Installing the CPU is probably the most intimidating a part of PC constructing for a lot of first-timers. But it’s a fast and straightforward course of if you understand what you’re doing.
On brand-new methods, appropriately align your Intel CPU to the socket using the markings. Then, gently place it within the socket and lock the retention latch. Finally, peel off the sticker and set up the CPU cooler.
If you’re changing an outdated CPU, you’ll have to take away the cooler and outdated CPU first. Other than that, the method is usually the identical as above.
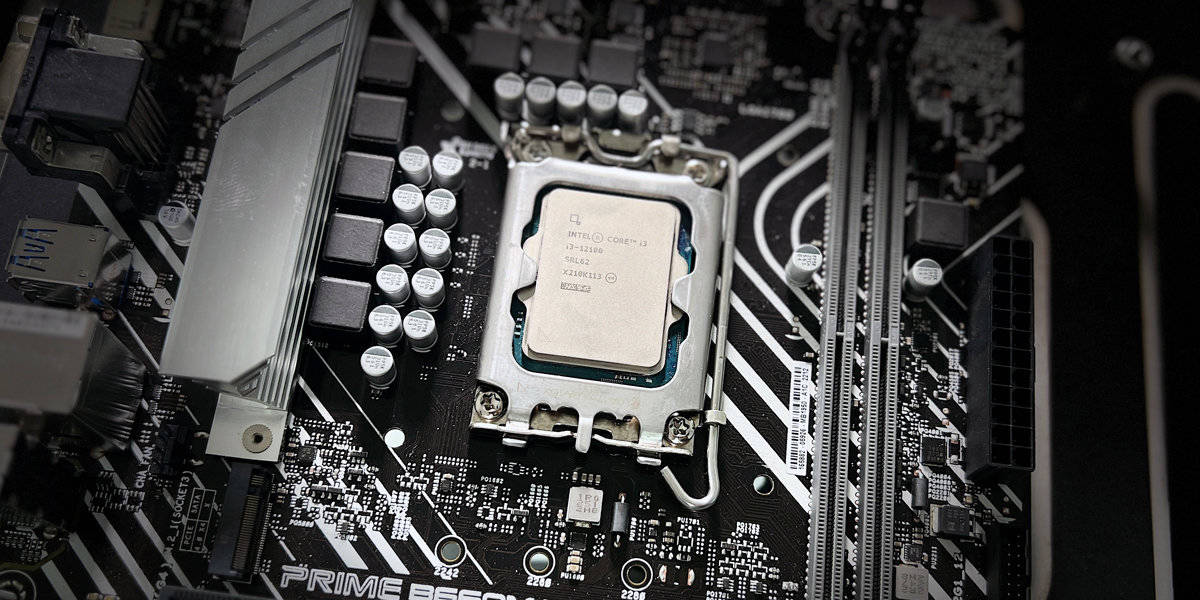
I’ll set up an i3-12100 on my ASUS PRIME B660M-Ok D4 board (LGA 1700 socket) to information you thru each situations.
Before You Begin
- Ensure the CPU is appropriate together with your motherboard earlier than anything. Just a fast reminder for newcomers.
- Use an anti-static wrist strap or periodically contact an unpainted metallic floor to discharge static electrical energy. This will shield the elements from ESD.
- If you’re constructing a brand new system, skip forward to the Install CPU part.
- If you’re changing the CPU on an outdated system, comply with the default define.
Remove the Cooler
Intel’s inventory coolers use a push-pin locking mechanism that’s very simple to work with. To detach the inventory air cooler:
- Shut down the system and unplug the ability cable.
- Lay the case on its aspect and open the aspect cowl. You’ll must take away the screws and slide open the quilt typically.
- You can depart the motherboard within the case (handy for most individuals). Or, you’ll be able to disconnect every thing, take away the standoffs, and take out the board. Then, you’ll be able to place it on a take a look at bench like I’ve finished right here.

- Unplug the CPU fan connector from the motherboard.

- Turn the pins within the indicated course (counter-clockwise). Then, pull them as much as unlock them.

- After unlocking all 4 pins, pull the cooler straight up/out. Gently wiggle it if it feels laborious to take away.


Remove the Old CPU
- You can use a tissue, microfiber towel, or any lint-free material actually to wipe off the outdated thermal paste.

- After cleansing the CPU, push down on the retention arm. It ought to transfer sideways, after which up.

- Grab the processor by the perimeters and thoroughly carry it straight up and out.

- Store the CPU in a CPU clamshell or an antistatic bag when you plan to make use of it sooner or later.


Install New Intel CPU
After pushing down the retention lever, it ought to transfer to the aspect and are available up. This will open the socket and help you insert the brand new CPU. Now,
- Grab your new CPU by the perimeters. Try to not contact the gold contacts.
- Align the CPU with the socket. They ought to have one distinctive marking (e.g., a triangle) to point the right orientation. This is extraordinarily essential as attempting to power an incorrect orientation will result in bent pins, and probably a useless CPU.

- Gently place the CPU straight into the socket. Modern CPU sockets use a Zero Insertion Force (ZIF) design, which suggests you should apply just about no power to put in the CPU.

- The markings and notches ought to match completely and the CPU ought to be cosy within the socket.

- Finally, pull the load plate back down, and set the retention arm back in place to lock the CPU down. You might have to use more power than you’re snug with right here. A faint creaking or crunching sound can also be regular and customary.

- If the socket cowl is current, it’ll come out at this level. Store it safely, as you could want it for motherboard RMA functions.


Put the System Back Together
After putting in the CPU, you have to put collectively the CPU cooler and the remainder of the system as nicely.
- If you’re putting in a brand new cooler, take off the sticker. If you’re reusing your outdated cooler, clear the thermal paste off the heatsink and apply some on the CPU.

- To connect the inventory Intel cooler, all you should do is join the heatsink to the IHS. The 4 mounting pins ought to align with the holes on the motherboard.

- Push down on the pins to lock them.

- Connect the CPU fan cable to the CPU_FAN header on the motherboard.

- Put collectively the remainder of the system.


Test the New CPU
After putting in the CPU, the ultimate step is to confirm that the system boots correctly.
Check out more article on – How-To tutorial and latest highlights on – Technical News