How To Enable XMP In BIOS?.
Enabling XMP (Extreme Memory Profile) permits you to simply get the very best out of your RAM.
Normally, RAMs run on the default velocity or frequency in keeping with the JEDEC specs. However, the utmost protected and secure frequency for any RAM is manner larger.
By enabling the appropriate XMP profile in your BIOS, you’ll be able to effortlessly run your RAM at quicker speeds with out tedious guide tweaking.
- Ensure your motherboard helps Intel Extreme Memory Profile (XMP) or AMD Extended Profiles for Overclocking (EXPO).
- Enabling XMP would possibly void your CPU guarantee in keeping with Intel and AMD guarantee insurance policies.
- To allow XMP, enter your motherboard’s BIOS menu on startup. Look for the XMP, DOCP, or A-XMP setting and allow the primary profile. Save adjustments and exit BIOS. Your RAM ought to now run at its rated velocity
The precise steps to allow XMP relies on the motherboard however the steps are usually comparable. I will likely be using the next parts to present you a sensible instance in an effort to comply with alongside.
- Motherboard: ASRock Z370M-ITx/ac
- RAM: Crucial RAM 8GB DDR4 3200MHz
- CPU: Intel Core i3-8100
Check Support for XMP

First, verify in case your Motherboard comes with Memory Profile help by wanting into its Memory specs. It ought to say one thing like “Supports Intel Extreme Memory Profile (XMP) 2.0” or “Supports AMD Extended Profiles for Overclocking (EXPO)” or “Supports Extreme Memory Profile (XMP).”
If we glance into the Z370M-ITx/ac’s help web page, you’ll be able to see that it helps Intel Extreme Memory Profile (XMP) 2.0
Also, whereas trendy RAMs do help XMP, it’s higher to verify your RAM’s specs anyway. Some older RAMs don’t embrace any XMP profile on their Serial Presence Detect (SPD) chip. Make positive to notice down the highest frequency supported by the RAM whilst you’re at it.
Then, verify your CPU’s specification to know its most theoretical help for the RAM frequency. However, do word that it might not characterize the frequency restrict in your system.

While testing out XMP on completely different methods, I found that some CPUs may help even a higher-than-rated frequency whereas some didn’t. This occurred even for separate CPUs of the identical mannequin.
As you’ll see later, I may use 3200MHz XMP on my RAM regardless that Intel shows help for under 2400 MHz RAM frequency.
It is likely to be as a result of the tolerance vary throughout the manufacturing course of brought on some {hardware} variations or the CPU producer didn’t take a look at with larger frequency RAM. So take the CPU’s theoretical supported RAM frequency as a baseline however don’t overly depend on it till you try it out your self.
Get to BIOS
The choice to allow XMP lies in your motherboard’s BIOS, so get to it first. The simplest way to take action is by urgent the BIOS key when the pc is beginning up and also you see the motherboard producer’s emblem.
I truly suggest repeatedly urgent the important thing as quickly as you restart or energy up your pc to not miss the timing.

The BIOS key for my ASRock motherboard is Del or F2. For another motherboards, the keys are:
You may get to the Advanced Startup choices and choose Troubleshoot > Advanced choices > UEFI Firmware Settings > Restart as well to the BIOS/UEFI. This technique is very helpful if the BIOS doesn’t present up once you use the BIOS key.
Enable XMP on BIOS/UEFI
XMP is an Intel know-how, however you will see reminiscence profiles even in AMD motherboard BIOS. Most AMD motherboards present it equally as XMP. But they might additionally present it as A-XMP or EOCP (Extended Overclock Profiles) or DOCP (Direct OverClock Profile).
Latest AM5 motherboards help extra profiles known as EXPO (Extended Profiles for Overclocking) which is principally for DDR5 RAMs.
The precise steps to allow XMP or any of those profiles relies on your motherboard. In common, you want to search for XMP or comparable possibility on the EZ Mode Interface and choose the reminiscence profile.
If your motherboard solely comes with Advanced Mode Interface, search for overclock or reminiscence settings and modify the related XMP setting.
Here’s how I may allow this profile on my ASRock motherboard:
- On EZ Mode Interface, search for XMP Profile beneath DRAM Information. Then, click on on the profile to toggle between the choices. You can verify the frequency and timing info for the profiles proper above.

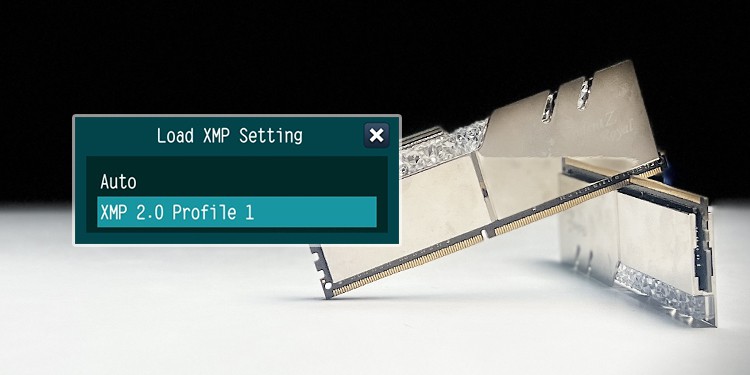
- On Advanced Mode Interface, go to OC Tweaker > DRAM Configuration and set Load XMP Setting to the XMP profile. Its frequency and timing adjustments ought to present up proper beneath DRAM Configuration.


If you even have an ASRock motherboard, and need to know more in regards to the course of, I like to recommend trying out my devoted article on enabling XMP on ASRock Motherboard.
We even have devoted articles on this course of for another motherboard,
Save and Exit BIOS
After enabling the XMP profile, save and exit the BIOS to use the adjustments. On most motherboards, press the F10 key and choose Yes to take action.
Or you’ll be able to go to the Exit tab in Advanced Mode, choose Save and Exit and ensure with Yes.

Test Your System
Now, try to boot into your system. If your CPU or motherboard totally help the XMP, you shouldn’t encounter any problem. Otherwise, your pc might crash or present different indicators of system instability like stuttering points.
After moving into your system, run RAM and CPU intensive duties to watch the efficiency enchancment as a result of new RAM frequency. You may run benchmark and stress exams to additional affirm system stability and enhancement.
If you run into stability points, disable XMP by reverting the BIOS settings or resetting the BIOS.
If you want to enhance RAM efficiency in such instances, attempt guide overclock first. If it doesn’t assist a lot, improve your current RAM sticks or add one other RAM in twin channel mode as a substitute.
Manually Overclock RAM

If the system is just not that secure, or whether it is however you want to push it even additional, overclock your RAM by manually altering the frequency and timing choices. You also needs to take a look at our article on RAM Latency to know what all these timing values imply and the way you need to change them.
However, remember the fact that not like XMP, which is the examined and secure RAM overclock, manually altering the settings can have an effect on RAM well being.
As for me, I couldn’t go over the 3200MHz frequency on guide overclock. So I merely enabled the XMP profile and left it as is because it didn’t result in any stability points.
Check out more article on – How-To tutorial and latest highlights on – Technical News