How To Clean Dust From PC.
To clear mud out of your PC, first flip it off, take away all connections, and take it outdoors. Use a compressed air can or air duster to blow out particles and mud bunnies from every part.
You might even make the most of a brush with comfortable bristles and microfiber towels to do the needful. I typically use Q-tips dipped in Isopropyl Alcohol to do away with the powerful stains.
There definitely isn’t one customary method to clear your PC. But there are just a few delicate issues to remember. My demonstration offers you a exact understanding of what to do.
Gather Necessary Tools

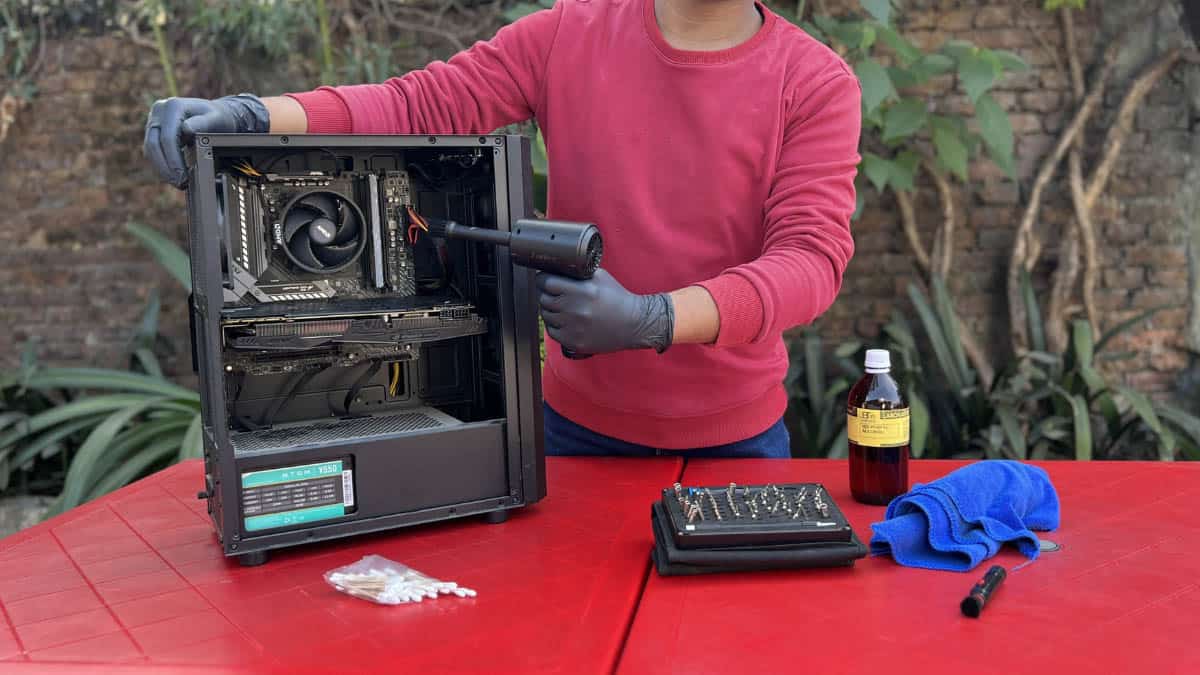
As I stated earlier, you’ll want to first seize a can of compressed air or an air duster.
I perceive that not everyone owns this. However, these are the very best bets when cleansing any PC part. So, I extremely suggest buying one.
I’ll be using Fulljion’s Compressed Air Duster to show the cleansing course of at present. But if you need a chapter possibility, a compressed air can (specialised for cleansing PCs) or perhaps a Silicon Air Blower ought to suffice.
Besides, listed below are another instruments I like to recommend as I’ve all the time most well-liked them for cleansing my PC elements:
- Isopropyl Alcohol (70%, one which’s beneficial for cleansing electronics)
- Microfiber garments/towels (of various sizes)
- Soft-bristle brush (a paintbrush will work)
- A pack of Q-tips
- Cleaning gloves (anti-static most well-liked)
- A face masks
- A screwdriver set (for disassembly)
Prepare Yourself
Before you start, take your PC outdoors and place it on a tidy floor. Do not clear t inside your private home as the method can result in mud storms, ultimately growing the burden.
Tip: While PC injury as a consequence of static electrical energy is kind of uncommon, it’s sensible to floor your self to be super-safe. Use an anti-static wrist band or for those who’re already carrying anti-static gloves, that needs to be sufficient.
Now, begin by taking out all of the PC panels– each the facet and the one on the entrance. The precise course of varies relying in your PC case.

If yours are tightened with thumb screws, you might unscrew them using naked fingers. But if it’s an older PC case, you’ll want a screwdriver.
Take additional care when eradicating the entrance panel. Apply drive however not an excessive amount of – or you might find yourself breaking the strain clips/tabs.
Also, some include a devoted cable and button for RGB, which must be unplugged accordingly.

Some best airflow PC circumstances include mud filters on the high and backside. These accumulate a big quantity of mud, so kindly take them off.
Note that cleansing the interior part can accumulate mud over your graphics card. So, I like to recommend eradicating it as properly.

Start With Air Duster to Clean the PC Case
Caution: Avoid using vacuum cleaners or hair dryers. These can result in static discharge and a few may even be too highly effective, which can injury the PC elements.
Now that you just’re prepared, use brief bursts of compressed air to blow mud from the PC elements. Start from the highest part (the place filters used to take a seat), as demonstrated under.

Once that’s performed and dusted, repeat the method within the back part in addition to the facet. Make positive you take away mud from each part. The gaps between the cables is likely to be soiled – blow off the particles from there as properly.
Lay the PC case flat and use the identical air blower to take away mud from the underside part. This part is just a little tough.

Choose the correct route such that every one the mud comes off from the facet, in any other case, mud might accumulate over the motherboard.
It’s now time to scrub the PSU enclosure/shroud. As you possibly can see, the highest of this part has collected probably the most mud in my state of affairs. So, I’ve blown air out and in to make sure the floor is tidy.

Dust Removal From Fans and Motherboard
The case and CPU followers are another vital elements that accumulate probably the most mud. If not cleaned properly, they will produce loud and worsening noise.
Start with the case followers – clear it from each inside and out of doors. Hold on to one of many blades earlier than blowing air.

Let’s transfer on with the CPU fan. I’ve utilized the identical approach for cleansing the AMD’s Wraith Stealth right here. While at it, clear the heatsink by pointing the air duster sideways.

A typical mistake most customers make is they only let the followers spin throughout the cleansing course of, which isn’t the best factor to do!
You might injury its bearing (particularly, if the fan is of low high quality). The worst-case state of affairs is it might even hurt the fan header if the air duster is just too sturdy.

After blowing air from all of the compartments, most mud will doubtless accumulate within the motherboard. So, begin blowing away the mud bunnies from every compartment.
You may even take away the RAM stick(s) and clear the DIMM slots using a brush. Repeat the method with PCIe and different motherboard headers.

Wipe Hard-To-Reach Sections
Air dusters and compressed air cans are nice for eradicating mud and particles that accumulate or stick across the elements. But for a way more thorough cleansing, you’ll want to examine every part and wipe them accordingly.
Get back to all of the areas the place you had beforehand used compressed air, and begin wiping those which are dusty. It will take time – so you require endurance!


Wipe each cable and connector. Once you’re within the rear part, brush off mud particles that may have collected over the PCB. Do this very rigorously or you might find yourself damaging the conductive pins.


Repeat the method on all of the earlier elements – case followers, PSU shroud, CPU cooler, and many others. Once you’ve reached the motherboard, clear the VRM (Voltage Regulatory Module) and chipset heatsinks.

As you possibly can see above, some dust and particles sat proper above the M.2 heatsink. So, I’ve wiped it properly using a microfiber towel.

Examine each part – together with the motherboard slots and headers to make sure no mud stays. You may even dip the fabric or a Q-tip in Isopropyl alcohol to do away with the powerful stains.
Caution:
Never clear your motherboard with family cleansing products or alcohol wipes. Even just a few drops of water could make the system board ineffective.
Do not blindly belief tutorials even when they present you that the pc POSTs after washing the motherboard with water. Those are performed for experiment functions and also you definitely don’t need to achieve this along with your working PC.
Clean the Ports and Buttons
We have cleaned most elements of the chassis and motherboard. But for those who examine carefully, you’ll discover mud accumulation contained in the ports too.

Reach out to every of them and use Q-tips to take off the particles caught inside. You may even use a pair of tweezers to pluck out hairs. Follow the identical steps for each the case and motherboard ports.

Also, wipe the I/O defend using a clear microfiber material. Make positive there’s no stain in and across the ports.
Let’s transfer on with the facility/restart button. While it’s uncommon to build up mud right here, they may get sticky. This is strictly what occurred to me. In such a state of affairs, use the dampened microfiber and rub it properly.

Clean the Panels and Dust Filters
Now, keep the PC on a dust-free floor and convey the mud filters and panels to the working space.

I’m going to start out with the entrance panel. Surprisingly, there have been even cobwebs, which clearly present how soiled PCs can get.
Make positive you clear every compartment. I’m going to undertake the identical above approach – first blowing off the webs using the compressed air duster adopted by wiping it with a microfiber towel.

Next, clear the facet panels. For this, you possibly can even rinse it with water. But ensure it’s 100% dry earlier than becoming it back.
The identical is the case for mud filters (if they’re too filthy). Clean them within the operating water and dry them in a single day. Or, you might merely use the compressed air duster like now we have performed right here.

Final Inspection Before Reassembly
Dust accumulation is a pure course of. So, don’t be stunned if some sections turn into dusty once more!
Before inserting back the panels, examine every part. Then, wipe down all of the elements from high to backside.
Also, clear your graphics card earlier than reinstalling it and connecting it to the facility provide.
Once every little thing seems to be neat and tidy, you might connect the PC circumstances and screw them accordingly. But earlier than inserting it back, ensure you clear your work desk too.
PC Too Dusty? Deep Clean Your PC
If you comply with my method as soon as each 3 to 4 months, you shouldn’t be apprehensive about mud accumulation anymore. Some professionals declare that cleansing a PC as soon as each 6 months needs to be greater than sufficient.
Actually, this fully is determined by how you could have positioned your case and the surroundings you’re in. If you’ve positioned it within the nook, it’s doubtless going to draw more mud. The identical is the case for customers whose rooms get dusted typically.
In case you haven’t opened your PC for years or have saved it someplace, I imagine you’re affected by clogged followers, dust within the motherboard slots, depleted thermal paste/pads, and overheating points.
The best method on this state of affairs is deep cleansing the pc. This includes eradicating and cleansing each part and reassembling the PC from scratch.

I’m speaking about full PC servicing right here. While I’ll provide you with an in depth information on this topic very quickly, listed below are some primary steps you possibly can attempt by yourself:
- Start by unscrewing all of the case followers and cleansing them individually.
- Also, unplug all of the connectors and take away the motherboard from the case. Take word of the standoffs and screws right here.
- Once that’s performed, you’ll get to clear the PC chassis even higher. Wipe all sections, together with the ports. Here’s my information on how to correctly clear the USB ports.
- You may even take away the PSU and clear it individually.
- Place the motherboard on an anti-static floor. Take out the CPU cooler, RAM sticks, and VRM / chipset heatsink.
- Remove mud from every part correctly. For the CPU cooler, comply with my colleague, Abhishek’s in-depth guides on cleansing inventory followers and AIO radiators.
- In case the heatsink has been clogged with mud, you might wash it.
- You may even clear the CPU with out damaging it if it feels too filthy.
- It’s important to scrub and reapply the thermal paste. Along with that, you might require changing the thermal pads from VRM, M.2, or chipset heatsinks if it has been used for too lengthy.
- Finally, clear the motherboard properly earlier than becoming it back into the PC case.
- Reassemble every little thing earlier than becoming back the PC panels. Then, test whether or not your pc boots into BIOS or not.
Check out more article on – How-To tutorial and latest highlights on – Technical News