
3 Ways to Read and Write NTFS Drives on macOS Catalina.
Trying to determine why you may’t save information or change the contents of your exterior storage device in your Mac?
If you’re unable to change the contents of your exterior drive or unable to save lots of new information, there’s a excessive probability that your exterior device is using an NTFS file system format.
New Technology File System or just NTFS is a file system utilized by most Windows computer systems because the 90s. Now, why is it not engaged on macOS?
As everyone knows, Microsoft and Apple provide their very own working system for desktops and laptops. While each corporations strive their best to make their OS appropriate with different working methods, Apple locks out its customers from having the ability to handle NTFS drives on macOS.
Thankfully, there are a couple of workarounds to this drawback and that’s what we’re going to speak about on this information.
Let’s get began.
1. Enable NTFS Writing on macOS.
The main motive why macOS is just not capable of modify or save new information on NTFS drives is that it’s only set to learn information from it. However, this doesn’t imply you may allow information writing on the drive.
Thanks to a couple terminal instructions, you may allow macOS to jot down on NTFS storage gadgets. Keep in thoughts that this methodology is just not formally supported by Apple and will include extra dangers like corrupting your device or bricking it completely.
Before doing something in your drive, do your self a favor and backup all of its content material in order that it’s secure in case one thing goes improper with this process.
Now, let’s bounce proper into the information.
- First, plug in your NTFS drive to a Windows laptop.
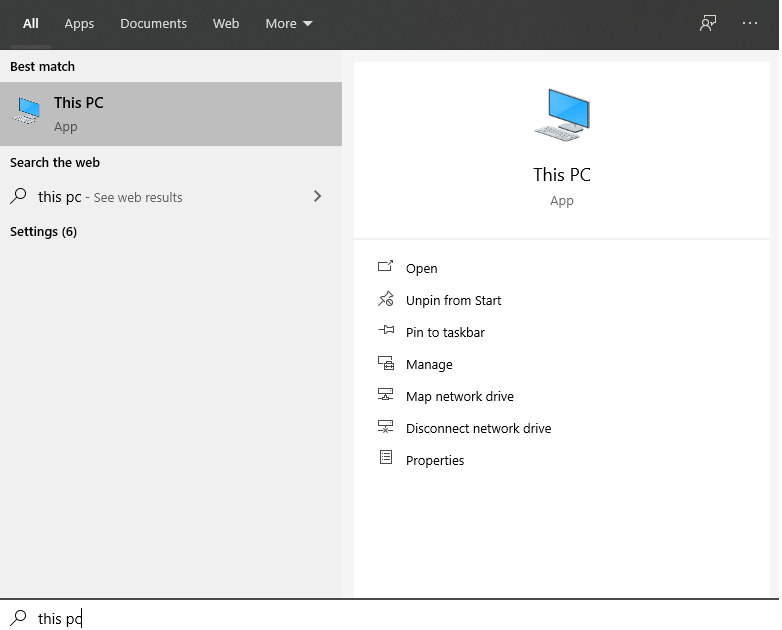
- Now, press on Windows key + S and seek for This PC.
- Click on Open to launch it.
- After that, right-click in your NTFS drive from the facet menu and choose Rename.
- Finally, assign a one-word identify to your drive.
Once you’re completed renaming your NTFS drive, unplug it from the Windows laptop and comply with the steps beneath.
- On your Mac, join the NTFS drive using a USB or Thunderbolt cable.
- After that, launch Finder and make sure that the drive is being detected in your Mac.
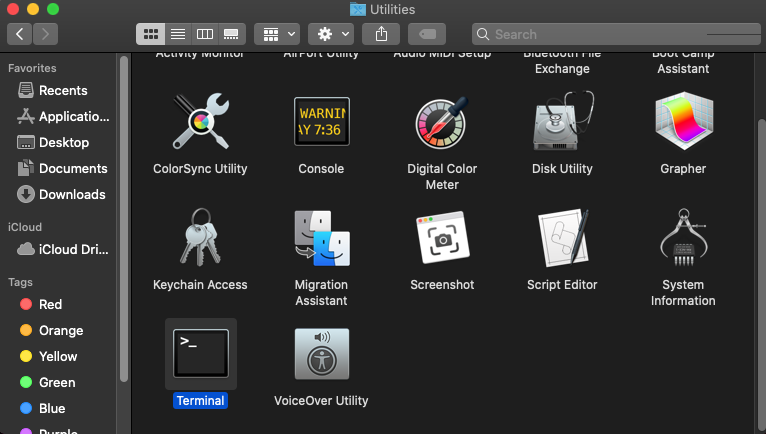
- Now, go to the Applications tab contained in the Finder and open the Utilities folder.
- Inside the Utilities folder, discover the Terminal app and open it.
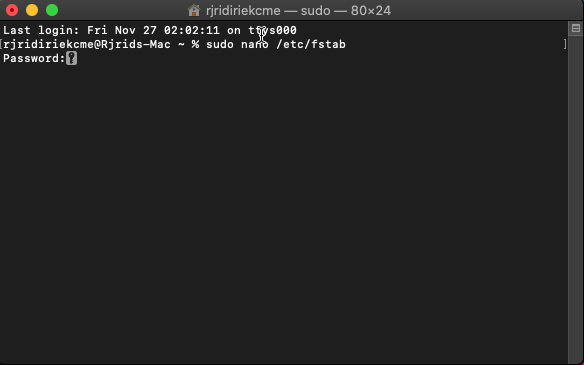
- Next, kind sudo nano /and so on/fstab and hit Enter. Type in your Admin password and hit Enter as soon as more.
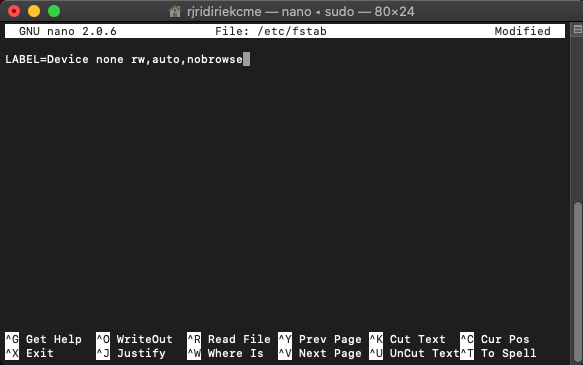
- Finally, kind LABEL = (NTFS Device Name) none rw,auto,nobrowse then hit Enter.
After the method has accomplished, press on Command + Q in your keyboard to save lots of the adjustments. Close the terminal and reconnect your NTFS drive to your laptop.
Now, attempt to save or modify the information inside your NTFS storage device to see if every part is so as.
2. Use Third-Party Applications.
If you aren’t keen to threat bricking your NTFS storage device or discover the steps above too difficult, can all the time go the simple route and use third-party functions.
iBoySoft NTFS for Mac is an software that permits you to learn and write NTFS drives on macOS Catalina and its different variations with none issues.
Aside from providing you with full entry to your NTFS device, it additionally has options like mounting and unmounting NTFS volumes, formatting NTFS gadgets and managing different drives like exFAT and FAT32.
The smartest thing concerning the software program is that it’s appropriate with macOS 10.13 as much as macOS 11.0, also called Big Sur.
To use the software program, try the information beneath.
- First, obtain and set up iBoySoft NTFS in your Mac.
- After that, restart your laptop by clicking the Apple brand on the top-left nook of your display, then choose Restart.
- Once you’ve restarted your Mac, join your NTFS device using a USB or Thunderbolt cable.
- Finally, open iBoySoft and you are able to do what you need in your drive as you’ll usually on an exFAT or FAT32 storage device.
Since this drawback has been current for a few years, there are quite a lot of third-party functions on the App Store that provides the identical performance. Simply seek for ‘NTFS drive’ on the App Store and it ought to provide you with a number of selections.
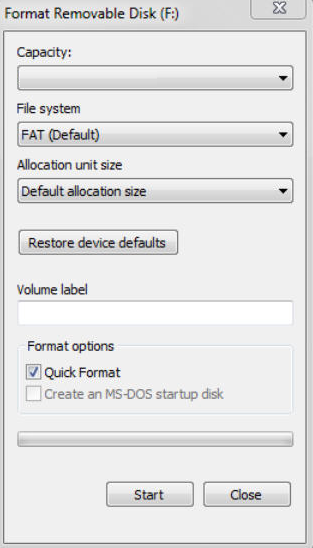
3. Format Your NTFS Drive.
The easiest way to make use of your NTFS drive in your Mac is to format it to a different file system that macOS helps like exFAT and FAT32.
While this isn’t an precise answer, altering the file system of your exterior drive is simpler and dangerous in comparison with the strategies above.
However, you would want a pc working on Windows to carry out this methodology.
- On your Windows laptop, join your NTFS drive using a USB cable.
- After that, press on Windows key + S and seek for This PC.
- Next, click on on Open to launch it.
- Inside This PC, right-click in your NTFS drive and choose Format.
- Lastly, change the File System of the drive to exFAT or FAT32 and hit the Format button to proceed.
This ought to take a few seconds relying in your storage drive and laptop. After formatting the drive, return to your Mac and join the exterior drive as soon as once more. Try to save lots of a few information on the drive to see if every part is working because it ought to.
This ends our information on how to learn and write NTFS drives on macOS Catalina. If you will have questions, go away a remark beneath and we’d strive our greatest to reply them.
If this information helped you, please share it. 🙂

Check out more article on – How-To tutorial and latest highlights on – Technical News, Apple Products