
How To Use Green Screen on CapCut.
CapCut is the most recent video modifying app by Bytedance, the makers of TikTookay that has managed to high the charts within the US app retailer. If you will have been on the hunt for video modifying app for cellular gadgets then CapCut deserves your consideration. It has a minimal UI with a plethora of results and filters that you should use to customise and improve your movies.
The editor additionally lets you use a inexperienced display and take away backgrounds on CapCut, If you will have been seeking to do the identical, then right here’s how one can get began.
: How to do 3D Zoom on Capcu4t
How to make use of inexperienced display in CapCut
Make positive you will have downloaded the CapCut app in your cellphone. Download: iPhone/iPad | Android
Green display can be utilized in two methods in CapCut. CapCut has its algorithm-powered background elimination instrument that may take away the inexperienced display for you. Additionally, it additionally comes with a chroma key possibility the place you’ll be able to key out any colour you want. Follow one of many strategies under that most closely fits your present wants and necessities.
Method #01: Use Background remover (Android solely)
Sadly, background remover is unavailable for iOS customers. If you want to take away the inexperienced display in CapCut on iOS, then you should use the following information.
Download and set up CapCut in your Android device using the hyperlink above. Once, put in, launch the app and faucet on ‘+ New project’.

Now choose your background clip out of your native storage. If that is your first time using CapCut, then you will have to grant it the mandatory storage permissions.

Tap on ‘Add’ as soon as chosen. You may also choose a number of background clips.

The clip will now be added to your timeline. Trim the clip if wanted after which deselect the clip. You will now get normal menu choices on the backside of your display. Tap on ‘Overlay’.

Tap on ‘+ Add overlay’.

Now choose your inexperienced display clip you want to add out of your gallery.

Tap on ‘Add’ within the backside proper nook of your display.

Tap on ‘Remove background’ within the backside proper nook of your display. Depending in your decision and display dimension, you would possibly must scroll to the correct on the underside of your display.

CapCut will now robotically take away the inexperienced display background out of your clip. You can now proceed to edit your undertaking as you want.

And that’s it! You will now have keyed out the inexperienced display in CapCut.
Method #02: Key out inexperienced display (Android and iPhone/iPad)
The choice to key out inexperienced display is accessible for each iOS and Android customers, and the format for the app is similar on each gadgets. Hence you should use the frequent information under on each platforms.
Open CapCut and faucet on ‘+ New Project’.
Tap and choose your background clip from the native storage.
Tap on ‘Add’ within the backside proper nook as soon as you’re performed.
The clip will now be added to your timeline. Tap on ‘Overlay’ on the backside of your display.
Now faucet on ‘+ Add overlay’.
Select your inexperienced display clip out of your native storage and faucet on ‘Add’ as soon as chosen.
The clip will now be overlayed on high of your background. Tap and resize the preview if wanted. Once performed, scroll the instruments on the backside to your proper and faucet on ‘Chroma Key’.

You will get a colour picker within the preview on the high of your display. Tap and maintain on to the picker and transfer it round to pick out the specified colour you want to key out.

Once chosen, faucet on ‘Intensity’.

You will now get a slider to regulate the depth of your colour elimination. Use the slider till you obtain the specified impact you had in thoughts.

Repeat the identical step above for ‘Shadows’. Ideally, a mixture of shadows and depth will enable you to get the right inexperienced display impact in your clip.
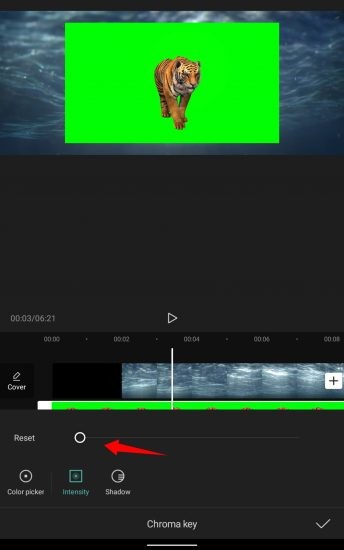
Once you’re pleased with the end result, faucet on the ‘check mark’ within the backside proper nook of your display
 .
.
You can now choose the clip and reposition it in line with the preview if wanted.
Finalize your undertaking by making different important edits and export your undertaking as you usually would. And that’s it! You will now have simply keyed out your inexperienced display in CapCut.
Customize background elimination: Tips
Sadly, CapCut solely offers you restricted management in the case of keying out colours out of your clips. You get entry to the next sliders.
Intensity: This slider helps you regulate how intensely the colour is eliminated out of your clip. In practicality, this slider in flip helps you handle and dictate the sides of your topic when eradicating the colour. This will be fairly helpful in sure textures like fur the place you’re coping with tons of fibers and edges. Sadly, this doesn’t imply that the depth slider affords you tons of management, moderately you get entry to a fundamental slider that doesn’t function any instruments to fine-tune the sides. But one thing is at all times higher than nothing.
Shadows: The Shadows slider lets you apply synthetic shadows to the sides of your inexperienced display topic to assist improve their define with out having it look misplaced. This is sort of a helpful function in case there’s a variety of noise within the background or if the topic’s lighting is totally different from the lighting used within the background. You can use the shadow slider relying in your present display to extend or lower the variety of shadows on the edges.
We hope this information helped you simply learn to use inexperienced display in CapCut. If you will have any questions or solutions, be at liberty to drop them within the feedback part under.
Check out more article on – How-To tutorial and latest highlights on – Technical News