How do I Use Generative Fill AI in Photoshop in App and Web.
What to know
- Generative Fill in Photoshop permits you to lengthen images past their body, add AI-generated objects, take away present objects, and alter the background fully.
- To lengthen a picture, use the Marquee software to focus on areas past the canvas, click on ‘Generative Fill’, kind your immediate, and click on ‘Generate’. You may use the Crop software to increase the handlebars across the image outward, choose Generative Expand from the ‘Fill’ dropdown within the choices bar on the high, then click on Generative Expand > Generate.
- You may generate a brand new background, a brand new object, and take away an object. Find step-by-step guides for these methods under.
- Generative Fill is accessible for Photoshop model 25.0 and above, and pictures created with it may be used commercially.
Adobe Photoshop is synonymous with skilled image modifying. Over the years, Photoshop has stayed head and shoulders above the remainder by incorporating the most effective instruments and options on its desktop app. 2023 noticed Adobe add a brand new Generative Fill software to Photoshop that makes use of generative AI to edit and increase your images.
The following information will take you thru the varied purposes of Generative Fill in Photoshop, how to make use of it, and a few ideas that can be sure that you benefit from the Generative Fill characteristic on Photoshop. Let’s start!
What is Generative Fill in Photoshop?
Generative Fill is a brand new software that makes use of superior AI capabilities to edit and improve images in Photoshop. Powered by Adobe’s proprietary Firefly AI mannequin, Generative Fill – and its cousin Generative Expand – can help you generate new backgrounds and objects, take away objects, in addition to lengthen present images.
With Generative Fill, you want solely spotlight the article or the background, kind in your immediate within the immediate field, and use its generative AI capabilities to your supposed function. Generative Fill helps over 100 languages so your creativity can take flight with none limitations.
Images edited using the Generative Fill AI may also be used for business functions, which is necessary and welcome information for creatives who need to monetize their creations.
How do I take advantage of Generative Fill in Photoshop on desktop
Generative Fill is now accessible on Photoshop’s secure model so that you don’t need to get Photoshop’s beta model in an effort to use it. Refer to the ‘Requirements’ part under to know more.
Requirements
To begin using Generative Fill, you will have the newest Photoshop model (25.0) put in in your PC. But since Photoshop is a paid product, be sure to fulfill the next necessities first:
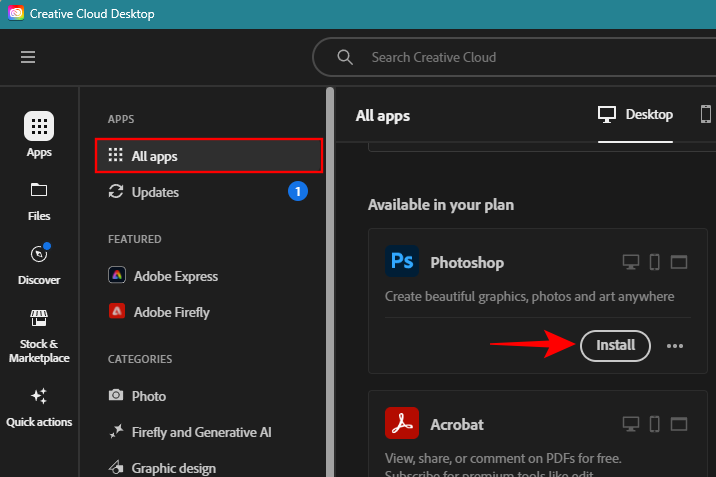
Launch Photoshop in your PC and import the image that you simply want to lengthen.
How do I take advantage of Generative Fill in Photoshop to increase images using AI
Launch Photoshop in your PC and import the image that you simply want to lengthen.

Select the Marquee software from the toolbar on the left.

Highlight the realm the place you’d like to increase your image.

Press and maintain the Shift key to focus on one other space.

Click on the Generative Fill field.

If that is your first time using Generative Fill, you’ll be requested to ‘Agree’ to Adobe’s person pointers for Generative AI.

In the immediate field, you may enter an outline of what you want to see, although it isn’t obligatory to take action. For our instance, we’re leaving the immediate field clean to see how Generative Fill fills in with none directions.
Note: If you’re leaving the immediate field clean, be certain to overlap the choice with some pixels from the image. This will give the AI some context to work with.
Click on Generate.

The AI will take a number of seconds to increase the image.

Once it’s finished, you will note your highlighted areas replenish. Check out the totally different variations from the underside.

The variations will even be accessible within the ‘Properties’ part within the backside proper nook.

If the generated choices don’t fit your image, you may enter the immediate (or go away it clean) and generate new variations as many occasions as you would like.
How do I take advantage of Generative Expand in Photoshop to increase images using AI
Generative Expand gives one other, a lot simpler option to lengthen and increase your images. It works much like Generative Fill however requires fewer steps to generate. Here’s how to make use of it.
Launch Photoshop in your PC and import the image that you simply want to lengthen.
With your image on the Photoshop canvas, click on on the Crop software within the toolbar.

The handlebars can be displayed round your image.

Make positive to pick out Generative Expand from the ‘Fill’ dropdown within the choices bar on the high.

Next, drag the handlebars outward and lengthen the canvas.

In the pop-up taskbar, click on on Generative Expand.

Here, kind an outline of what you’d wish to see. Then click on on Generate.

If you permit the immediate field empty, the image can be prolonged primarily based on the context of the image.

As earlier than, you may additional lengthen the canvas and increase the image as a lot as you want.
Another manner to make use of ‘Generative Expand’ is to crop out the pointless parts from the image after which increase the canvas. Here’s how:
Use the Crop software to isolate the principle topic from the image. Then click on on Done.

Then (with Generative Expand chosen from the Fill dropdown as proven beforehand), increase the canvas outward.

Now kind your immediate (or go away it clean) and click on Generate.

This will can help you plant the topic of your image in several environments.

Speaking of which, let’s see how one can generate new backgrounds to your topic with Generative Fill.
How do I generate new backgrounds in Photoshop using AI
Generative Fill permits you to isolate the topic and alter the scene behind it. Here’s how to take action:
Import the image into Photoshop and select the Object Selection software from the left.

Now hover over your topic (it is going to be highlighted in purple) and click on on it to pick out it.

Alternatively, click on on the Select topic possibility within the context toolbar to robotically detect your topic.

Next, click on on the ‘Invert Selection’ software within the context toolbar.

This will choose your background in relation to the topic.

Now click on on Generative Fill.

Enter a immediate for the background (or not) and click on on Generate.

Choose from one of many variations or click on on ‘Generate’ once more to get extra choices.

As earlier than, you may as well increase the canvas with Generative Fill or Generative Expand to additional lengthen the image in all instructions.

How do I generate new objects in Photoshop using AI
Generative Fill can add photo-realistic objects to your images with ease. To begin, import your image into Photoshop and select a range software from the toolbar (such because the Marquee software or the Lasso software).

Then draw across the space the place you need to insert a brand new object and click on on Generative Fill.

Enter the immediate and click on on Generate.

And similar to that, the article can be generated and inserted into the image.

Similarly, you may spruce up your image with a number of objects.

How do I take away objects in Photoshop using AI
Just as new objects are inserted, present objects may be faraway from the image as nicely with Generative Fill. Here’s how to take away objects from a picture in Photoshop using Generative Fill:
Import your image into Photoshop, use a range software from the toolbar, and draw across the object that you simply want to take away. Then click on on Generative Fill.

Leave the immediate field empty and click on on Generate.

Your chosen object can be eliminated.

Similarly, use the identical steps and take away as many objects from the image as you want.

Note: Make positive to overlap the choice with the encircling areas to make sure that the article doesn’t go away any undesirable artifacts.

Don’t fear should you embody a bit of the principle topic. As lengthy as the article you need to take away is primarily inside the chosen space, Generative Fill will perceive the contextual cues and know which parts to delete and which to protect.

How do I take advantage of Generative Fill in Photoshop on the internet
Generative Fill can also be accessible for Photoshop on the internet.
Visit creativecloud.adobe.com/cc/photoshop, be sure to are signed in, after which click on on New File to start.

Then drag and drop your image or add one out of your pc.

Once uploaded, select what you need to do with the file. Or choose ‘I’m undecided but’ and click on on Get began.

1. Add new objects
Similar to Photoshop’s desktop app, select a range software from the toolbar on the left.

Then draw across the space the place you need to insert a brand new object and click on on Generative fill.

Type in your immediate and click on on Generate.

Once the article is generated, select from the accessible variations. Generate more variations by clicking on the + button.

2. Expand image
Select the ‘Crop tool’ from the facet toolbar.

Expand the handlebars outward and click on on Generative Expand.

Enter a immediate to explain what you want to see within the expanded image, or go away it clean to let the AI take contextual clues and generate the expanded sections itself. Then click on on Generate.

And Generative Fill will comply.

3. Remove objects
To take away an object, use a range software from the toolbar and draw across the object you need to take away. Then click on on Generative fill.

Then, whereas conserving the immediate field empty, click on on Generate.

The object can be eliminated and the empty house can be crammed in with a background generated by Generative fill AI.

Tips and methods to make use of Generative Fill AI in Photoshop
Photoshop is exclusive in additional methods than one and there are specific ideas and methods that can allow you to navigate by means of the maze of its choices simply, particularly when using Generative Fill. Some of the following pointers can be displayed inside Photoshop itself. But it helps to find out about them however.
1. About Prompts
When typing prompts within the generative fill immediate field, keep away from using phrases like ‘create’, ‘add’, ‘change’, and so forth. Instead, dive straight in and kind what you want to see. The AI will robotically decide up on the phrases and generate the pictures accordingly. You additionally don’t have to make use of too many phrases whereas prompting. Keep it easy and ensure to lean on adjectives and nouns that describe what you need to see.
As talked about within the information above, you may go away the immediate field empty wherever vital. Whether it’s to see what the AI does with the contextual clues or to take away an object, generally it’s higher to not immediate the AI and let it do its factor with none intervention.
2. Selection instruments
In most instances, you should use any choice software, such because the Marquee software or the Lasso software, whichever most closely fits your functions.
Note that whenever you’re drawing round an space or an object to take away it out of your image (or to increase the image), be certain to incorporate some parts from the encircling pixels as nicely. This will give the AI some contextual clues as to what’s happening across the drawn space so it could actually ship higher outcomes.
3. Languages
Adobe Generative Fill helps over 100 languages so that you don’t all the time need to depend on English alone when prompting. If it is smart to make use of your mom tongue or the language you’re most comfy with, attempt prompting Generative Fill in that language. That mentioned, do word that Adobe is using Microsoft Translator to do machine translation so the outcomes could generally fluctuate.
4. Commercial utilization
Images created with Adobe’s Generative Fill can be utilized for business functions, together with advertising, product design, and promoting. As lengthy as you’re not modifying licensed images and passing them on as your personal, you should not have any drawback using Generative Fill to create images from scratch and using them commercially.
FAQ
Let’s check out a number of generally requested queries about using Generative Fill in Adobe Photoshop.
What is the distinction between Generative Fill and Generative Expand?
Both Generative Fill and Generative Expand use the identical Adobe Firefly AI expertise to generate content material. The distinction is just in how they perform their operate. Generative Fill makes use of choice instruments to attract alongside the perimeters of the image to increase it whereas Generative Expand makes use of the Crop software to increase the canvas and the image. Because it makes use of fewer steps to ship the identical outcome, Generative Expand is healthier in relation to increasing images with AI.
How do I allow generative fill in Photoshop?
Generative Fill is accessible in Photoshop model 25.0 and above. It will pop up each time you choose a software that permits you to use generative fill, as an example, a range software just like the Marquee or the Lasso software that permits you to add and take away objects, change backgrounds, and so forth. in addition to when increasing images with the crop software.
Why can’t I see generative fill in Photoshop?
If you don’t see Generative Fill in Photoshop, it’s possible the case that you simply’re using an outdated model of Photoshop. Make positive to update Photoshop from Help > Updates from the principle toolbar on the high.
Can I take advantage of generative fill in Photoshop offline?
No, you can not use Generative Fill offline. You need to be linked to the net for the characteristic to contact Adobe’s Firefly AI mannequin and performance correctly.
Can you utilize images created with Photoshop’s Generative Fill commercially?
Yes, you should use images created with Photoshop’s Generative Fill commercially.
The Generative Fill characteristic is among the best implementations of AI in knowledgeable Adobe software. Now that it’s out of its beta section, you should use it to create commercially viable images in Photoshop, add AI-generated objects, increase the horizons of an image, and edit present parts. Soon, if Adobe’s tasks come to fruition, Generative Fill will carry its AI magic to movies as nicely. So keep tuned for that.
We hope this information helped you get began with Generative Fill on Photoshop. Until next time! Keep creating.
Check out more article on – How-To tutorial and latest highlights on – Technical News