Power Supply Cable Management Tips & Tricks.
Managing the ability provide cables may appear a bit intimidating at first look, however with the proper strategies, the method is seamless.
To be trustworthy, you’ll be able to fully ignore the ability provide cable administration and nonetheless run your PC fantastic for years. But somewhat effort will help you get some notable advantages like improved airflow and ease of part improve and troubleshooting.
To handle the ability provide cables, first, information every of them by means of cable administration channels in your PC case. Then join the PSU with the PC parts using the corresponding energy cables. Next, fasten these cables to the chassis using zip ties or Velcro straps.
Getting Started
To start with, be sure to floor your self. You could both use an anti-static wrist wrap or periodically contact some unpainted steel object. It will make certain the electrostatic discharge out of your physique gained’t do any hurt to the PC parts.

Then collect just a few issues like Velcro straps/zip ties together with a wire cutter/scissors and a Phillips head screwdriver. If obtainable, additionally collect just a few adhesive clips that can assist tuck the cables correctly.

Moving ahead, be sure to solely set up the naked minimal parts beforehand. Avoid putting in cumbersome parts like a GPU, customized loop/AIO cooler or massive CPU coolers that can presumably intrude with the cable administration course of.
And yet another factor! In case you might have a modular or a semi modular energy provide, join all the required energy provide cables prior. But you’re good to go you probably have a non-modular one.

Now assuming that you’ve got already put in the ability provide unit, let’s start the cable administration course of. If you haven’t but, right here’s an in depth information that can assist you set up PSU into your PC case.
Plan the Cable Routing
The next step entails planning the cable routing. Check the cutouts, holes, and grommets in your PC case. Finalize which energy provide cable will likely be going by means of which gap. Decide the absolute best path, relying upon the structure of the PC case. I recommend you route cables by means of the opening that’s nearest to its corresponding connector.
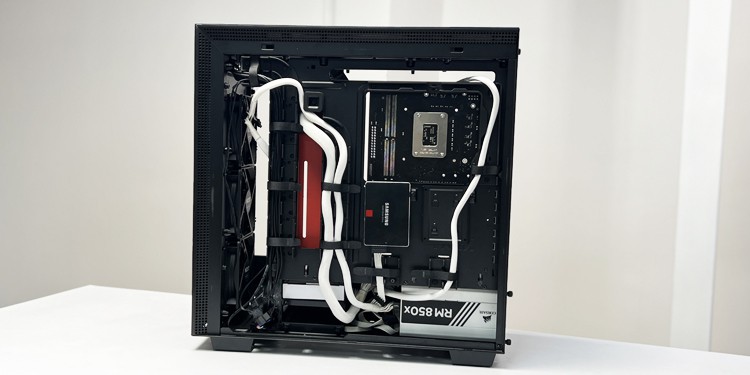
Below is my mid-tower NZXT H700 PUBG PC case the place I’ve routed the 24 pin ATX energy connector from the leftmost gap and the 12V CPU energy connector from the topmost gap. Similarly, discover the most effective route to your GPU, SATA and Molex connectors.

Do be aware that some PC circumstances have a devoted cutout on the shroud to go the PCIe energy cable. Check you probably have one. It will make cable administration to your GPU far simpler.
Connect Power Cable to PC Components
Now allow us to join the ability provide connectors to the consecutive PC parts. Start by connecting the 24-pin ATX connector to the ATX header on the motherboard.

Then plug the 12V CPU energy cable into the CPU header. Similarly, join the SATA and Molex units with their respective energy cables.

If you might have a case fan controller hooked up to the back of the motherboard tray, route the fan energy cables as much as the controller and energy it using the SATA energy cable.
Since a lot of the SATA and Molex cables are pigtailed in trend, you should use a single cable to energy a number of units, finally decreasing the cable muddle.

Manage the Cables
Once you might have related the cables to each ends, there is just one factor remaining—managing the cables. This is the place it will get nasty for these first-time PC builders. But, there isn’t a factor to fret about. Follow us by means of, and we’ll breeze you thru all the course of very quickly.
To start with, seize the ability cables and information them by means of the cable administration channel within the PC case.
Then fasten them to the case using zip ties or Velcro straps. Make certain you chop any additional size of those ties.

If your PC case doesn’t have devoted channels for routing the cables, tie the cables to the “chassis tabs” and route cables by means of them. Adhesive clips additionally turn out to be useful in such conditions.

Consider making a loop if the cable is simply too prolonged and there may be ample area between the facet panel and motherboard tray. While at it, make certain the loop isn’t stretched a lot to keep away from breakage in the long term.
Moving ahead, pull out all of the extreme cables, bundle them along with a zipper tie, and securely tuck them beside the PSU compartment.

Finalizing Cable Management
Before finalizing the cable administration, reinstall your graphics card or the CPU cooler in case you might have eliminated it earlier. Then plug in corresponding energy provide cables into it.
Once all of the cables are plugged in securely, double-check all the pieces. Here’re just a few issues you must guarantee earlier than ending up.
- Avoid making a large number of cables by crossing them throughout that may presumably intrude with the fan motion. Plus, make certain the cables don’t contact any scorching parts like a CPU cooler, GPU or RAM.
- Refrain your self from stretching the cables unnecessarily.
- Leave some area in cable administration holes to accommodate future upgrades.
- Make certain you’ll be able to shut the facet panel with out stressing the cables.
If all the pieces is as much as par, attempt turning in your laptop. Provided that your PC powers up shut it down and reattach the facet panels.
Check out more article on – How-To tutorial and latest highlights on – Gaming News