How To Clean Mechanical Keyboard In 7 Steps.
If your keyboard keys are sticky and also you’re discovering them onerous to press, understand it’s time to wash your keyboard.
To clear a mechanical keyboard, first, pry out the keycaps and soak them. Start brushing each part – from the principle floor to in between the switches. You might use microfiber material and cotton swabs to do away with the robust stains.
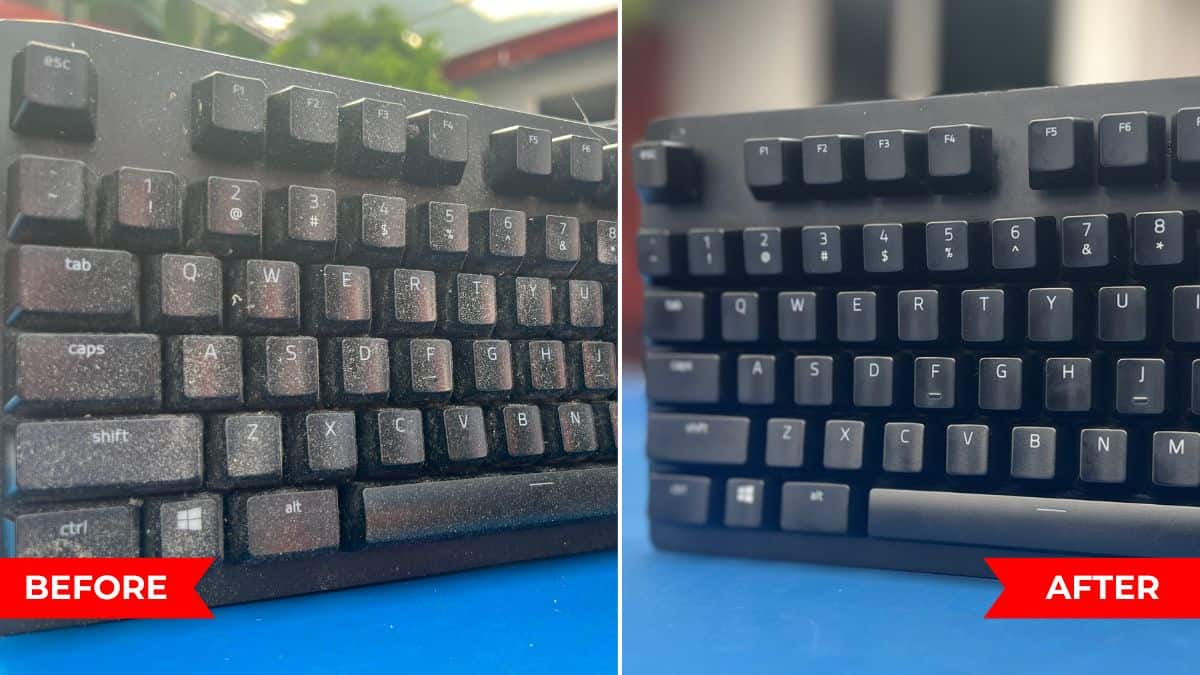
That’s precisely what we did to wash our Razer Huntsman Elite optomechanical keyboard. See how we managed to take away all of the mud, filth, grime, meals crumbs, and stickiness.
Even although the cleansing course of might fluctuate relying on the keyboard you’ve gotten, my demonstration under ought to provide you with a normal concept of how to wash it anyway.
Before You Begin
Whether you’re a gamer or a traditional office person, you’re in all probability spending most time in your PC, totally on the keyboard!
Dr. Gerba from the University of Arizona claims that keyboards get contaminated with as much as 3,295 micro organism/sq. inch. That being mentioned, it’s important to wash this peripheral not less than as soon as every week for well being and hygiene causes.
Don’t wait to your keyboard to build up with mud. Those germs and micro organism would possibly make you sick.
But earlier than wiping any part, listed here are just a few instruments that you’ll want to collect. These must be simply obtainable in your house. But for some, you would possibly require visiting the closest departmental retailer:
- Lint-free microfiber garments
- Good-quality cotton swabs
- A pair of tweezers
- Keycap puller (ought to come along with your mechanical keyboard)
- Wet Wipes or 70% Isopropyl Alcohol (advisable for cleansing and disinfecting)
- Brush (with delicate bristles)
- Compressed Air Can (or Air Duster)
- Cleaning Solution/Soap and Water/Detergent (just for keycaps)
In this information, I’ve used a rechargeable air duster as effectively. Don’t fear even when you don’t personal one. The above gear listing ought to suffice.
Unplug the Keyboard and Place it on Clean Surface

Start by disconnecting the USB-A or C cable out of your pc’s port. If your mechanical keyboard has a pass-through cable, unplug that as effectively.
Next, take your peripheral to a dust-free desk. Note that you simply’re required to clear the floor all through the method alongside along with your keyboard.
Personally, I like to recommend taking it outdoors your working space. That’s what I normally do in terms of cleansing my PC parts.
Take Off Keycaps
If you’re solely planning to wash your gaming keyboard evenly, begin by holding it the other way up. Shake it gently or give some faucets on the back. This ought to make all of the particles and meals crumbs fall off.
You might even insert the compressed air can’s pipe beneath the keys. Give quick bursts of air and this could blow out the particles which can be caught inside.

Even so, pet hair and stains should stay! Thus, it’s all the time best to take off the keycaps. But earlier than that, I like to recommend taking an image to make sure you don’t overlook the place to reattach.
Caution: Do not try to yank the keys off along with your naked hand. You might find yourself damaging the switches.
Make certain you use a keycap puller to do that job. If you don’t have one, a flat-headed screwdriver would additionally do.
Place the 2 ends between the keys and pull them straight. Here’s what our Huntsman Elite seems like after prying out all of the keycaps:

Note that the longer keys, (like Space bar, Caps Lock, Shift, Enter, and so forth.) would possibly take somewhat more effort. They have stabilizers that make sure the keys don’t shake or rattle when pressed.
If you exert an excessive amount of pressure whereas pulling, they will doubtlessly break. So, be very cautious!

Soak the Keycaps
Caution:
Even although fashionable gaming keyboards are spill-resistant, cleansing with liquid options ought to solely be carried out on keycaps.
Avoid spilling water on the keyboard floor or switches, particularly the device’s openings.
Even if tiny drops of water get inside, the PCB would possibly get broken.
Once all of the keys are eliminated, you possibly can put together a cleansing liquid answer your self. Take a bowl stuffed with cleaning soap/detergent and water.

Now, pour down all of the keys and rinse them effectively. I saved them soaked for greater than an hour and counsel you do the identical.
While that is being carried out, you possibly can transfer on with the remaining technique of cleansing.
Remove Stain, Crumbs, and Dust
Before continuing with the next steps, keep the comb, duster, microfiber material, and cotton swabs prepared:
- Start by holding your keyboard the other way up and gently shake. All the meals crumbs, mud, and particles ought to fall down.

- Now, place the keyboard on a desk and begin by wiping away mud particles using a brush.

- In my case, that wasn’t sufficient. So, I had to make use of a rechargeable air duster as demonstrated under.

- Yet, some strands of hair can stay. Pluck them out with the assistance of tweezers.

- Still, the keyboard will look soiled as we haven’t labored on stains but. Dip the cotton swab in Isopropyl Alcohol (that’s meant for cleansing).
The alcohol ought to evaporate rapidly. But keep away from using any laboratory reagents even when they declare to have non-corrosive properties. - Apply little or no strain and begin rubbing the filthy components using a cotton swab, particularly in between the keys. Replace the broken buds as they could go away strands, which can add as much as the cleansing course of.

- In case the switches seems soiled, use one other cotton swab to wash your mechanical keyboard correctly.


Deep Clean Your Keyboard [For Advanced Users]
By now, your keyboard ought to look a lot tidier than earlier than. But if yours nonetheless has caught hair or stains within the swap, you’ll must go one step additional.
This includes detaching the keyboard’s prime casing from the underside. Once you get entry to the inner components, begin cleansing every of the inner parts.
For mechanical gaming keyboards, test when you have hot-swappable keys. If sure, chances are you’ll use a swap puller to pluck every of them and clear them individually. Also, don’t overlook to take away filth and dirt from the compartment.

In reality, in case your keyboard is making ratting or scratchy sounds, I counsel lubing the switches. You may even use this method to make your keyboards quieter.
These duties require fundamental {hardware} abilities and can be robust for inexperienced persons. We’ll quickly have an in depth information that can assist you disassemble mechanical keyboards.
Finalize Cleaning
There are just a few further areas that you’ll want to work on. These embody media buttons, aspect/backside housing, cable, ferrite bead, ft, USB connector, and so forth.
- If your keyboard has media buttons and a digital dial, gently wipe them using a microfiber material. In case they’ve seen stains, chances are you’ll dip the material in Isopropyl Alcohol and redo it.

- Next, clear your entire keyboard floor to make sure no stain stays. Also, mud away extra particles which may have accrued after cleansing different components.

- Hold your keyboard and clear the aspect housing.

- Continue doing so within the backside housing as effectively.

- While at it, clear the keyboard ft as demonstrated under.

- In our case, we used a cotton swab to clear the six-pin connector. It’s used for connecting the wristrest and powering the RGB lights.

- Let’s transfer on to the cable. Take a dry material and begin wiping it from prime to backside.

- You’ll come throughout the ferrite bead for certain. Make certain to wash it as effectively.

- Now, finalize the cleansing by wiping the USB connector.


Dry and Reattach Keycaps
Now that your mechanical keyboard seems neat and tidy, it’s time to maneuver back to the keycaps that we soaked earlier. Start wiping them using a towel one after the other and place all of them on a clear and dry desk.
Don’t reattach them straight away! Let them dry for just a few hours.

Well, that’s what we did. But even after three hours, it wasn’t sufficient. Although the keycaps appeared all dry, they had been nonetheless holding water droplets.
Indeed, we didn’t wish to take the danger and determined to dry the keycaps in a single day. The next day, we reattached all of the keys taking assist from the {photograph} taken earlier.

When placing back the keycaps, ensure you test for caught keys. In our case, we had been capable of repair the Esc key that was caught and never working.
Once all the pieces is finished and dusted, plug within the gaming keyboard in your pc’s port. Then, I like to recommend using an internet keyboard testing utility to confirm if the keyboard works or not.
Check out more article on – How-To tutorial and latest highlights on – Gaming News