BIOS Update Failed? Try These Methods To Recover.
After a failed BIOS update, your PC can’t begin the {hardware} initialization course of, and that’s the rationale your system is unable besides up. In technical phrases, we name this a ‘NO POST’ problem.
Most motherboards assist an auto-recovery characteristic, or you could even manually provoke the boot block recovery. Also, some fashions supply options like Dual BIOS and USB Flashback buttons that may make this course of a breeze.
Most customers assume that their motherboard is bricked after flashing an incompatible ROM file or there was an influence interruption in the course of the improve. However, superior methods like changing or reprogramming the chip can assist.
So, in case your BIOS update fails, don’t panic! I’ve coated each primary and superior methods on this article that ought to allow you to out.
Try BIOS Auto-Recovery
Some methods (primarily laptops) have a BIOS auto-recovery functionality. The backup image is saved on the first storage drive, and if something goes fallacious, it ought to begin routinely (until you had it disabled earlier than).
- First, power restart your PC and see if the method continues the place it left off.
- If that doesn’t assist, carry out an EC/exhausting reset or clear CMOS. Then, strive once more to see if the auto-recovery can leap into motion.
- In some pocket book computer systems, it’s essential to explicitly provoke this course of using the manufacturer-recommended hotkeys or different strategies.
For instance, HP recommends urgent Windows + B when turning on the system, and DELL customers want to carry Ctrl+ Esc when connecting their AC adapter.
Check the assist web page of your mannequin to study more about this.
Use Manufacturer-Recommended Boot Block Recovery
Most motherboards that provide computerized recovery options are based mostly on Boot Block Technology. Unlike the earlier technique, this one allows you to reflash the proper BIOS model if the Boot Block was not corrupted in the course of the flashing.
Again, the precise course of varies based mostly in your mannequin. However, the overall thought is similar, and right here’s what it’s essential to do:
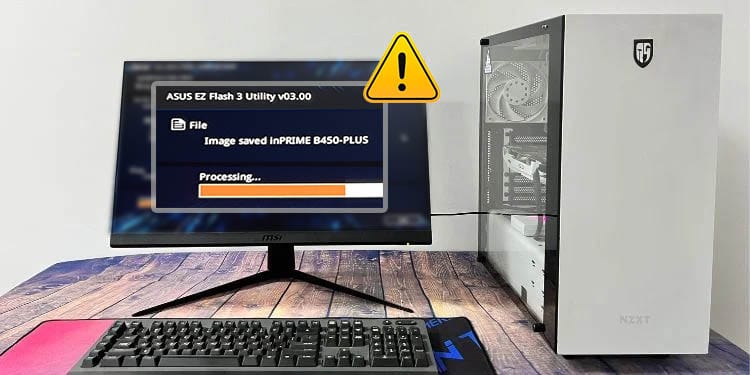
- First, guarantee your motherboard or laptop computer helps such a characteristic. For instance, ASUS presents CrashFree Utility that takes you to the EZ Flash display, from the place you possibly can reflash the suitable
ROMfile. - If it does, use a working pc to obtain the newest/suitable BIOS file. In case you’ve the motherboard DVD, it is best to discover a BIOS ROM file right here as effectively.

- Next, rename the file as acknowledged in your mannequin’s BIOS Update Manual. This can fluctuate relying on the BIOS producer (AWARD / AMI / PHOENIX). As demonstrated beneath, ASUS presents a devoted BIOSRenamer utility that does this job routinely.

.batwhereas AMI customers require altering it to.ROM. The course of is a bit totally different for newer boards using AMI BIOS Core. - Copy the content material to a USB flash drive earlier than inserting this into the problematic PC.

- Start/restart your PC and this takes you to the flash utility, the place you possibly can proceed the identical manner you had up to date the BIOS earlier than. This time, guarantee no energy failure happens (I recommend using an UPS).
- If your motherboard/laptop computer doesn’t assist this, use the BIOS producer’s strategy of making ready a bootable floppy disk containing the DOS batch file. The course of stays much like doing it from a USB drive.


Via Dual BIOS Feature
Dual BIOS is a fail-safe characteristic out there on a handful of motherboards. As the identify suggests, it embeds two ROM chips. If the first fails, the backup BIOS will kick in.
Depending on the motherboard, the twin BIOS characteristic will both begin routinely or it’s essential to toggle the devoted swap. For the previous, you simply should restart the PC, and the boot block recovery will start. But for the latter course of, undergo the beneath directions:
- Prepare a USB flash drive containing the suitable ROM file (use one other working pc for this).
- Then, swap to the backup BIOS (by toggling the swap or urgent the devoted button).

- Insert the pen drive (if required) into the troublesome PC, begin it, and proceed to flash the brand new BIOS model.
- Once you’re within the devoted utility, choose the ROM file.
- Now, swap to the first BIOS and begin the method.
- Wait for the method to finish and this could recuperate the defective BIOS.

While the overall steps above work for many methods, it’s reasonably best to observe what your producer recommends. Our group has already ready totally different guides on the preferred motherboards. Navigate to the next hyperlinks to study more:
Reflash Using USB Flashback Button
Most trendy motherboards (each mid-end and high-end) now embody a USB flashback characteristic that has made BIOS update a painless job.
Since your PC doesn’t get to BIOS to carry out a guide update and if the above strategies don’t work out for you, that is the subsequent and possibly the best choice. Even just lately, our group was in a position to recuperate BIOS using this characteristic on the ASUS ROG STRIX B550-I GAMING motherboard.
The following steps are in regard to how we did it and will be just right for you regardless of the system you’re using:
- Download the BIOS file on one other working pc, rename it, and duplicate it to a USB flash drive.
- Now, insert this drive into your motherboard’s USB BIOS Flashback port.
- Make certain the PSU cables are linked earlier than urgent the button for about 3 seconds.

- You’ll see an LED gentle flash. After just a few blinks, this could pace up. As we had the monitor linked, we bought the “BIOS is updating LED firmware” message on the display.

- After roughly 5 to 10 minutes, the course of ought to full, adopted by your BIOS producer display.
- Hit the devoted key to enter BIOS Setup and reset it to manufacturing facility defaults.


Contact Manufacturer
In case not one of the aforementioned strategies labored for you, I recommend contacting the producer. They ought to reprogram/exchange the BIOS chip if doable or supply another related methods.
While it’s true that updating BIOS can void the guarantee, it’s nonetheless best to verify this your self. They might need a distinct guarantee policy and I’ve heard from some customers that they have been in a position to get a brand new board.
Reprogram BIOS Using Specialized Tools
Even if the producer can’t allow you to, it’s time to go for some hardcore strategies. You can manually reprogram the BIOS you probably have prior expertise in breadboarding electronics.
Note that your motherboard is just not completely damaged. Just the BIOS chip must be restored. Thus, specialised instruments like SPI CH341A Mini Programmer, TL866 Programmer, and Buspirate can assist you recuperate it. Also, you will discover BIOS programming kits on-line.
What I’ve coated above concerned software program flashing that doesn’t at present assist flashing the boot block.
On the opposite hand, the strategy concerned right here entails {hardware} flashing and moreover requires EEPROM utility working on a working pc to have the ability to write into the SPI flash chip (which is the place the BIOS is saved). Some common examples embody Flashrom, MiniProfessional, Xgpro, SPIPGM, and so on.
The course of may be time-consuming and sophisticated however it’s positively one of the efficient methods to repair a bricked BIOS:
- If doable, desolder the chip and join it to the breadboard or one other programming software.
- For customers using the CH341A Mini Programmer, you possibly can straight join the clamp cable to the SPI chip.
- However, it’s essential to know its pinout beforehand to make sure you’re placing the clamp on the acceptable dot on the SPI chip (as demonstrated beneath).

- Connect it to a working pc and use the popular third-party software program to rewrite the BIOS.
- Once carried out, solder back the BIOS chip (should you had it eliminated earlier).
- Start your PC and the recovery needs to be profitable.

Performing a ‘hot flash’ can also be a way cracked by some professionals. However, this may be extraordinarily harmful as it might utterly injury the motherboard. So, solely proceed should you’re able to take some dangers.
The course of entails using one other an identical board. Once you attain the flashing display, take away the present BIOS chip and insert the faulty one. After the update is full, you possibly can reinsert it on the earlier board and verify if the PC can boot up.
Replace Your BIOS Chip
The remaining choice is to exchange the BIOS chip. You can seek for devoted web sites that promote pre-programmed chips. But ensure you get the one which’s suitable along with your motherboard.
- Locate the BIOS chip. If it’s in a socket, use a chip puller/tweezer to take it off.
- But if it’s slotted into the PCB, you’ll have to have correct soldering abilities to desolder this.
- Once that’s carried out, slot/solder the brand new chip to the motherboard and begin your PC.
Both the talked about remaining methods are supposed for super-advanced customers. If you’re a standard consumer who doesn’t need to get entangled, I recommend searching for skilled assist. Otherwise, the final kind could be to exchange the motherboard.
Check out more article on – How-To tutorial and latest highlights on – Gaming News