Best Thermal Paste Pattern: 5 Methods Tested.
After testing totally different patterns on a number of CPUs, I discovered that the X-pattern yielded the most effective outcomes for bigger processors just like the Threadripper. But for many different processors, something greater than a tiny dot was extreme.
The pea technique is without doubt one of the best methods to use thermal paste. This includes placing a pea-sized dot of paste in the course of the CPU earlier than attaching the cooler.
The paste then spreads out evenly when strain is utilized from putting in the cooler, creating a skinny layer that fills in all of the microscopic gaps between the CPU and the cooler floor.
Other generally used patterns are 5-dots, single/double/triple strains, and buttered toast. All of those include their particular person professionals and cons.
Now, let’s focus on all these patterns intimately.
I’ve additionally examined the unfold by inserting plastic sheets between my thermal paste (HY510) and the heatsink for example higher the way it spreads.
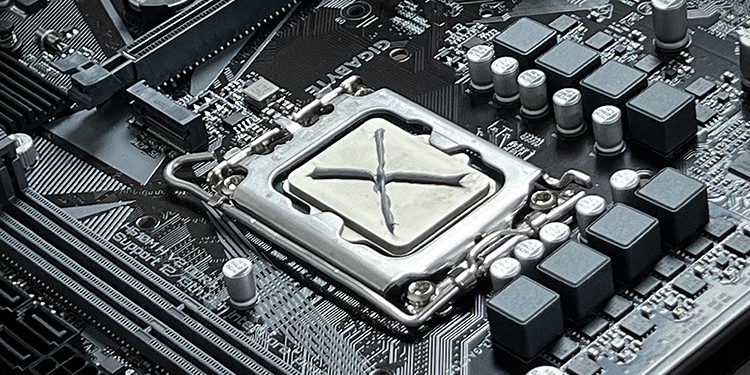
X-Pattern or Cross

The X-pattern is without doubt one of the hottest thermal paste patterns and for a great cause. Here, you apply the paste as two diagonal strains by forming a cross.
This approach, the paste on every line spreads sideways when putting in a cooler or heatsink and covers many of the processor.
- Good general unfold on the processor.
- Very much less probabilities for air pockets.
- Suitable for thermal paste with low to medium viscosity.
- Best choice for bigger CPUs
- Chance of spilling thermal paste from corners.
- Difficult to evaluate probably the most appropriate quantity of paste.
- Not ultimate for thermal paste with excessive viscosity.
- Unsuitable for electrically conductive thermal pastes like liquid metallic.
Note: The viscosity of a thermal paste impacts its unfold. A much less viscous thermal paste spreads additional whereas making a skinny layer however can simply spill to the motherboard with an incompatible sample.
A more viscous thermal paste doesn’t unfold as a lot. So it could create thicker spots the place you apply it. And it requires a more spreaded sample. But it doesn’t spill as a lot and is simpler to wash from the cooler and the CPU.
Best Way to Apply:
- Make the width of every diagonal steady however as skinny as potential.
- Don’t let the ends of the ‘X’ go all the best way to the corners.
Pea or Dot (Blob)

Another solution to apply the thermal paste is by placing a pea or dot of it within the middle of the processor. After putting in the heatsink, the paste spreads outwards in all instructions from the middle.
The dot is often pea-sized for traditional CPUs. For CPUs with bigger socket sizes, you might want an even bigger blob. If you’re making use of the paste to a processor with out IHS, a rice-grain-sized dot ought to be sufficient.
- Easiest to evaluate the required quantity and apply.
- Least possibilities of spilling the thermal paste.
- Thermal paste lasts longer.
- Suitable for thermal paste from low to excessive viscosity. But works best with medium viscous pastes.
- Suitable for many processors, together with delidded ones.
- May not unfold to all of the floor of the processor, particularly its corners.
- May be thicker within the center, rising the general thermal resistivity.
Best Way to Apply:
- Just squeeze an acceptable quantity of paste in accordance with the dimensions of your CPU die or IHS.
- Avoid shaking the thermal paste tube an excessive amount of, or some air pockets might kind. Having the least air pockets prolongs the thermal paste’s lifespan.
Buttered Toast

You may also use a thermal paste spreader to unfold the paste all around the CPU floor. Here, you aren’t counting on the heatsink to unfold the paste however doing it your self.
Depending on the way you unfold the paste, it could have a tough or clean floor texture. But clean is all the time preferable as a tough unfold can create air pockets.
These pockets enhance the general thermal resistivity of the layer, consequently overheating the CPU and decreasing its lifespan.
- Best unfold over the processor floor.
- Ideal for thermal paste with medium viscosity.
- Low chance of spilling to the edges in case you use a correct quantity.
- Time consuming to use correctly.
- Highest probabilities to kind air pockets.
- Difficult to resolve the appropriate quantity.
- Can spill with larger quantity or in case you use pastes with low viscosity
- Unsuitable for electrically conductive thermal pastes.
Best Way to Apply:
- Apply the paste on one facet as a straight, steady line. Then, unfold it slowly to the opposite facet.
- Use an everyday Thermal Paste Spreader as a substitute of on the lookout for alternate options.
- Make the unfold as clean as potential to restrict potential air bubbles. More air bubbles will trigger the paste to dry out sooner.
- Try to not spill the thermal paste to the motherboard whereas spreading.
- After mounting the heatsink, it’s higher to examine if the paste contacts its base correctly to substantiate the required quantity.
Single Line

Many folks additionally apply the paste in a single straight line from one facet to the opposite. It acts just like the dot sample, however the unfold in all instructions is more uneven.
- Easy to evaluate the required quantity and apply.
- Less possibilities of air pockets.
- Good choice for thermal paste with low to medium viscosity.
- May not unfold correctly to all the edges and corners.
- Can spill on the edges nearer to the ends of the road.
- May be thicker within the center, rising the general thermal resistivity.
- Not appropriate for thermal paste with excessive viscosity.
Best Way to Apply:
- Don’t let the ends of the road contact the edges.
- You can apply the paste both vertically or horizontally.
- Don’t make it too skinny or too thick. It’s higher to check out the unfold earlier than the ultimate software.
Double/Triple Lines

Since a single line doesn’t unfold the paste a lot to the edges parallel to the road, you may apply more strains for a greater unfold. In this sample, you set the thermal paste as two or three parallel strains symmetrically on the CPU.
You want thinner strains if you wish to use the triple-line sample. However, all the pieces else stays the identical between these two patterns.
- The paste will unfold to all the edges.
- Somewhat even thickness all around the layer.
- Good choice for thermal paste with low to medium viscosity.
- May not unfold to the corners.
- Can spill on the edges nearer to the ends of the strains.
- Some possibilities of air pocket formation.
Best Way to Apply:
- Make every line steady and skinny.
- Don’t let the strains contact the edges.
- You can equally apply the paste vertically or horizontally.
5-Dots

You may also apply 5 dots of the thermal paste on the processor in order that it spreads to the entire floor after you mount a heatsink. Four dots go to the corners, and the ultimate one goes to the middle.
- Easy to use.
- Good even unfold over the processor.
- Suitable for greater processor chips.
- Good choice for thermal paste with medium viscosity.
- Less possibilities of spillage.
- More possibilities of air pocket formation.
- Slightly tough to evaluate the required quantity.
Best Way to Apply:
- Apply a small dot-shaped thermal paste on the middle.
- Apply 4 smaller dots close to the center level between the middle dot and the corners.
Testing Out the Patterns
I additionally examined out the outcomes of various HY510 thermal paste patterns on an Intel CPU beneath the identical atmosphere situations. I attempted out all of the patterns a number of occasions with various quantities of paste and monitored the CPU temperature.
I’ve illustrated the most effective end result for every sample in a comparability graph. I didn’t examine patterns using the identical quantity of paste because it spreads in a different way for separate patterns. So the comparability wouldn’t be honest.
The elements that I used included,
- Processor– Intel i3-12100 (no OC)
- CPU Fan– Intel Stock Fan
- Motherboard– MSI PRO B760M-E DDR4
- Thermal Paste– HY510

From the comparability graph, we are able to see that there’s not a lot distinction within the CPU temperature.
In the idle state of the CPU, the temperature ranged from 34-38.5°C. On working a single core stress check, the temperature remained between 49.3 and 54.6°C.
Regardless, I bought the best end result from the pea sample, carefully adopted by the cross.
Check out more article on – How-To tutorial and latest highlights on – Gaming News