ASUS BIOS Update: 5 Easy Ways.
ASUS BIOS updates normally include safety patches, bug fixes, compatibility enhancement, and in some instances, new options!
Unless you completely require safety and {hardware} enhancements, updating BIOS is just not essential because the risk-to-reward ratio is much too excessive.
ASUSTek affords 5 completely different strategies and every serves a novel function:
- EZ Flash: Upgrade to a brand new model straight from the BIOS interface
- EZ Update: For customers who search to run the BIOS update from AI Suite
- Windows BIOS Flash: A devoted Windows app to carry out BIOS updates
- USB BIOS Flashback Button: Updates the BIOS with out a CPU or RAM
- BUPDATER: Run the update in FreeDOS Prompt
No matter which technique you’re going to observe, it’s important to be further cautious when updating the BIOS. This detailed information ought to allow you to set up the newest firmware model on any ASUS motherboard
Before You Begin
First, it’s essential to verify whether or not your ASUS motherboard requires a BIOS update. Only then do you have to obtain the appropriate file.
In some eventualities, you may require copying it to a storage drive. And don’t neglect to take precautions earlier than beginning the method as I acknowledged earlier. Let’s cowl every of them briefly.
Check and Compare BIOS Version
First of all, I like to recommend following my different information to examine the present model after which examine it with the newest one out there on-line.
This is feasible from each the official ASUS web site and the MyASUS utility. For demonstration, I’m going with the primary strategy:
- On the ASUS residence web page, seek for your motherboard mannequin and choose it.

- Switch to its Support part.
- Now, choose Driver & Utility > BIOS & FIRMWARE.

- The latest BIOS file will likely be proven on the prime. If you need to get a fast overview of all the opposite variations, press Expand All.

- Now, examine the Version subject together with your motherboard’s present BIOS model.


Download the BIOS File and Transfer to USB Flash Drive
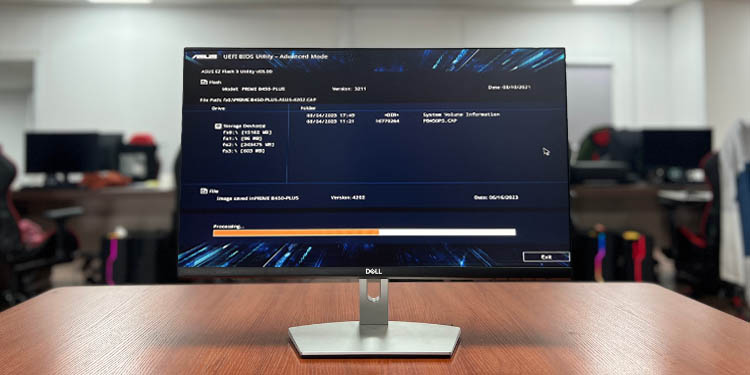
Well, I’m at the moment working the 3211 model on PRIME B450-PLUS however the latest one on-line is 4204. Since I’m looking for system efficiency enchancment, a BIOS update ought to assist me out.
That mentioned, you must solely carry out such upgrades if completely required. If you have got a selected motive and are 100% able to go for a firmware update, right here’s what to do next:
Note: It’s best to go together with the newest model as proven earlier. However, I counsel skipping the one which’s talked about ‘beta’ because it’s not examined correctly by the producer.
- Hit the Download button and the zip file needs to be saved to your PC.

- Extract the content material inside it. The particular factor about ASUS is that you simply’re going to search out two information – BIOS Renamer and the
.CAPfile.
- Run the Renamer file and your BIOS file needs to be renamed robotically.


If you’re planning to make use of the EZ Update utility on AI Suite 3, you’re now good to go.
However, customers who’re making an attempt to update through EZ Flash Utility (using the Storage technique) want to repeat the file to a FAT32-formatted drive. Note that the NTFS and exFAT file methods aren’t supported within the firmware interface.
Things to contemplate
- Since there’s a danger of boot-related points, at all times back up your essential information and information earlier than continuing to update the BIOS.
- Do not flip off the PSU when the update is in progress. For customers who is likely to be experiencing frequent energy cuts, I extremely advocate connecting your PC to a UPS.
ASUS laptop computer customers are steered to maintain the facility adapter plugged in all through the method. - Also, it’s best to keep away from urgent any keys or unplugging the related USB flash drive. This may trigger interruption and should result in boot failure.
- If you’re performing an update through the web, go for a wired connection. And most significantly, be sure to don’t face any network points in the course of the course of.
- While it’s best to go together with the newest BIOS model, some may require a earlier update to be appropriate. Kindly try for such exceptions from the outline.
- Also, ASUS recommends loading optimized defaults after the update to make sure the system is secure.
Use EZ Flash Utility in ASUS BIOS
The normal solution to update your motherboard’s firmware is thru the BIOS interface itself. ASUS affords the EZ Flash Utility and the newest one (EZ Flash 3) permits you to take action using an exterior storage device and even straight through the Internet.
Well, the concerned steps barely range on UEFI and Legacy modes. Since most methods are geared up with the trendy UEFI interface right this moment, I will likely be emphasizing the identical. Nonetheless, I’ve supplied the simply basic steps for the opposite mode beneath.
Key Steps for Legacy BIOS customers:
- Enter ASUS BIOS > Advanced tab > ASUS EZ Flash [2 or 3].
- Now, insert the storage device, and choose the suitable file from Text Mode.
- Hit Yes to verify the BIOS update and look ahead to about 5 to 10 minutes.
Via Storage Device
This technique includes inserting the FAT32-formatted USB drive you ready earlier and manually initiating the method.
Just a number of months back, my PRIME B450-PLUS mannequin was experiencing random stuttering after enabling TPM. The closing choice to resolve my drawback was updating BIOS.
Even although the 3802 model might resolve this drawback, I made a decision to go for the newest one (which was 4202 at the moment).
The course of was pretty simple and accomplished in lower than 5 minutes. Based on this expertise, I’ve compiled the important steps that you must perform:
- First, begin/restart your pc and use the Del/F2 key to enter ASUS BIOS.
- Use F7 to shortly change from EZ to Advanced mode.
- Navigate to the Tool tab.
- Here, choose ASUS EZ Flash 2 Utility or ASUS EZ Flash 3 Utility, relying on the motherboard.

- Pick the through Storage Device(s) choice, if requested.
- Select the thumb drive and choose the
.CAPfile that you simply had renamed earlier.
- A dialogue field ought to pop up. Press Yes to proceed.

- Now, a closing affirmation seems with the brand new model that will likely be flashed. Again, choose Yes.

- It’s time to look ahead to the BIOS update to finish.

- Once finished, you’ll probably get this message, “Update successful! System will be reset”. You might hit OK or the pc will robotically reboot.
- Now, the AMIBIOS display screen ought to seem asking you to arrange your BIOS to get better the settings. Press F1 to proceed.

- For closing affirmation, you will get back to the ASUS UEFI Utility and examine the up to date model.


Via Internet
This is a brand new characteristic built-in on just some fashions that help ASUS EZ Flash 3. Do be aware that it’s not out there on each BIOS.
In our office, each the PRIME B450-PLUS and ROG STRIX B450-I GAMING didn’t present this feature although they supported the third revision of the EZ flash utility.
However, it was out there on the ROG STRIX 450-I GAMING. Our crew was keen to check the way it labored out. We determined to go for the BIOS update, which has certainly helped enhance the system efficiency.
Here are the required steps for this course of:
- First, get to BIOS and change to the Advanced mode.
- Select Tool and choose ASUS EZ Flash 3 Utility.

- Then, select the ‘via Internet’ choice and hit Next.

- Then, choose considered one of these choices – DHCP, PPPoE, or Fixed IP, based mostly in your Internet technique.

- The BIOS will now immediate you to the affirmation obtain display screen. Identify the model earlier than hitting OK.

- Wait for the obtain to finish. This ought to take now not than a minute however might range you probably have a slower web connection.

- Now, you may be taken to the same affirmation window as with the storage media technique. Select Yes to proceed.

- The update course of will start. Now, all you want is endurance! Once that is full, your ASUS system ought to restart robotically.


Via EZ Update in AI Suite
For ASUS customers who want to run the BIOS update straight from their working system, AI Suite is the software you’re searching for. The latest model is AI Suite 3 however be aware that solely the newer boards help it.
Along with fan velocity customization, {hardware} monitoring, and a plethora of different options, you’ll discover the EZ Update choice throughout the utility itself. Like the earlier technique, it additionally affords performing BIOS updates on-line or through the storage technique.

If you haven’t downloaded AI Suite already, search for it underneath Driver & Utility in your mannequin’s help web page. It needs to be within the Software and Utility part as demonstrated within the above screenshot.
Manual Update
Let’s look into the handbook course of first. As I discussed earlier, you don’t require a USB flash drive on this case. Just obtain the file through the MyASUS utility or the official Support web site.
Recently, ASUS got here up with the 4204 model for my PRIME B450-PLUS motherboard. While this update wasn’t completely essential, it did resolve the potential safety vulnerabilities.
This time, I attempted the EZ Update utility from the Windows atmosphere and I didn’t discover a lot distinction as in comparison with the sooner technique. The solely benefit right here is you don’t want to organize a USB drive.
Having mentioned that, you possibly can go for both of the 2 strategies as they work the identical. Here are the overall steps you might want to observe:
- First, launch the ASUS AI Suite Utility.
- Click on the hamburger button on the left facet of the applying.

- Once the menu seems, choose EZ update.

- From the ‘Manually update Boot logo or BIOS’ part, press the meatball menu icon.

- Now, you possibly can browse for the renamed file and choose it.

- Wait for a number of seconds and two separate buttons ought to seem – MyLogo and Update. Pick the second choice.

- Now, click on the Flash button.

- A affirmation dialogue field ought to pop up. Hit OK and also you’ll be taken to the EZ Flash display screen.
- Wait till the update will get accomplished and the PC ought to restart.


Check Updates From the Internet
A a lot faster choice is to detect the out there BIOS model on-line and proceed provided that essential. It’s an identical to the Internet technique within the EZ Flash.
I did do this on PRIME B450-PLUS nevertheless it didn’t present the newest 4204 model I used to be searching for. That’s the explanation I opted for the earlier technique.
Here’s what to do:
- In the ASUS AI Suite utility, get to the EZ update part first.
- Hit the Check Now! button as proven beneath.

- Click on Connect to look if there’s an update out there.

- For some motive, I bought the “There’s no need to update the environment” message. This meant that the app couldn’t discover a appropriate model for my system.

- But if you happen to get one, merely choose the newest model and hit the Update button.
- Once the dialogue field pops up, press OK and this takes you to the EZ Flash display screen.
- After the update completes, your PC will restart. Enter the setup web page and cargo the optimized defaults and try to be good to go.


Run Windows BIOS Flash Utility
Some fashions include a devoted Windows utility for updating BIOS. This is very the case with ASUS laptops.
Look for Windows BIOS Flash Utility or BIOS Installer for Windows in your mannequin’s help web page. If you have got put in the MyASUS app, examine if there’s a BIOS Update for Windows part out there.
Even lately, I flashed the newest BIOS model (317) on my Vivobook Pro 15 (X580VD) laptop computer using Windows BIOS Flash Utility.
The following directions are based mostly on my expertise. The actual course of may range relying in your mannequin.
- First, obtain the set up file from the Driver & Tools / BIOS & FIRMWARE web page.

- Run the execution file, full the setup, and open the WinFlash utility.

- The first window normally checks for the network, adapter, and battery energy. If there’s something defective, it ought to show some type of message. In case all the things is okay like beneath, hit Next.

- Select any one of many two strategies – Get BIOS from the Web or Get BIOS from Device.

- Check the BIOS data and hit the Update button to begin the method.


Use USB BIOS Flashback
Ever questioned what the marked USB-A port on the motherboard implies? If you are taking a better view, you’ll additionally discover a button next to it labeled ‘BIOS’.
This is the USB BIOS Flashback characteristic nevertheless it’s solely out there on some trendy ASUS boards. It’s primarily used so as to add compatibility to a brand new element (particularly the processor).
While this characteristic can be utilized to update BIOS even with out putting in a CPU or RAM, that’s not at all times the case. Some ASUS fashions may ask you to mount a minimum of an older appropriate processor to finish the method. Take a peek at your consumer handbook to verify this.
Sharing my expertise, once I tried putting in Ryzen 5 4500 on the ROG STRIX B550-I GAMING motherboard (working the 2407 model), it didn’t work. I needed to update it to the newest model as this processor has solely been supported because the 2603 model.
This exercise additionally includes using a USB flash drive containing the appropriate BIOS model. If you’re having boot-related points in your PC, you possibly can make the most of one other working pc for this function. Make positive solely the CAP file is current on the stick.
Once that is ready, undergo the next directions:
- First, fully shut down your PC however don’t unplug the facility cable.
- Insert the flash drive containing the BIOS file and press the devoted button for about three seconds.

- You’ll see that the LED begins flashing which signifies the BIOS update has initiated. After a number of brief blinks, the method will likely be fast.

- Wait till the LED stops flashing. Once you’ve reached the stage, activate the PC.
- You might discover the “BIOS is updating LED firmware” message just like the one beneath. Just look ahead to a number of seconds and your ASUS pc ought to begin the POST.

- After you get the AMIBIOS display screen, press F1 and cargo the optimized defaults. Save modifications and restart your PC.

- You can now set up the brand new elements (if you happen to haven’t already) and examine in case your PC can boot to BIOS or not.


In FreeDOS Prompt

Using DOS utilities to update BIOS is unquestionably not the usual technique. But if you happen to’re somebody who likes to have hands-on expertise with all the things, I’d say that is price a strive!
BUPDATER additionally known as the ASUS BIOS Updater requires a DVD optical drive in addition to a flash drive containing the CAP file. Also, you’ll have to have primary information of the DOS atmosphere and its instructions.
Key Steps:
- Use F8 to launch the Boot Menu window.
- Set the boot device precedence to the DOS-supported DVD.
- In the command-line interface, use <driveletter>: (eg. E:) to shortly change to the USB drive.
- Execute the bpudater /g and this could take you to the Text Mode (barely just like Legacy BIOS).
- Select the BIOS update file (as demonstrated within the screenshot on the highest).
- Hit Yes in each the successive dialogue containers and look ahead to the update to finish.
What to Do if BIOS Update Fails?
BIOS is your motherboard’s firmware and it isn’t one thing to tinker with steadily. As aforementioned, updates are required solely when completely essential!
Also, you have got most likely heard this saying – “failure or interruption in BIOS update will render the motherboard useless”.
Well, that’s true to some extent as most ASUS boards now include a wide range of failsafe options. So, BIOS updates aren’t as scary as in earlier days!
I’ve already supplied an in depth walkthrough on one of many recovery strategies – USB BIOS Flashback. Other than that, listed below are another strategies that ought to assist get better your presumably ‘bricked’ motherboard:
- ASUS CrashFree Utility
- Dual BIOS
- Reprogramming BIOS using specialised instruments (for superior customers solely)
- Replacing BIOS chip (for superior customers solely)
Don’t fear! I’ve already coated an in depth clarification of how these methods work within the following guides:
Check out more article on – How-To tutorial and latest highlights on – Gaming News