
Kdenlive not rendering movies? How to repair.
For all its plentiful options and modifying choices, Kdenlive can typically throw a wrench within the video modifying course of. And when issues emerge proper on the level of rendering or exporting movies, issues can get irritating, to say the least.
There are a variety of issues that would result in issues with rendering in Kdenlive. In this information, we’ll present you a number of fixes that may assist remedy issues with rendering. Without additional ado, let’s get began.
How to repair Kdenlive not rendering movies [7 ways explained]
From corrupted temp information to dangerous setting paths, the checklist of doable issues is lengthy. But moreover points with Kdenlive information and well-known bugs, dangerous undertaking settings also can result in Kdenlive failing to render your movies. Here is a take a look at a number of widespread fixes for points to Kdenlive rendering.
Fix 1: Uninstall after which set up the most recent model
If you’re using an older Kdenlive model, putting in and updating to the most recent model can repair numerous the issues. There have been recognized bugs with earlier Kdenlive variations which have brought about points particularly with rendering initiatives.
But earlier than you do, be certain that to uninstall the model that you simply presently have. To achieve this, press Win+I and open the Settings app. Then click on on Apps within the left pane.

Click on Installed apps.

In the checklist of apps, discover Kdenlive and click on on the three-dot icon next to it.

Select Uninstall.

Click on Uninstall once more.

In the uninstaller window, click on on Uninstall.

Wait for it to complete. Once performed, click on on Close.

Then go to the Kdenlive web site to obtain and set up the most recent model. As of scripting this subject, the most recent model is 22.12.0. Click on Installable and obtain the setup.

Then run the setup and comply with the on-screen directions to put in the most recent model of Kdenlive. To know more about putting in and establishing Kdenlive, discuss with our information on How to obtain, arrange and set up kdenlive on Windows.
: How to make use of Kdenlive on Windows: Step-by-step information
If the update doesn’t work, then you definitely may need to attempt the following technique first after which set up the most recent Kdenlive model.
Fix 2: Delete the Kdenlive Appdata folders
Kdenlive can go away behind a number of non permanent file folders after uninstallation. Sometimes the incongruency between these and any newly created non permanent information could cause issues, particularly for those who’re putting in a special, newer model of Kdenlive.
In such a case, you’ll have to manually delete these non permanent file folders created by Kdenlive earlier than a brand new set up. The following are the folders that you could delete:
C:Users(username)AppDataRoamingkdenlive
C:Users(username)AppDataLocalkdenlive
C:Users(username)AppDataLocalstalefiles
The AppData folder is hidden by default. To view hidden information and folders, merely click on on View in File Explorer.

Then choose Show and click on on Hidden objects.

Once you discover these folders, maintain down the Shift key after which press Delete. This will delete them for good.
Note: Deleting these information will pressure Kdenlive to recreate them and also can assist in conditions the place they’ve turn into corrupted.
Fix 3: Make certain you have got the video within the timeline
For those that know the way to make use of Kdenlive and different comparable video modifying instruments, this can be an apparent factor. But many customers make the error of importing the information into Kdenlive however not transferring them to the timeline earlier than making an attempt to render. The result’s, as one would count on, that nothing is rendered as a result of there’s nothing within the timeline to render.
So, at the price of stating the plain, ensure you switch your media to the timeline as soon as it’s imported to Kdenlive. Doing this is so simple as dragging and dropping them from the undertaking bin to the timeline, like so:

Make the mandatory edits, then choose Render below “Project” within the toolbar above.

Fix 4: Enable proxy clips in Settings
If the supply information used within the video are moved or deleted from their authentic location, Kdenlive can find yourself rendering movies which can be fully white, or have lacking parts. In such circumstances, restoring the supply information to their location once they had been imported after which rendering once more can do the trick.
But a greater different is to allow proxy clips on your undertaking. This will permit Kdenlive to create proxy clips of your media in order that even for those who transfer the supply clips round, it’s going to nonetheless have the proxy clips to depend on when rendering.
Users have benefitted from using proxy clips within the Kdenlive undertaking when rendering to bypass any points that could be stopping them from exporting their movies. Here’s how to allow proxy clips in your Kdenlive undertaking.
Click on Project within the toolbar above.

Then choose Project settings.

Click on the Proxy tab and swap to it.

Here, click on on Proxy clips and be certain that there’s a tick earlier than it.

You can customise the proxy clips as you want. But for those who don’t need to put situations and be certain that proxy clips are created each time, go away all the pieces as it’s by default. Then click on OK.

Now while you go to render your file, choose Use Proxy Clips within the “More options” part.

You will be capable to render your video with out worrying about transferring the supply information round.
Fix 5: Disable Parallel Processing
Using paralleled processing with CPUs which have a number of cores may help share the workload and scale back rendering time. But in case your CPU is just not multi-cored, using parallel processing can really trigger more injury to your output video, and even elevate render time.
What’s worse is that parallel processes can also render disjointed artifacts as an alternative of a complete video – one thing that’s recognized to happen even with multi-core CPUs. So, the prudent factor could be to keep away from it altogether. To guarantee this, be certain that Parallel Processing is unchecked within the “Rendering” window.

Fix 6: Ensure that undertaking information are uncorrupted
Corrupt supply information are one of many most important causes of render failure, be it for Kdenlive or another video modifying app. If Kdenlive can learn however is in any other case unable to parse the information in any means, rendering is just not going to supply the anticipated outcomes.
Even for those who’re using proxy clips, you’ll first have to make sure that the supply information that are used to generate proxies or copies are in working order.
How to inform if a file is corrupted?
One solution to inform if the file is corrupt is by operating it with its default utility. If the file refuses to play or takes longer than common to take action, it’s fairly possible an indication of corruption.
You also can test the properties of the file (press Alt+Enter after choosing it) to test its dimension and particulars. Compare this to an identical file, or a replica of the file if in case you have any, and test for discrepancies. If the file particulars are scrambled or if the dimensions is unreasonably bigger or smaller than an identical file, you’ve obtained corrupt information in your hand.
Fix 7: Ensure that the MLT setting has the proper codec paths
Kdenlive depends on the correct codec information to learn, write, and render media information. These codecs are mechanically put in upon putting in Kdenlive. But if in case you have not too long ago up to date (or downgraded) Kdenlive, you may need to test if the paths to the codec information are right.
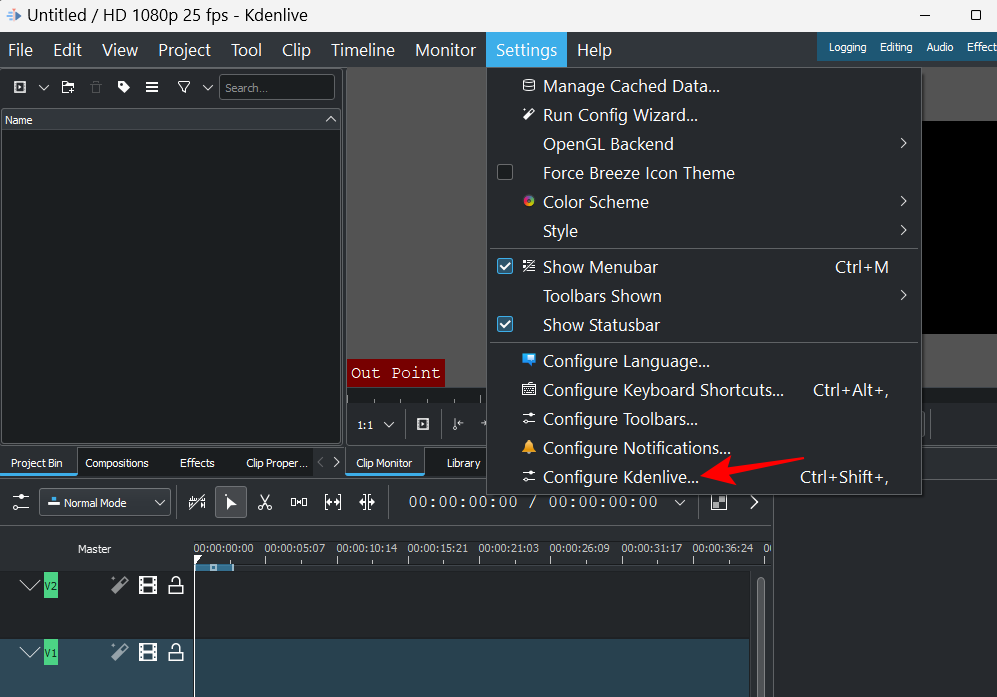
To test this, open Kdenlive and click on on Settings.

Then choose Configure Kdenlive.
In the “Configure” window, click on on Environment within the left pane.

Then click on on MLT Environment to change over to that tab.

Here, be sure that the codec executables are all of their right location. These can be as follows:

- FFmpeg – C:/Program Files/kdenlive/bin/ffmpeg.exe
- FFplay – C:/Program Files/kdenlive/bin/ffplay.exe
- FFprobe – C:/Program Files/kdenlive/bin/ffprobe.exe
- MLT profiles folder – C:/Program Files/kdenlive/share/mlt/profiles
- Melt path – C:/Program Files/kdenlive/bin/soften.exe
If there are any discrepancies right here you’ll proceed to get render points. So be certain that the paths are pointing to the information the place they’re presupposed to. Once that is performed, Kdenlive will be capable to use these codecs correctly and render information with none hiccups.
FAQs
In this part, we check out a number of generally requested queries about rendering movies in Kdenlive.
Why is my Kdenlive not working?
Depending on the place the foundation of the issue lies, Kdenlive can cease working both partially or wholly. If the issue is with rendering movies, you need to use our information above to repair the problems.
How do I render mp4 in Kdenlive?
Rendering in MP4 is a cinch in Kdenlive. All you must do is click on on “Render” below “Project”, and with the default render preset chosen – MP4-H264/AAC below “Generic” – click on on Render to File.
We hope you had been in a position to repair points to rendering in Kdenlive with the assistance of this information. If you encounter such points with Kdenlive sooner or later, be sure that your information are corrupt-free and readable, that you’re operating the most recent model of Kdenlive, and that the codecs upon which rendering depends are all accessible and of their proper location. Until next time, keep creating!
Check out more article on – How-To tutorial and latest highlights on – Technical News