
How to Use ShareX to Take Screenshots and Record Screen on Windows 11 or 10.
ShareX is a free, open-source productiveness instrument that makes the method of capturing your display and enhancing and sharing the screenshots in your PC handy. Being a light-weight software program that’s stacked with options and might seize absolutely anything in your display, ShareX is a superb instrument for anybody who must seize or edit screenshots on their Windows PC.
Here’s how one can arrange and use ShareX in your PC for max effectivity.
How to get ShareX
Here’s how one can get and set up ShareX in your PC.
ShareX is accessible to obtain on the official ShareX web site.
To obtain ShareX, go to the above-mentioned hyperlink in an internet browser in your PC and observe the next steps.

On the ShareX web site, click on on the Download possibility.

The ShareX setup file has now been downloaded to your PC. Open the newly downloaded ShareX setup file out of your obtain location and ensure the UAC immediate to run this setup file as an administrator.

In the ShareX setup, ensure that the I accept the settlement checkbox is chosen and click on on Next.

Choose the vacation spot folder the place you wish to set up ShareX and click on on Next.

Select the extra choices in line with your choice and click on on Next.

Click on Install to start putting in ShareX in your pc.

Once the set up is completed, click on on Finish.

Before you get began
What separates ShareX from different comparable display capturing software program is its accessibility and the way it may help you pace up the tedious course of of making screenshots. However, ShareX is an countless pit of options and it may be exhausting to get a very good grip on all of its choices within the early days of using ShareX.
We suggest you configure the next options earlier than taking screenshots so as to discover them and use them in line with your wants. Let’s take a fast take a look at every one in all them.
Tip 1: Hide your cursor
Open ShareX out of your PC.

In ShareX, click on on Task Settings.

In the Task Settings, click on on the Capture possibility.

Click on the Show cursor within the screenshots checkbox to uncheck it.

Make certain the Show cursor within the screenshots checkbox is unchecked.

ShareX provides you the choice so as to add a devoted Edit with ShareX button within the Windows Explorer context menu (right-click menu). This button can then be used to open a picture straight into the ShareX image editor with out having to open the ShareX instrument individually.
Let’s ensure that this feature is enabled within the ShareX instrument in your PC.
Open ShareX out of your PC.
In ShareX, click on on Application Settings.
In the Application Settings, click on on the Integration possibility.
In the Integration settings, click on on the Show “Edit with ShareX” button in Windows Explorer context menu checkbox to pick out it.
Make certain the Show Edit with ShareX button within the Windows Explorer context menu checkbox is chosen.
To see this feature, right-click on any image and click on on the Show more possibility. You can then see this feature within the context menu.
Tip 3: Set your vacation spot folders
To set your native vacation spot folder, click on on the Application settings icon within the left panel.

In the Application settings, click on on the Paths possibility.

In the Paths part, you’ll be able to see the tackle the place all of your screenshots captured using ShareX are saved.

To change this tackle, click on on Browse.

In the Choose ShareX private folder path window, navigate to the brand new vacation spot folder and click on on the Select Folder possibility situated within the decrease proper nook of your display.

Now, click on on Apply to avoid wasting the adjustments made.

In the next immediate, click on on Yes to restart your ShareX and finalize the brand new vacation spot folder.

It ought to be famous that ShareX will additional create subfolders in your vacation spot folder. The default format of those subfolders is year-month. For instance, 2022-03 and so forth.

You also can change the subfolder format if you want. To accomplish that, merely click on on the unique subfolder sample and choose the parameter you wish to embrace within the sample.

You can now use the ShareX image editor to edit your screenshot.
How to make use of ShareX
To use ShareX to its full capabilities, you will have to arrange hotkeys in your PC accordingly. As Windows 11 now has devoted kernel maps for the PrtSc key, we will’t use the identical as our hotkey for ShareX. Let’s first arrange our hotkeys after which check out how one can seize your display using the identical.
How to arrange or change Hotkeys on ShareX
Open ShareX and click on Hotkey Settings in your left.

You will now be proven a brand new window to configure your Hotkeys. Let’s first begin by including Hotkeys for all of the actions we will probably be organising inside ShareX. By default, the next hotkey choices will exist already.
- Capture area
- Capture total display
- Start/Stop display recording
- Start/Stop display recording (GIF)
Click on Add on the high so as to add extra entries.

Click on the drop-down menu for Task: and choose Screen Capture > Capture energetic window.

Hit the X to shut the dialog field.

Similarly, add listings for all the next actions below Screen Capture.
- Capture final area
- Scrolling seize
- Text Capture (OCR)
- Auto seize
Similarly, add the next actions discovered below the Screen document.
- Start/Stop display recording using energetic window
- Start/Stop display recording using the final area
- Start/Stop display recording (GIF) using an energetic window
- Start/Stop display recording (GIF) using the final area
- Abort display recording

Now add the next actions discovered below Tools.
- Color picker
- Screen colour picker
- Image editor
- Image results
- Ruler
- Image combiner
- Image thumbnailer
- Image Splitter
- Video converter
- Video Thumbnailer
Lastly, add these actions discovered below Other.
- Open screenshots folder
- Exit ShareX
Once you’ve added all these actions, you’ll be able to configure their hotkeys unexpectedly. Start by clicking None moreover the primary motion we added, Capture energetic window.

You will now see the choices flip inexperienced with the textual content Select a hotkey. Press the specified key mixture in your keyboard to set your hotkey for this motion.

Similarly set the hotkeys for all of the actions we added earlier. If you obtained an error message throughout ShareX’s first startup stating that the software program was unable to configure the hotkeys in its registry settings, then we suggest you alter the default hotkeys for the default listings as properly.

Once you’re performed, you should use these hotkeys and the guides beneath that can assist you seize screenshots effectively in your PC.
8 Ways to seize your display using ShareX
You can seize screenshots in numerous methods relying in your present necessities using ShareX. Follow one of many related sections beneath relying in your present wants. Let’s get began.
Method 1: Fullscreen screenshots
To seize a full-screen screenshot, use the hotkey you devoted to the identical earlier. Your display will blink as soon as to indicate that screenshots have been captured and it is best to now be capable of discover the identical in your screenshots folder. You ought to have personalized this folder’s location initially of this information.

In addition to this, you too can use the ShareX app itself to seize a fullscreen screenshot.
Alternatively, to seize your total pc display, click on on Capture > Fullscreen from the ShareX instrument.

This will seize the complete display as such and reserve it in your vacation spot folder.
Method 2: Capturing energetic windows
Execute an energetic window seize by utilizing the hotkey you set earlier. Ensure that the window you want to seize is at present energetic in your monitor and never simply seen in your display.
The screenshot will now be saved in your devoted folder. You also can seize an energetic window screenshot using ShareX.
Alternatively, to seize one of many energetic windows operating in your PC, choose Capture > Window from the ShareX instrument.

Choose the window you wish to take a screenshot of and click on on it.

You can discover the identical in your vacation spot folder.

You also can discover this screenshot from the ShareX instrument itself.
Method 3: Capturing screens
Capturing screens is a superb characteristic in ShareX that may be a enormous benefit when you’ve got a multi-monitor setup.
Start by utilizing the devoted hotkey in your keyboard and choose the monitor you want to seize by clicking on a area in the identical.
The screenshot will now be captured and saved in your devoted screenshots folder we configured earlier. You also can use the ShareX app to seize particular person screens in your setup.
Alternatively, to decide on which monitor you wish to take the screenshot of, choose Capture > Monitor from the ShareX instrument.

Choose the monitor you wish to take a screenshot of and click on on it.

This will seize a screenshot of the chosen monitor and reserve it in your vacation spot folder.

Method 4: Capturing a area
Use the hotkey you set earlier to activate the area seize instrument in ShareX. The instrument makes use of an automated seize characteristic to intelligently choose the realm you want to seize based mostly on its borders. You can use this to your benefit and click on in it to seize it or click on and drag on one other a part of your display to seize a area manually.

Click and choose in your display to seize the specified area. Once you let go of the LMB, the chosen area will probably be robotically captured and saved in your screenshots folder.
Here’s how one can alternatively use the ShareX app to seize a area in your display.
Alternatively, to seize a {custom} choice space, choose Capture > Region from the ShareX instrument.

Similar to the hotkey above, the instrument will robotically attempt to choose an energetic area. Either manually or robotically choose the area you want to seize and the chosen area will probably be saved to your screenshots folder.
Method 5: Scrolling display captures
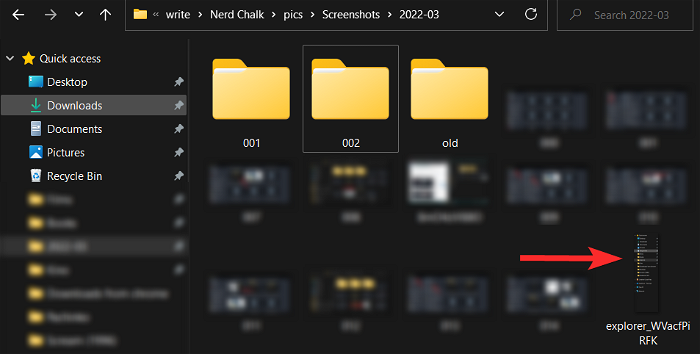
Use the devoted hotkey we set earlier to start out a scrolling seize. This will launch the seize instrument, and choose the doc or webpage you want to seize by clicking on its area or choosing it manually.

You will now be proven the scrolling seize choices. We want to depart most of them as they’re and deal with Maximum scroll depend. Start by estimating the size of your doc and coming into a quantity accordingly.
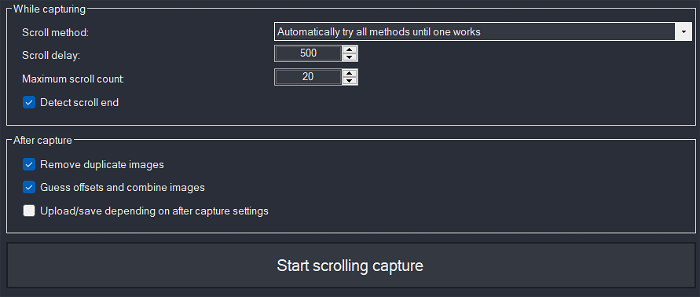
Now configure the After seize choices based mostly in your present wants. We suggest unchecking all of them in case you’re not sure of what to do.
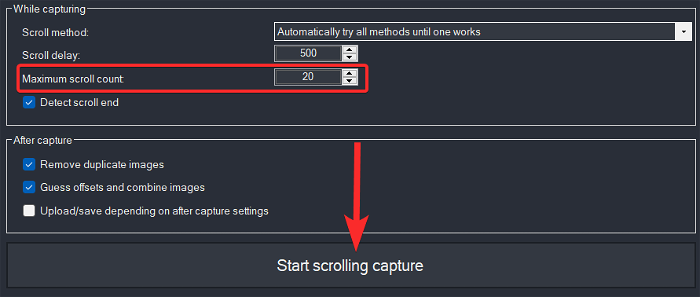
Click on Start scrolling seize as soon as performed.
Once the area has been captured, you may be proven a dialog field. Click Upload/save relying on after seize settings to avoid wasting your captured area accordingly. You can discover it in your vacation spot folder.

Alternatively, you too can entry this feature by going to Capture > Scrolling Capture from the ShareX instrument.

Method 6: Capturing on-screen textual content
This characteristic may help you copy and seize textual content from on-screen components together with non-interactive components like PDFs, images, movies, screenshots, and more.
Use the hotkey we set earlier to activate the on-screen textual content seize instrument or OCR (Optical Character Recognition). Once activated, click on and choose the area in your display from the place you want to seize the textual content.

Click Yes to permit ShareX to make use of the net API to acknowledge on-screen characters. ShareX will now entry its servers and show you a results of the acknowledged textual content accordingly.

You can now copy all of the textual content from the textual content field beneath and use it how you would like in your PC. You also can click on on the drop-down menu within the high proper nook to alter the interpretation service when you’re attempting to seize a language unknown to you.

Method 7: Auto-capturing screenshots
Auto-captures may help you seize a number of screenshots for a area in a single go. This may also be used for full-screen screenshots and can be utilized to seize your actions on-screen. They may also be used to seize steps simply as a screenshot will probably be taken after a pre-determined set of time passes.
Use the hotkey we set earlier to activate the auto display seize instrument. Now click on and choose whether or not you want to seize your total display or a custom-selected area. To choose a {custom} area, click on Select area and choose the specified area in your display.

Next, choose your Repeat time. A screenshot will probably be taken every time this set interval involves an finish.

Click Start as soon as you’re performed.

You can now begin performing the on-screen duties you want to seize. ShareX will robotically seize screenshots when the set interval involves an finish every time.
Once you’re performed and want to finish the Auto seize activity, then press the hotkey for a similar once more and click on Stop.

And that’s how you should use Auto Capture inside ShareX to your benefit.
Alternatively, you too can click on on Capture > Auto seize from the ShareX app to activate auto-capture.

Method 8: Capturing delayed screenshots
Delayed screenshots assist you to add a delay to your actions of taking a screenshot. This consists of all of the display capturing choices supplied by ShareX. You can set a delay of as much as 5 seconds which may help you seize OS components that aren’t often capturable by means of conventional means. This consists of loading screens, lock screens, recovery screens, and more. As the instrument is activated after a delay, you’ll be able to set off a screenshot when the instrument is accessible to you and subsequently swap to the lock display to take its screenshot. Here’s how you should use delayed screenshots to your benefit in ShareX.
Note: You cannot set a hotkey for screenshot delay inside ShareX sadly. You should use the app to set your delay after which activate the seize activity using the suitable hotkey in your PC.
Alternatively, to seize screenshots robotically at set intervals, click on on Capture > Screenshot delay from the ShareX instrument.

Select a price of screenshot delay in line with your choice and click on on it.

Now, use one of many hotkeys we set earlier to seize your display based mostly in your choice.
Once completed, it is best to be capable of discover the screenshot in your vacation spot folder.

How to make use of ShareX instruments
ShareX additionally comes with a number of in-built instruments that can assist you improve your productiveness. Let’s take a fast take a look at every one in all them and the way you should use them to your benefit.
1. Using Ruler in ShareX
A ruler may help you measure on-screen components after which put together and edit your canvas accordingly. This instrument often is useful when attempting to composite images or when attempting to match on-screen components. It also can assist you to keep your annotations constant all through your display captures. Here’s how one can entry the ruler inside ShareX.
Start by activating the ruler by utilizing the hotkey we had set earlier in your PC. You will now get a picker that can assist you to choose the area in your display that you just want to measure.

Once chosen, you’ll discover all the size of the identical on the high of the chosen area.

You also can click on and drag one of many corners of the chosen area to manually choose a area in your display.

And that’s how you should use the Ruler in ShareX to measure on-screen components.

You also can activate the ruler from throughout the ShareX app by going to Tools > Ruler.
2. Using Color Picker in ShareX
Color Picker is an particularly useful gizmo for image editors. It means that you can get RGB, CMYK, and HEX values for any on-screen colour in your display by merely clicking on it. This may help you discover {custom} colours, keep a constant colour palette and even extract new colours that catch your eye. Follow the information beneath that can assist you together with the method.
With ShareX setup in your PC, press the hotkey for Color Picker in your PC. This will activate the colour picker in your PC. Now choose a colour by both coming into its values in RGB, HEX, or CMYK. Click the picker icon when you want to decide a colour out of your display.

Point the picker to the specified colour and click on LMB in your mouse. The colour will probably be robotically captured and added to the colour picker instrument.

Now click on Copy to repeat the picked colour to your Clipboard. You can now paste the identical into the specified image or video editor.

You also can select to manually enter values from the choices seen in your display.

You also can entry the colour picker inside ShareX by going to Tools > Color Picker.
3. Using Image Editor in ShareX
ShareX additionally has an in-built editor that may assist you to crop, resize and modify your images on the fly. Here’s how one can benefit from it in your PC.
Image Editor may help you crop, resize, annotate and edit your image in line with your wants. Start by urgent the hotkey for Image Editor we set earlier in your keyboard.
You now have the next choices in your display. Choose the one that most closely fits your present wants and necessities to open a picture within the Image Editor.

- Open image file…: This possibility will assist you to open a picture manually by choosing it out of your native storage.
- Load image from clipboard: This possibility will assist you to open a current display seize that has been copied to your clipboard.
- Create new image…: This possibility will assist you to create a picture from scratch using a clean or clear canvas relying in your preferences.
- Cancel: This possibility will cancel the Image Editor and assist you to return to the earlier display.
Once you’ve chosen the image you want to edit, it is going to be robotically opened in your image editor. You can now use the toolbar on the high to edit the image in line with your wants.

Let’s take a fast take a look at all the choices at present at your disposal.
- Run after seize duties: If you’ve after seize duties configured in your images then this feature may help you execute the identical with a single click on.
- Save Image: This possibility will assist you to save the present adjustments to the unique image in your native storage.
- Save Image as: This possibility will assist you to save a replica of the present image with all of the adjustments to your native storage in your required folder.
- Hotkey:
Ctrl + Shift + S
- Hotkey:
- Copy Image to clipboard: This possibility will copy the present image with all of the adjustments to your clipboard.
- Hotkey:
Ctrl + Shift + C
- Hotkey:
- Upload Image: This possibility will assist you to add the present image along with your edits to the chosen on-line service.
- Print Image…: This possibility will assist you to print the at present edited image in your PC.
- Select and transfer: This possibility may help you choose and transfer round extra components added to your image together with shapes, annotations, extra images, and more.
- Rectangle: This possibility will assist you to add rectangular shapes to your image.
- Elipse: This possibility will assist you to draw ellipses in your image.
- Freehand: If you want to draw freehand images, shapes, and contours in your image then this feature may help you do the identical.
- Line: This instrument will assist you to draw straight strains in your image.
- Arrow: This possibility will assist you to draw arrows and annotate your image as wanted.
- Text define: This possibility will assist you to add textual content to your image. The textual content added using this feature will probably be within the define format and the colour received’t be stuffed in.
- Text background: This possibility may also assist you to add textual content to your image however this article is going to have its background making it more legible on chaotic backgrounds.
- Speech balloon: Speech balloon may help you add the identical to your images. This may help you create comedian strips and more.
- Step: If you’re annotating images then that is an particularly useful gizmo. It may help you add steps to your image.
- Magnify: The magnifier instrument may help you zoom and deal with sure components throughout the image.
- Image (File): This possibility will assist you to add a picture to your present image from a file in your native storage.
- Image (display): This possibility will assist you to seize your display and add the identical to the image that you’re at present enhancing.
- Sticker: If you want to add stickers to your image then you should use this feature to reinforce your image.
- Cursor: If you want to manually add mouse cursors to your image to level to sure components then you should use this feature.
- Smart Eraser: This instrument may help you well erase and take away on-screen components out of your image. This instrument takes under consideration close by areas to well decide the area that must be erased.
- Blur: The Blur instrument may help you add blur to your image to cover sure on-screen components.
- Pixelate: Just like Blur, you too can Pixelate areas of your image using this feature.
- Highlight: You can spotlight on-screen components within the image using this instrument.
- Crop Image: As the title suggests this instrument may help you crop chosen areas of your image.
- Edit: This possibility will assist you to entry extra Edit settings for the image together with choices like Delete all and more.
- Image: This possibility will assist you to edit your canvas, resize, crop, skew, and more the present image. You also can use this feature to open extra images or to flip your present image.
- Options: This possibility will assist you to edit the settings in your Image Editor inside ShareX.
Once you’ve edited your image in line with your wants, use the Save or Save as possibility to avoid wasting the image to your native storage. If you choose Save then the adjustments will probably be saved to your authentic image. Save as however will assist you to save a replica of the present image with the adjustments made to the image.

Additionally, you too can entry the Image Editor throughout the ShareX app by going to Tools > Image Editor.
4. Using Image Effects in ShareX
ShareX additionally has a devoted instrument so as to add results to your images. Use the hotkey we set earlier to activate the Image Effects inside ShareX. Select the image you want to edit out of your native storage.

The image will now be opened within the Image Effects editor. You can now click on on the + icon beneath Effects so as to add an impact.

Select and add the specified impact to your image. You primarily have these 4 choices at your disposal.
- Drawings: This possibility will assist you to add drawings with numerous results and texts to your image.
- Manipulations: This possibility will assist you to manipulate your image together with modifying points like canvas, scale, crop, resize, and more.
- Adjustments: This possibility will assist you to regulate the publicity, distinction, and colours of your image.
- Filters: Use this feature to use pre-determined filters to your image.
Once you’ve edited your image, click on on Save Image to avoid wasting your adjustments. You also can click on Upload Image to add it to a selected service.

You also can entry Image Effects by going to Tools > Image Effects inside ShareX.
5. Using Image Joiner in ShareX
Image combiner in ShareX may help you create composite images simply. Use the hotkey we set earlier to launch the Image Combiner in your PC.
Once launched, click on Add… and choose the photographs you want to mix out of your native storage.

You can now change the order of the photographs by clicking on Move up or Move down.

Select the best way you want to mix your images by choosing the orientation beside Combine orientation.

Additionally, select your alignment by clicking on the subsequent drop-down menu.

If you want to add house between the photographs, you’ll be able to dictate the identical when it comes to pixels using the Space between images possibility.

Check the field for Autofill background if you want in your background to be non-transparent.

Once you’re performed, click on Combine images and save/add relying on after seize settings.

And that’s it! The mixed image will now be saved to your vacation spot folder in addition to uploaded to the cloud relying in your present configuration.
You also can entry the Image Combiner from the ShareX app by going to Tools > Image Combiner.
6. Using Image Splitter in ShareX
Image Splitter may help you break up images out of your native storage into columns and rows. This can come in useful when you want to individually present totally different sections of a picture. Start by utilizing the hotkey we set earlier to activate the Image Splitter.
Now click on … beside Image file path: to pick out the image out of your native storage that you just want to break up.

Click … beside the Output folder and choose your vacation spot folder for the break up images.

Now select the variety of columns and rows from the subsequent menus.

Click Split image as soon as you’re performed.

And that’s it! The chosen image will now be break up and saved within the vacation spot folder you configured earlier.
You also can entry the splitter throughout the ShareX app by going to Tools > Image Splitter.
7. Using Image Thumbnailer in ShareX
If you’re a content material creator then creating the suitable thumbnails is the important thing to success. While discovering the suitable thumbnail will be simple, producing a number of of them in a single click on generally is a robust activity. Use the Image thumbnailer in ShareX that can assist you with the identical.
Use the hotkey in your keyboard to activate the thumbnailer. Now click on Add and choose all the photographs you want to use to create thumbnails.

Once chosen, use the size on the backside to find out your thumbnail dimensions. Select the standard of your thumbnails as properly.

Now choose your Output folder by clicking on … moreover the identical.

Select a filename format in your thumbnails. Use the next format the place $filename_ denotes the unique filename of the thumbnail.
$filenmae_YOURNAME

Click Generate thumbnails as soon as you’re performed.

And that’s it! The chosen thumbnails will now be generated and saved within the Output folder set by you earlier.
You also can entry the Image Thumbnailer by going to Tools > Image Thumbnailer.
8. Using Video Converter in ShareX
Want to transform movies? Use the video converter in ShareX that can assist you do the identical in your PC.
Start by activating the converter using the hotkey we had arrange earlier. You will now be prompted to obtain ffmpeg in your PC. Click Yes to robotically obtain and arrange the identical. Once downloaded, click on OK.

The converter will now robotically launch in your PC. Click … beside Input file path to pick out the file you want to convert.

Select your Output folder by clicking on … moreover the identical.

Enter a reputation in your output file as soon as you’re performed.

Click the subsequent drop-down menu and choose the specified video codec. We suggest leaving this at default if you’re not sure of what to pick out at this level.

Use the subsequent slider to find out your output video high quality.

Click Start encoding to transform your video as soon as you’re performed.

And that’s it! Once the video has been transformed, the folder containing the video will probably be robotically opened in your PC.
You also can entry the converter by going to Tools > Video converter throughout the ShareX app.
9. Using Video Thumbnailer in ShareX
Video thumbnailer may help you create thumbnails for movies based mostly on a set of pre-defined parameters. Thumbnails created by ShareX are the more conventional ones that mix totally different frames out of your video to create a thumbnail. Use the information beneath that can assist you create thumbnails for all of your movies.
Start by activating the Video thumbnailer by utilizing the hotkey we set earlier. Click … and choose the video you want to use out of your native storage.

Now configure the next choices based mostly in your present preferences.

- OuputLocation: Use this feature to alter the output location in your thumbnails.
- CustomizedOutputListing: Use this feature to briefly outline a {custom} output listing for the present video.
- ImageFormat: Choose the format in your thumbnail
- ThumbnailCount: The variety of screenshots that will probably be taken to composite your closing thumbnail.
- FilenameSuffix: This suffix will probably be added to the tip of every file, thumbnail, or screenshot created by the video thumbnailer.
- RandomFrame: If you want to seize frames randomly from the present video then you should use this feature.
- UploadThumbnails: You can activate this feature to straight add your creations to your default image internet hosting website.
- KeepScreenshots: If you want to keep the screenshots used for creating your thumbnail then you’ll be able to allow this feature.
- OpenListing: If you would like for the folder containing your thumbnail to open as quickly as the method finishes, then you’ll be able to allow this feature.
- MaxThumbnailWidth: This possibility will dictate the utmost width of all of your captured thumbnails.
Similarly, configure the next choices below Thumbnails/Combined.

- CombineScreenshots: This possibility will robotically mix all captured screenshots set by you right into a single composite image.
- Padding: You can set {custom} padding between images using this feature. This impacts the house between your images and the border.
- Spacing: This possibility will assist you to set the spacing between images themselves.
- ColumnCount: Your images will probably be organized in a grid sample when making a default thumbnail. Use this feature to extend or lower the variety of columns in that grid.
- AddVideoInfo: If you would like metadata from the video to be included within the thumbnail, then you’ll be able to allow this feature.
- AddTimestamp: This possibility will add a timestamp for every captured thumbnail within the high proper nook.
- DrawShadow: Use this feature to emboss an oblong shadow behind your thumbnails.
- DrawBorder: Use this feature so as to add a border to your thumbnails.
Once you’re pleased along with your settings, click on Take screenshots.

ShareX will now course of the chosen video and output a thumbnail file based mostly in your settings. You can discover this file within the default vacation spot folder in case you didn’t modify your settings.
You also can entry the video thumbnailer by going to Tools > Video Thumbnailer.
How to arrange and use after-capture duties in ShareX
After seize duties may help you carry out automated duties in ShareX as quickly as you seize your display. This may help you with effectivity. You can select to straight edit your image, add results to it, add it to an internet site, and more. Use the information beneath that can assist you together with the method.
In the ShareX instrument, click on on the After seize duties possibility within the left panel.

In the checklist of after-capture duties, click on on the duties that you really want ShareX to execute instantly after capturing a screenshot.
For instance, within the image beneath the duties Copy image to clipboard, Save image to file, and Upload image to host are chosen.

To execute the chosen after-capture duties, merely use one of many seize choices accessible in ShareX to take a screenshot.

After capturing, ShareX will robotically execute the chosen after-capture duties one after the other.
For instance, in our case, the captured screenshot will probably be saved to the native vacation spot folder, copied to the clipboard, and uploaded to a picture internet hosting service.
How to arrange and use after-upload duties in ShareX
After-upload duties because the title suggests, carry out automated duties as quickly as your images are uploaded to a specific web site. This is especially utilized by customers to edit their images after backing them as much as the cloud however you should use it for different situations as properly. Follow the steps beneath that can assist you together with the method.
Open ShareX and click on the After-upload duties possibility within the left panel.

In the checklist of After-upload duties, click on on the duties that you really want ShareX to execute instantly after importing a screenshot.
For instance, within the image beneath the duties Copy URL to clipboard and Open URL are chosen.

To execute the chosen After-upload duties, choose one of many seize choices accessible in ShareX.
After capturing, ShareX will robotically execute the chosen After-upload duties, one after the other.
For instance, in our case, ShareX will copy the URL of the uploaded screenshot to your clipboard and open the identical URL in your default net browser.
How to document display using ShareX
ShareX makes use of ffmpeg.exe to document your display which is free and open supply. Use the information beneath that can assist you document your display using ShareX.
Start by activating the ShareX display document instrument using the hotkey we had set earlier. Once activated, you may be prompted to obtain ffmpeg.exe. Click on Yes to proceed with the identical.
Click on OK as soon as you’re performed.
The instrument will probably be robotically launched as soon as ffmpeg.exe is ready up in your device. Click and choose a area that you just want to seize.

ShareX will now robotically document the chosen area. Click Stop as soon as you’re performed recording your display.

Tip: You can use Abort in case you want to begin over and discard the present recording.
The recording will now be saved to your vacation spot folder.
You also can entry the display recording possibility by going to Capture > Screen recording.
How to document a GIF using ShareX
The regular display recording instrument will document movies however in case you want to document GIFs then you should use this instrument as an alternative. Activate the identical by utilizing the hotkey for Recording GIFs that we had set earlier.
You will now be proven a area choice instrument. Select the area you want to seize by clicking on the identical.
ShareX will now robotically begin recording the chosen area. Once you’re performed click on Stop.
Tip: You also can click on Abort when you want to begin over and abandon the present recording.
The chosen recording will now be saved to your vacation spot folder.
You also can activate this instrument by going to Capture > Screen recording (GIF).
How to add screenshots using ShareX
ShareX is a complete instrument and thus comes with in-built add instruments that may assist you to add your screenshots on to the cloud or image internet hosting web sites. Use both of the guides beneath relying in your preferences that can assist you together with the method.
Method 1: Automatically
To arrange ShareX in order that it uploads the screenshots robotically after capturing, choose Destinations > Image uploader from the ShareX instrument.

In the Image uploader choices, choose the host web site the place you wish to add your screenshots. For this information, we’ll select Imgur.

Now, within the ShareX instrument, click on on the Upload image to host possibility situated in After seize duties.

Once chosen, the Upload image to host possibility will look just like the image beneath.

Then, click on on After-upload duties and ensure the Copy URL to clipboard and Open URL choices are chosen.

That’s it. Now, each time a screenshot is taken, ShareX will open the Imgur add hyperlink for that specific screenshot in a brand new tab in your default browser.

Additionally, the hyperlink to this uploaded image has additionally been copied to your clipboard. You can then share this Imgur hyperlink by pasting it in a messaging app of your selection by utilizing CTRL + V shortcut out of your keyboard.
Method 2: Manually
You also can configure After-upload duties so as to add screenshots manually with a single click on. Follow the steps beneath that can assist you together with the method.
To do this, choose Destinations > Image uploader from the ShareX instrument.
In the Image uploader choices, choose the host web site the place you wish to add your screenshots. For this information, we’ll select Imgur.
Now, take the screenshot using ShareX or find the screenshot you wish to add.

Right-click on this screenshot and choose Upload. This will add the screenshot to your chosen host and create a brand new thumbnail in ShareX.

Now, to go to the add hyperlink, right-click on the brand new thumbnail and choose Open > URL.

This will open the Imgur add hyperlink for that specific screenshot in a brand new tab in your default browser.
How to encode screenshots in QR codes using ShareX
Sharing screenshots generally is a bit troublesome when you’re low on knowledge or desire a everlasting answer. ShareX provides you the power to create QR codes for cloud-hosted screenshots which might then be scanned and opened from any device. Follow the information beneath that can assist you together with the method.
Choose a screenshot that you just want to use for a QR code. Capture your display, go to your vacation spot folder, and right-click on the screenshot to pick out Upload.
Now, right-click on the brand new thumbnail and choose Show QR code.

You will probably be offered with the QR code for the Imgur add hyperlink of your screenshot.

Right-click on the QR code and choose one of many choices relying in your choice. 
- Copy image to clipboard
- Save as image file…
- Upload Image
- Decode
How to repeat screenshots to the clipboard robotically using ShareX
First, manually add the screenshot from ShareX to a web based host. To do this, choose Destinations > Image uploader from the ShareX instrument.
In the Image uploader choices, choose the host web site the place you wish to add your screenshots. For this information, we’ll select Imgur.
Now, take the screenshot using ShareX or find the screenshot you wish to add.
Right-click on this screenshot and choose Upload. This will add the screenshot to your chosen host and create a brand new thumbnail in ShareX.
Now, right-click on the brand new thumbnail and choose Show QR code.
You will probably be offered with the QR code for the Imgur add hyperlink of your screenshot.
To see the next 3 choices for coping with the QR code, merely right-click on the QR code.
You can now select one of many above 3 choices to deal with the QR code the best way you need.
How to edit screenshots using ShareX
As mentioned above, ShareX has a devoted image editor that you should use to your benefit to annotate and edit your screenshots as wanted. Use the steps beneath that can assist you together with the method.
Method 1: Accessing the screenshots throughout the ShareX app
Open ShareX and navigate to your vacation spot folder. Now click on on the specified image and hit Ctrl + E in your keyboard.

The image will now be opened within the ShareX editor and you may edit and save the identical to your native storage as wanted.

As we had configured ShareX to make use of the context menu possibility, we will additionally straight edit images from the File Browser itself.
Navigate to the specified image within the File Browser and right-click on the identical. Select Edit with ShareX.

The chosen image will now be robotically opened within the ShareX editor. You can now edit and save the image to your native storage as meant.
We hope this submit helped you get conversant in ShareX. If you face any points or have any more questions for us, be at liberty to succeed in out to us using the feedback part beneath.
:
Check out more article on – How-To tutorial and latest highlights on – Technical News