How to Install Windows Subsystem for Android Manually With Msixbundle.
Windows 11 Beta Channel customers can now Android apps however surprisingly, the identical isn’t out there for the Insiders underneath the Dev channel. You could be forgiven to assume the Dev channel will obtain the brand new function to start with. But anyway, right here’s a technique to set up Windows Subsystem for Android on a Dev Channel Windows 11 construct and be capable of run Android apps.
How to put in Windows Subsystem for Android
You can obtain the .msix bundle individually hosted on the internet after being sourced from Micorosft or you may supply it from the Microsoft Store your self. Once you’ve the .msix bundle in your native storage, you may both use PowerShell or Terminal to put in Windows Subsystem for Android in your system. Use one of many strategies listed beneath relying in your preferences.
Method 1: Use PowerShell and a guide obtain
In this methodology, we will likely be using the .msix bundle hosted on One Drive and Google Drive from us. You can then use PowerShell to put in and use Windows Subsystem for Android in your PC. Follow the steps beneath to get you began.
Step 1: Download Windows Subsystem for Android Msixbundle
Visit this Google Drive hyperlink (by way of) (Mirror: OneDrive) to obtain the Msixbundle file for Windows Subsystem for Android. Click Download.

Click Download anyway.

: How to Ungroup Icons on Windows 11 Taskbar With a Registry Hack
Step 2: Install Windows Subsystem for Android Msixbundle
Copy path of the Msixbundle file. Open the folder the place your downloaded file is saved. Right-click on the file and choose Copy as path.

Open Powershell. Press the Windows key after which sort Powershell. From outcomes, click on Run as administrator.

In your Powershell window, sort the command beneath:
Add-AppxPackage -path "path-of-the-file-comes-here"
Tips in regards to the command above:
- You can paste the file’s path within the command above. You have already copied it with the Copy as path command above. So, merely press ctrl+v to stick after typing the a part of the command previous it (that’s, Add-AppxPackage -path ).
- Do not take away the citation marks across the filename.
- If our file’s path (from Copy as path) is that this:
“C:UserskapilDownloads1quick12MicrosoftCorporationII.WindowsSubsystemForAndroid_1.7.32815.0_neutral___8wekyb3d8bbwe.Msixbundle” - Then our command will likely be this:
Add-AppxPackage -path “C:UserskapilDownloads1quick12MicrosoftCorporationII.WindowsSubsystemForAndroid_1.7.32815.0_neutral___8wekyb3d8bbwe.Msixbundle”
Here’s the way it appears to be like on our PC.

Hit the enter key to run the command.
You will get a message displaying ‘Deployment operation progress’ and when it’s completed, the Windows Subsystem for Android will likely be put in in your PC with Windows 11 Dev channel.

When completed, sort Exit after which hit enter to exit Powershell.
To open Windows Subsystem for Android to run Android apps, press the Windows key and seek for Windows Subsystem for Android.
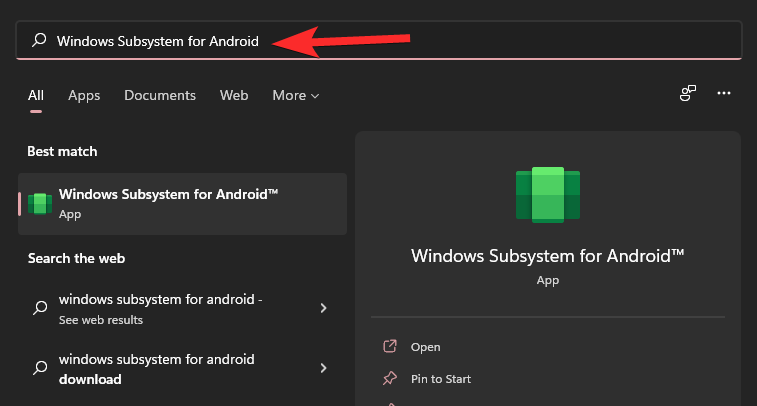
Click Windows Subsystem for Android. Or click on Open.

Now, you may run Android apps in your Windows 11 PC working Dev Channel builds. Hopefully, the official assist comes over quickly.
Method 2: Get .msix bundle immediately from the Microsoft Store
If you’re not pleased with the strategy above or for some cause you might be unable to obtain the file then you should use this information as a substitute. Here we are going to supply the .msix bundle for Windows Subsystem for Android immediately from the Microsoft Store. Follow the information beneath to get you began.
Step 1: Download Windows Subsystem for Android Msixbundle
Open this submit in your desktop browser and replica the ‘Windows Subsystem for Android’ Store hyperlink to your Clipboard.

Now go to the Link Generator in your browser and paste the copied hyperlink in your clipboard within the textual content area in your display screen.

Click on the drop-down menu beside the textual content field and choose ‘Slow’.

Click on the ‘check mark’ to course of the shop hyperlink you pasted earlier.

You will now get obtain hyperlinks for all of the information queued for obtain when downloading Windows Subsystem for Android. Scroll to the underside and right-click on the ‘.msix’ bundle which is 1.2 GB in measurement.
Now click on on ‘Save as’ and obtain the file to a handy location in your PC.

Once the file is downloaded, use the information beneath to put in the Windows Subsystem for Android in your PC.
Step 2: Install Windows Subsystem for Android Msixbundle
Navigate to the folder the place you downloaded the .msix bundle in your system and right-click on the file. Select ‘Copy as path’ from the context menu.

Press Windows + X and click on on ‘Windows Terminal (Admin)’.

Now sort within the following command. Replace ‘PATH’ with the trail to the .msix bundle we copied to your clipboard earlier.
Add-AppxPackage -Path PATH

Windows Subsystem for Android will now be put in in your system.

Type in Exit to shut Terminal.

You can now configure it out of your Settings app and use the guides beneath to troubleshoot putting in Android apps should you face any points.
Unable to make use of Windows Subsystem for Android? Try this!
If you run into an error referred to as Unable to Start Windows Subsystem for Android, then take a look at our information beneath to repair it.
Read: Unable to Start Windows Subsystem for Android: How to Fix ‘Virtualization Not Enabled’ Error on Windows 11
How to put in Android apps
You might want to set up apps using ADB (ADB set up command, that’s). Here is how to do that.
Read: How to Install Android Apps on Windows 11: Sideload APK Using Windows Subsystem for Android
Fix the error ‘Virtual Machine Platform can not be found’
This is a nominal error and it merely implies that you’re lacking considered one of Windows’s add-on options. Use the information beneath to put in the Virtual Machine Platform in your system.
Press Windows + i in your keyboard to open the Settings app and click on on ‘Apps’ in your left.

Click on ‘Optional features’.

Click on ‘More Windows features’ on the backside.

Find ‘Virtual Machine Platform’ on this listing and examine the field beside it.

Now click on on ‘Ok’.

The function will now be put in in your PC. Once put in, you may be prompted for a restart. It is very really helpful that you simply restart your PC at this level.

Click on ‘Restart Now’ to get you began.

Once your system restarts, Windows Subsystem for Android needs to be up and working in your system.
How to make use of the Amazon App Store?
If you want to use the Amazon App Store to obtain your apps then you’ll need to activate a VPN and alter your area to USA for now. This will permit Amazon App Store to hook up with the mandatory servers which can can help you log in to your Amazon account and obtain apps in your PC.
That’s all.
If you want any assist relating to this, get in contact with us by way of the feedback part beneath.
Happy Androiding on Windows!
Check out more article on – How-To tutorial and latest highlights on – Technical News