
How to Install Fonts on Windows 11.
Windows has all the time been heavy on customization and personalization, so it is just pure that the development will proceed with Windows 11 as nicely. If, after putting in a recent copy of Windows 11, you need to personalize your PC and provides it that additional oomph, one thing as small as altering to a unique set of fonts for Office can do the trick.
So, with that in thoughts, let’s check out the alternative ways you possibly can set up fonts on Windows 11.
Installing fonts is a reasonably easy course of. Here are the three ways in which you are able to do so:
Method #01: Download and set up from Microsoft Store
With this methodology, you possibly can obtain and set up your fonts from the identical place. To set up fonts from the Microsoft Store, open the Microsoft Store and seek for ‘fonts’. Once you get the suggestions, click on on Fonts – discover new fonts.

This gives you a ton of font selections so that you can discover, each Free and Paid. Pick one which catches your fancy and click on on it. For our instance, we’re selecting ‘Ink Draft’.

Then click on on Free to put in those which can be free.

If you’re selecting a Paid font, you will note its value mirrored in blue. Click on it and observe the on-screen prompts to buy it.

Once it’s downloaded, click on on Launch to put in it.

And that’s it! Your fonts are actually loaded and prepared to be used in Microsoft Office apps.
: How to Uninstall Microsoft Edge From Windows 11
Method #02: Download from the online and set up manually
If you don’t discover something that fits your model from the Microsoft Store, you possibly can attempt downloading fonts from third events. There are tons of locations to obtain fonts. Here are just a few that you just may need to try:
Once you may have downloaded your Font archives, right-click on them and choose Show more choices.

Then unzip them through a file archiver resembling 7-zip or WinRar.

Now, you should have the font file accessible in your pc that you may set up using any of the strategies given beneath. It is fairly simple.
: 6 Ways to Update Drivers on Windows 11
Right-click on the font’s file, after which click on Show more choices.
Now, click on Install.
The system will set up robotically.
Method #2.2: From Font preview
Another technique to set up the extracted font information is to double-click on them.

And then click on on Install.

Method #2.3: Install from Settings (using drag and drop)
Now press Win+I to open Settings and click on on Personalization within the left panel.

On the best, scroll down and click on on Fonts.

You will see a ‘Drag and drop to install’ possibility beneath ‘Add fonts’.
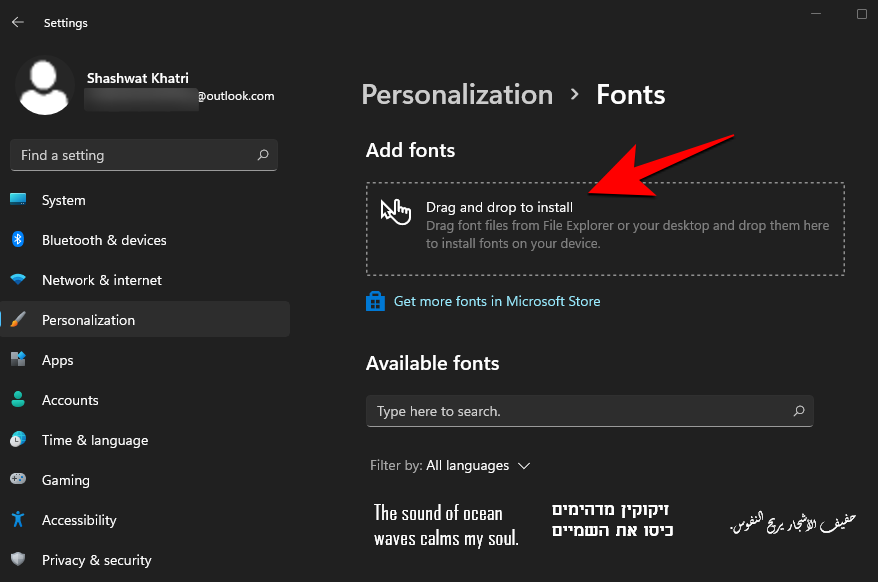
So, do as prompted. Open the folder the place you had extracted the fonts and drag and drop them to the Drag and drop to put in space in Settings.

The font information will probably be in both the .tff or .otf format. Make positive you’re not dragging and dropping information that aren’t in these two codecs as they received’t be put in this fashion.
How to obtain fonts for all languages
By default, Window 11 will solely have fonts for the English language and its Latin script. But it’s doable to obtain fonts for all languages as nicely. Here’s how you are able to do so:
Method #01: From Settings app
Press Windows + i to open Settings and click on on Personalization within the left panel.

Click on Fonts on the best.

Now, scroll all the best way down and click on on Download fonts for all languages beneath ‘ settings’.

When prompted, click on OK.

You will get a notification telling you that Windows is including some new options.

Once the obtain is full, the fonts will robotically be put in. Do notice that downloading and putting in fonts for all languages will take up a good portion of your disk house. So, achieve this provided that you really want them.
Method #02: From Control Panel
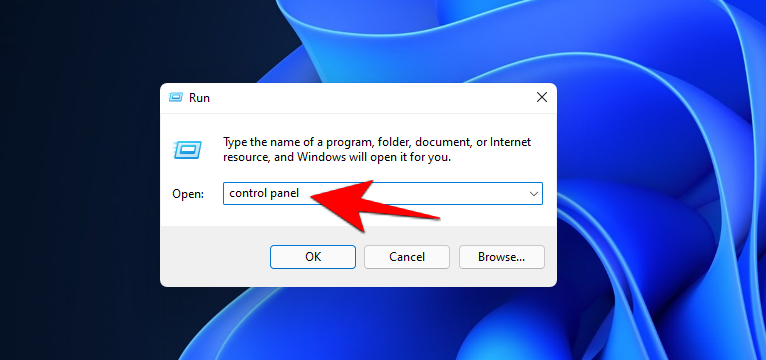
The similar possibility can be accessible from the Control Panel. To obtain fonts for all languages, firstly, press Win+R to open the RUN field, sort ‘control panel’, and hit Enter.
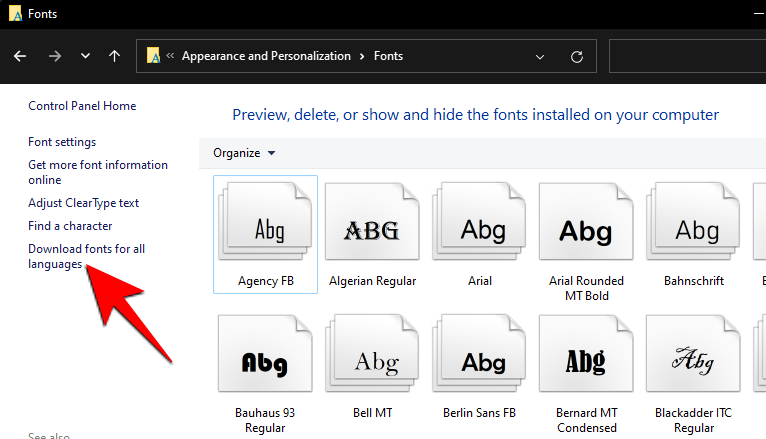
Click on Appearance and Personalization.

Then click on on Fonts.

Click on Download fonts for all languages within the left panel.
When prompted, click on Yes.

How to Uninstall fonts on Windows 11
If you’ve been putting in fonts willy-nilly and are discovering it exhausting to sift by way of the numerous completely different kinds that you just’ve downloaded, or are merely trying to clear up some valuable house, uninstalling these fonts will certainly assist. Here’s how you are able to do so:
Press Win+I and open Settings, then click on on Personalization within the left panel.

Then click on on Fonts on the best.

Click on the font that you just need to uninstall (you may also seek for it by typing its title beneath ‘Available fonts’).

Now choose Uninstall.

And that’s it. Your font is now deleted out of your PC.
Writers understand how delicate modifications to their workflow can spark the creativeness to maintain the fingers shifting. And altering the fonts on Windows 11 is a method to take action.
Check out more article on – How-To tutorial and latest highlights on – Technical News