
How To Dual Boot Windows 11 with Windows 10: Step-by-step information.
Windows 11 Dev construct is out now and it’s all nicely and good if you wish to get your fingers on it as quickly as bodily attainable. But contemplating that that is simply the Dev construct, it isn’t all peachy excellent. It may take a while to get adjusted to the brand new UI and there are various modifications that we expect (and hope) Microsoft will embody in future preview builds and the steady Windows 11 that’s popping out this vacation season.
Until then, you may set up Windows 11 in your PC with out having to say goodbye to its predecessor that’s been with us for six years now. Here’s every little thing it’s good to know to twin boot Windows 11 and Windows 10 in your PC.
: How To Install Windows 11 From USB
Step 1 (Optional): Create a separate drive for Windows 11
In order to put in and twin boot Windows 11 on a PC that’s working one other model of Windows, you need to create a separate drive that may stay assigned to Windows 11. It wants its personal house (at the least 64 GB) as well and cargo its parts to run successfully.
Although you may choose any one in all your drives to put in Windows 11 on, it’s higher to create a separate drive to maintain issues well-demarcated and arranged.
First up, press Win+R to open up the RUN field. Type diskmgmt.msc and press Enter.

Now, we’re going to create a partition for Windows 11. Right-click on a drive and choose Shrink quantity.

Here, you will notice the house that’s out there for shrinking. You must have at the least 64 GB of house so ensure you have chosen the disk that may allocate that a lot house, to start with. Now Enter the quantity of house to shrink in MB. Then click on on Shrink.

You will now see the Unallocated house seem in Disk administration. Right-click on it and choose New Simple Volume.

This will open up the wizard, click on Next.

Click Next once more.

Assign the brand new drive a letter and click on Next.

Now, give the amount a label and click on Next.

Click on Finish.

Your new separate drive is now out there.

Let’s transfer on to putting in Windows 11 on it.
Step 2: Download Windows 11 ISO file
The next (first) step is to obtain the Windows 11 ISO file. As the Windows 11 Dev construct is at present solely out there to Windows Insiders by way of Windows updates, you’ll have to circumvent that course of by utilizing the UUP Dump instrument to create an ISO file.
Use this information to obtain the ISO file from Microsoft itself:
Step 3: Create a bootable drive and set up it by way of the Boot menu
Once you may have the ISO file you’ll have to create a bootable drive with it as a way to set up Windows 11 by way of the Boot menu. This is as a result of solely when putting in Windows by way of the Boot menu will you get the choice to pick the drive. Otherwise, Windows will assume that you just’re updating your PC and robotically assign the drive.
Use this information to create a bootable USB with Windows 11:
Note: Before making a bootable pen drive, you should definitely convert the USB drive to GPT partition kind whether it is of MBR kind. Windows 11 set up requires the bootable pen drive to be of GPT kind.
Step 4: Select the drive to put in Windows 11
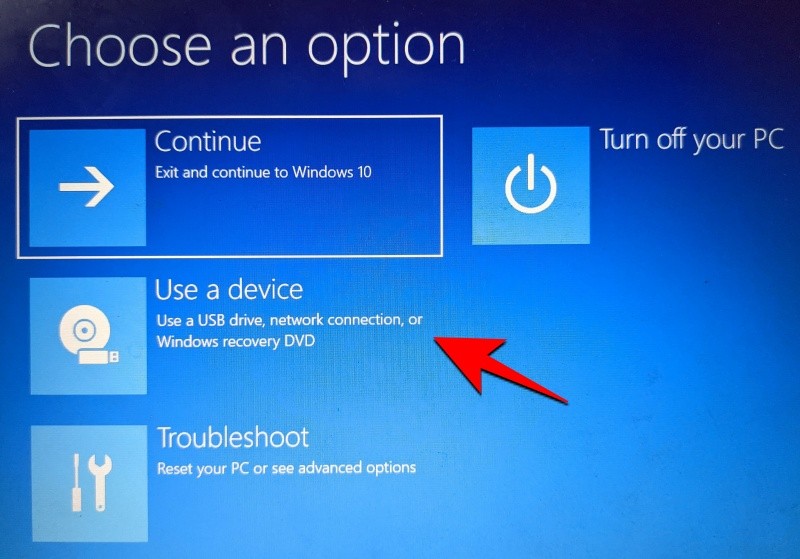
Once you may have created a bootable USB, it’s now time to begin putting in Windows 11 by way of the Boot menu. For this course of, first up, shut down your PC. Then, flip it back on and press F8 to restart the PC into boot mode.
Once you’re in Boot mode, click on on Use a tool.
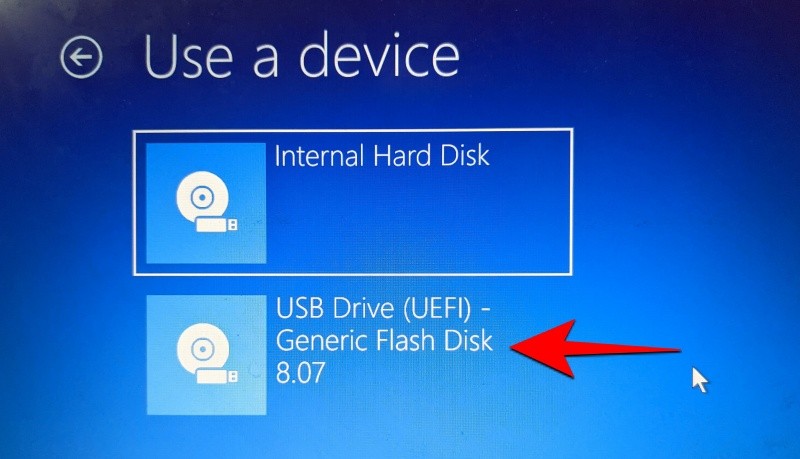
Then choose your USB Drive.
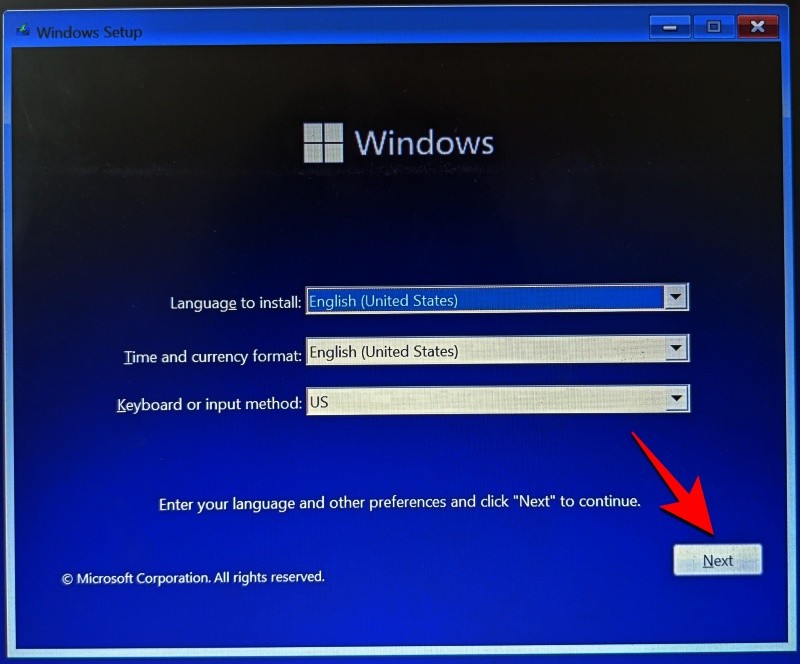
The Windows 11 setup ought to begin. Click Next to proceed.
Then click on on Install now.

Select Windows 11 and click on Next.

Accept the phrases and circumstances and click on Next.

Now – that is the necessary bit – click on on Custom: Install Windows solely (superior).

You will probably be requested to pick the drive the place you need to set up Windows 11. You can choose whichever drive you like (so long as it has a minimal out there house to put in Windows 11). Don’t fear, your knowledge will stay intact. However, this drive will develop into the system drive and would be the important listing for all Windows 11 operations.
That is why it’s higher, on the entire, to put in it on a separate drive. If you may have created a separate drive as talked about in Step 0.1, choose this drive to put in Windows 11 and click on Next.

Now simply comply with the on-screen directions and look forward to Windows 11 to be put in. Once accomplished, you should have entry to each Windows 10 and the newly put in Windows 11.
How to decide on the default OS as well between Windows 11 and Windows 10
Open the Settings app, after which click on System. Or, click on Win+X and choose System.
Now, click on Advanced system settings.

Click Settings beneath Startup and Recovery.

Click the dropdown menu beneath Default working system.

Select the OS of your selection you need to be of default.
Select how a lot time you need the system to will let you choose the OS once you restart the PC earlier than booting up with the default system you selected right here.

That’s all.
How to put in Windows 10 on a Windows 11 PC as twin boot
Well, you may. Use the identical process as given above to put in Windows 10 over Windows 11. You might want to obtain the Windows 10 ISO (get from Microsoft from right here) after which use Rufus to create Windows 10 bootable pen drive.
Now, boot into EUFI/BIOS boot mode and choose pen drive as your set up methodology. Follow the remainder of the process as given above and you’ll be good to go.
Let us know in case you want any assist with twin booting Windows 11 on Windows 10 or vice versa.
Check out more article on – How-To tutorial and latest highlights on – Technical News