How To Setup RAID On ASRock Motherboard.
Usually, you possibly can arrange RAID as a {hardware} or software program RAID. As BIOS-level RAID makes use of the onboard controller on the motherboard, it is usually referred to as Fake RAID. It is a cost-free various to the devoted RAID {hardware}, however configuring it requires more effort.
You want to put in correct storage disks, allow this expertise in your BIOS/UEFI, create a RAID array, and set up the mandatory drivers to set it up in your ASRock motherboard. You can usually use the UEFI interface or the AMD/Intel Windows Desktop apps to configure one of these RAID.
There are many issues you might want to observe whereas setting RAID on ASRock. For instance, whereas attempting to create a non-OS RAID quantity with my NVMe drives, I had mistakenly enabled RAID mode for each SATA and NVMe units. So, my OS SATA drive was not booting in any respect and I used to be getting the INACCESSIBLE_BOOT_DEVICE BSOD error.
In this text, I can be guiding you to be able to arrange RAID whereas avoiding all such errors.
Check for RAID Support
Before you start with really organising RAID, you might want to be sure that your motherboard helps RAID. It must have a built-in RAID controller for this goal.
The onboard controller additionally must help the RAID degree you need. Otherwise, you might want to use a devoted RAID controller card.
You can test the motherboard specs on ASRock’s official web site.
Note: It’s additionally best to make use of equivalent storage disks with the identical capability and pace in a RAID setup. Otherwise, the RAID array will use the specs (each measurement and pace) of the lowest-spec disk.
Enter BIOS or UEFI
Generally, you possibly can entry the BIOS setup utility or UEFI firmware settings through the use of the BIOS key on startup.
- Power up or restart your pc.
- After you get to the startup display screen with ASRock’s emblem, press F2 or Del to get to BIOS/UEFI.


You also can get to Advanced Startup after which choose Troubleshoot > Advanced choices > UEFI Firmware Settings > Restart to do the identical. The latter technique is helpful when you have enabled Ultra Fast Boot and may’t use the BIOS key to entry the UEFI setup.
Enable RAID Mode
Now you will want to allow RAID mode on the UEFI/BIOS. For SATA drives, you should set the SATA controller mode to RAID as an alternative of AHCI.
You have to carry out totally different steps to have NVMe SSDs within the RAID array relying in your CPU. The motherboard must help NVMe RAID or else you gained’t discover the mandatory settings.
Note: You have to have the identical kind of disks to make use of them in a RAID Array. For instance, in case you are using an HDD, the opposite disks should be HDDs as properly. Similarly, in case you are using a NVMe SSD, different disks must be NVMe as properly.
You can’t use a M.2 SATA or SATA SSD with an NVMe SSD. You can nevertheless, use an M.2 SATA SSD with a 2.5” SATA SSD.
With AMD CPU,
- Go to the Advanced tab.
- If you need to arrange RAID for SATA HDDs or SSDs,
- Go to Storage Configuration and choose SATA Mode Selection.
- Set it to RAID Mode and press Enter.

- If you need to arrange a RAID array with NVMe SSDs,
- Go back to the Advanced tab and choose AMD PBS.

- Set NVMe RAID Mode to Enabled.

- Go back to the Advanced tab and choose AMD PBS.


With Intel CPU,
- Go to the Advanced tab and choose Storage Configuration.
- If you need to allow RAID for SATA drives,
- Select SATA Mode Selection.
- Set it to Intel RST Premium With Intel Optane System Acceleration (RAID Mode) and press Enter.

- Also, in case you see M2_X – RST PCIe Storage Remapping choices, ensure to disable them if you wish to create a non-OS SATA RAID and have the OS on an NVMe drive.
- If you need to arrange a RAID array with NVMe SSDs,
- Look for VMD Configuration and choose it.
- Set Enable VMD controller and Enable VMD Global Mapping to Enabled.


Older Intel-based ASRock motherboards that do not need NVMe RAID help comprise a RST PCIe Remapping function that makes the PCIe units appear to be linked to the SATA RAID Controller as an alternative.
This manner, you possibly can create a bootable RAID array using the NVMe-com drives since your system thinks it’s making a RAID for SATA drives.
Note: The PCIe units have to help remapping in addition to be NVMe-compliant. You additionally want to attach the NVMe drives to M.2 sockets whose PCIe lanes come from the chipset’s PCH part, not the CPU. Additionally, you can not mix an NVMe drive and a SATA drive in the identical RAID array.
You additionally can’t set up 32-bit Windows or any Linux on a RAID quantity that makes use of PCIe Storage Remapping.
- Make certain to set SATA Mode Selection to RAID mode.
- Look for M2_X – RST PCIe Storage Remapping for the M.2 slots the place you’ve got linked SSDs and choose the choice.
- Set them to Enabled or RST Controlled.


Disable CSM
If your storage units are set to run with Legacy help, you possibly can’t create a RAID disk array. In truth, the BIOS choice to handle RAID settings gained’t present up in any respect.
So you might want to disable the Compatibility Support Module (CSM) function that gives legacy help to the firmware. Or you should a minimum of set the storage device to run on UEFI solely.
- Go to the Boot tab and choose Compatibility Support Module (CSM).
- Set CSM to Disabled and press Enter. Or you might be able to depart it as Enabled after which set Launch Storage OpROM policy to UEFI Only.


Now, you should save the adjustments and exit the BIOS to use the adjustments. Press F10 and choose Yes to take action.
Create RAID Array
Now you might want to create a RAID array or quantity to make use of the drives with RAID features. You can use the settings within the BIOS/UEFI or a devoted BIOS RAID utility and even AMD/Intel’s RAID software program for this goal.
Note: If you need to use a PCIe enlargement card with NVMe drives for a RAID array, just be sure you have enabled PCIe bifurcation by splitting the PCIe lanes from x16 to x4x4x4x4 or x8x4x4 on the BIOS. Also, guarantee that you’re using a PCIex16 slot. Otherwise, your system won’t detect the drives.
Using Windows Desktop Application
Using the Desktop Application from AMD or Intel is the simplest solution to create a RAID array, particularly as a result of it should routinely set up the mandatory RAID drivers. However, you might want to have a operating Operating System on a separate kind of storage disk to make use of such apps.
First, just be sure you have enabled RAID mode just for the storage kind you need and you’ve got an OS drive of one other storage kind in your pc. Then, log in to Windows and set up all doable updates earlier than going by means of the steps beneath.
With AMD CPU
- Go to AMD’s help webpage.
- Under Find Drivers and Support by Selecting Your Product, choose your Chipset from the record and click on Submit.

- Expand your Windows model and click on on Download next to AMD RAID Installer.

- Extract the archive and run this system inside it. Follow the on-screen directions to put in RAIDXpert2 and the RAID drivers.
- After restarting your pc, go contained in the
C:Program Files (x86)RAIDXpert2folder or the folder the place you put in the app. - Right-click on
RAIDXpert2.exeand choose Run as administrator.
- Here, first you might want to delete the Non-RAID arrays. Select an array, go to the Array tab on the menu bar and choose Delete.
- Do so for all the present arrays.

- Then, click on on the Array tab and choose Create.
- Check the disks you need within the record.
- Under Array Options, set the RAID degree, Array Name, and different settings per your want.
- Then, click on Create.


With Intel CPU
- Search for Intel Rapid Storage Technology Driver Installation Software on the web and go to the official web page of its latest model on Intel’s web site.
- Click on Download SetupRST.exe or any obtain button for the software program.

- Run the installer and comply with the on-screen directions to put in the software program and the drivers.
- After restarting, open the Intel Optane Memory and Storage Management app.
- Go to the Create RAID Volume tab.
- Set the identify and choose the controller (PCIe or SATA) in addition to the RAID kind. Click Next.

- Tick all of the drives you need on the RAID.
- You can select whether or not you need to keep information in your disks. However, I extremely suggest choosing No for higher efficiency.
- Set the opposite choices relying in your RAID kind and test Initialize Volume. Click Next.

- Confirm by checking Delete information on… and choose Create RAID Volume.


Warning: You mustn’t uninstall or take away the RAID drivers in your system after putting in them. Doing so could cause information loss and an INACCESSIBLE_BOOT_DEVICE error.
Using BIOS/UEFI Settings
You also can use the RAIDXpert2 Configuration Utility or Intel Rapid Storage Technology Utility on the UEFI to configure a RAID array. It could be the better technique if you wish to set up your working system within the RAID quantity.
Here, get back to the UEFI and press F6 to entry Advanced Mode if needed. Then, comply with the steps beneath relying in your CPU.
With AMD CPU
- Go to the Advanced tab and choose the brand new choice, RAIDXpert2 Configuration Utility.

- Go to Array Management and choose Delete Array. You have to delete the prevailing disk array earlier than you possibly can create a brand new one.

- Select Check All > Delete Array(s) > Yes. If you don’t have the Check All choice, you might want to choose particular person arrays and delete all of them.

- Set Confirm to Enabled and click on Yes.
- Now, contained in the Array Management setting, choose Create Array.

- Set the RAID degree per your desire.

- Then, click on on Select Physical Disks.

- Set the Media Type to HDD or SSD relying on what you might be using. Or you possibly can depart it as Both.

- Go right down to the person disks and set those you need within the RAID array to Enabled. If you need to embrace all of the disks, you possibly can choose Check All.
- Now, click on on Apply Changes.

- Select Create Array.

- Then, press F10 and click on on Yes to save lots of the adjustments and exit the UEFI.


With Intel CPU
- Go to the Advanced tab and choose the brand new choice, Intel Rapid Storage Technology. Here, you will note an inventory of the drives you need to use for the RAID. If you might be using the remapping function, the NVMe drives will present up as SATA drives.

- Choose Create RAID Volume.

- Set the Name for the RAID Volume as you would like.
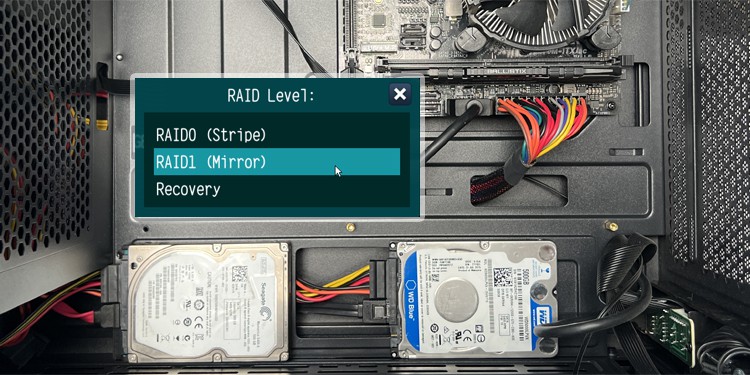
- Select RAID Level and set it to your most well-liked RAID degree.

- Under Select Disks, set the worth of the disks you need to embrace on the RAID Array to X.

- Set the Strip Size relying in your want. You also can depart it as default
- Select Create Volume and press Enter.

- Press Enter once more.

- Press F10 and choose Yes to save the adjustments and exit the BIOS/UEFI.


Using RAID BIOS Utility
You also can use the devoted RAID BIOS Console or Utility on most motherboards to create a RAID array in case you can’t disable CSM mode. After the ASRock emblem display screen, your show will present an Intel Rapid Storage Technology or AMD-RAID Controller BIOS display screen. Here, you need to be capable to see one thing like “Press <CTRL-R> to Configure” or “Press <CTRL-I> to enter Configuration Utility”. Press the hotkey (Ctrl + R or Ctrl + I) to entry the RAID Utility.

The course of to create an array from this console is similar to that using the UEFI interface. So I like to recommend checking that part to search out out what you might want to do. Navigating by means of the choices and specifying totally different values might require totally different strategies however the interface ought to show what you might want to do, so it’s simple to comply with by means of.
Note: If you might be using a devoted RAID controller to arrange RAID, it’s higher to test if the controller’s producer supplies any devoted RAID configuration apps and use it as an alternative. This manner, you should have more choices relying on what options the producer has built-in into the controller.
Install RAID Drivers
RAID requires particular drivers to work correctly. If your working system doesn’t have such drivers, it gained’t acknowledge the RAID quantity in any respect.
Depending on whether or not you might be creating an OS RAID quantity or a non-OS RAID quantity, you might want to comply with totally different steps to put in the RAID drivers.
If OS Drive is Not Part of RAID Array
If you utilize the Windows Desktop Application to arrange RAID, it ought to have straight put in the mandatory RAID drivers into your system. However, in case you set the RAID by means of the UEFI, it’s possible you’ll want to put in the drivers individually.
You can use the identical preliminary steps from the Using Windows Desktop Application part to take action. You have to carry out steps 1-3 for Intel and steps 1-4 for AMD.
While Installing Windows on RAID Array
The Windows set up media might not comprise the RAID drivers. In such circumstances, in case you undergo the traditional set up course of, you’ll not discover any disk the place you possibly can set up the OS.
You have to obtain the RAID drivers and retailer them on a USB drive after which load them on the Windows installer to search out the RAID array within the setup.
Download and Extract RAID Drivers right into a USB drive
For AMD CPU,
- Go to AMD’s help web site.
- Under Find Drivers and Support by Selecting Your Product, choose your Chipset from the record and click on Submit.

- Expand your Windows model and click on on Download next to AMD RAID Driver.

- Extract the archive.
- Copy the folder on your RAID controller inside (normally NVMe_CC, NVMe_DID or RAID_SATA) to a USB drive. If you might be making a SATA RAID, copy the RAID_SATA folder. For NVMe, AMD Desktop processors with out iGPU or processors earlier than and together with AMD Ryzen 2000 sequence usually use CC drivers and all others use DID drivers. Also, 1st Gen AMD Threadripper Processors use CC whereas the remaining use DID.


For Intel CPU,
- Search for Intel Rapid Storage Technology Driver Installation Software on the web and go to the official web page of its latest model on Intel’s web site.
- Click on Download SetupRST.exe or any obtain button for the software program.
- Go to the folder the place you saved or downloaded SetupRST. Right-click on the folder and choose Open in Terminal. You also can click on on the folder path handle bar, kind
powershelland press Enter.
- Type
./SetupRST.exe -v EXTRACTDRIVERS=SetupRST_extractedand press Enter to extract its contents.
- Go contained in the extracted folder and inside your windows model. Copy the
iaStorAC.inffolder to a USB drive.


Load RAID drivers whereas Running Windows Setup Utility.
- Create an set up media in case you haven’t accomplished so already.
- Then, boot using the USB set up media and undergo the method till you get to the Where do you need to set up Windows tab.
- If you see the RAID quantity there, the set up ought to have the mandatory drivers. SO you possibly can straight set up Windows there. If you don’t see the RAID quantity there, comply with the steps beneath to load the drivers.
- Insert the USB media containing the drivers into the PC and click on on Load driver.

- Choose Browse and navigate to the folder you copied and choose OK.
- For Intel, just one driver needs to be out there. Select it and click on Next.

- For AMD, choose all of the distinctive drivers from the record one by one and click on Next. You want to do that course of 3 times till you get all of the drivers (
rcbottom.inf,rcraif.inf,rccfg.inf)
- Insert the USB media containing the drivers into the PC and click on on Load driver.
- Now, comply with the remainder of the method to put in Windows. After doing so, don’t neglect to update the system and set up motherboard drivers and different utilities.


Initialize and Partition the RAID Volume
If you create a non-OS RAID quantity, you should additionally initialize the RAID quantity and create a partition. If you used the Desktop apps and in addition chosen their choices to initialize the disk, you’ll solely have to partition the RAID quantity.
You may have to format or partition the storage drive from the Disk Management.
- Open Run (Windows key + R), kind
diskmgmt.mscand press Enter. - If it asks you to initialize the disk, test GPT (or MBR relying on which disk kind you need) and click on OK. If not, you might want to right-click on the RAID disk, choose Initialize Disk after which do the identical.

- Right-click on the Unallocated house next to the RAID quantity and choose New Simple Volume.
- Follow the on-screen directions to create a partition.

Check out more article on – How-To tutorial and latest highlights on – Technical News