How To Remove Write Protection On USB Drive?.
When a USB drive turns into write-protected, you’ll face hassle copying information, formatting, or setting permissions.
If it’s finished on the OS or utility degree, the problem persists solely in your laptop. However, USB drives can be protected on the {hardware}, malware, or firmware ranges, which can prohibit performing write operations on each device.
Considering the several types of write safety, listed below are some efficient methods to take away it.
Check for Write-Protection Switch

Some high-end flash drives are outfitted with a bodily swap that permits you to allow/disable write safety on the {hardware} degree.
There’s an opportunity that you’ve by chance shifted the latch to the ‘lock’ place. Unlike SD playing cards, most USBs don’t embody this, which can also be why many customers have been reportedly unaware of this characteristic.
- Disconnect the drive and test the indication on the backside or the facet.
- Now, all you must do is slide the swap to the ‘unlock’ place, which ought to take away the write safety.
- Reinsert your USB drive and attempt copying information or formatting it to substantiate that it’s now working.
Clear Read-Only Attribute Using Diskpart
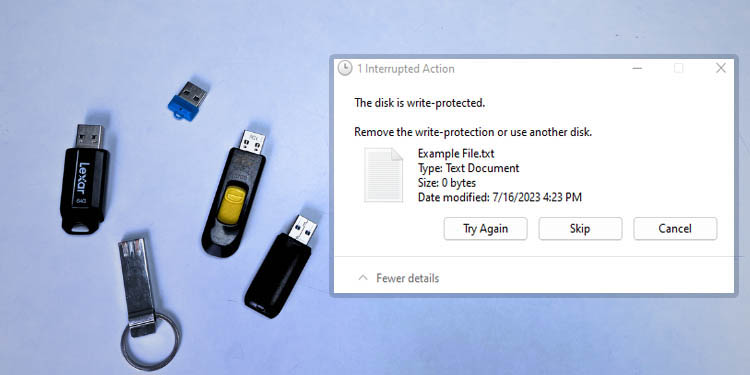
In most instances, your USB drive is about to Read-Only mode, and also you’re accompanied by “The disk is write protected” and “Remove write protection and use another disk” errors.
You can simply disable this using a devoted command. Also, some third-party drive administration purposes can help you do it.
Since Read-Only is enforced inside your working system (by way of system calls to the kernel), the write safety will get applied solely in your laptop. So, you shouldn’t have points copying/formatting/setting permissions on different units.
To take away the write safety on the operating-system degree, right here’s what you are able to do:
- First, launch the Run app by urgent Windows + R hotkey.
- Execute
diskpartcommand.
- You’ll have to press Yes within the User Account Control immediate to launch the utility.

- Run the
record diskcommand and test on your flash drive based mostly on its dimension.
- Then, execute the
choose disk <disk_no>(for instance,choose disk 1). This ought to choose your USB drive. - Now, kind
attributes disk clear readonlyand hit Enter. This will take away the Read-Only mode on the chosen disk.
- To confirm, run the
attributes diskcommand. Here, each the Current Read-Only State and Read-Only fields ought to show No.


Change Registry Entry
Sometimes, you could encounter ‘Yes’ in Current Read-Only State and ‘No’ within the Read-Only subject when checking your disk’s attributes. In such instances, simply clearing the read-only attribute gained’t assist.
Before specializing in different write safety ranges, I counsel analyzing your registry keys first. Windows enables you to tweak the DWORD values that may allow/disable read-only mode for all of your exterior storage units. Here’s how:
- Use Windows + R to launch Run and execute
regedit.exe.
- Once prompted, hit Yes and the Registry Editor window ought to open up.

- Paste the following path within the deal with bar and hit Enter:
ComputerHKEY_LOCAL_MACHINESYSTEMCurrentControlSetControlStorageDevicePolicies - Double-click on the WriteDefend DWORD worth or related indication from the correct pane.

- Change the worth to
0and press Ok.
- Now, reboot your laptop and reinsert the flash drive.
- Try copying a file into the USB drive to see if altering the registry entry has eliminated the write safety.


In case you didn’t discover the StorageDevicePolicies key, you could manually create one. This may also help permit write entry by introducing the lacking key.
Also, it might probably repair potential registry corruption that would have triggered further issues with the write entry.
- Right-click on the Control key and choose New > Key.

- Rename this to StorageDevicePolicies.

- Right-click wherever within the empty space. Then, choose New > DWORD (32-bit) Value.

- Rename it to WriteDefend.
- By default, the worth needs to be 0. Nonetheless, you may nonetheless confirm by checking the Data subject.

- Reboot your PC and reinsert the USB drive. Then, test in the event you get entry to write down knowledge in your flash drive.


Perform Malware Scan on Your USB Drive
You might need seen that sure information in your USB drives can’t be deleted. It throws surprising errors that keep you from eradicating it.
This probably signifies that your file is contaminated by malware able to write defending sure information and even the whole drive.
A easy workaround right here is to make use of dependable antivirus software program. You can have a number of ones but when you don’t even personal one, you could make the most of the built-in Antivirus program on Windows:
- Use Windows + E hotkey to launch the Explorer.
- Select This PC from the left pane.
- Expand Devices and drives (if wanted), right-click in your USB drive, and decide Scan with Microsoft Defender.

- Once the Windows Security app opens up, choose Full Scan and hit Scan Now.

- Wait for the built-in antivirus to scan and take away potential malware that would have led to write-protection errors.

- Once that’s finished, now you can format the USB drive or wipe it to make sure the malware is eliminated for good. Now, you must be capable of carry out write operations if the perpetrator was malware.


Format and Remove Encryption

If not one of the above strategies helped you out, you may actually use a dependable utility to bypass the write safety in your USB drive.
- There are loads of third-party purposes that allow you to modify the write-protection settings. Just ensure you have downloaded a dependable one to carry out this motion.
- In case that doesn’t assist, attempt reformatting the drive. A number of high-end third-party drive administration utilities ought to permit it even when the ReadOnly mode is enabled.
- You may even attempt formatting your flash drive using Linux-based utilities, like Gparted.
- While most HDDs and SSDs supply devoted purposes to management firmware-level write protections, there may be restricted ones for USB flash drives. Kingston Format Utility and Apacer USB Repair Tool are some fashionable ones.
- You can test your producer’s web site to seek out out if they’ve a devoted program on your Pendrive.
- Some distributors supply encryptions to lock the USB flash drives. Without a password, you gained’t be capable of entry any content material from the disk.
- So, in the event you discover a ‘lock’ icon in your drive or get the “Access is denied” error when making an attempt to repeat information, that you must enter the suitable password to realize entry first.
- If the USB drive is encrypted using Windows Bitlocker, that you must use the proper credentials right here as nicely.
- To make sure you get entry the subsequent time, now you can flip it off from Control Panel > System and Security > BitLocker Drive Encryption.
- In case your PC doesn’t assist Windows BitLocker or you don’t keep in mind the password, you could format it to realize back the learn and write entry.
When doing so, you’ll lose all of your knowledge. So, solely go for this in the event you’re not anxious about your information (or you’ve already backed up your knowledge).
Dump Your USB Drive
Even if not one of the above options labored for you, your flash drive might have robotically enabled write safety because it’s on the verge of its finish life. Different sectors of the disk might have worn out and are not any more dependable.
Unlike SSDs, the lifespan of a flash drive is even shorter. However, there’s no commonplace issue to measure this and even distributors don’t present a devoted specification for it.
Also, it’s potential that the inner chip of your flash drive has detected an unrecoverable failure. While there may be some superior instruments that may enable you reset the write safety flag, this won’t be a possible choice for everybody.
While it may be disheartening to listen to, it’s potential that your USB drive can now not write knowledge. So, the one choice is to attempt recovering the information in it using superior software program. Then, you could bodily destroy it (which occurs to be one of the best ways to dump the drive on this situation).
Check out more article on – How-To tutorial and latest highlights on – Technical News