How To Install A Power Supply Unit In Your PC.
The course of to combine the PSU into your construct is kind of easy and simple. Having stated that, you can’t nonetheless overlook the doable hazards due to an improper set up. For instance, harm to the PC elements and even quick circuits.
So, it’s vital, you perceive the method of putting in an influence provide unit whether or not you’re constructing a PC or changing the previous PSU with a brand new one.
In this text, I’ll be explaining the step-by-step process to put in a brand new PSU into your PC.
Getting Things Ready
Here’re an inventory of few issues it is advisable to have earlier than beginning up:
- A proper measurement screwdriver, Phillips head most popular.
- A tray for holding screws, ideally a magnetic one.
- Anti-static wrist wrap to floor your self. If you don’t have one, proceed with set up in an anti-static space. You can steadily contact a steel object (unpainted one) throughout the set up course of to empty the static cost.
- Cable ties or Velcros.
Now that you’ve gathered the mandatory instruments, it’s time to get into the precise course of. Let’s Start!
Attach Power Supply Cables to the PSU
You could skip this step when you’ve got a non-modular PSU (PSUs with all cables pre-attached to them.)

Otherwise, it is advisable to join the cables to the PSU manually. You will usually discover 5 sorts of cables together with your modular PSU, like those that got here with my totally modular Corsair RM 850x.

Grab the required cables to your setup and join them to the ability provide unit. Make certain the connection is safe and tight.

Remove the Side Panel
The next step entails eradicating the aspect panel. If you might be in-between the PC constructing course of, you in all probability have already got the aspect panel off. If not, learn on.
Each PC case has its distinctive means of eradicating the aspect panel. It usually relies upon upon the producer.
In most instances, you may both do it by eradicating the thumb screws on the perimeters of the panel or unfastening the tiny screws on the perimeters of the back panel.

You could require eradicating solely the left aspect panel or each side relying upon whether or not your PC case has a shroud or not.
For instance, the NZXT H700 PUBG case that I purchased for my high-end gaming rig requires eradicating each aspect panels earlier than I can set up the PSU.

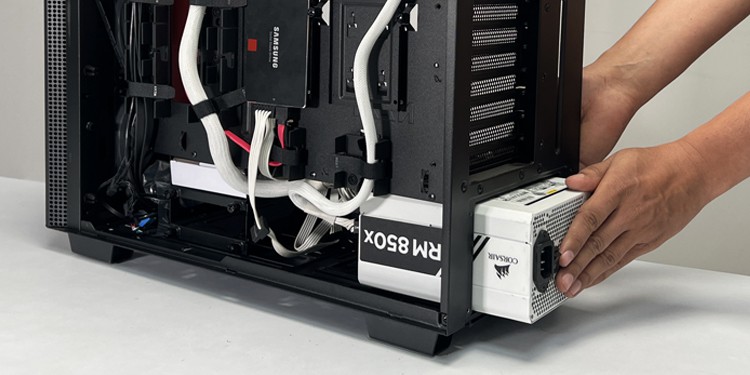
Mount the PSU
Now that you’ve eliminated the aspect panel, you’ll get entry to the PSU compartment, usually situated on the backside of the PC case.
In the case of my NZXT H700,
- Grab the PSU and align it correctly into its bay such that the air-intake-fan faces downwards and the AC twine inlet aspect faces backward.

- If there isn’t a ample air flow on the backside, you can even face the fan upwards. However, your PSU should have appropriate mounting holes to assist the orientation.

- Tighten up the screws to connect the PSU to the chassis.


The steps needs to be related in case of different PC instances too.
Note: Only mount the fan upside in case your PC has a correct cooling system. Otherwise, the new air inside the PC case can overheat the PSU, finally inflicting thermal throttling in the long term.
Route the Cables
The next factor it’s best to deal with is the correct routing of the ability cables. PC instances lately have a devoted cable routing path with ample house behind the motherboard tray, as you may see in my mid-tower NZXT H700.

You can direct the ability cables via these paths, then information them via the cable administration holes in your PC case. You could use zip ties or Velcro to arrange them.
I like to recommend you information these cables via the holes/slots closest to the connectors on the motherboard/gadgets, in order that the connection turns into simpler later.
Connect PSU to the PC elements
Once you might be completed with cable routing, it’s now time to attach them to the motherboard and different elements.
- Simply join the 24-pin ATX motherboard connector to the ATX header, like I’ve completed on my GIGABYTE TRX40 AORUS MASTER.

- Similarly, plug the 12V CPU energy connector to the 8-pin ATX_12V CPU header.

- Likewise, join the PCIe, SATA and Molex connectors relying upon your necessities.


If you might be having difficulties determining the cables and the place they go, now we have an in-depth article on energy provide connectors.
Finalizing Installation
Now you’re just one step away from giving life to your machine. But wait, don’t reattach the aspect panel or energy in your PC but. Instead, double-check all the pieces first.
Make certain if the ability cables are securely connected on each side. Check if the PSU is correctly mounted, and confirm the cable routing too. Once all the pieces is ready,
- Turn off the energy swap in your PSU (press the 0 aspect.)

- Attach the AC energy twine to the unit and activate the ability provide from the wall outlet.

- Switch on the PSU (press the 1 aspect.)

- Turn in your pc. If the pc boots up efficiently, shut down your pc and reattach the aspect panels to your PC case.


Your PC ought to activate as anticipated. However, typically on account of different causes the PSU could not activate. In such instances, it is advisable to troubleshoot the ability provide.
Moving ahead, if something doesn’t appear to work, you might need to switch your PSU. Although changing the ability provide unit is as straightforward as putting in the brand new one, be sure to discover the appropriate product.
I counsel getting a excessive effectivity energy provide unit that has an 80 PLUS Gold or Platinum score. This means, it doesn’t waste plenty of power as warmth and might even prevent cash in your electrical energy invoice over time.
Check out more article on – How-To tutorial and latest highlights on – Technical News