How To Enable Virtualization In ASUS BIOS.
You presumably gained’t have the ability to run Hyper-V or third-party digital machines like VMware Workstation/VirtualField in your ASUS system with out configuring the associated settings on BIOS.
To allow virtualization, navigate to CPU Configuration within the Advanced tab. Intel customers can search for Intel Virtualization Technology or VMX possibility whereas these with AMD processors ought to discover SVM Mode. Just increase the drop-down, set it to Enabled, and save the settings.
Recalling my first try to make use of Ubuntu on VMWare, I couldn’t begin the digital machine even after correctly setting it up. I received the “This host supports AMD-V, but AMD-V is disabled” error and to resolve this, all I needed to do was tweak a easy setting on BIOS. Since then, I’ve been capable of emulate a number of working techniques on my ROG STRIX B450-F GAMING PC with out additional points.
Check Processor Virtualization Support
Even although most fashionable motherboards embody the virtualization setting inside the BIOS settings, it may not work in case your processor is incompatible.
Here, at our TechNewsToday office, all of our Intel and AMD processors help this function. We have had no complaints from any authors and editors when using virtualization on their ASUS laptops or PCs.
But this may not be the identical case for everybody. For that cause, it’s a good suggestion to first affirm whether or not your CPU helps it or not.
For Intel Users

If you’re a Team Blue, you’ll be able to straight verify your processor’s specs. Identify whether or not Intel Virtualization Technology, VT-x, VT-d, VT-c, or related terminologies are included there.
Another approach is to obtain and set up their Processor Identification Utility. Launch it and confirm if the associated possibility has a checkmark.
For AMD Users

On the flip aspect, Team Red customers don’t require digging round their on-line specs web page as AMD hasn’t included something associated to virtualization, SVM Mode, or AMD-V there. Instead, I counsel downloading their AMD-V Technology and Microsoft Hyper-V System Compatibility Check utility.
All you need to do is extract the zipped folder and run the amdhyperv.exe file. It will robotically present whether or not your system helps Virtualization and Hyper-V, as demonstrated within the above snap.
Access ASUS BIOS Utility
After confirming compatibility, it’s time to enter UEFI/BIOS display screen in your ASUS PC. Just begin/restart the pc and spam the Del key as quickly as you press the ability button.

However, some ASUS fashions use F2. So, if Del doesn’t work, reboot the pc, and this time, press F2 as quickly as you encounter the primary ROG/ASUS/TUF brand.
Navigate to CPU Configuration in Advanced Mode
In most techniques, you enter the ASUS EZ Utility after using the devoted BIOS key. But since you’ll be able to’t make modifications to the Virtualization settings right here, you might want to change to Advanced Mode. Follow the beneath directions on what to do next:
- From the underside of the display screen, choose the Advanced mode possibility. As indicated within the small brackets, you could even use F7.

- Next, go to the Advanced Tab.

- Then, choose CPU Configuration. This is the place the virtualization settings in your BIOS lie.


Enable Virtualization
In order to your hypervisor or VMM to make the most of the extra {hardware} capabilities supplied by Vanderpool Technology, you might want to now allow the associated settings.
While the walk-through on each Intel and AMD ASUS motherboards are related, they use their very own terminologies that may confuse you. Don’t fear–I’ll be guiding you with my expertise on how to configure them on each techniques.
On Intel Motherboards
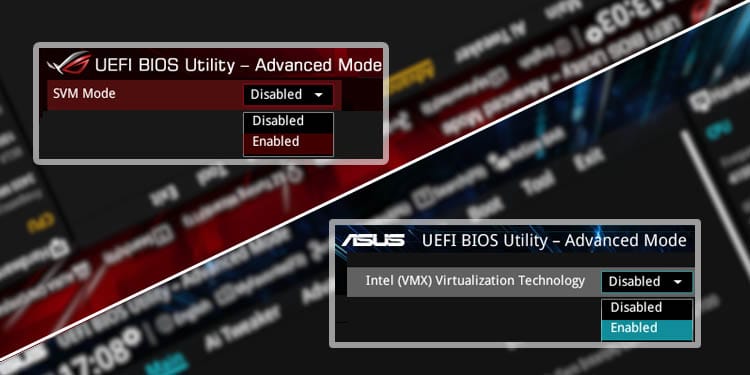
In some Intel ASUS boards, you’ll be able to solely discover VT-x, because the demonstration beneath on my PRIME B660M-Okay D4 motherboard:
- Once you’re contained in the CPU Configuration web page, scroll all the way down to find Intel (VMX) Virtualization Technology.
- Expand the choice and set it to Enabled.

- Now, press F10 to save lots of modifications and exit from ASUS BIOS.


Some ASUS laptops and motherboards may give you extra virtualization options like VT-d ((Virtualization Technology for Directed I/O) and VT-c (Virtualization Technology for Connectivity).
For instance, my NX580VD doesn’t combine the precise VT-x possibility however as an alternative comes with simply Intel Virtualization Technology, which is mainly the identical factor. But together with that, I can allow/disable VT-d as nicely.

The two will not be associated by any likelihood. While the VT/VT-x possibility permits me to allow CPU virtualization on my ASUS pc, VT-d lets me entry my I/O units straight, together with storage controllers, network adapters, add-on graphics, and so on.
On AMD Motherboards
Just like Intel, AMD has its personal virtualization function known as AMD-V, which may be enabled by SVM (Secure Virtual Machine) on ASUS BIOS. Here’s a fast demonstration of how I’ve executed it on my ROG STRIX B450-F GAMING motherboard:
- From the CPU Configuration part, discover and increase the SVM Mode drop-down.
- Pick Enabled.

- Now, press F10 to use and save the modifications. Your ASUS system ought to now reboot.


Verify and Use Virtualization Features
Finally, you’ll be able to affirm whether or not the Virtualization possibility exhibits up on Windows:
- Once your OS boots up, use Ctrl + Shift + Esc hotkey to open Task Manager.
- Get to the Performance tab and choose CPU.
- From the proper, discover the Virtualization possibility. It ought to point out ‘Enabled’.


While that is regular on techniques supporting simply VT-x or SVM Mode, you may additionally discover Hyper-V Support right here. That was the case with my NX580VD laptop computer once I disabled the Intel Virtualization Technology possibility however stored the VT-d possibility enabled.

Indeed, I used to be ready to make use of Microsoft Hyper-V with out a hitch. But once I began a digital machine on my VMWare Workstation Pro 16, I met with the ‘The host supports Intel VT-x, but Intel VT-x is disabled’ error (an analogous instance on my AMD ASUS PC as acknowledged earlier).
From right here, I got here to know that the VT-d possibility presents Hyper-V help. However, when you want to run third-party virtualization packages, you could allow the Intel VT-x or SVM mode.
Moving on, now you can begin using totally different {hardware} virtualization options in your OS. Here’s a listing of guides ready by our TNT staff that ought to provide help to grasp virtualization very quickly:
Check out more article on – How-To tutorial and latest highlights on – Technical News