How To Create A RAID Array On MSI Motherboard.
Most MSI boards assist motherboard RAID via the IRST (Intel) or RAIDXpert2 (AMD) applied sciences. You may’ve additionally seen such RAID arrays go by names like onboard RAID, BIOS RAID, or FakeRAID.
To create an onboard RAID array, you should first set the storage controller to RAID mode within the MSI BIOS. Then, you possibly can choose the disks and RAID degree to make use of and configure the array to your liking. Finally, after loading the RAID drivers, the quantity turns into recognizable by Windows.
It’s a easy course of general, however the steps could differ barely relying in your actual setup. So, I’ll information you thru every step of establishing SATA and NVMe RAID arrays on MSI motherboards.
Setting RAID Mode in MSI BIOS
If you haven’t already carried out so, you must set up the NVMe/SATA drives at this level. Make positive you’re using similar drives (measurement and pace) to forestall any bottlenecks. Also, backup any information elsewhere as these drives shall be formatted while you create the array.
- Turn on or restart your system and repeatedly press Del to get to the MSI BIOS.
- Press F7 to alter to Advanced Mode if required. Go to Settings > Advanced > Integrated Peripherals.
- In AMD’s case, set SATA Mode to RAID Mode. Although not apparent from the identify, this setting will allow NVMe RAID as effectively.

- The course of varies for Intel boards relying on the BIOS interface. Try the next steps:

- Set SATA Mode to RAID/Optane Mode.
- Set M.2/Optane Genie to Enabled.
- Go to RAID Configuration (Intel VMD). Enable the VMD Controller and the required RAID ranges right here.
- Now, go to Settings > Advanced. Ensure the BIOS Mode is about to UEFI. This setting can also be contained in the Windows OS Configuration tab.

- Finally, press F10 to save lots of the adjustments and exit the BIOS.


Note: If you have got an enlargement card with a number of M.2 drives, you must join it to a PCIex8 or x16 slot. Then, break up the PCIe lanes to x4x4x4x4 or the same break up in accordance with the variety of drives used. If you don’t do that, some drives received’t be detected.
Creating the RAID Array
Now that your MSI BIOS is configured correctly, you need to use the steps from the RAIDXpert2 or IRST part to create the RAID array.
Using RAIDXpert2 (AMD)
- Enter the MSI BIOS once more and go to Settings > Advanced. The RAIDXpert2 Configuration Utility needs to be accessible now.

- Click on Array Management > Create Array right here.

- If Create Array is inaccessible, which means there’s already a RAID array in place. In that case, you possibly can go to Delete Array and wipe the present arrays.

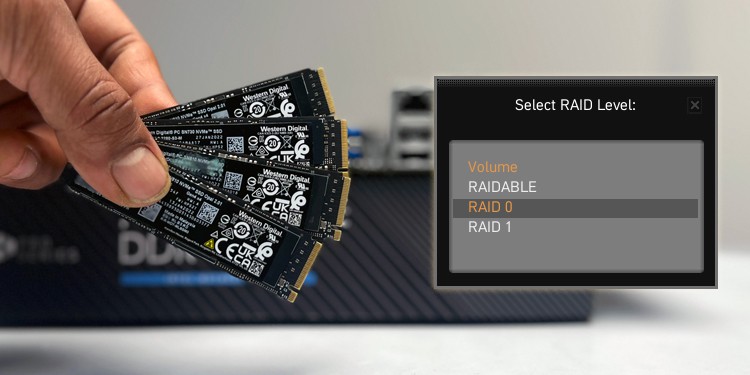
- Select the RAID degree now.

- Volume – Just a bunch of disks (JBOD). This enables you to pool a number of disks to create one logical quantity.
- RAIDABLE – Marks disks as RAIDABLE. You can use these disks to get well degraded arrays or convert them to RAID 0 or 1.
- RAID 0 – Uses two or more disks. The knowledge is striped, that means you get greater storage capability and improved R/W speeds. But there’s no redundancy resulting in a better threat of knowledge loss. This shouldn’t be used to retailer essential information.
- RAID 1 – Uses two or more disks to reflect knowledge from one drive onto the opposite. This is the other of RAID 0 because it gives redundancy as a substitute of storage or R/W advantages.
- RAID 5 – Uses three or more disks to stripe knowledge together with parity. This means it gives each redundancy (can deal with one failed drive) and efficiency enhancements.
- RAID 10 – Uses 4 or more disks to mix striping (RAID 0) and mirroring (RAID 1). This means it may well tolerate 1-2 drive failures whereas additionally offering efficiency enhancements.
- Next, go to Select Physical Disks. Enable the drives to make use of for the array right here and click on on Apply Changes.

- You can alter the array parameters such because the CacheTagSize (stripe measurement) if you need, however the default values will work effectively for most individuals. When you’ve finalized all the pieces, choose Create Array to arrange the array.

- Finally, press F10 to save lots of and reboot. After exiting the BIOS, you must boot your system using the OS set up media. Continue with the steps from the Installing Drivers part to do that.


Using IRST (Intel)
- Enter the MSI BIOS and go to Settings > Advanced. Open the Intel(R) Rapid Storage Technology utility from right here.

- Select Create RAID Volume.

- Here’s an important part. Select the RAID degree acceptable in your wants.

- RAID 0 – Uses two or more disks. The knowledge is striped that means you get greater storage capability and improved R/W speeds. But there’s no redundancy resulting in a better threat of knowledge loss. This shouldn’t be used to retailer essential information.
- RAID 1 – Uses two or more disks to reflect knowledge from one drive onto the opposite. This is the other of RAID 0 because it gives redundancy however no storage or R/W advantages.
- RAID 5 – Uses three or more disks to stripe knowledge together with parity. This means it gives each redundancy (can deal with one failed drive) and efficiency enhancements.
- RAID 10 – Uses 4 or more disks to mix striping (RAID 0) and mirroring (RAID 1). This means it may well tolerate 1-2 drive failures whereas additionally offering efficiency enhancements.
- Recovery – Use this to revive a RAID 1 or 5 array by changing one disk.
- Matrix RAID – This enables you to create two RAID volumes on a single RAID array.
- RAID-Ready – Set up a RAID-Ready system with a single SATA drive. This enables you to improve the system to RAID 0, 1, or 5 at a later level with out dropping knowledge.
- Enable the disks for the array by marking them with X.

- You can alter parameters just like the Strip Size if you need. Afterward, click on on Create Volume to arrange the array.

- After creating the array, you’ll have entry to actions like deleting the quantity or resetting a disk to non-RAID standing. The former wipes your complete array, whereas the latter removes the RAID construction and degrades the array. In this case, the array could be rebuilt by changing the failed disk.

- When you’re carried out checking all the pieces, press F10 to save lots of and reboot.


Installing the RAID Drivers
Once you create the RAID array, the subsequent step is to put in the OS onto it and boot with it. The course of goes one thing like this:
- Use Rufus or your most popular utility to create a bootable USB.
- Download the RAID drivers and transfer them to this USB. The drivers will differ relying on variables just like the CPU, chipset model, OS model, SATA or NVMe RAID, and so on. The linked information will aid you get the proper RAID driver in your system because it covers this subject intimately.

- After getting ready the USB with the drivers, boot from it to launch the Windows Install wizard. Load the drivers right here to make the RAID quantity accessible.


After Setting Up RAID
RAID was designed to supply storage and efficiency advantages and guarantee your system doesn’t go down due to a failed disk. Although generally misunderstood, it isn’t the identical factor as a backup.
You might nonetheless lose your knowledge attributable to varied causes starting from a number of disk failures to malware or easy human error. So, it’s essential that you just arrange a separate backup of any vital knowledge elsewhere.
Check out more article on – How-To tutorial and latest highlights on – Technical News