Changing Boot Order On ASUS BIOS: A Step-by-Step Guide.
While specifying boot precedence will not be required when using a single bootable device, it’s important for customers preferring multi-booting. Since your ASUS system selects the drive listed on the prime of the boot order, it’s worthwhile to prepare them in a correct sequence.
To handle your bootable units on ASUS BIOS, get to Boot Priority within the EZ mode or Boot Option Priorities within the Advanced mode. Now, drag and drop the drives in desired positions or set them accordingly within the respective boot choices.
For instance, I’ve put in Ubuntu on my major drive and Windows on the secondary. By default, Ubuntu is booted each time I begin the PC however what I choose is Windows.
Even although it’s attainable to pick out the latter from ASUS Boot Menu, doing so each single time on startup could be fairly tedious. Instead, preserving the secondary drive first within the boot precedence record would be the best answer right here.
Restart Your Computer to Access BIOS Interface
To entry the Boot Order settings, it’s worthwhile to get to ASUS Legacy/UEFI display screen first. If you haven’t accessed the interface earlier than, the method isn’t as daunting as you may suppose.
Start/restart your PC and as quickly as you see the ASUS/ROG/TUF display screen, press the Del or F2 key.

The first display screen is often accompanied by “Please press Del or F2 to enter UEFI BIOS setting” or an analogous message. Note that if you’re late in urgent the devoted key, one other emblem display screen seems with a ‘loading’ icon and also you gained’t be capable to entry the ASUS BIOS.
To keep away from this from taking place, I recommend spamming the BIOS key as quickly as your laptop begins up. This even helps if the Fast Boot characteristic is enabled.
Note: The steps on this information are emphasised on ASUS UEFI Utility. While the precise course of barely differs on Legacy BIOS, the thought stays the identical. You simply must navigate to the devoted Boot part and alter the precedence in an analogous means that I’ve demonstrated under.
Manage Boot Priority in EZ Mode
In most ASUS fashions, the default BIOS menu display screen is EZ mode. It gives a easy consumer interface that’s straightforward to comply with alongside, particularly for novices.
In EZ mode, you possibly can handle all the essential system settings, together with the boot device precedence. My fundamental directions under ought to assist simply that:
- Locate the Boot Priority part, which ought to be on the bottom-right a part of the EZ mode display screen.

- If you’ve got greater than 4 units and wish to handle all, press the Switch all button.

- Click and drag the device (that you simply prioritize essentially the most) to the primary place within the record.

- Then, place the next prioritized drive within the second place.

- Repeat the above steps on your different bootable units. In my case, I’ve linked 4 drives and that is how my last boot order will probably be:


Additional Tip: To rapidly swap between EZ and Advanced modes in ASUS BIOS, use the F7 key.
Change Boot Priority in Advanced Mode
If your ASUS Setup mode is about to Advanced, you’ll immediately be navigated to the Advanced mode. While you possibly can rapidly swap to EZ, it’s in no way obligatory as there’s a devoted Boot Option Priorities part on this mode as effectively (don’t confuse it with Boot Override).
- First of all, navigate to the Boot tab.

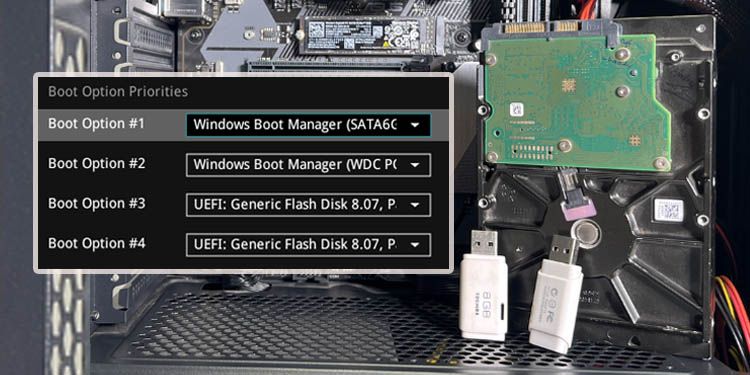
- Locate the Boot Option Priorities part. Here, the variety of boot choices will change based mostly on the variety of linked units.

- Start with the primary boot choice. Expand the drop-down and choose the storage device that you simply want to boot from.

- Now, increase the second boot choice’s drop-down and choose the device you want to keep as a second precedence.

- Repeat the identical steps for the remaining boot choices. As you possibly can see under, you even get to disable the boot choice.


Save Changes and Reboot
Once all the pieces is configured, be sure you save this setting earlier than exiting from the ASUS BIOS Utility. Press F10 adopted by Ok and this could do the job.

Since managing bootable units is only a minor change, it gained’t be proven within the dialogue field (as demonstrated within the above determine).
Quick Troubleshooting: If you’re making an attempt to entry an MBR-partitioned bootable drive on a UEFI system, it’ll seemingly not get detected within the Boot Priority part. A easy answer is to allow CSM, which ought to add legacy compatibility. So, you don’t require changing this drive to GPT.
Check out more article on – How-To tutorial and latest highlights on – Technical News