How to Set a Timer on iPhone Camera.
Whether you’re an beginner or a professional at taking photos in your iPhone, one factor that may show you how to take higher pictures is the Timer possibility. Like the self-timer perform on digital cameras, the built-in timer device on the iPhone Camera helps you to activate the shutter button after a selected interval so as to plan a second to seize it and pose for it your self.
In this publish, we’ll clarify every part you’ll want to know to set a timer and seize timed photos in your iPhone’s digicam.
How to set a timer on iPhone Camera
Although setting a timer on the iPhone digicam is a reasonably simple course of, the way you do it differs on the iPhone mannequin you’re using.
Method 1: On iPhone XS/XR and newer fashions
If you personal an iPhone XS/XR or a more recent mannequin, the Timer possibility is obtainable inside a hidden menu contained in the Camera app.
- To set a timer, open the Camera app in your iPhone.

- When the Camera opens, be sure you’re in Photo or Portrait modes by tapping on these modes on the backside. By default, the Camera app opens in Photo mode however it could differ if you happen to protect your settings for the Camera app.

- When you’re inside Photo or Portrait mode, faucet on the upward-facing arrow on the high of the display screen to open further choices.

- These choices may also be accessed by swiping up on the viewfinder inside both of those modes.

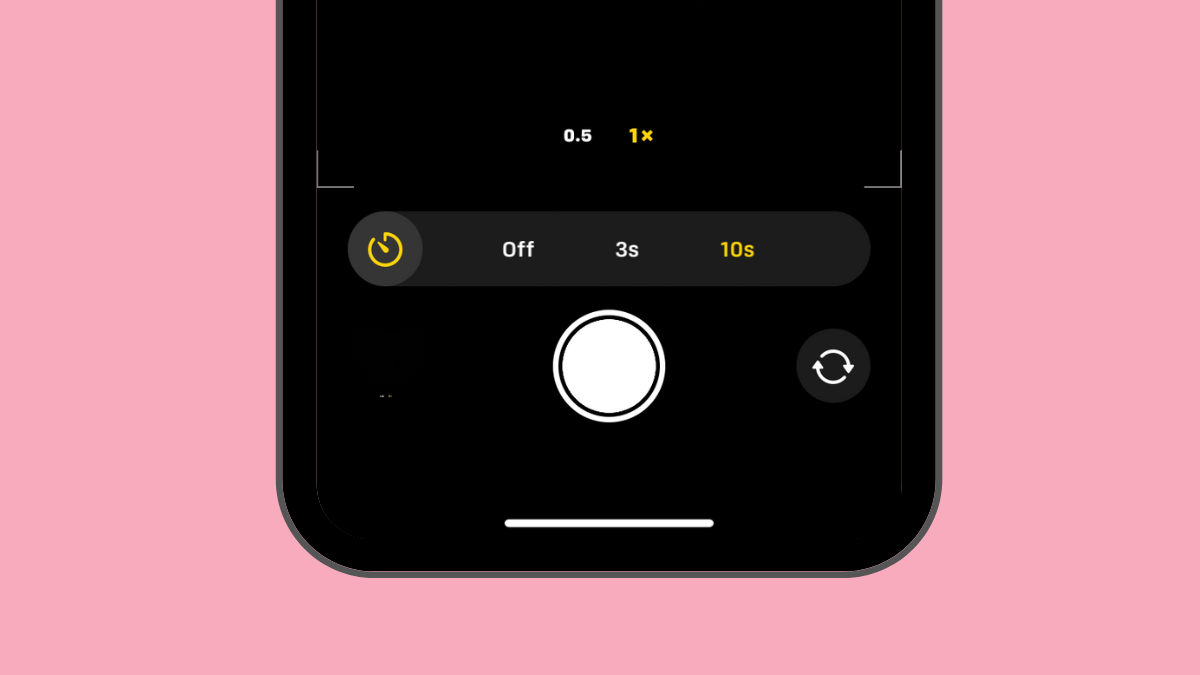
- In the choices that seem on the backside, faucet on the Timer icon (the one marked with a clock-like signal).

- When you faucet on the Time icon, you will notice new choices seem on the backside. From right here, select 3s or 10s to set a timer relying on how briskly you need the shot to be taken.

- The chosen timer possibility will present up on the high proper nook that can assist you be sure you selected it appropriately.

- Once the timer is ready, you possibly can align your self to face the digicam. If it is a group selfie, you might need to relaxation the iPhone beside a wall or mount it on high of a tripod.
Note: You can disable Live Photo mode in your iPhone by tapping on the Live Photo icon (the one marked with concentric circles) if it’s highlighted in yellow to seize a number of pictures in timed mode. This icon can be positioned on the high proper nook or on the backside contained in the hidden menu the place you accessed the Timer possibility.
- If Live Photo reveals as enabled contained in the hidden digicam menu, choose Live Off after you faucet on the Live Photo icon.

- Once you’re prepared with the shot, faucet on the Shutter button on the backside.

- You will now see the countdown seem on the backside proper nook of your display screen. If you’re capturing the photograph out of your most important (back) digicam, your iPhone’s flash can even blink to let you understand the rely so that you could be able to pose on the proper time.

- At the top of the countdown, your iPhone will seize the image or a number of photos relying on whether or not or not you’ve enabled Live Photo for the image.
- When a timed shot is captured, you will notice its thumbnail seem on the backside left nook. To take a look at the image that was taken, you possibly can faucet on this thumbnail to see how effectively the image was captured.

You can repeat these steps to seize more timed pictures in your iPhone.
Case 2: On iPhone X and older fashions
The above methodology works when you have got a contemporary iPhone. In case the iPhone you employ is an iPhone X, iPhone 8, or older, the timer possibility can be readily accessible on the iOS digicam.
- To seize a timed shot on an iPhone X or older, open the Camera app on iOS.

- When the Camera opens, faucet on the Photo tab on the backside to have the ability to seize timed pictures. The Timer possibility gained’t be accessible on different digicam modes.

- Inside the Photo or Portrait mode, faucet on the Timer icon (the one marked with a clock-like signal) on the high of your display screen.

- When you do this, you’ll see further choices on the high to set a timer. From right here, select both 3s or 10s relying on how lengthy you need to wait to your iPhone to seize the image.

- The Timer you set can be seen on the high proper nook to let you understand the chosen time.

- Once the timer is ready, you possibly can align your self to face the digicam. If it is a group selfie, you might need to relaxation the iPhone beside a wall or mount it on high of a tripod.
Note: You can disable Live Photo mode in your iPhone by tapping on the Live Photo icon on the high (the one marked with concentric circles) if it’s highlighted in yellow to seize a number of pictures in timed mode.
- Once you’re prepared with the shot, faucet on the Shutter button on the backside.

- You will now see the countdown seem on the middle of your display screen. If you’re capturing the photograph out of your most important (back) digicam, your iPhone’s flash can even blink to let you understand the rely so that you could be able to pose on the proper time.

- At the top of the countdown, your iPhone will seize the image or a number of photos relying on whether or not or not you’ve enabled Live Photo for the image.
- When a timed shot is captured, you will notice its thumbnail seem on the backside left nook. To take a look at the image that was taken, you possibly can faucet on this thumbnail to see how effectively the image was captured.

- You can repeat these steps to seize more timed pictures in your iPhone.
How lengthy are you able to set a timer on the iPhone digicam?
When you entry the Timer possibility contained in the Camera app in your iPhone, you’ll get choices to decide on between two modes: 3 seconds (3s) and 10 seconds (10s). You can use the primary possibility for taking fast selfies from the entrance or back digicam when your iPhone is handheld. The second possibility can be helpful in eventualities to click on group photos or selfies the place you’ve mounted your iPhone onto a tripod from far out.
How to cease a timer halfway contained in the digicam
When you faucet the Shutter button for a timed photograph, the Camera app reveals the countdown timer on the backside proper nook of the display screen (or on the middle on older iPhones) or it flashes the LED on the back to inform you in regards to the remaining time. You can cease the timed shot at any time throughout this countdown interval to stop the Camera app from taking your image.
To cease the counter halfway throughout a timed shot, faucet on the Stop button on the backside. This button will seem instead of the Shutter button contained in the Camera app.

When you cease the timed shot halfway, the display screen will return to the way in which it was earlier than you pressed the Shutter button. You can re-adjust your body, make modifications to the scene, after which faucet on the Shutter button once more to restart the countdown timer.
How to show off the timer on iPhone Camera
When you set a timer for capturing photos contained in the Camera app, the Camera app preserves this setting for the following time you need to seize one thing in your iPhone. What this implies is that if in case you have enabled the timer beforehand, everytime you open the Camera app once more to click on one other photograph, the chosen timer is re-activated by default. To keep away from ready for the timed countdown, you have to to manually disable the timer in your iPhone in order that subsequent clicks are common pictures captured if you faucet on the Shutter button.
Method 1: On iPhone XS/XR and newer fashions
- To flip off the timer on these iPhones, open the Camera app and faucet on the timer possibility (indicated by a clock signal with 3s or 10s) that reveals the beforehand set time.
- This will open a brand new menu on the backside. From right here, choose Off.

The beforehand configured timer will now be disabled and any photos you click on now can be captured if you faucet on the Shutter button.
Method 2: On iPhone X and older fashions
- To flip off the timer on these iPhones, open the Camera app and faucet on the timer possibility (indicated by a clock signal with 3s or 10s) that reveals the beforehand set time.
- In the choices that seem on the high, choose Off.

The beforehand configured timer will now be disabled and any photos you click on now can be captured if you faucet on the Shutter button.
FAQs
How many photos are saved on a timed shot?
Ideally, if you seize an image in your iPhone, the Camera app captures a bunch of pictures in burst mode for the time being when the shutter button is tapped. When using timed pictures, the variety of photos which can be taken out of your iPhone’s digicam will rely upon whether or not or not Live Photo is enabled.
Live Photo is a characteristic contained in the Camera app that permits your iPhone to seize moments earlier than and after the shutter button is tapped, so you possibly can select the very best second from the sequence of images or the video that will get captured. While Live Photo captures a video with audio throughout common pictures, timed pictures in Live Photo mode work otherwise.
- When Live Photo is turned on throughout a timed shot, your iPhone will solely seize a single shot.
- When Live Photo is turned off throughout a timed shot, your iPhone will seize 10 pictures in burst mode.
Regardless of whether or not or not Live Photo is enabled, all timed pictures are saved in your Photos library and you’ll entry them by tapping on the thumbnail on the backside left nook of the Camera app or by opening the Photos app in your iPhone.

Which modes can you employ with a timer on the Camera app?
You can seize timed pictures in your iPhone solely when taking nonetheless photos of moments contained in the iOS Camera app. The Timer icon will solely be accessible if you’re in Photo mode or Portrait mode contained in the app. You can select these modes by tapping on the respective mode tabs on the backside or by swiping left or proper on the digicam viewfinder.
You can not use the Timer possibility if you’re capturing a panoramic shot which might require you to manually transfer your iPhone backward and forward to take an prolonged shot.
This additionally applies when capturing movies because the Timer possibility is unavailable if you’re in Video, Time-Lapse, or Slo-Mo modes contained in the Camera app. Since you possibly can trim pointless parts from a video after it has been shot, it doesn’t make sense so as to add a timer to seize movies as you possibly can at all times edit them to take away the start portion.
The Timer possibility works when taking photos from any digicam in your iPhone no matter its place. This means you possibly can seize timed pictures from the entrance (selfie) digicam, most important (large) lens, Ultra-wide angle lens, and Telephoto lens.
Why and when do you have to use a timer on digicam?
Timed pictures can turn out to be useful if you’re planning to seize a second, not when the second is true in entrance of you. The best event to make use of the Timer possibility is if you’re taking group selfies. Since you’re not required to time the shot on the proper second, setting a timer will enable others within the body to be prepared for the shot to be taken when the countdown reaches zero. You may even use your iPhone’s most important digicam (the one on the back) to seize a higher-quality shot than an atypical selfie.
Using timed pictures for group selfies permits you (the photographer) to be prepared and within the body for group selfies. You may also forestall digicam shake or blur that will in any other case happen when manually clicking these photos because you not must press the amount down or Shutter button for the time being. Since timed pictures with out Live Photo seize burst pictures, you’ll have as much as 10 photos to decide on the very best second from.
You may also use the Timer choice to seize better-looking selfies out of your back and front cameras. Since you not must manually press the Shutter button to click on photos, you possibly can place the digicam in direction of you or place it on a gradual floor to click on selfies and pose for them on the proper time.
Other eventualities the place you might profit from timed pictures are if you’re about to seize a long-exposure photograph or a macro photograph. In each of those circumstances, your iPhone must be completely regular and targeted on the topic at hand. Using the Timer possibility in such eventualities helps get rid of blur that will in any other case occur if you take photos with the Volume Down or Shutter buttons.
I can not discover the Timer possibility on the iOS Camera. Why?
The Timer possibility seems if you’re taking an image contained in the Photo or Portrait modes in your iPhone’s digicam. The characteristic is obtainable on the iPhone 5 or newer fashions so long as it runs on iOS 8 or later. If you’re unable to seek out this feature, it’s as a result of:
- The Timer possibility is hidden on the Camera app. On iPhone XR/XS or newer fashions, you’ll want to faucet on the upward-facing arrow or swipe up on the viewfinder to make the Timer possibility seen.
- You can not use timed pictures when capturing a panoramic photograph in Pano mode.
- You can not use the Timer possibility when taking a video on any of those modes – Video, Time-Lapse, or Slo-Mo.
- You can not seize timed pictures on iPhone 4 or older fashions.
- Your iPhone hasn’t been or can’t be up to date to iOS 8 or newer.
To seize a time shot on a supported iPhone, be sure you’re on Photo or Portrait mode, swipe up on the viewfinder to entry the Timer possibility, and set it to your most popular length.
That’s all you’ll want to learn about setting a timer on the Camera app on an iPhone.
Check out more article on – How-To tutorial and latest highlights on – Technical News