
How To Fix Call Failed On iPhone [2020 Updated].
Are your calls getting reduce off with a ‘call failed’ error on iPhone while being unable to obtain incoming and outgoing cellphone calls?
iPhones have had lots of issues with calls. Often sufficient you’d get interrupted with an error that claims ‘call failed’ in the midst of, or throughout, a name. Although the assorted iOS upgrades have mounted this downside in a lot of circumstances, it’s nonetheless frequent to obtain this error.
Despite there being a protracted record of articles that provide options, many fixes can solely be discovered on sure web sites which are scattered round different articles. This record combines all the guidelines which have labored for apple customers.
Now as an alternative of contacting Apple buyer assist and ready 72 hours for a similar response, let’s recover from what we will do about your downside now.
Let’s get began.
1. Turn On and Off Airplane Mode.
The best answer is commonly the quickest, which is to toggle the Airplane mode setting in your iPhone on and off. This is a good technique to refresh your cellular device from {hardware} or software program issues that may sabotage your calls.
The Airplane mode approach is arguably essentially the most typical and standard answer that the majority cellphone customers use when their cellphone has related network issues as this.
- Swipe up in your display to entry your Control Center.
- Next, faucet the Airplane icon by the upper-left nook to show it on.
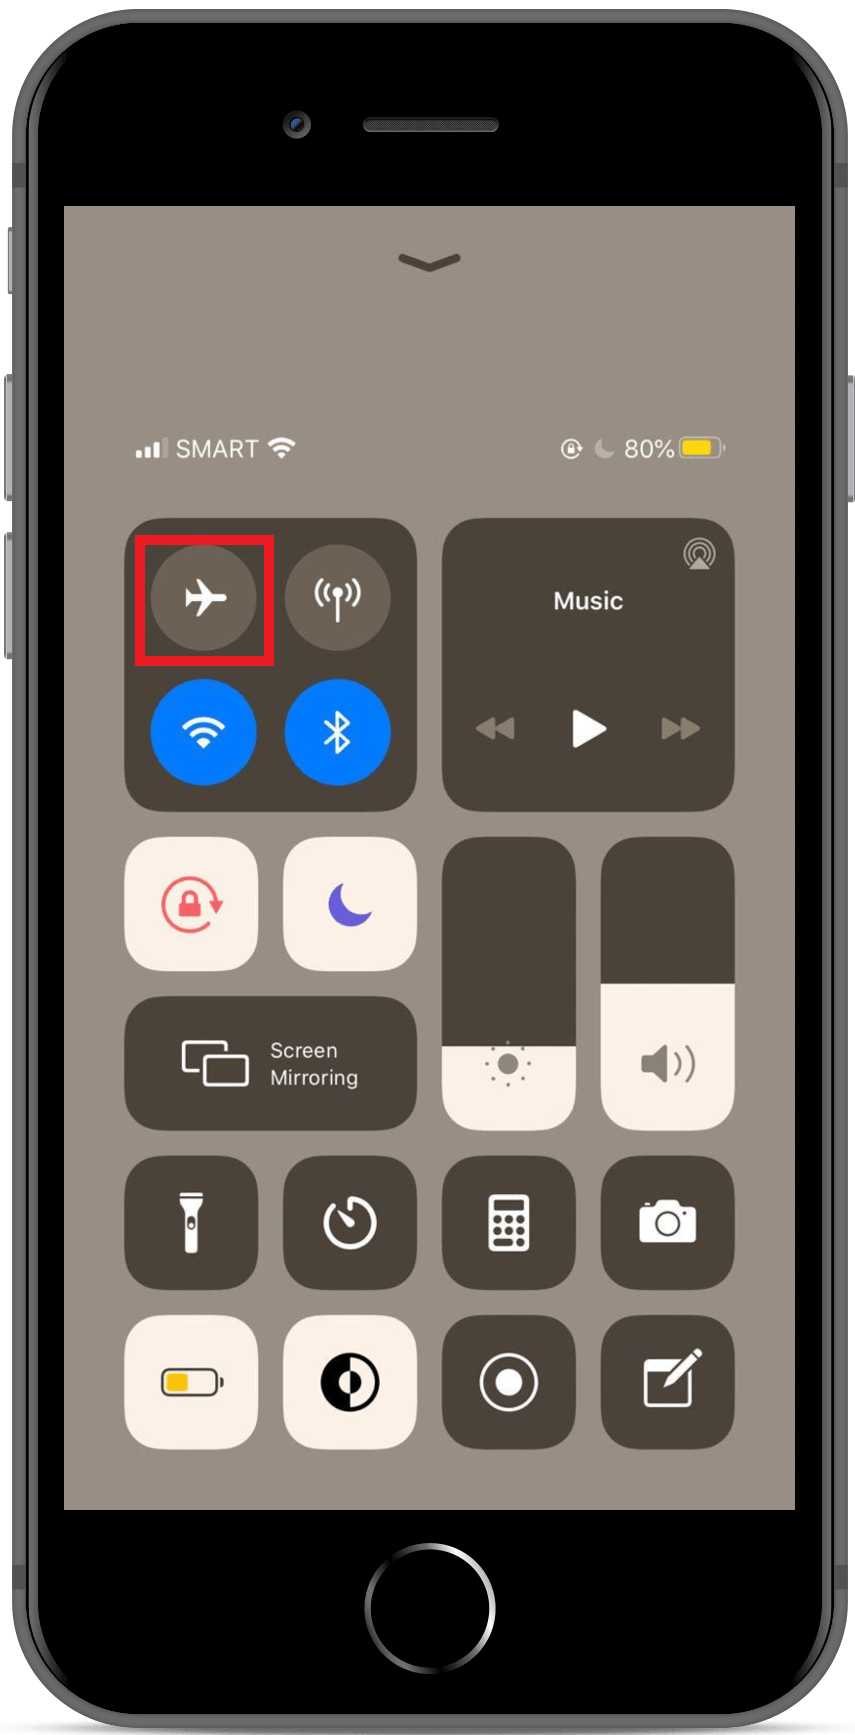
- Lastly, after a number of seconds, faucet it once more to show it off. Make positive that Airplane mode is off, which is indicated by the presence of a sign bar on the prime left facet of your display.
After this quick-fix, attempt calling your required quantity to see in case your name nonetheless fails. If the issue stays, you’ll be able to proceed to the subsequent technique to attempt to repair your calls.
2. Disabling Do Not Disturb.
When we’re busy with work or private enterprise we choose to not be disturbed by the vibrations and ringings of our telephones. The ‘Do Not Disturb’ is a function that’s meant to silence calls, vibrations, and most notifications, but it surely isn’t supposed to dam calls. Nonetheless unconnected issues like this typically mysteriously clear up these issues.
To flip off your ‘Do Not Disturb’ standing, observe these steps:
- Open up your Settings
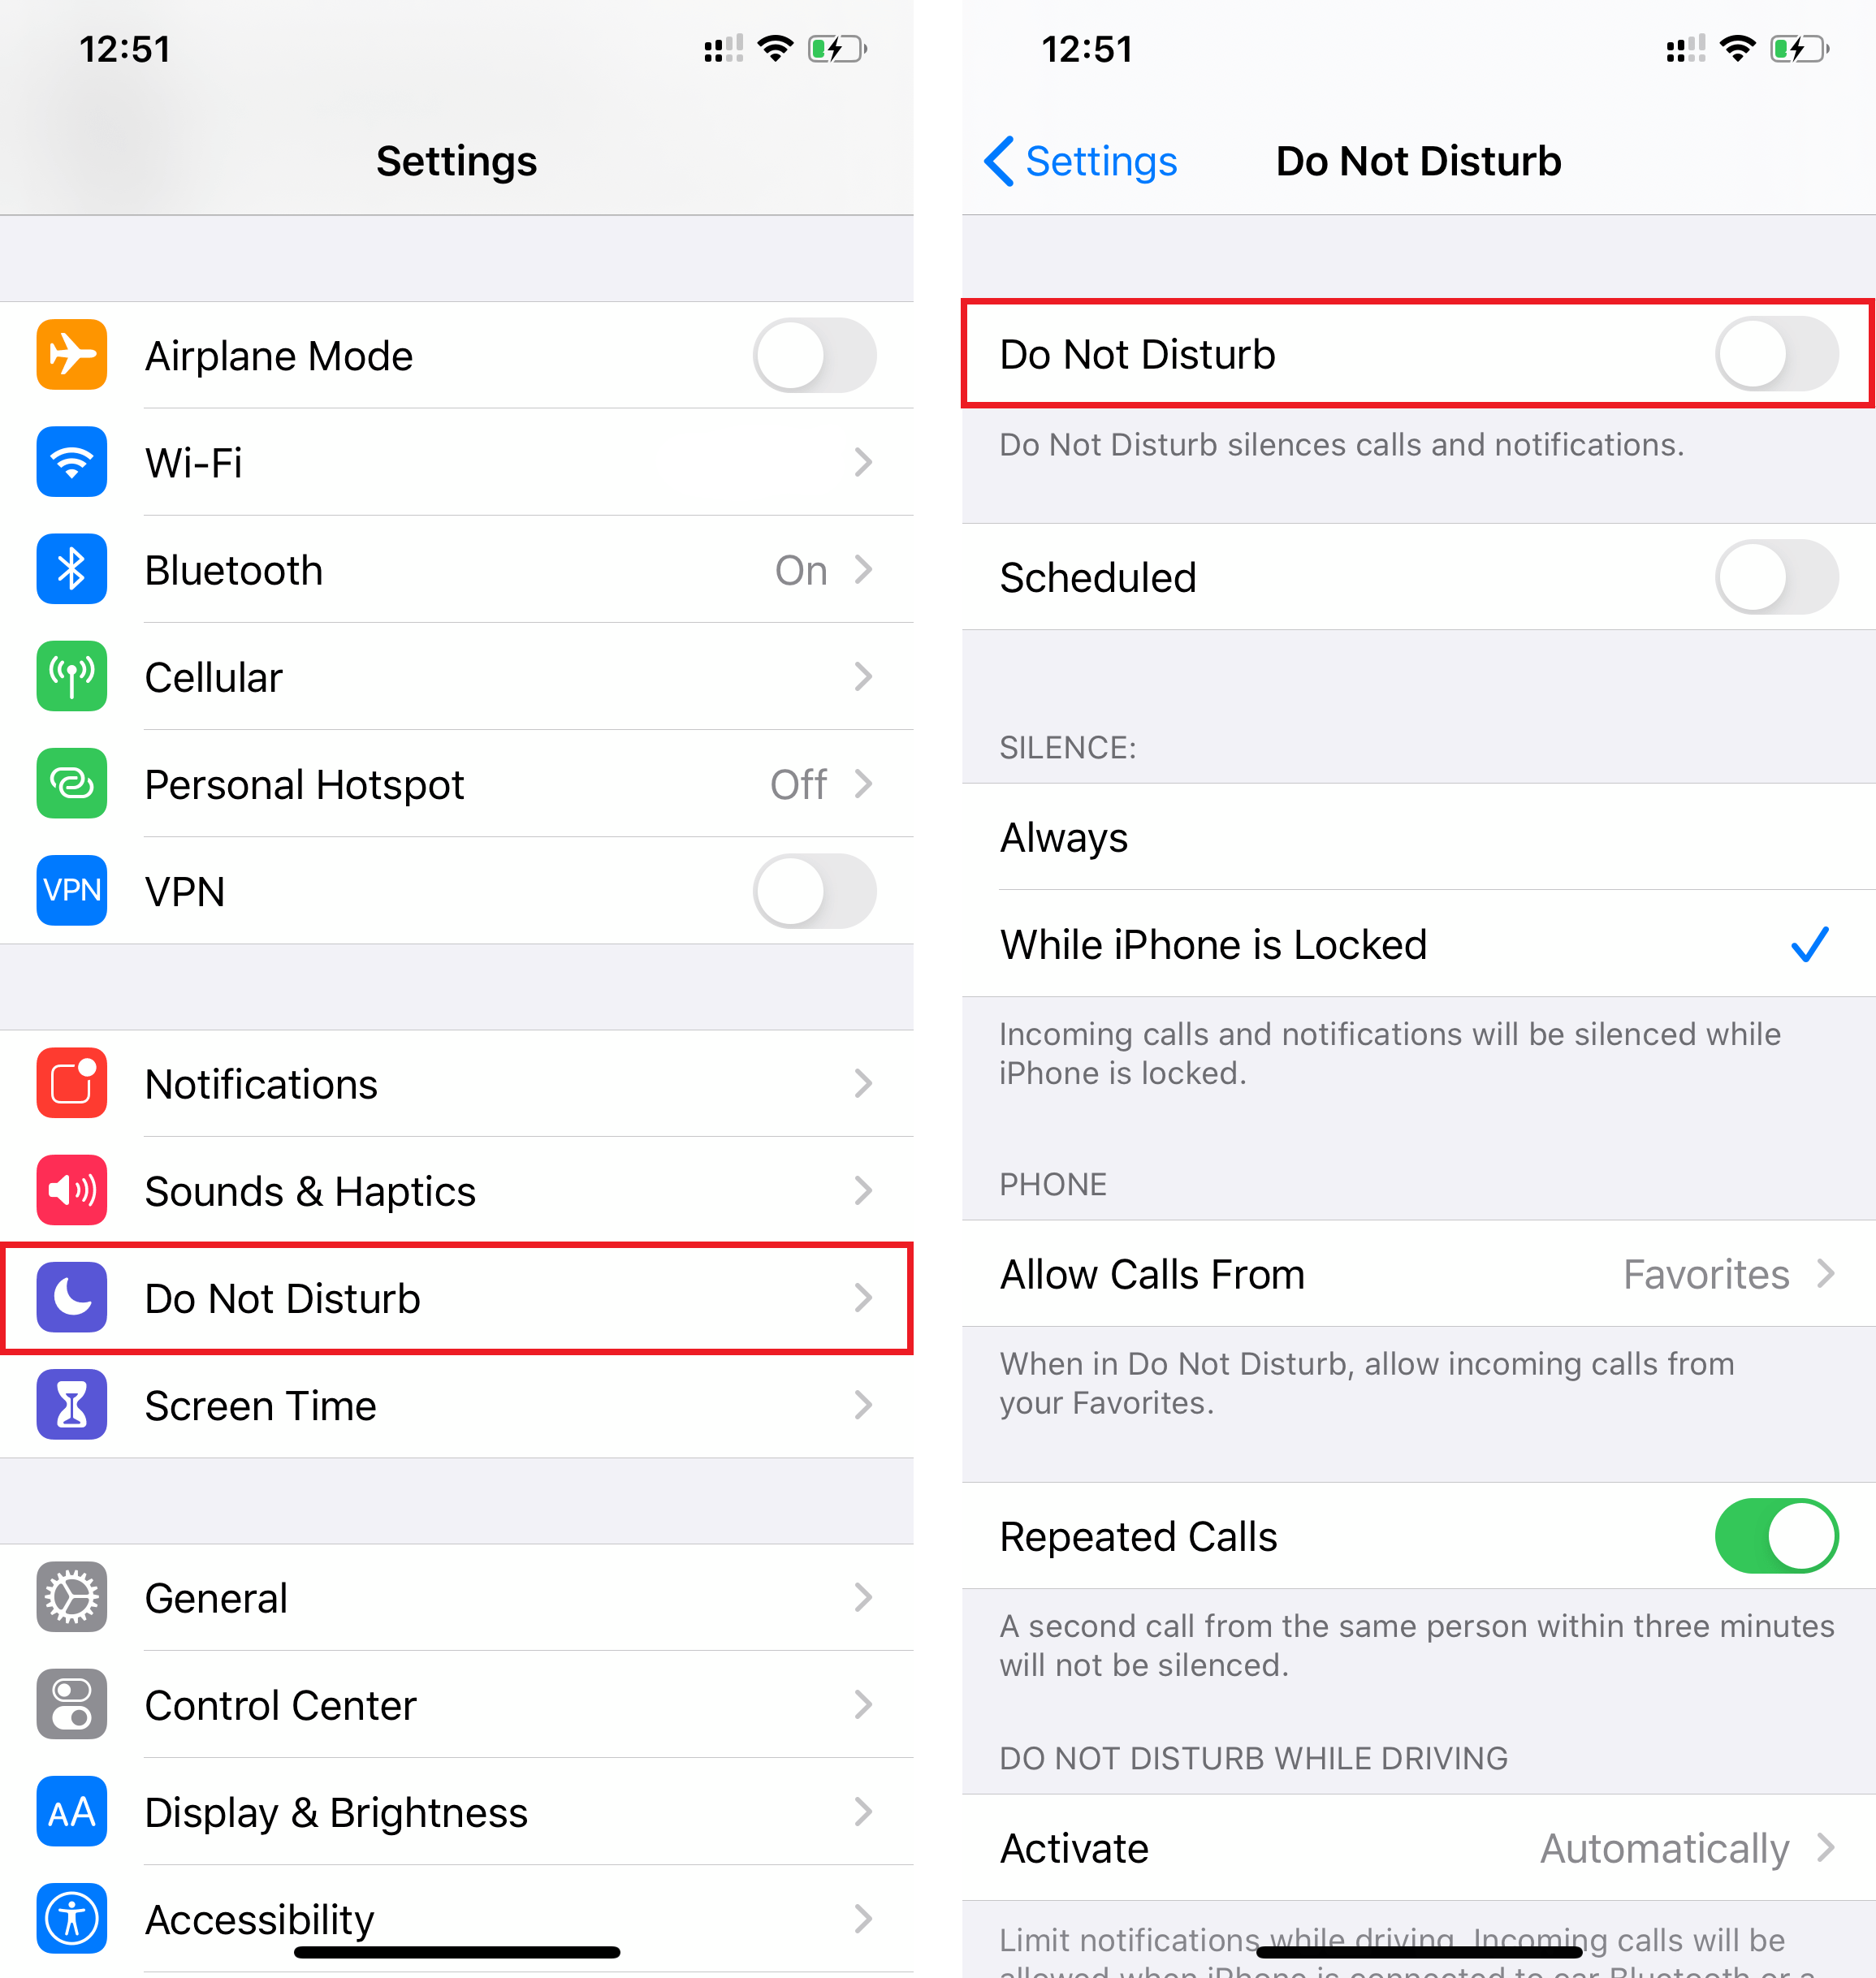
- Go to Do Not Disturb and toggle it off.
After turning off this function, calls and notifications ought to now not be filtered by your cellphone.
3. Dial *#31# or Check your Caller ID.
Chances are your quantity could possibly be hidden, thereby inflicting your calls to fail.
The iPhone has a function that enables customers to name different numbers with out displaying their caller ID or cellphone quantity. This sneaky trick can generally compromise your calls and trigger them to fail.
To unhide your cellphone quantity and present your caller ID, Apple launched a hidden code in your iPhone that disables your anonymity standing on outgoing and incoming calls.
Here’s how one can unhide your cellphone quantity:
- Firstly, open the Phone app.
- Next, faucet on the Keypad close to the underside of your display and enter *#31#.
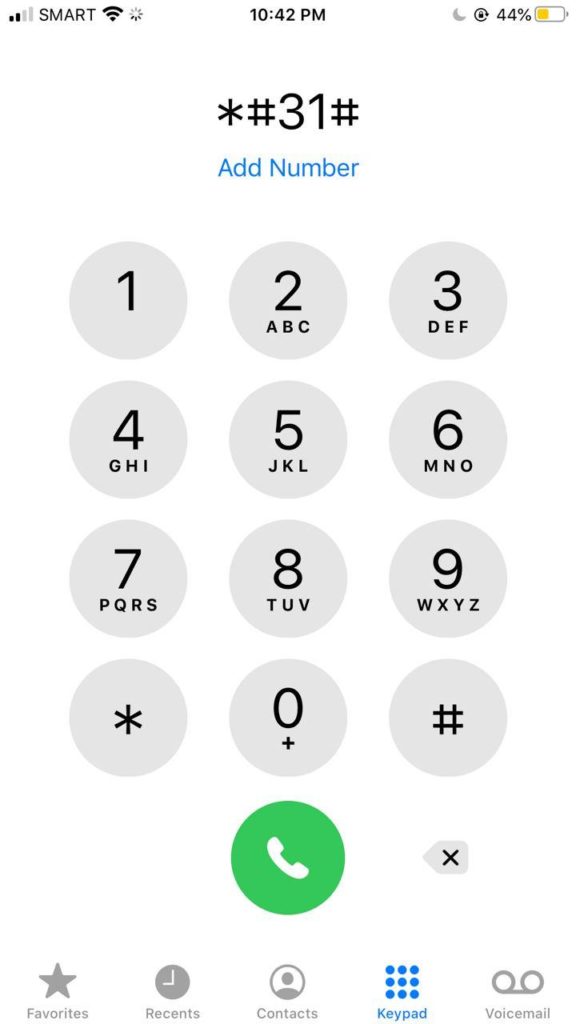
- Lastly, press name and that ought to unhide your cellphone quantity.
Alternatively, you may also:
- Go into your Settings.
- Then, scroll down to seek out and faucet Phone.
- Finally, Show My Caller ID must be in your display, set the button to inexperienced.
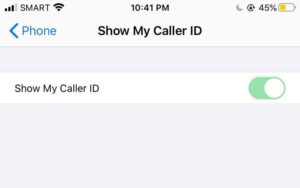
Both options will make your cellphone quantity accessible to anybody who’s attempting to contact you and vice versa.
4. Change the Date and Time Settings.
It’s fairly frequent for folks to manually set their clocks quarter-hour forward of time to assist them be punctual.
Regardless for those who’re that type of particular person or not, ‘Date and Time’ settings can typically malfunction or glitch randomly. This is a bizarre answer, however most of the time uncommon fixes like this could clear up your downside.
Here’s how one can change your Date and Time Settings:
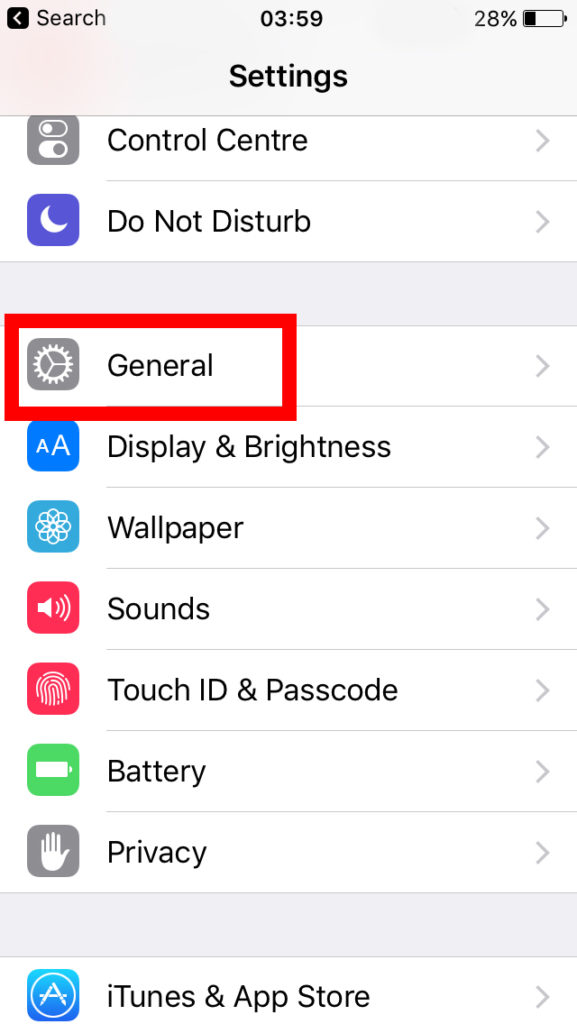
- Go forward and open your Settings from the house display.
- Then, search for and faucet on General.
- Now, open Date & Time.
- Turn on ‘Set Automatically‘ and configure your Time Zone to your geographical location.
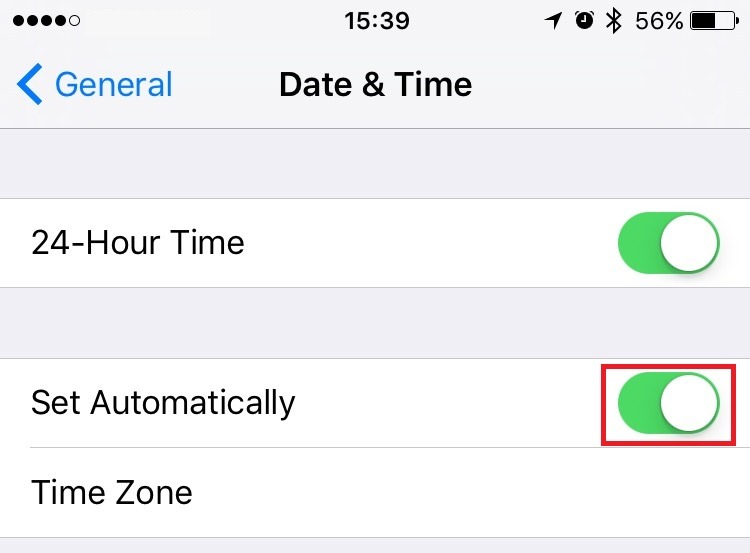
Now in case your settings are already set to computerized, attempt to disable and allow ‘Set Automatically’ to refresh your settings. Whether it really works or not, reverting to your regular 15-minute advance time settings shouldn’t make the calls fail once more.
5. Restart Your iPhone.
There are a few simpler issues you are able to do on this record that contain configuring your settings, however for those who’re beginning to get impatient and need to take a fast break; restarting your cellphone will typically repair most issues whilst you’re free to do a fast 5-minute process.
Here’s a collection of fast steps to restart your iPhone:
- First, maintain the facility button in your device for a number of seconds.
- Then, a pink slider ought to seem to energy off.
- Now, swipe it to the appropriate and watch for 20 seconds.
- Turn your cellphone on once more by holding the facility button.
6. Check for Blocked Numbers.
Blocked numbers might be unable to contact you thru texts or calls. Simultaneously, additionally, you will be unable to achieve them.
Try to verify for those who’ve blocked the quantity you’re attempting to contact by following the steps under.
- Go forward and open your Settings.
- Next, scroll down to seek out and faucet Phone.
- Lastly, entry Block Contacts and ensure the quantity you’re attempting to contact isn’t there.

If the particular person or quantity you’re attempting to contact is within the record of blocked contacts, simply faucet on the quantity and unblock it. This ought to have the very best probability of fixing your downside.
7. Check If Call Forwarding is Turned On.
‘Call Forwarding’ units up incoming calls to be redirected to a special quantity. With name forwarding turned on, any calls in direction of you’ll instantly ring on one other cellphone with out notifying you.
To verify if Call Forwarding is turned on, observe the steps under:
- Go to Settings.
- Then, scroll down to seek out and faucet Phone.
- Lastly, Tap on Call Forwarding and toggle the change next to it to show it off.
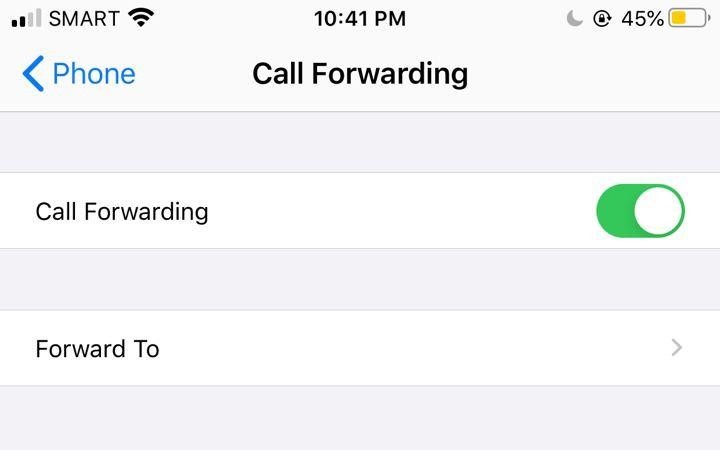
After this step, all future calls that may attempt to attain it’s best to begin notifying your cellphone as an alternative of being redirected. If the issue nonetheless happens, you’ll be able to attempt doing the subsequent technique under.
8. Disable Dial Assist.
Most mobile calls are made in the identical area, whereas worldwide calls are generally linked by means of Wi-Fi. Every nation has a special prefix (the primary two numbers of your cellphone quantity, like +44 for the UK). Because of this, everytime you dial a cellphone quantity there may be an robotically assigned native prefix. This is what ‘Dial Assist’ does.
The automated function generally is a downside whenever you’re attempting to contact somebody with a international quantity or a special prefix. By disabling ‘Dial Assist’, it provides you the assure that the quantity you dial is the one which’s going to obtain your name.
Here’s how one can disable Dial Assist in your iPhone:
- Go forward and go to Settings.
- After that, scroll down to seek out and faucet Phone.
- Now toggle off the change next to Dial Assist.
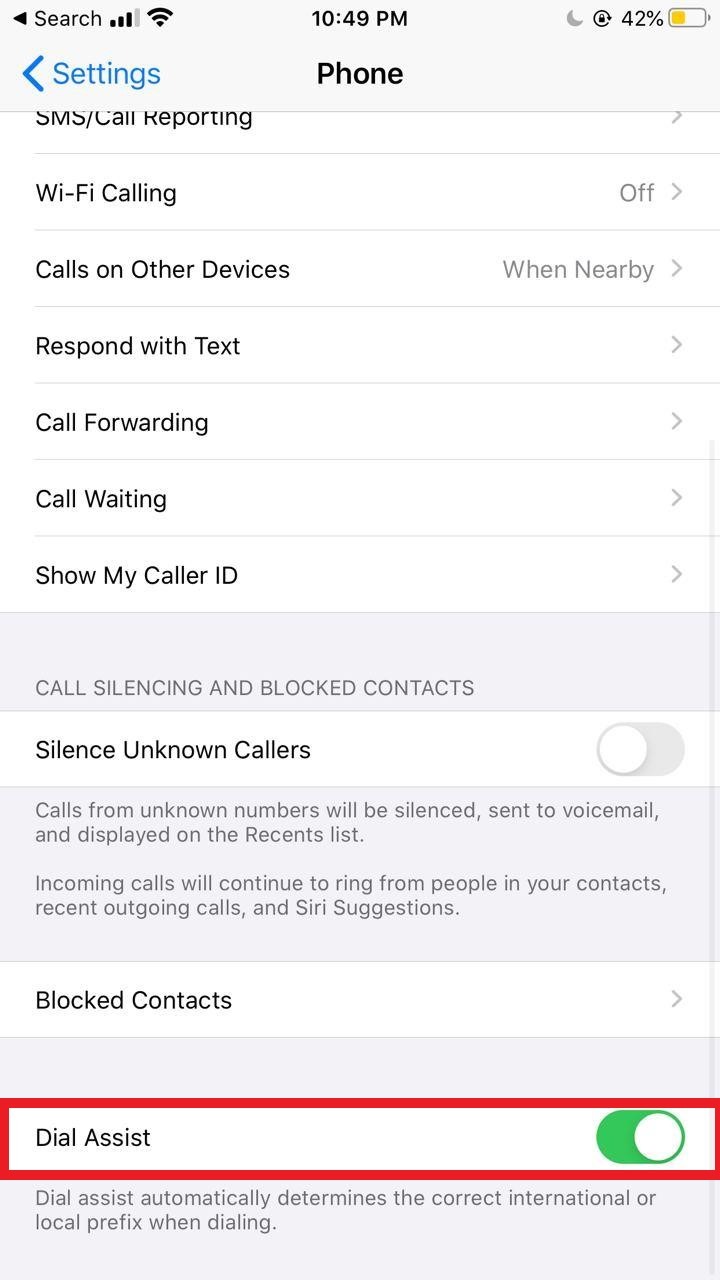
- Lastly, restart your cellphone.
After restarting your cellphone, dial-in or select by means of your contacts the total variety of the particular person you want to name. Your smartphone ought to now dial the numbers of your contact with none automated interventions.
9. Carrier Settings Update.
Perhaps your service settings are old-fashioned, which could trigger an error in your calls.
Just like iOS updates, ensuring all of your settings are updated is an effective way to handle errors and bugs like this. Updating your service settings ought to solely take lower than a minute, however speeds range relying in your Wi-Fi network.
Here’s how one can update your service settings:
- Firstly, open your Settings.
- Next, discover and faucet General.
- Scroll down and faucet on About.

- Finally, if an update is out there there must be a transparent notification.
However, if the issue nonetheless continues, you’ll be able to proceed to the previous couple of strategies to attempt to repair your name failed issues.
10. Check Your Wi-Fi Calling Options.
‘Wi-Fi Calling’ is a function that makes your iPhone obtain and make calls over a Wi-Fi connection as an alternative of your cellphone’s mobile network.
This is beneficial whenever you’re linked to a Wi-Fi network whereas concurrently not having one of the best mobile reception. However, this could get in the best way of constructing common mobile calls.
Disabling or enabling this setting has labored for a lot of customers. In this step, you’re going to seek out out what your present settings are after which activate the alternative.
Here are the steps to allow/disable ‘Wi-Fi Calling’:
- Go forward and open your Settings.
- After that, scroll down to seek out and faucet Phone.
- Next, press Wi-Fi Calling and disable/allow it (whichever is the alternative of the present setting).
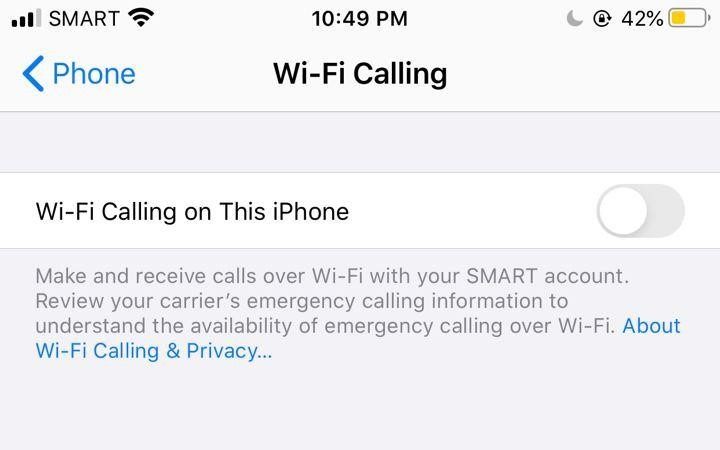
- Lastly, restart your device.
Now your calls must be made totally by means of your mobile network or with the assistance of your Wi-Fi connection.
11. Reset Your Network Settings back to Default.
If there’s nothing improper together with your preferences, then it’s in all probability with the networks you’re attempting to hook up with. Resetting your network settings back to its default state could clear up the issue.
Giving your network settings a reset doesn’t compromise any private knowledge besides your VPN, Wi-Fi passwords, and mobile settings that are networks your cellphone will get providers from.
We will present you the step-by-step strategy of resetting your network settings, under:
- First, open your Settings.
- Find and faucet General.
- Next, faucet on Reset.
- Then, press Reset Network Settings.
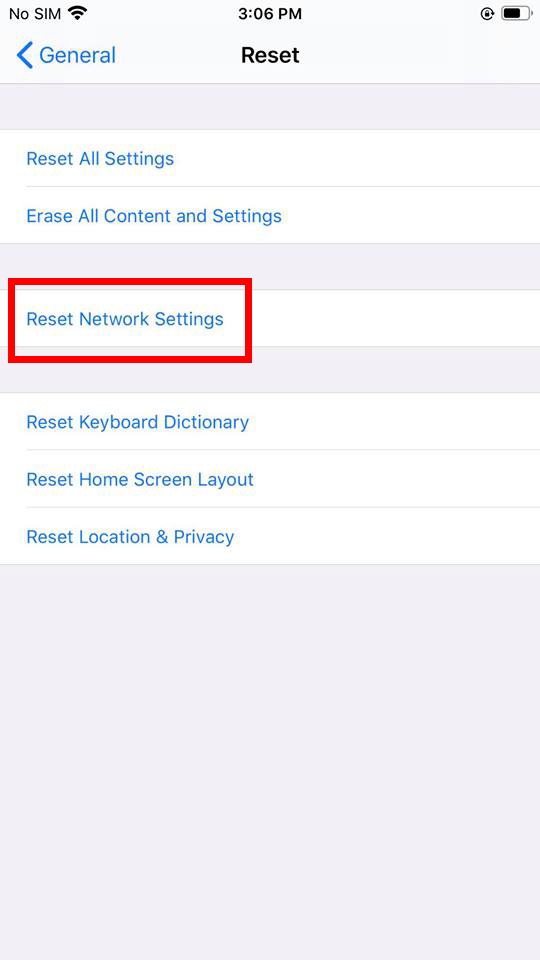
- Lastly, restart your device.
Your networking settings must be reverted back to its default state from when it was produced and must be functioning like factory-quality iPhones.
12. Remove and Reinsert the SIM Card.
A technique of its time, the brute power answer of eradicating and reinserting your SIM card has labored time and time once more even earlier than smartphones. In phrases of hardware-related issues that could possibly be liable for your calls failing; changes, scratches, harm, or mud in your SIM card may sabotage your mobile expertise.
If you’ve by no means carried out this earlier than don’t be alarmed, it’s not that troublesome and might be carried out in solely a few steps.
Here’s how one can take away and reinsert your SIM Card:
- On the facet of your iPhone, there must be a SIM tray. If you’re carrying a cellphone case, then it would be best to take it off with the intention to find it.
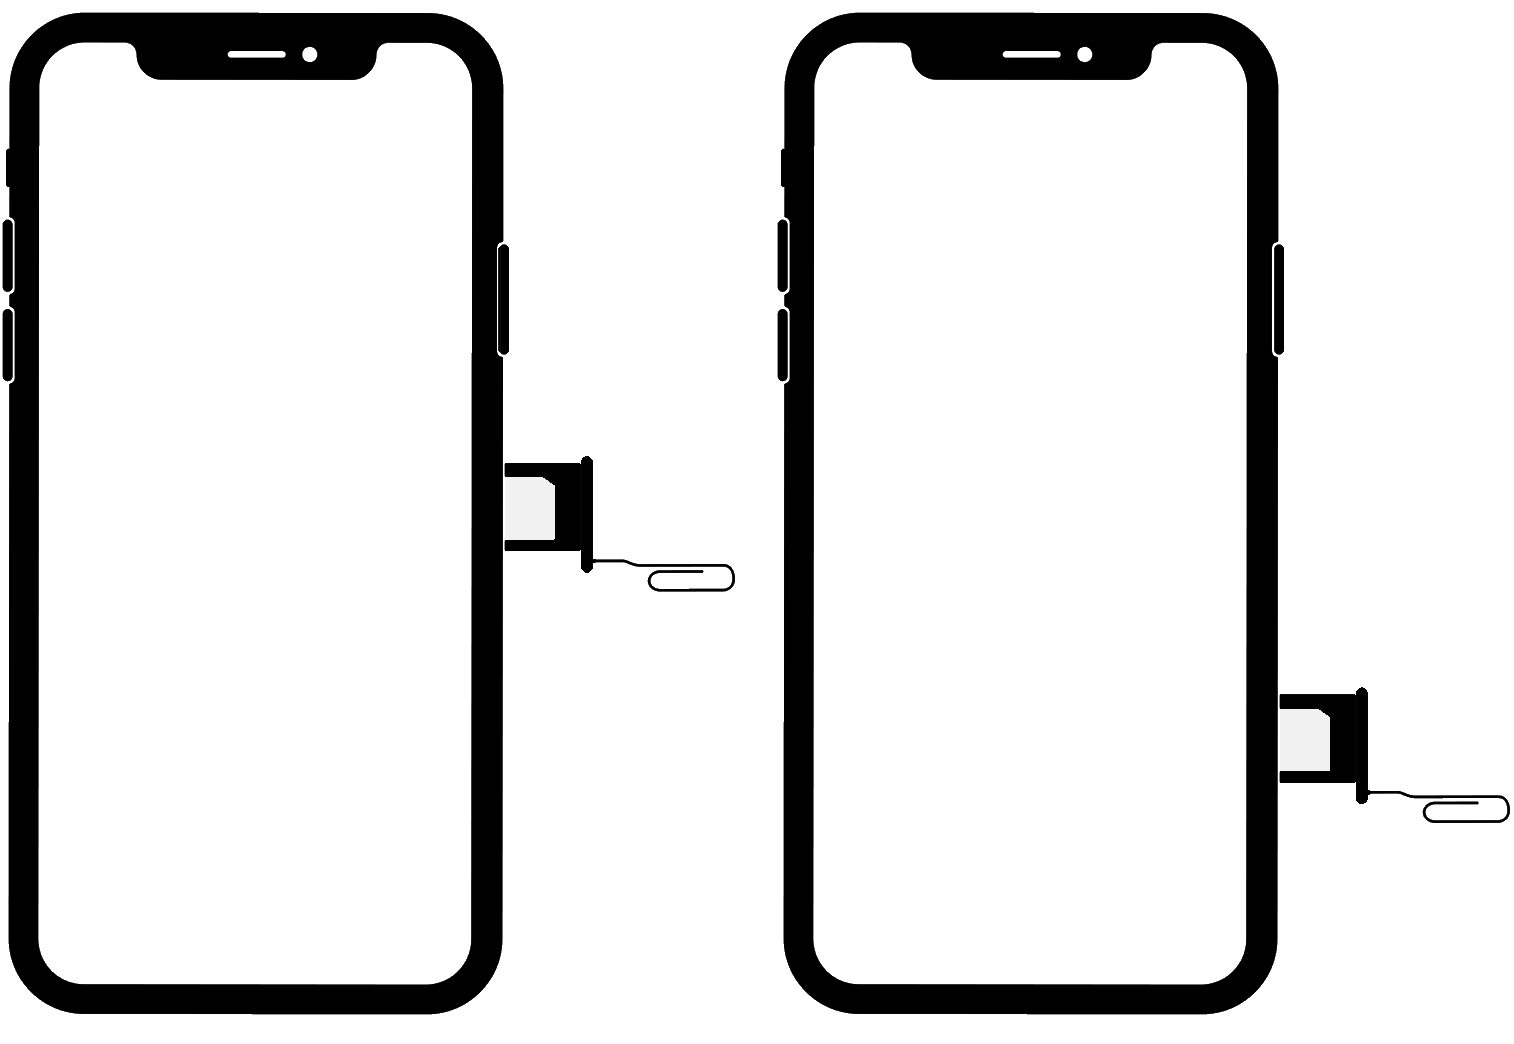
- After discovering the tray, use a paper clip or SIM-eject instrument to press into the opening. This ought to eject the SIM tray up a few millimetres.
- Next, take away the SIM tray together with your SIM card inside it.
- Then, examine the SIM card for damages and dirt.
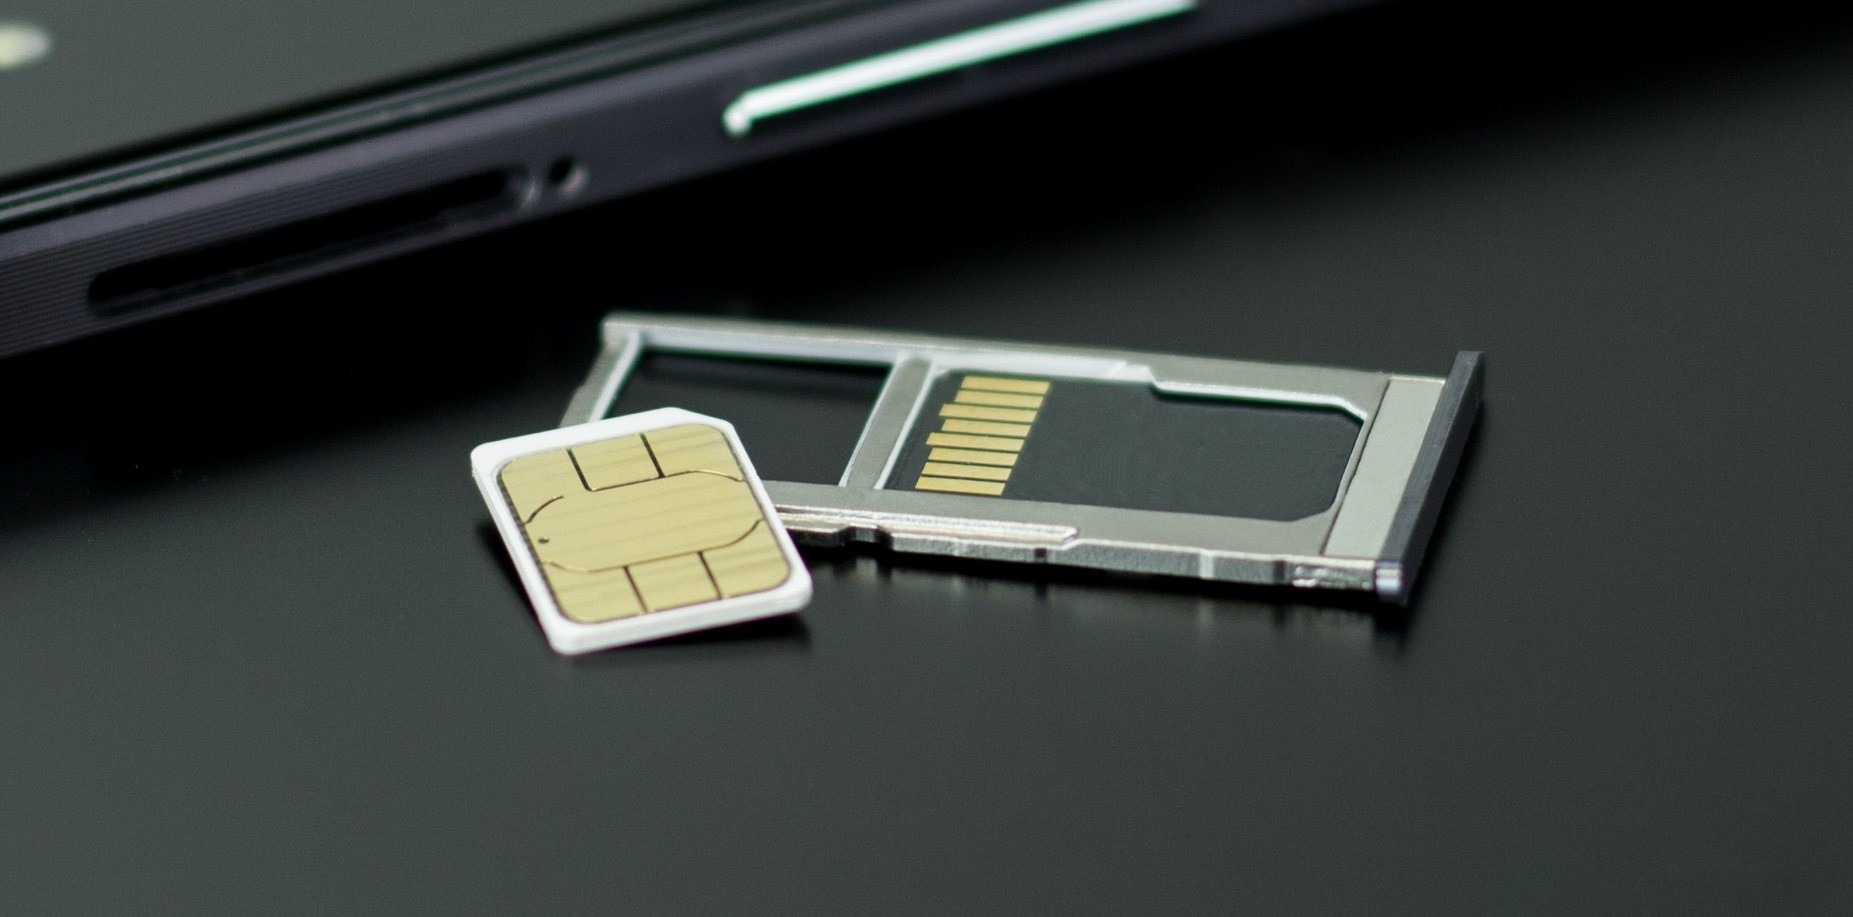
- If you’ll be able to’t discover any scratches you’ll be able to gently wipe the SIM on a clear and clean material earlier than inserting it back in with the SIM Tray.
This technique will clear any direct {hardware} issues together with your SIM card in addition to reset your iPhone’s SIM slot. Any bugs in your iPhone’s connectivity to the SIM will reset and hopefully work like regular.
If all of the strategies up to now haven’t been of any assist, maybe the final two main fixes will clear up your downside.
13. Update iOS.
Any iPhone mannequin can begin to get bugs and issues if its software program is outdated.
Often sufficient updating your iOS fixes most issues, together with failed calls. Because bugs, glitches, and different performances require month-to-month updates and modifications in code; commonly updating your iPhone’s iOS is an effective way to keep away from most errors and bugs.
Before updating, be sure that your cellphone has greater than 40 % battery life and is linked to a steady Wi-Fi connection. Updating can take as little as 5 minutes to an hour relying on the pace of your Wi-Fi network and {hardware} of your device.
Here are the steps to update your iOS:
- Go forward and open your Settings.
- Next, faucet on General.
- Now, go to Software Update.
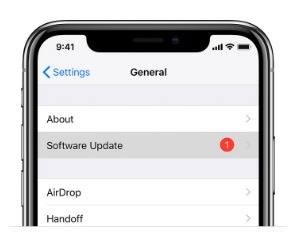
- If there may be an update, merely faucet Install Now.
Updating your iOS ought to guarantee that you’ve got the most recent working system to your iPhone. Try to make a name and see if the issue persists.
14. Restore Factory Settings.
If all else fails, it’s potential that your iPhone’s iOS could also be corrupted. Usual indicators could embrace however aren’t restricted to:
- Malfunctioning of options.
- Your iPhone feels significantly slower.
- Crashing functions.
Restoring your cellphone to its manufacturing unit settings will utterly wipe all of your knowledge and preferences in your cellphone. Once you’re carried out, your smartphone will run similar to a brand new iPhone out of the field. If you’re utterly out of choices you’ll be able to all the time get your cellphone examined at an Apple Store earlier than contemplating this step.
Before we proceed with the manufacturing unit reset, it’s vital that we back up all of your information to a pc so we will restore them later after the manufacturing unit reset. This manner you received’t lose any private knowledge in any respect.
All it takes is roughly 20 minutes to do that, and to get began you’re going to wish a PC or a Mac, a steady Wi-Fi connection, and iTunes put in in your laptop. Do additionally just be sure you’ve totally charged your iPhone earlier than beginning.
Let’s get began.
Backing up your iPhone.
In this step, we might be backing up all of your information to your laptop so you’ll be able to retailer them in a protected location whereas we reformat your iPhone.
Here are the required steps to backing up all of your knowledge:
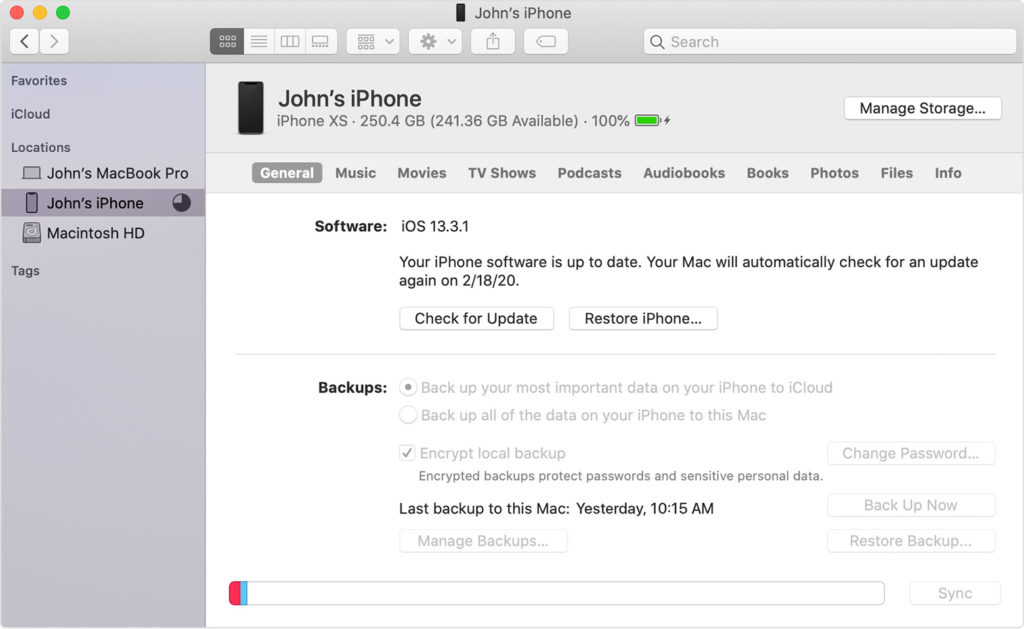
- Launch iTunes in your laptop and click on on Edit/iTunes on the prime left nook (Edit for PC, iTunes for Mac).
- Then, transfer your mouse all the way down to Preferences.
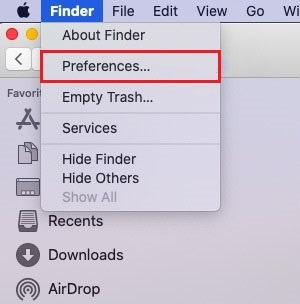
- Next, open the Devices tab.
- After that, flip off Automatic device synchronization.
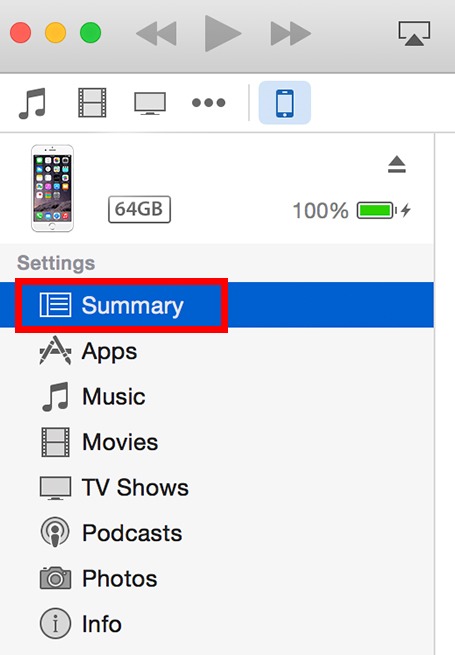
- Connect your iPhone to your laptop with a USB or charging cable, your device ought to seem on iTunes.
- Lastly, within the Summary Settings, it’s best to see a Manually Backup and Restore part. Click Backup Now.
Your cellphone must be within the strategy of backing up all of your obligatory and vital knowledge. We might be restoring your vital information afterward.
Restoring your iPhone.
Your iPhone might be reformatted which can delete all of your information and revert all the pieces back to its manufacturing unit settings.
Here’s the detailed step-by-step strategy of restoring your iPhone:
- Firstly, join your iPhone to your laptop using a USB or charging cable.
- Select your iPhone identify/mannequin on iTunes and click on Backup Now.
- Then, energy off your device by holding down the facility button and swiping the slider to substantiate.
- Now, watch for 10-20 seconds. Press and maintain the facility button.
- After 3 seconds maintain down the quantity down button. You must be urgent down on each the facility and quantity down button on the identical time.
- Hold the 2 buttons down for round 10 seconds or till a pop-up seems on iTunes saying that your device is in ‘Recovery mode’.
- Finally, click on ‘Restore iPhone…’ and decide a restore date.
Now your iPhone must be utterly restored back to its manufacturing unit settings whereas nonetheless storing all of your private information in its storage.
If all of those steps have failed, it could be in your best curiosity to search for a close-by Apple Store for help as an alternative. Their technicians may assist establish a {hardware} downside that can not be mounted by simply fiddling round your settings.
It’s additionally value checking for those who qualify for any guarantee protection to your device, which can assist low cost the service prices.
Now that you’ve got reached the top of this text, we hope that this submit helped present options that helped repair your ‘call failed on iPhone’ problem. If you’ve gotten different questions associated to this text, please be at liberty to go away a remark under. Likewise, for those who expertise the decision failed error together with your Apple Watch, then we’ve written a information on that too. 😀
If this information helped you, please share it. 

Check out more article on – How-To tutorial and latest highlights on – Technical News