How to Access Files on iPhone.
You can retailer recordsdata in your iPhone and entry them using the Files app that comes pre-installed together with your iPhone. This app is the place you will note all of your paperwork, recordsdata, images, or some other content material you downloaded from the online.
If you’re questioning how one can entry the recordsdata saved in your iPhone, the next publish ought to clarify how to define recordsdata, entry completely different storage areas, sync recordsdata with iCloud, and entry them from different gadgets.
: [Easy] How to Remove Background Using Files App on iPhone or iPad
How to search out your recordsdata on an iPhone
Checking the recordsdata saved in your iPhone is fairly simple. All you want is Apple’s Files app that comes pre-installed on all iPhones and will be accessed from the App Library or by trying to find it on Spotlight. If you’re unable to entry it in your iPhone, you could have unintentionally deleted it out of your device however you possibly can at all times obtain and set up it back from the App Store.
- Open the Files app in your iPhone.

- When you open the Files app, you will note three completely different tabs on the backside: Recents, Shared, and Browse.
Recents: It’s the place you see all of the recordsdata that you just opened typically in the previous couple of weeks. Files right here might be sorted by the order of the date you final accessed them however you possibly can change the sorting order by tapping on the grid icon on the high proper nook and deciding on any of those choices – Name, Kind, Date, Size, and Tags. You may also group them as you’d on a folder and carry out different actions on them.
Shared: If you’ve shared or acquired recordsdata from another person by way of iCloud, you will note the Shared tab on the backside of the Files app. In this tab, you will note all of the recordsdata and folders shared by you or shared with you over iCloud and you may kind via them by date final modified, variety, and measurement. You may also group recordsdata and folders by who shared it with you which of them makes finding shared recordsdata simpler.
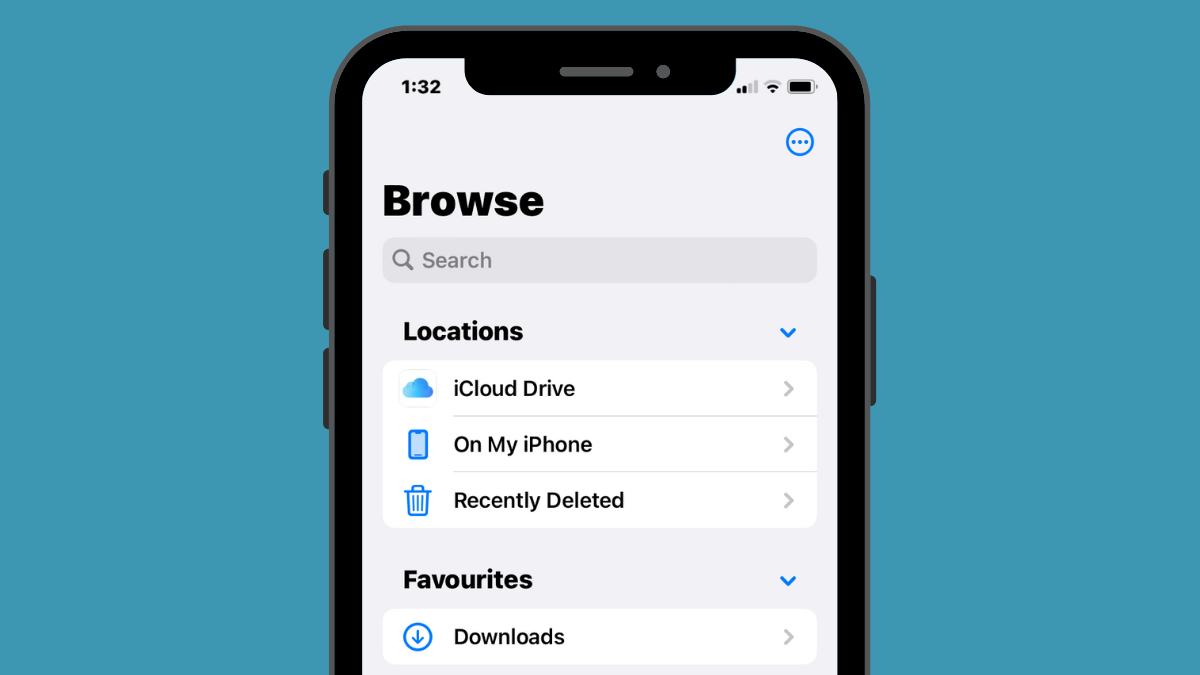
Browse: This is crucial tab contained in the File app and maybe the one part you’d entry probably the most when searching via the content material contained in the app. Your recordsdata might be accessible beneath completely different storages, most notably iCloud Drive and On My iPhone. On this display screen, additionally, you will see folders you’ve marked as favorites and you may search recordsdata and folders straight in case you’ve beforehand added coloration tags to them.
- To entry the recordsdata which are saved domestically in your iPhone, choose the Browse tab and faucet on On My iPhone.

- On the following display screen, you’ll have the ability to see all of the recordsdata and folders which are saved in your device.

- To change how these recordsdata and folders are listed on the display screen, faucet on the 3-dots icon on the high proper nook.

- From the menu that reveals up, you possibly can toggle between Icons and List views, and kind or group recordsdata and folders by identify, variety, date, measurement, and tags.

- You can open a file in Quick Look by tapping on it. If the file the supported, it’ll open on the following display screen inside the Files app.

- When the file opens, you’ll get extra choices to share, search markup, or add captions from the underside toolbar.

- You can carry out varied different actions on a file by long-pressing on it. This will open an overflow menu that may permit you to do sure actions like rename, compress, duplicate, add tags, copy, transfer, share, and delete.

- You can equally work together with folders by long-pressing on them and deciding on an motion of your alternative.

- To examine a file’s measurement, long-press on it and choose Get Info. You can do the identical for folders current inside your iPhone.

- In the Info display screen that seems, it is best to see the file measurement, date created, final opened, or modified, and more data that’s out there.

How to handle storage areas on the Files app
By default, the Files app on iOS will present your two storage areas – iCloud Drive and On My iPhone. If you utilize third-party storage apps like Google Drive, Dropbox, OneDrive, Box, or Adobe Creative Cloud in your iPhone, you possibly can browse any file you’ve saved on these storage providers straight from the Files app.
Any file you’ve uploaded by way of your pc or different gadgets will get synced with the Files app in your iPhone. In addition to accessing all your recordsdata throughout these apps from the Files app, it’s also possible to copy content material throughout these storage areas at any time.
- Before you proceed so as to add third-party storage accounts to the Files app, it’s essential to first set up the involved app (on this instance, it’s Google Drive) and register to your account contained in the app.
- With the storage app (Google Drive) prepared, open the Files app and choose the Browse tab on the backside proper nook.

- Inside the Browse display screen, faucet on the 3-dots icon on the high proper nook.

- In the overflow menu that seems, choose Edit.

- You will now see all out there storage choices which are out there in your iPhone. In this instance, we now have the Google Drive app that we’ve arrange and signed in to. To add Google Drive as one of many storage areas inside Files, activate the Drive toggle beneath “Locations”. Similarly, you possibly can activate the toggles to your respective storage app so as to add them to the Files app.

- While modifying the Browse part, you possibly can disable the iCloud Drive and On My iPhone sections to stop them from displaying up in your iPhone. Doing so will hide the chosen storage and received’t delete any knowledge on them.

- You can re-arrange these areas by long-pressing the 3-lines icon adjoining to the chosen storage and dragging it upwards or downwards as per your desire.

- On the identical display screen, it’s also possible to take away folders that you’ve beforehand marked as Favorites by tapping on the crimson minus (-) icon on the left-hand facet of the folder you need to take away.

- To affirm your alternative, faucet on Remove on the right-hand facet.

- You may also take away sure tags from the “Tags” part in the identical method.

- When you’re performed modifying your storage areas and the Browse part, faucet on Done on the high proper nook to save lots of adjustments.

Once you add an exterior storage location to the Files app, it is possible for you to to flick thru it such as you would browse recordsdata in your iPhone. You can transfer recordsdata round so long as you do it inside the chosen storage location however you should use the Copy motion to repeat recordsdata between a number of areas.
: How to Edit a PDF Document on iPhone
How to save lots of one thing to the Files app
Anything that may be saved as a file will be saved contained in the File app at a location of your alternative. You can do that throughout any app that’s put in in your iPhone and this motion ought to work seamlessly on the native iOS apps in addition to on third-party apps.
- To save one thing from an app, open the app you need to save from and go to the situation of the content material that you just need to save. Now, relying on the app you’re at the moment on, open the app’s share sheet by tapping on the Share icon typically (however not restricted to) current on the backside left nook of the display screen.

- On some apps, the share choice might be accessible once you faucet on the 3-dots icon typically current on the high proper nook. When extra choices seem, choose Share from the listing.

- Once you’ve accessed the iOS Share Sheet, faucet on Save to Files.

- When you try this, the Files app ought to load up on a popup display screen. From there, choose a location and select a file identify for the content material you’re saving in your iPhone. After selecting your required location, faucet on Save on the high proper nook to retailer the file in your iPhone, iCloud, or a storage location you’ve linked contained in the Files app.

- At any time, you possibly can entry this file by opening the Files app in your iPhone and going to the situation the place you saved the file from the app.

: How to Change File Extensions on iPhone
How to sync your recordsdata from iPhone on iCloud Drive
Any Apple ID is related to an iCloud account which isn’t simply an electronic mail tackle but in addition a storage choice in itself. You can use your account’s 5GB of free cloud storage to not simply back up your iPhone and the photos you’ve captured however it’s also possible to retailer recordsdata out of your iPhone and different Apple gadgets as nicely.
If you want to add your recordsdata natively out of your iPhone and sync them at any time, you will have to allow iCloud Drive in your iPhone.
- Open the Settings app in your iPhone.

- Inside Settings, faucet on your Apple ID card on the high.

- In the Apple ID display screen, faucet on iCloud.

- When the iCloud display screen seems, choose iCloud Drive.

- On the following display screen, activate the Sync this iPhone toggle.

- You will now have the ability to add recordsdata out of your iPhone to the iCloud Drive by going to Files > Browse > iCloud Drive.

Any file you create, transfer, or save right here might be despatched to your iCloud account and so they’ll be accessible from different Apple gadgets you personal or on the internet.
: How to Merge PDFs on an iPhone Using Files App or a Shortcut
How to search out not too long ago deleted recordsdata on iPhone
When you delete a file from any of the storage areas contained in the Files app, the chosen file is instantly despatched to the Recently Deleted part of the app from the place it may be deleted completely or will be recovered back to your iPhone. Files within the Recently Deleted part will proceed to seem for as much as 30 days from once you deleted it and that is the case regardless of whether or not you deleted it from the iCloud Drive, from On My iPhone, or from some other storage location linked contained in the Files app.
- To entry your not too long ago deleted recordsdata, open the Files app and choose the Browse tab on the backside proper nook.
- Inside Browse, it is best to see the Recently Deleted part beneath “Locations”. To discover the recordsdata you latterly deleted, faucet on Recently Deleted.

- On the following display screen, you’ll see a listing of recordsdata you’ve deleted someday within the final month. If you discover a file that you just need to recuperate or delete from this listing, faucet and maintain on the file till you see an overflow menu.

- In the overflow menu that seems, choose Recover to carry the file back to your iPhone’s storage. If you want to take away the file completely, faucet on Delete Now.

- In the immediate that reveals up, you’ll be requested to verify your motion. To proceed, faucet on Delete.

- If there are a number of recordsdata that you just need to recuperate or delete, faucet on the 3-dots icon on the high proper nook.

- In the menu that seems, faucet on Select.

- Now, you possibly can choose the recordsdata you need to delete or recuperate to focus on them with a blue tick icon.

- When you’ve made your choice, faucet on Recover on the backside left nook to place the recordsdata back into your iPhone or iCloud storage. If you want to delete the chosen recordsdata completely to clear your iPhone storage, faucet on Delete on the backside proper nook.

- If you’re deleting recordsdata, you will note a further immediate asking you to verify your motion. To proceed, faucet on Delete.

- You may also delete or recuperate the entire recordsdata from this display screen with no need to pick them one after the other. To try this, faucet on Recover All or Delete All from the underside relying in your desire.

: How to Edit a PDF on iPhone Using the Files App
How to entry iPhone recordsdata on a pc
Now that we’ve established all of the methods you possibly can entry recordsdata in your iPhone, what do you do when need to view the identical recordsdata in your pc? Fortunately, you possibly can flick thru your iPhone storage to entry all of the recordsdata saved on it out of your Windows or Mac pc. If there are a variety of recordsdata saved in your iPhone and also you’re having a tough time discovering or opening sure recordsdata, we propose you strive connecting your iPhone to a Mac or Windows pc to switch the recordsdata that you just need to entry.
To get this performed, you’ll want to meet the next necessities:
- You have a Mac or a Windows pc.
- You’re up to date to the most recent model of macOS on the Mac or an up to date model of iTunes for Windows on a Windows PC.
- You’re signed into the identical Apple ID on the Mac or iTunes on Windows because the one in your iPhone.
- You have a USB-to-Lightning cable to attach your iPhone to Mac or Windows.
- An energetic web connection in your Mac or Windows.
With that out of the way in which, now you can join your iPhone to the pc and observe the steps beneath.
- Open the Finder app in your Mac or the iTunes app on Windows.
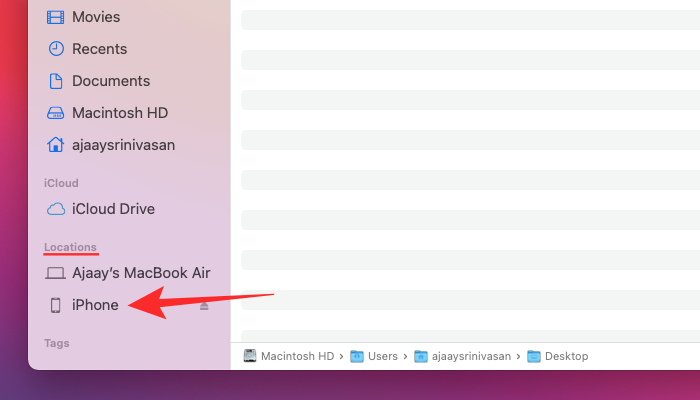
- When the respective apps, open choose your iPhone from the left sidebar on Finder or click on on the Phone icon on the iTunes app.

- If that is the primary time you’re connecting your iPhone to the pc, click on on Trust in your pc within the “Trust iPhone” immediate that seems on the display screen.

- Similarly, you’ll get a “Trust This Computer” dialog in your iPhone to verify your reference to the Mac or Windows. To proceed, faucet on Trust. You may additionally have to enter your iPhone passcode to proceed additional.

- Once all that’s performed, it is possible for you to to see your iPhone and all its particulars inside Finder or iTunes.
- To sync the recordsdata out of your iPhone to the pc, choose the Files tab on this display screen and click on on Sync on the backside proper nook. On the Windows device, click on on the File Sharing tab on the left sidebar, choose the recordsdata you need to view, and click on on Save.

The course of ought to be related whatever the device you utilize however you could possibly get issues performed with ease in case you personal a Mac as Apple provides seamless connectivity when a consumer owns a bunch of their very own gadgets just like the iPhone, iPad, or Mac.
There are different methods you possibly can join your iPhone to a Mac to switch content material between them and you may learn more on that within the publish linked beneath.
▶︎ How to Connect iPhone to MacE book Without USB [9 Ways]
If you’re searching for a a lot simpler solution to share recordsdata to entry them on a Mac, you are able to do that by way of AirDrop. You can study more about that within the publish linked beneath.
▶︎ How to Airdrop Between Mac and that iPhone
That’s all there’s to learn about accessing recordsdata in your iPhone.
Check out more article on – How-To tutorial and latest highlights on – Technical News