
What is Assistive Access and How do I Use It on iPhone.
What to know
- Assistive Access is an accessibility function that’s designed for folks with cognitive disabilities to make use of an iPhone by stripping away pointless options from iOS and changing them with a less complicated interface that’s simple to work together with.
- Available on iOS 17 or newer variations, Assistive Access could be configured with restricted apps, contacts, and in-app choices in order that the one who’s going to make use of the iPhone isn’t overwhelmed with extreme choices, images, or animations.
- You can allow and arrange Assistive Access on an iPhone by going to Settings > Accessibility > Assistive Access > Set Up Assistive Access and following the on-screen directions to set it up as you want.
- At any time throughout Assistive Access, you’ll be able to return to the common iOS interface by triple-pressing the Side button and deciding on Exit Assistive Access.
What is Assistive Access on iPhone?
To assist folks with cognitive disabilities and make it simpler for them to make use of an iPhone, Apple affords the Assistive Access function. Assistive Access when enabled will reduce the person interface on iOS and exchange complicated gestures and choices with easy-to-use buttons and easier gestures. By providing a minimal interface, Apple makes certain folks with cognitive disabilities aren’t overwhelmed by the sheer quantity of images, texts, and animations which might be normally current on the iPhone’s display screen.
When Assistive Access is enabled, customers can both set their residence display screen to seem with massive grid icons or massive rows of apps with textual content, making it simple for them to know what app they’re interacting with. Apps are additionally designed with easier UIs and large-sized choices in order that the contents on them are simply decipherable whereas less-necessary contents are stripped away from this interface.
For instance, the Photos app will present massive thumbnails in two columns as a substitute of tiny previews. Similarly, the Messages app could be configured to solely embody an emoji keyboard to assist individuals who want speaking visually. The Camera app on Assistive Access will solely be capable of take photos and can lack any function that will overwhelm folks with cognitive disabilities.
How do I arrange and activate Assistive Access on iPhone
While enabling the Assistive Access function is fairly simple, there are some things it is best to be aware or arrange earlier than you activate the function on an iPhone.
- Ensure that your iPhone is operating iOS 17 or a more recent model.
- Make certain the iPhone has been paired with all of the wi-fi networks it’s supposed to connect with.
- Set up Face ID for the one who’s going to make use of this iPhone.
- Alternatively, arrange a numeric device passcode both with 4 digits or 6 digits. Passwords could be prevented as they might get too complicated for the involved individual. You can keep away from including a passcode if the individual you’re establishing the iPhone for might not be snug with it.
- Ensure that every one the apps that the individual might require have already been put in earlier than turning on Assistive Access.
- If you’re establishing the iPhone for an individual with cognitive disabilities, ensure you have saved the contact numbers and e-mail addresses of solely necessary folks. Avoid including contact info of individuals whom they might not usually talk with.
Once you’ve arrange the iPhone for the one who will likely be using Assistive Access, now you can allow this function on the device. For that, open the Settings app on the iPhone.
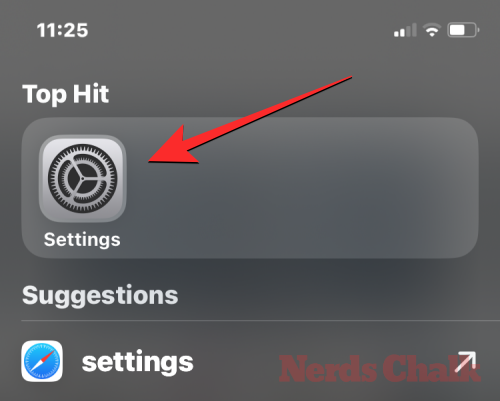
Inside Settings, scroll down and choose Accessibility.
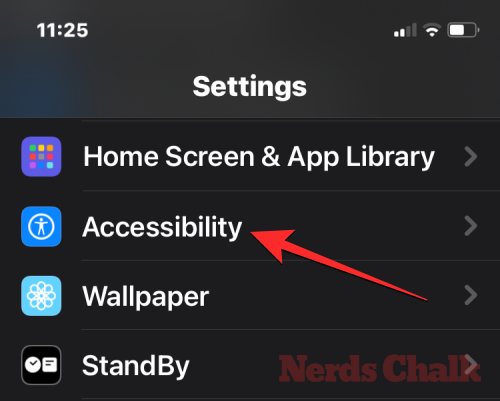
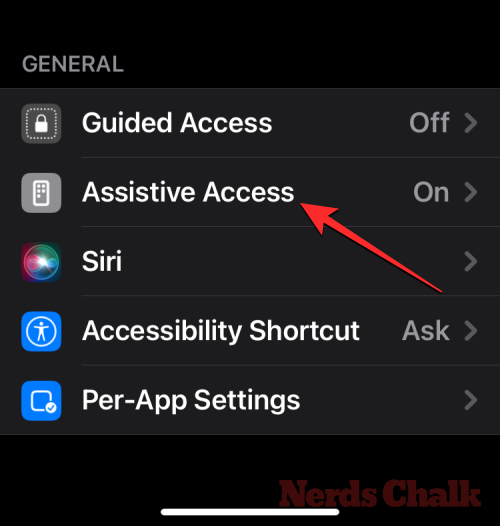
On the Accessibility display screen, faucet on Assistive Access underneath “General”.

On the following display screen, faucet on Set Up Assistive Access.

You’ll now see the Set Up Assistive Access display screen. Here, faucet on Continue to start out the setup course of.

On the following display screen, Apple will inform whom this iPhone is related to by exhibiting you the title and e-mail deal with that was used to arrange the iPhone.

It’s really helpful that Assistive Access is ready up with the Apple ID of the one who’s going to make use of it. So, if the prevailing Apple ID belongs to you however you’re setting it up for another person, you’ll be able to faucet on Change Apple ID on the backside and observe the on-screen instruction so as to add one other Apple account on the iPhone. If the Apple ID that reveals up on the display screen is right, you’ll be able to faucet on Continue as a substitute.

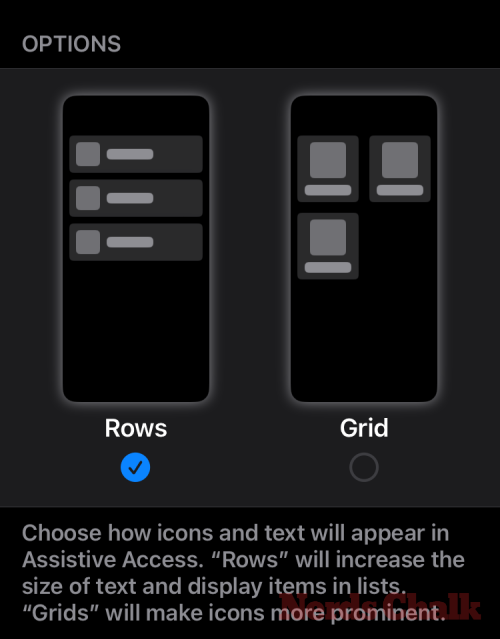
In the following step, you’ll be requested to decide on an look model in your residence display screen and you may select both Rows or Grid. Rows reveals an inventory of obtainable apps with elevated textual content measurement whereas Grid will present your apps with large-sized app icons in 2 columns. Once you’ve chosen your most popular look model, faucet on Continue on the backside.

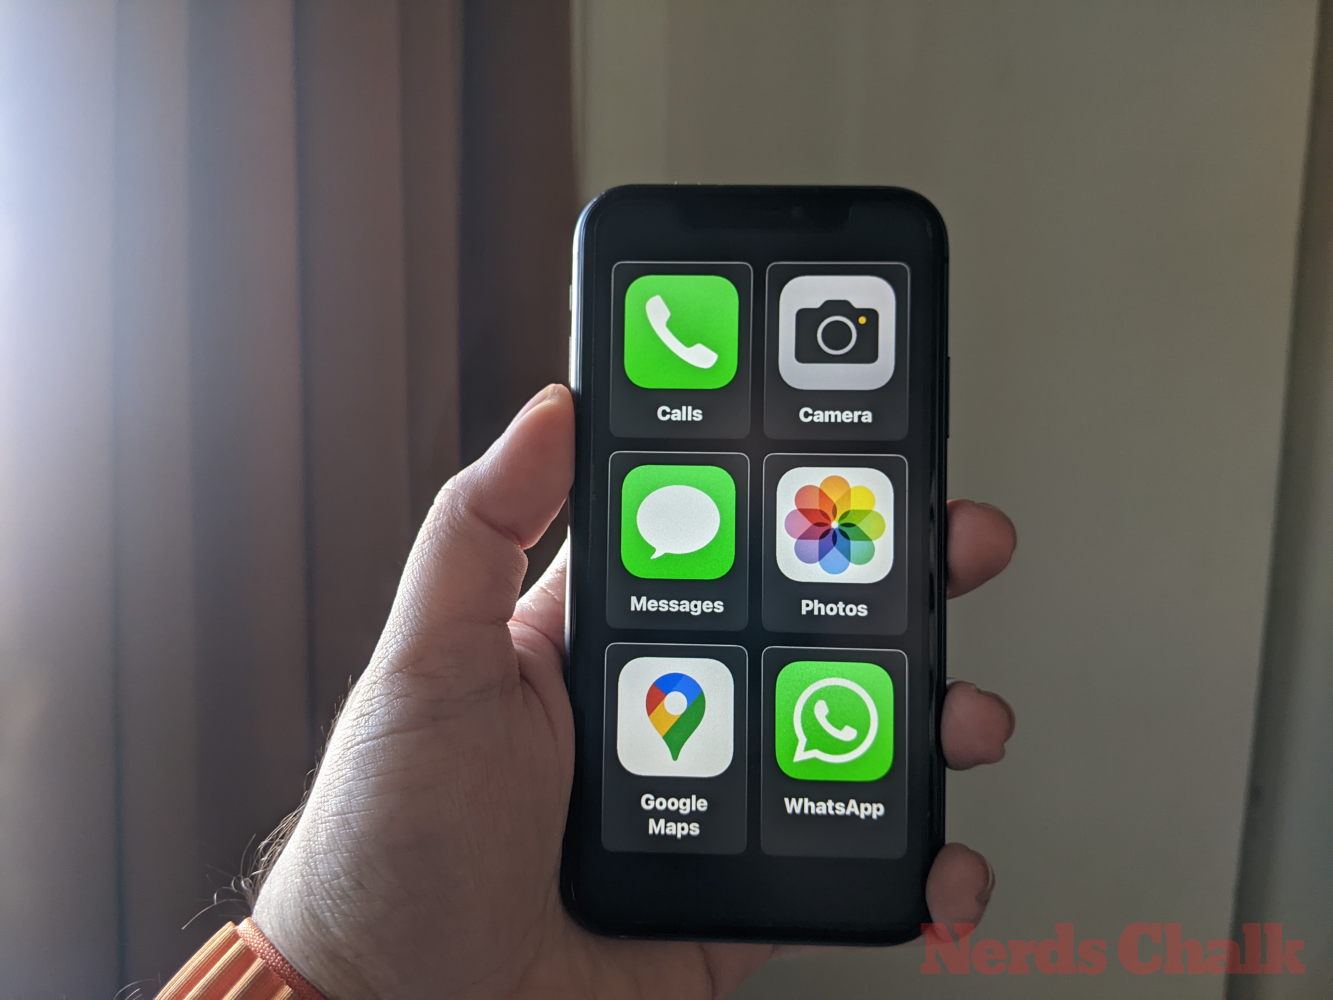
You’ll now arrive on the Select Apps display screen. Here, you’ll see a choose few apps listed underneath “Optimized for Assistive Access” and because the label says, these apps will likely be configured to work with Assistive Access. For now, we are able to additionally add the next apps to the Assistive Access residence display screen – Calls, Camera, Messages, and Photos. To add any of those apps, faucet on the inexperienced Plus icon on the left-hand aspect of the specified app.

When you add an app from this part, a brand new display screen will pop up prompting you to configure settings and options for the chosen app. For instance, if you add the Calls app from the above listing to the Assistive Access residence display screen, you’ll have choices to select from whom you’ll be able to obtain calls on this iPhone (everybody or solely chosen contacts), who are you able to make calls to (by including contacts to this listing), and toggle dialer, keypad and speaker in your calls. Once you’re carried out establishing an app’s settings, you’ll be able to faucet on Continue on the backside of the display screen to substantiate these settings.

You can repeat the above step to arrange different Optimized apps from the listing above. Here’s a preview of what you’ll be able to configure with the Camera, Messages, and Photos apps.

When you add apps to Assistive Access, they’ll seem underneath the “Selected Apps” part on the Select Apps display screen.

You may also browse different apps that aren’t optimized for Assistive Access by swiping downwards to the “More Apps” part on the Select Apps display screen. In this part, you’ll see an inventory of all of the apps which might be put in on the iPhone. To add them to the Assistive Access residence display screen, faucet on the inexperienced Plus icon on the left-hand aspect of the specified app.

Similar to the way you configured the optimized apps beforehand, including a few of the apps from the “More Apps” listing will present further screens from the place you’ll be able to configure the app’s settings. Unlike the configured apps, including any app from the “More Apps” listing will solely assist you to handle permissions for the chosen app however received’t present you choices to handle the app’s contents.
Let’s say you need to add the Gmail app to your “Selected Apps” listing. When you select an app, iOS will now immediate you with completely different permission prompts that you could be or might not enable for the chosen app. Depending on the app you select, you can be prompted to grant the app permissions like entry to Contacts, Face ID, Motion & Fitness, Photos, Camera, and Microphone. You can both select Allow or Don’t Allow on these prompts based mostly on what sort of entry you need to give to this app. After making your selection, you’ll be able to faucet on Continue to get to the following immediate till the chosen app is added to your apps listing.

You can add as many apps as you need to see in your Assistive Access residence display screen however because the objective right here is to maintain the interface more easy, we recommend you solely add actually crucial apps. Once you’re glad with the apps you’ve added to the “Selected Apps” part, you’ll be able to faucet on Continue on the backside to proceed to the following step.

When you try this, you’ll get to the Using Assistive Access display screen. Here, Apple will clarify a bunch of the way about how iOS works in another way with Assistive Access enabled. Once you’ve learn by way of these particulars and have defined it to the one who could also be using Assistive Access, you’ll be able to faucet on Continue on the backside to proceed.

On the following display screen, iOS will inform you whether or not or not Face ID and device passcode have been arrange on the iPhone. If they’ve been configured correctly, you’ll be able to faucet on Continue on the backside to proceed or you’ll be able to choose Change Security Settings to vary the Face ID and device passcode for the device.

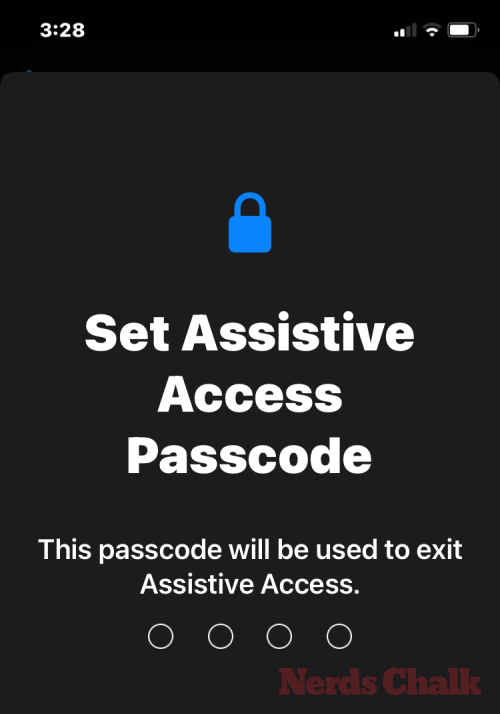
You’ll now arrive on the Set Assistive Access Passcode display screen the place you’ll be able to enter a 4-digit passcode to enter and exit Assistive Access on the iPhone. This passcode could be completely different from the device passcode you will have already set on the iPhone but when the one who’s supposed to make use of Assistive Access might discover it tough, you’ll be able to keep the identical passcode for the device in addition to Assistive Access.

On the following display screen, you’ll have to re-enter the passcode you typed on the final display screen.

iOS will now immediate you to arrange a Recovery Apple ID for if you or this individual might neglect the Assistive Access passcode. If you need to add a recovery Apple ID, you’ll be able to faucet on Set Recovery Apple ID or you’ll be able to faucet on Not Now to keep away from this step solely.

iOS will now clarify the way you’re alleged to exit Assistive Access as soon as it’s enabled. You can do it by triple-pressing the Side button, typing the Assistive Access passcode, and deciding on Exit Assistive Access. Once you’ve understood the way it works, you’ll be able to faucet on Continue on the backside to proceed.

You will now see the “Assistive Access is ready to use” display screen. You can both faucet on Start Using Assistive Access to allow this mode immediately or faucet on Enter Later if you happen to want to flip it on at another time.

How do I exploit your iPhone with Assistive Access
With Assistive Access now configured in your iPhone, you can begin using it by enabling it from the Accessibility shortcuts after which using the iPhone on Assertive Access mode.
Enter Assistive Access mode
If you hadn’t used the Start Using Assistive Access possibility through the setup, you’ll must manually activate Assistive Access on the iPhone. Now there are two methods to enter Assistive Mode as soon as it has been enabled.
From Settings app
The easiest (however not the quickest) solution to enter Assistive Access is through the use of iOS settings. To do that, open the Settings app on the iPhone.
Inside Settings, scroll down and choose Accessibility.
On the Accessibility display screen, scroll all the way down to the underside and faucet on Assistive Access underneath “General”.
On the following display screen, faucet on Start Assistive Access.

When you try this, iOS will ask you to enter the Assistive Access passcode on the display screen.

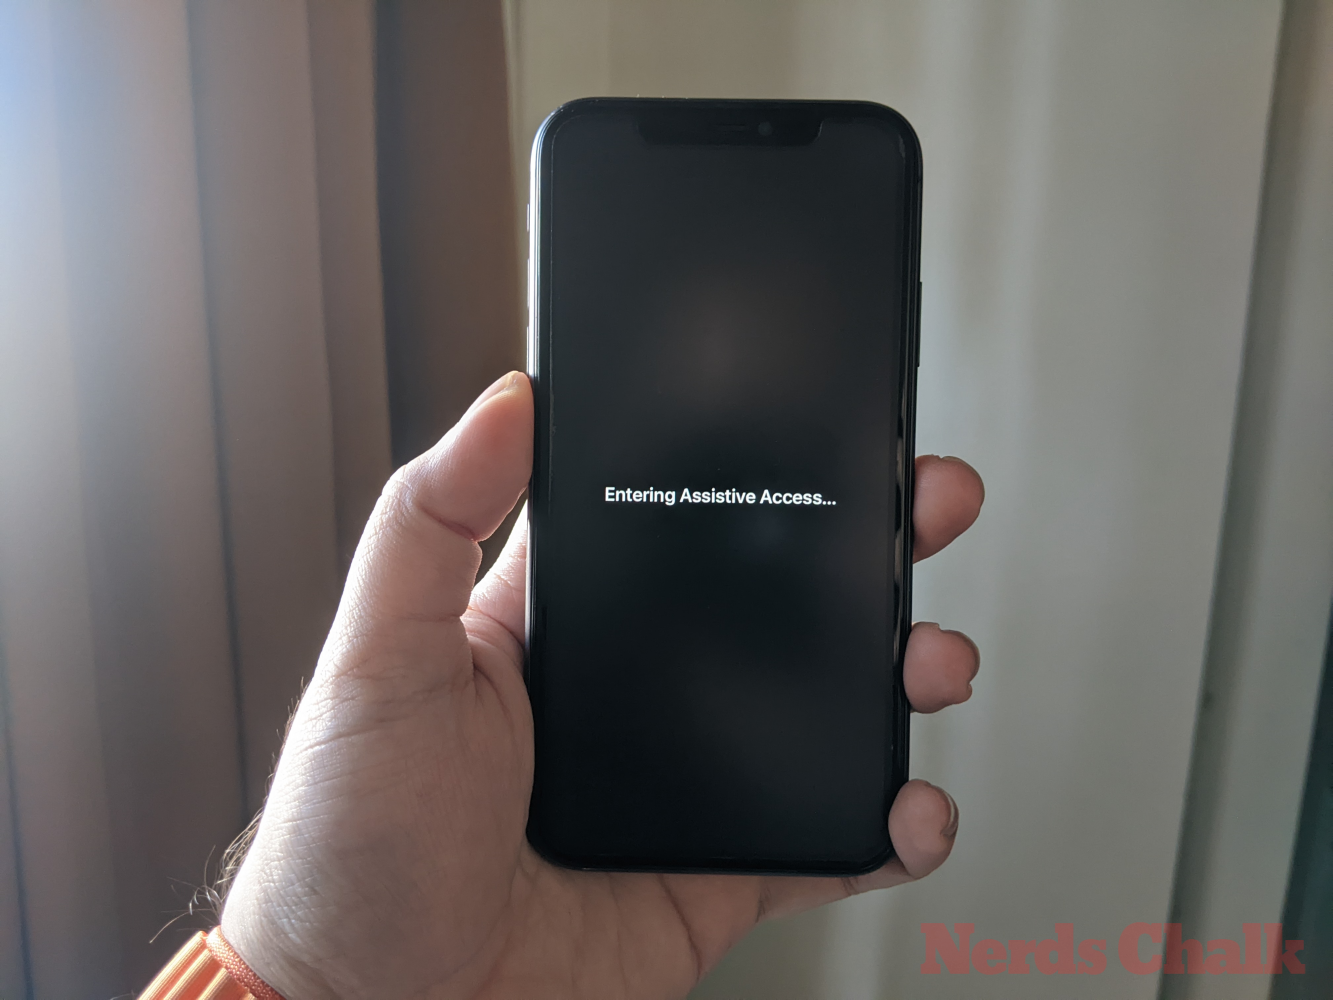
As quickly as you enter this passcode, the display screen will go black and browse the “Entering Assistive Access” message. Within seconds, you’ll see the Assistive Access residence display screen on the iPhone, and from there you can begin using it.
From Accessibility Shortcuts
If you don’t want to go to the Accessibility display screen on the Settings app each time you need to activate Assistive Access on the iPhone, there’s a neater solution to flip it on – by including Assistive Access to your Accessibility Shortcuts. This includes a fast setup course of which when carried out can assist you allow Assistive Access with simply the press of the Side button.
To add Assistive Access to an iPhone’s Accessibility Shortcuts, open the Settings app. Inside Settings, go to Accessibility.
On the Accessibility display screen, scroll all the way down to the underside and faucet on Accessibility Shortcut.

Here, faucet on the Assistive Access choice to see a tick mark seem on its left-hand aspect underneath the “Triple-Click the Side Button For” part. You have efficiently arrange Assistive Access to work with Accessibility Shortcuts.

To activate Assistive Access, triple-press the Side Button in your iPhone. From the overflow menu that seems, faucet on Assistive Access.

When you try this, iOS will ask you to enter the Assistive Access passcode on the display screen.
As quickly as you enter this passcode, the display screen will go black and browse the “Entering Assistive Access” message. Within seconds, you’ll see the Assistive Access residence display screen on the iPhone, and from there you can begin using it.
Unlock your telephone
When Assistive Access is enabled, your iPhone can nonetheless be unlocked using Face ID or your device passcode. To unlock the iPhone, faucet anyplace on the display screen or press the Side button as soon as. When the display screen wakes up, you’ll be greeted by the clock beneath a lock. This lock icon will change to an unlocked icon if you carry the iPhone in entrance of your face.

When the iPhone detects your face, you’ll be able to go to the Assistive Access residence display screen by tapping on the Open button on the backside. This button will also be interacted with in case your iPhone fails to unlock using Face ID.

When you faucet on Open with out unlocking the iPhone with Face ID, you can be requested to enter your device passcode on the display screen. After getting into the passcode, you can be straight taken to the Assistive Access residence display screen.
Interacting with apps
When you unlock your iPhone on Assistive Access, you’ll both see a grid of large-sized apps or rows of apps with massive texts you added to this mode. You can open any app by tapping on its icon.
Calls
For instance, we opened the Calls app which is the Assistive Access model of the Phone app on iOS. The Calls app will then load your chosen contacts with their contact images in bigger thumbnails. To name a contact from this display screen, merely faucet on the contact you want to name.

On the following display screen, you will note a bigger preview of the contact image together with a Call button on the prime. To make a name to this individual, faucet on Call.

You may also make calls by dialing the telephone numbers of contacts you didn’t add to the Calls app throughout setup. For this, faucet on the Phone Number part on the prime of the Calls display screen.

The app will now present a big keypad on the display screen that will help you dial a telephone quantity manually. Once you enter the telephone quantity, faucet on the Call button above the keypad to make the decision.

When you obtain calls inside Assistive Access, you will note a large-size button to Answer and Don’t Answer the calls on the display screen.
Camera
Similarly, if you open the Camera app inside Assistive Access, you will note all of the digital camera choices you activated for Assistive Access throughout setup. As we are able to see right here, solely the Photo and Photo Selfie choices are seen on the display screen since didn’t allow the Video choices for Assistive Access.

To seize photos or movies, faucet on the specified possibility on the display screen relying on which digital camera you need to use. For instance, Photo and Video buttons will activate the back digital camera whereas Photo Selfie and Video Selfie choices will use the iPhone’s entrance digital camera.
Once you choose the specified choices, you will note the chosen digital camera’s viewfinder to border your image/video. When the shot is able to be captured, faucet on Take Photo to seize it.

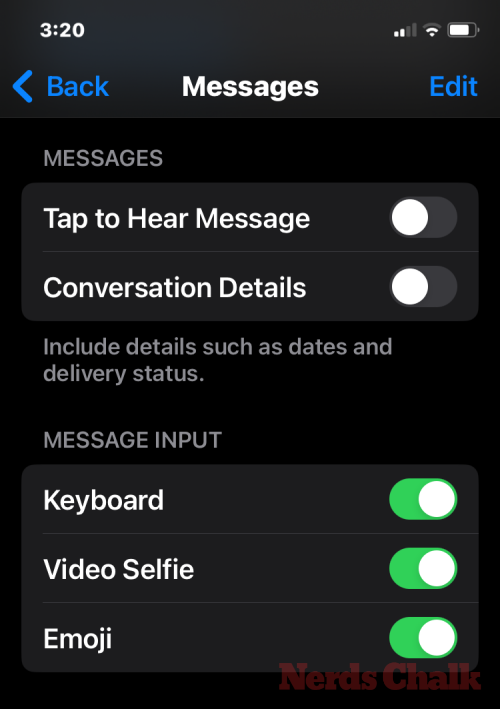
Messages
Unlike the Calls app, the Messages app will solely present contacts you chose throughout setup. To add more contacts to ship messages to, you will want to exit Assistive Access and go to the Assistive Access settings on iOS to handle the contacts listing. To ship a message to a contact or view your conversations with them, you’ll be able to faucet on their contact image from the Messages display screen.

Here, you will note the entire previous messages you exchanged with this individual. To ship a message, faucet on the New Message button on the backside.

You can now select from three choices to script your message – Keyboard, Video Selfie, and Emoji.

Keyboard will open the default iOS keyboard on the display screen.

Video Selfie will open the entrance digital camera viewfinder from the place you’ll be able to document a video message to this individual.

Emoji will open an Emoji drawer on the backside that’s despatched as a person message.

Photos
The Photos app will present all the images out of your Camera roll in rows of two. Unlike the Photos app on common iOS, you received’t be capable of entry different images saved on the iPhone.

When you faucet an image from the Photos app, you will note the chosen picture load up in fullscreen. You can not, nonetheless, zoom into a picture, edit it, or share it on different apps from Assistive Access.

Other Apps
When you add apps to Assistive Access that aren’t configured with this mode, they’ll open to indicate the default interface that you will have interacted with when Assistive Access isn’t lively. You can work together with these apps as you usually would however you received’t be capable of use the iPhone’s swipe gestures like on iOS.
Here’s what the Google Maps app appears like on Assistive Access.

Go to residence display screen
Unlike on iOS, Assistive Access doesn’t work with swipe gestures to change between apps or go to the house display screen. When you’re inside an app on Assistive Access, you’ll be able to solely return to the house display screen by tapping on the Back button on the backside as soon as or repeatedly relying on how deep you might be contained in the app’s interface.

Check time
While iOS reveals you the time and different necessary data (Wi-Fi sign, mobile sign, or battery stage) on any app you’ve open on the display screen, it’s not the identical when Assistive Access is enabled. When you’re inside Assistive Access mode, the one approach you’ll be able to verify the present time is by locking the device using the Side button after which urgent this button once more to view the lock display screen. This is as a result of you’ll be able to solely view the time contained in the lock display screen on Assistive Access.

How do I handle Assistive Access settings on iPhone
You can handle the Assistive Access settings at any time even after the preliminary setup. Although iOS permits you to configure Assistive Access with and with out this mode being lively, you’re going to get more granular choices to configure when Assistive Access is inactive on the iPhone.
When Assistive Access is lively
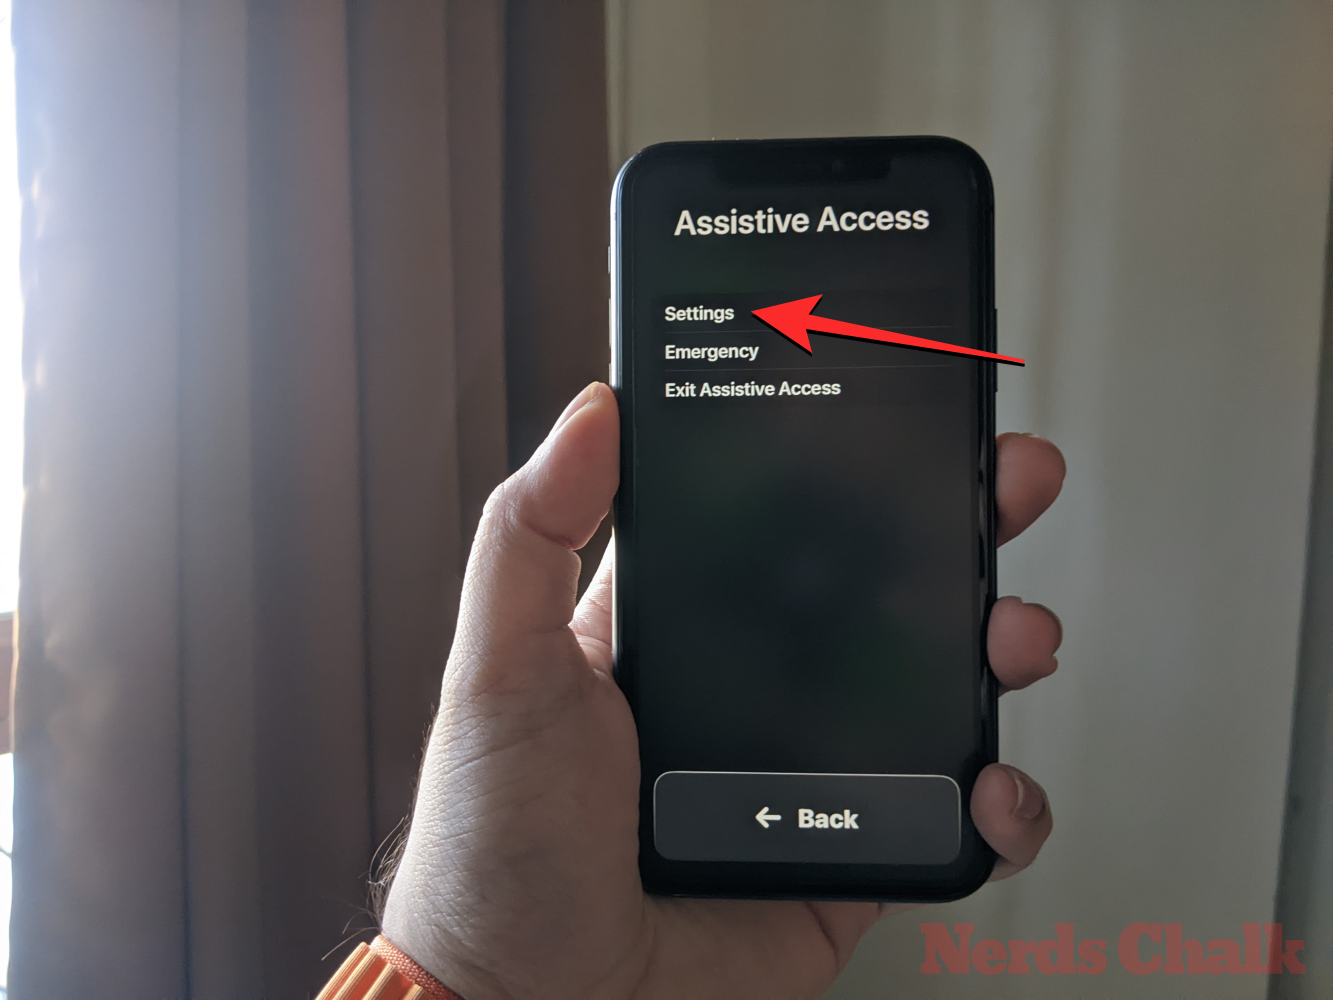
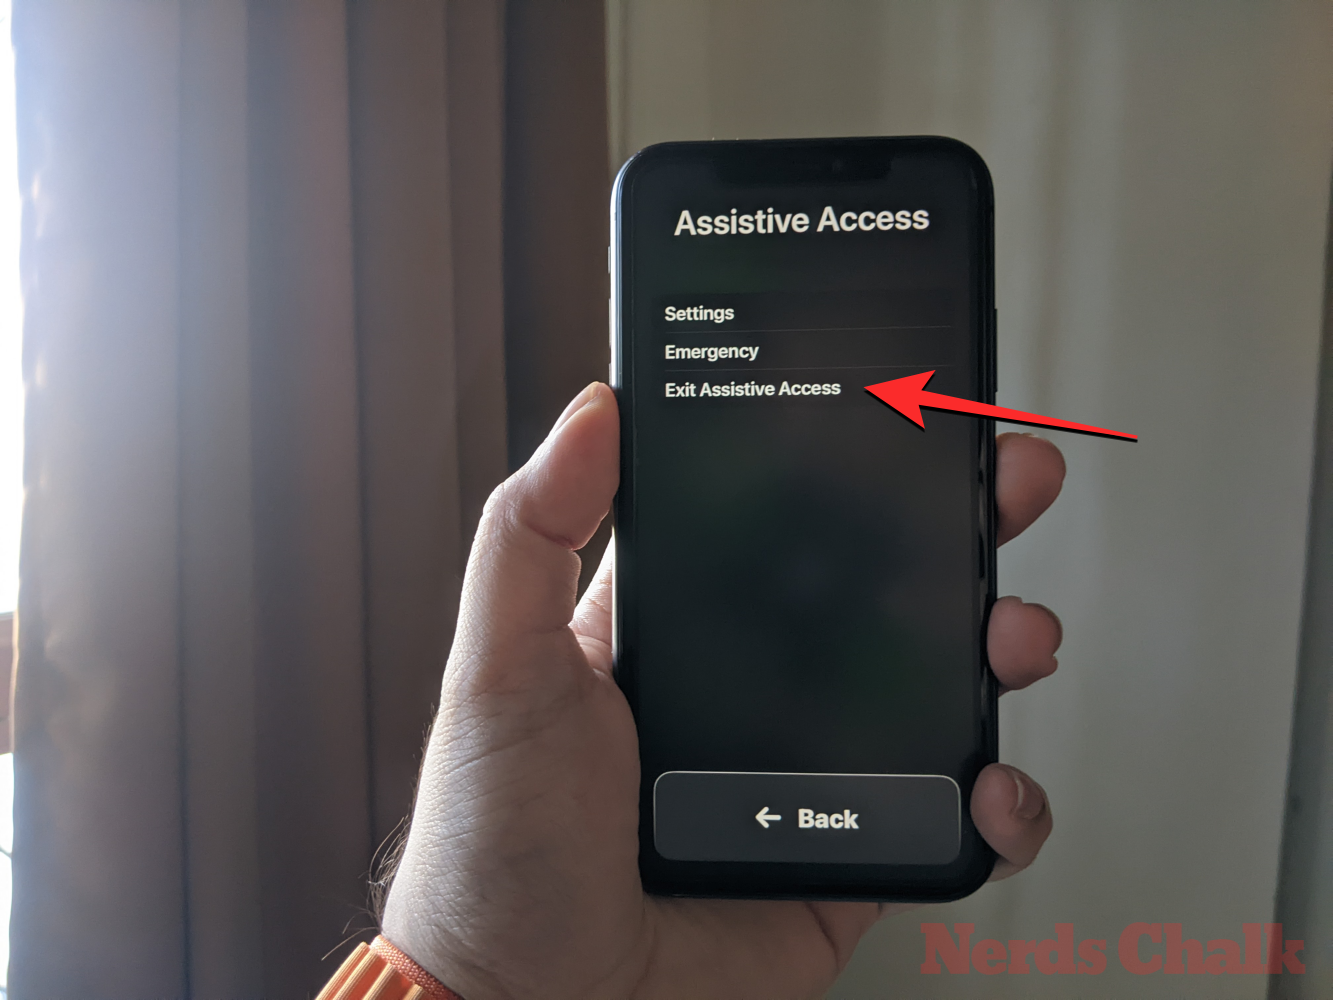
When Assistive Access is already lively on the iPhone, there are a couple of settings you’ll be able to handle inside this mode. To entry Assistive Access settings, triple-press the Side button on the iPhone. You’ll now see the Assistive Access display screen. Here, choose Settings.
You’ll must enter your Assistive Access passcode.

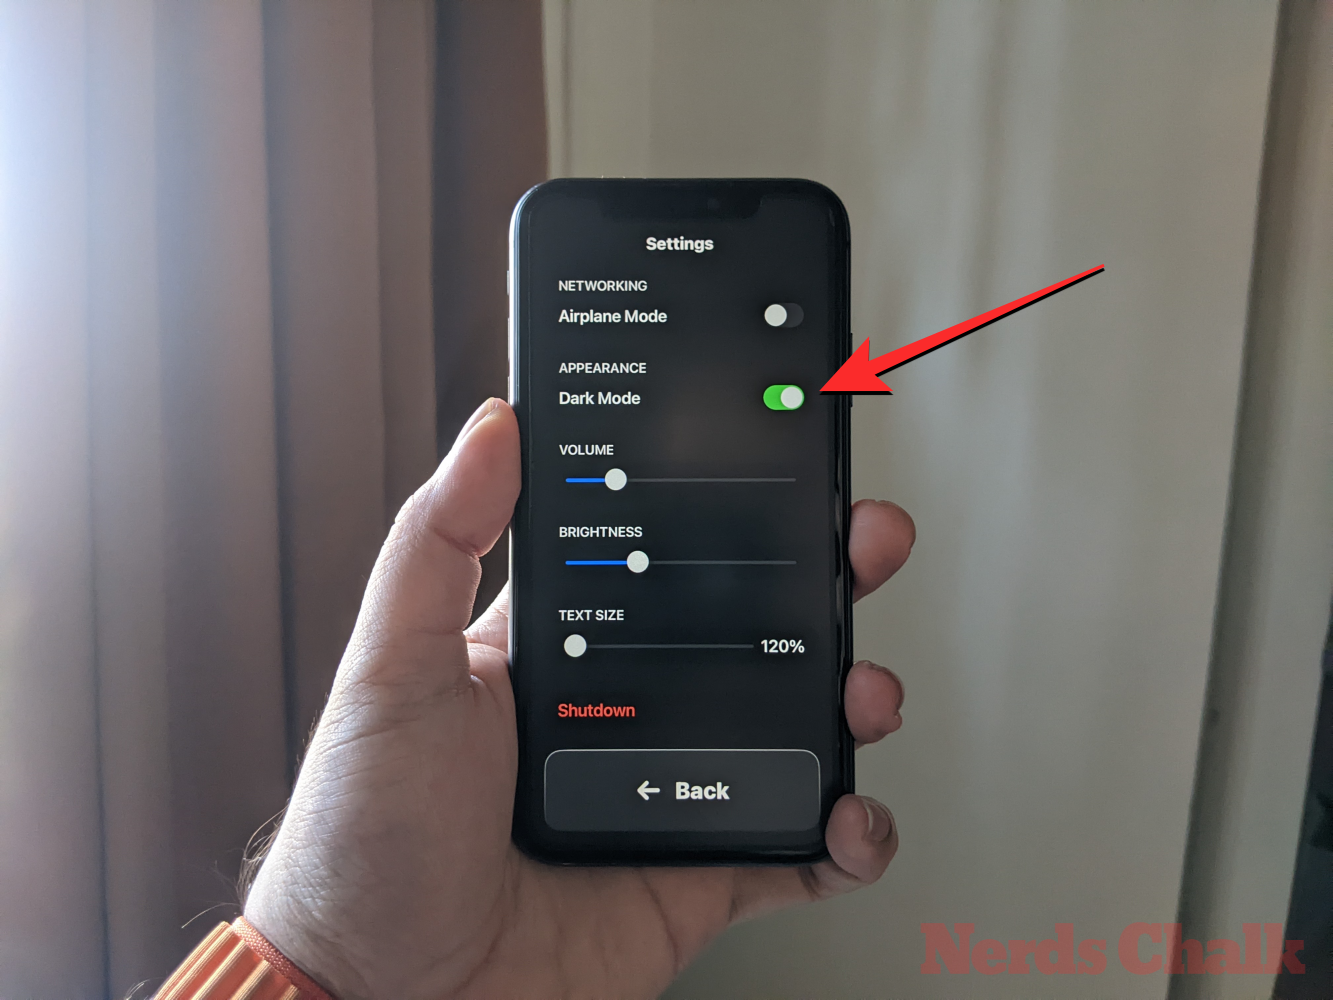
When you try this, your device will load the Settings web page for Assistive Access. Here, the very first thing you’ll be able to toggle is switching the Airplane Mode on/off underneath “Networking” to stop/enable your iPhone to connect with wi-fi and mobile networks.
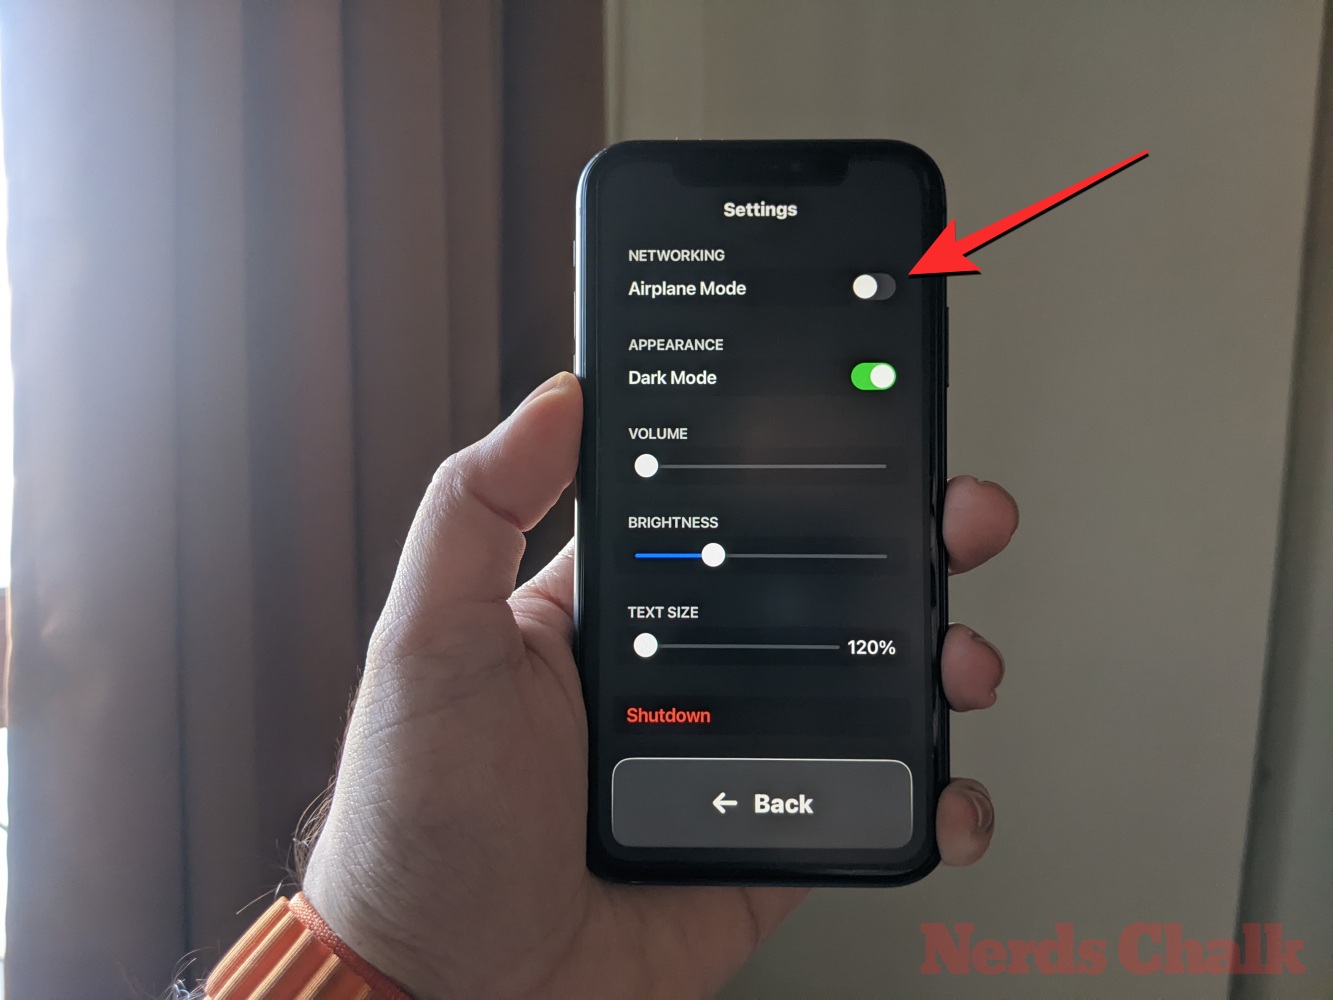
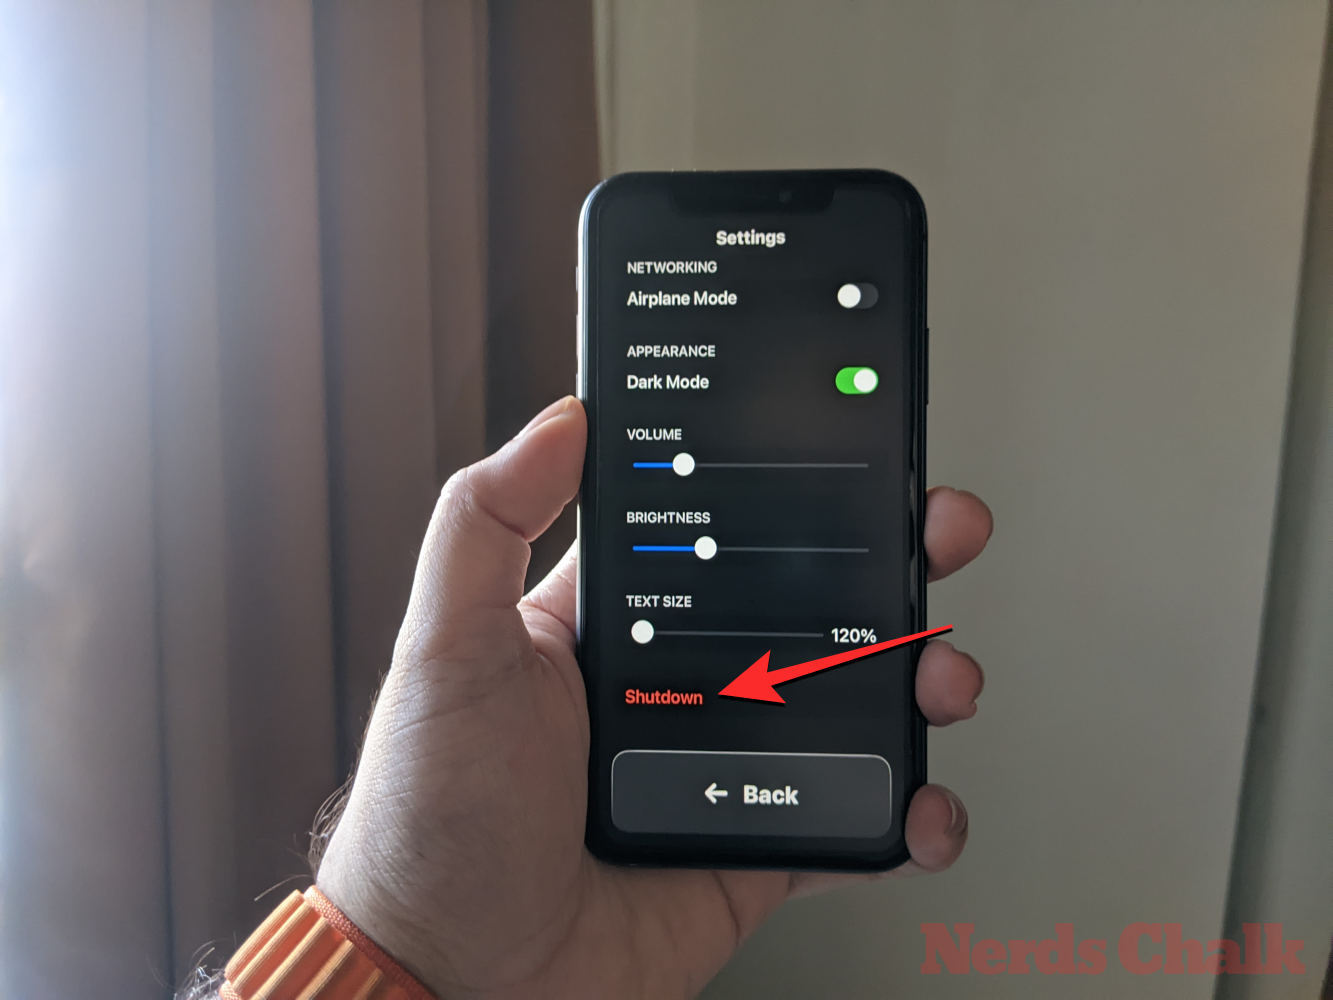
Underneath the “Networking” part, you’ll discover the “Appearance” part the place you’ll be able to activate/off Dark Mode for Assistive Access.
You can then transfer the sliders on the display screen to regulate Volume, Brightness, and Text Size.
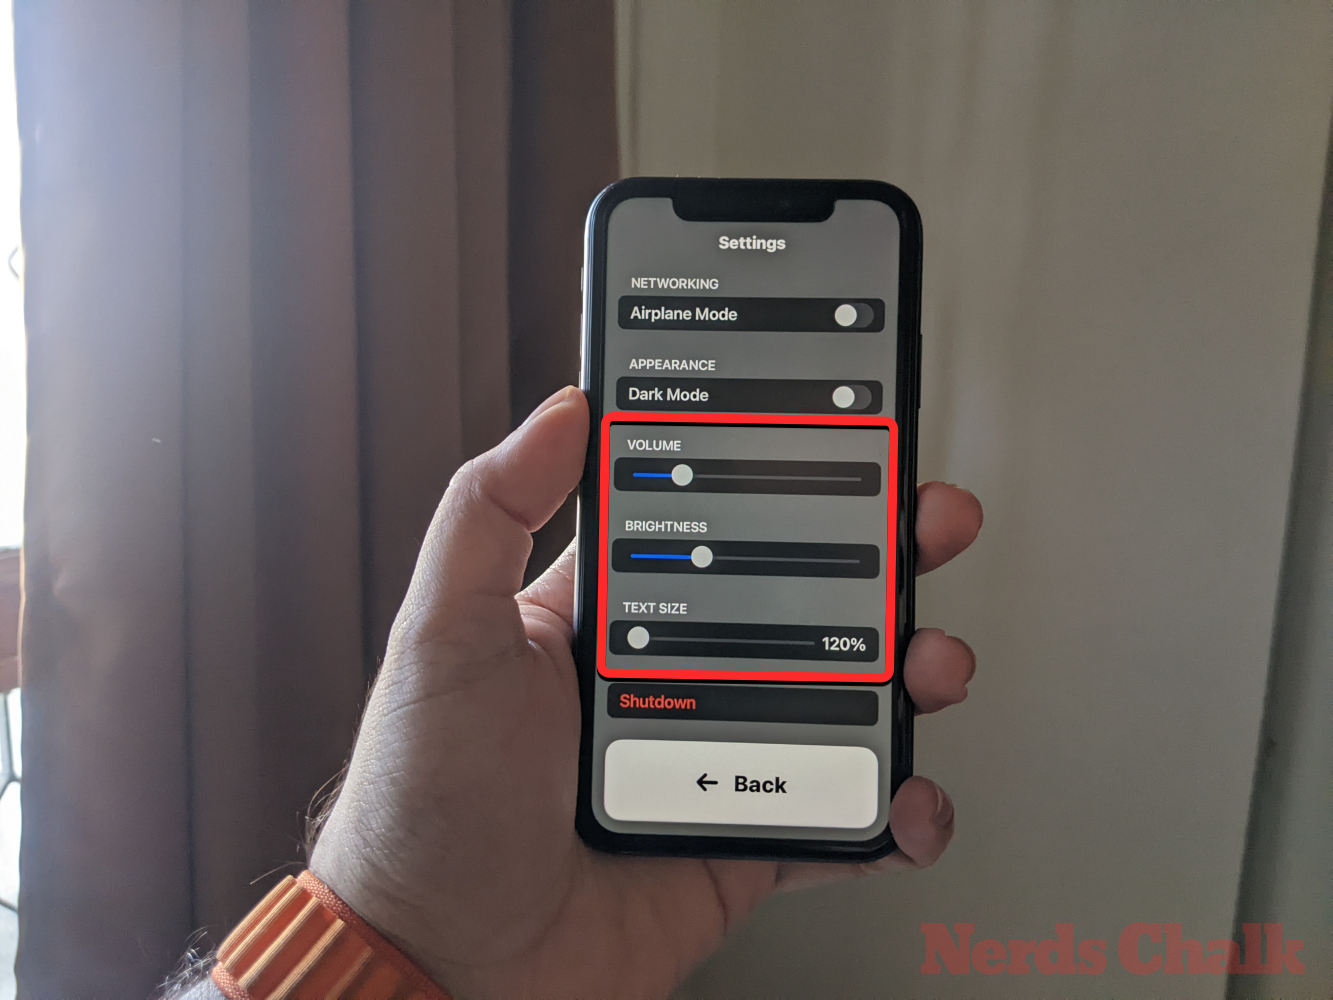
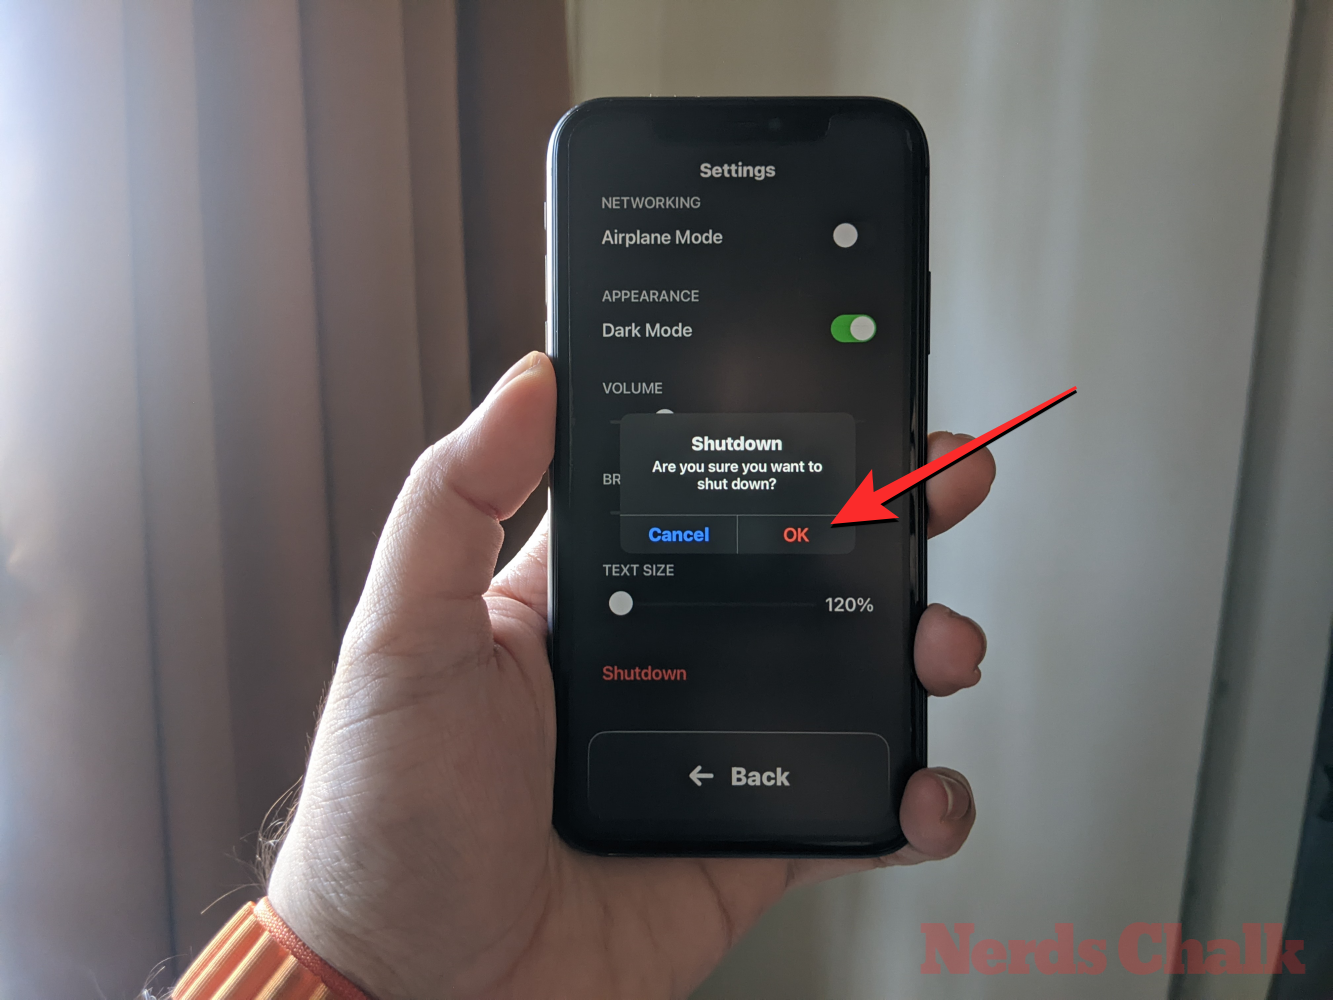
At the underside of the Settings display screen, you’ll be able to faucet the Shutdown button to energy off the iPhone inside Assistive Access.
When you try this, you’ll be prompted to substantiate your motion. To proceed with the Shutdown motion, faucet on OK.
At any time, you’ll be able to return to the Assistive Access residence display screen by tapping on the massive Back button on the backside.
When Assistive Access is inactive
When Assistive Access is inactive, you’ll be able to handle its settings by first opening the Settings app on the iPhone.
Inside Settings, scroll down and choose Accessibility.
On the Accessibility display screen, scroll all the way down to the underside and faucet on Assistive Access.
You will now arrive on the Assistive Access display screen from the place you’ll be able to handle completely different settings for Assistive Access in your device.
Add, take away, and handle purposes
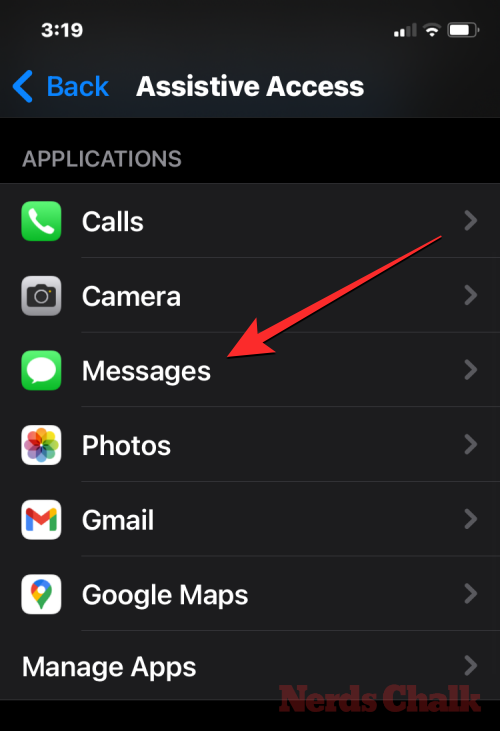
The very first thing you’ll be able to configure is the “Applications” part. Here, you’ll see an inventory of all of the apps you’ve set as much as be out there inside Assistive Access. To change the settings and permissions for any of those apps, choose an app from the “Applications” part.
On the following display screen, you’ll be able to toggle completely different choices, options, and permissions for the chosen app if out there. Apps configured with Assistive Access will present more choices to configure.
Other apps you added right here will solely assist you to grant or deny particular permissions for them when Assistive Access is lively.
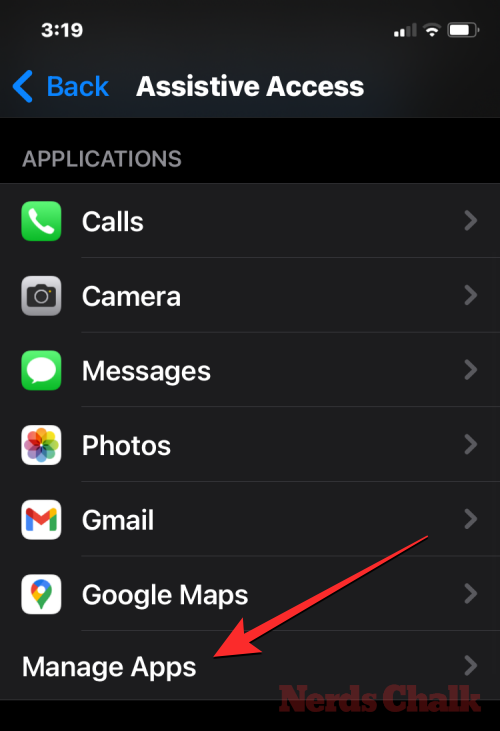
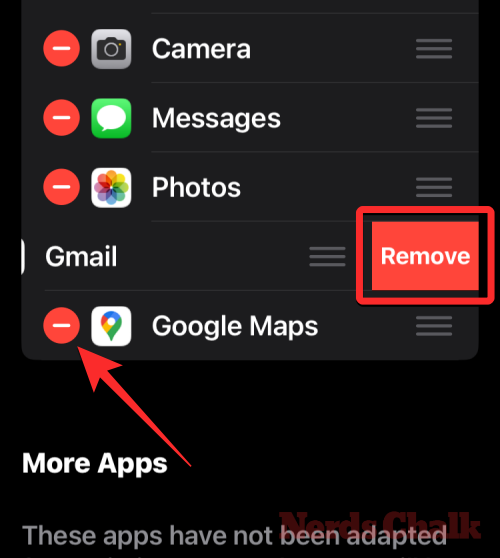
To take away or add more apps inside Assistive Access, faucet on Manage Apps underneath “Applications”.
On the following display screen, you will note current apps underneath “Selected Apps” and apps that haven’t but been added underneath “Optimized for Assistive Access” and “More Apps”. To add an app from these sections to Assistive Access, faucet on the green-colored plus (+) button on its left-hand aspect and configure the chosen app on the following display screen.
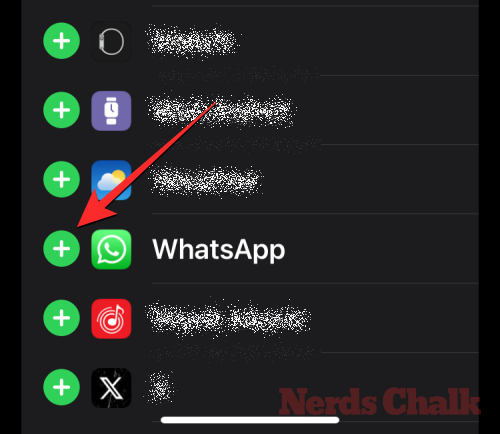
To take away an app from Assistive Access, faucet on the red-colored minus (-) icon on its left-hand aspect after which faucet on Remove on the suitable.
Change apps format
Once you’ve configured the apps to be current inside Assistive Access, you’ll be able to return to the earlier display screen to handle this mode additional. Under the “Options” part, you’ll be able to change between Rows and Grid to vary the looks of the Assistive Access residence display screen as described throughout setup.
Change default wallpaper
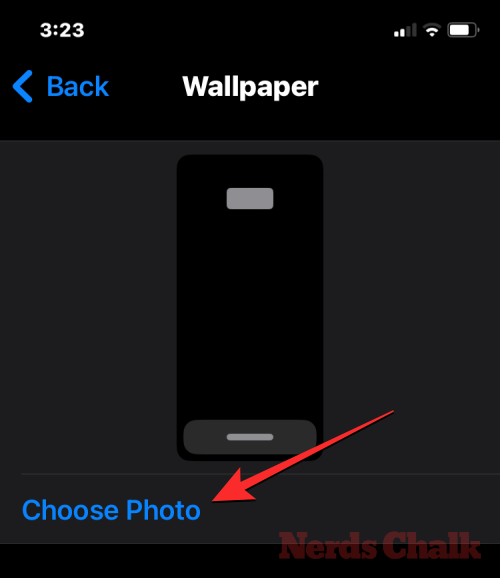
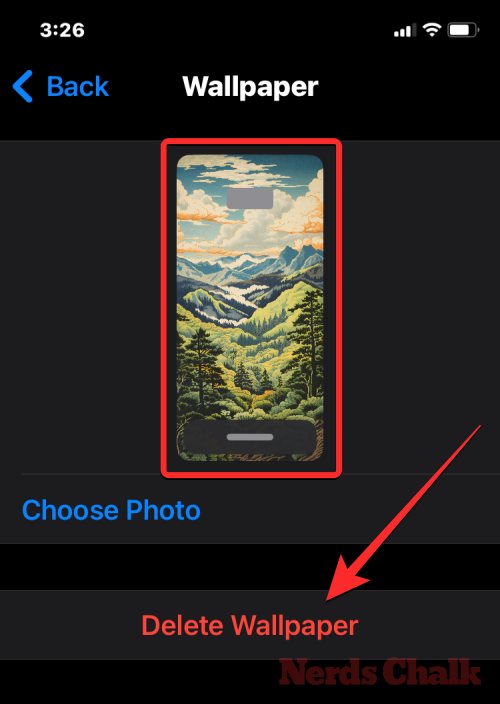
By default, when Assistive Access is ready up, the lock display screen reveals a black wallpaper. To set a photograph as your lock display screen wallpaper inside Assistive Access mode, faucet on Wallpaper.

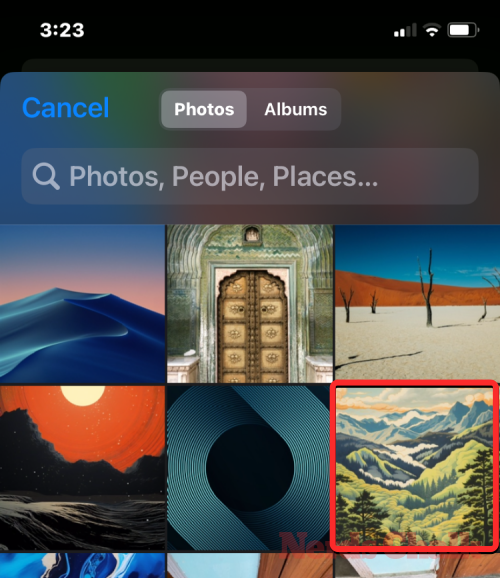
On the following display screen, faucet on Choose Photo to proceed.
Now, you’ll be able to choose an image out of your Photos library so as to add it as your lock display screen wallpaper inside Assistive Access mode.
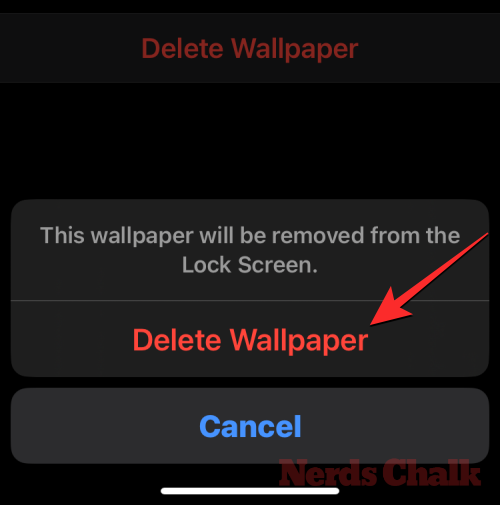
The chosen wallpaper will now be added to your Assistive Access lock display screen. A preview of it’ll seem on the Wallpaper display screen. If you need to take away the utilized wallpaper from the lock display screen, you are able to do that by tapping on Delete Wallpaper.
To affirm the motion, faucet on Delete Wallpaper from the immediate that seems on the backside.
Turn on further options
Inside the Assistive Access settings, it’s also possible to toggle a bunch of various choices to allow or disable when Assistive Access is lively.
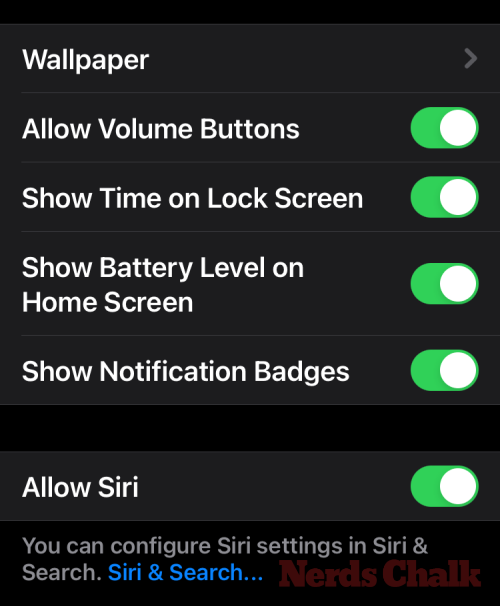
These embody:
Allow Volume buttons: When enabled, you’ll be able to flip up or down the amount ranges using the amount button throughout Assistive Access. When disabled, urgent the Volume buttons received’t change something on the iPhone.
Show Time on Lock Screen: By default, the one solution to see the time with Assistive Access lively is by checking the iPhone’s lock display screen. If you disable this toggle, nonetheless, you received’t see a digital clock on the lock display screen.
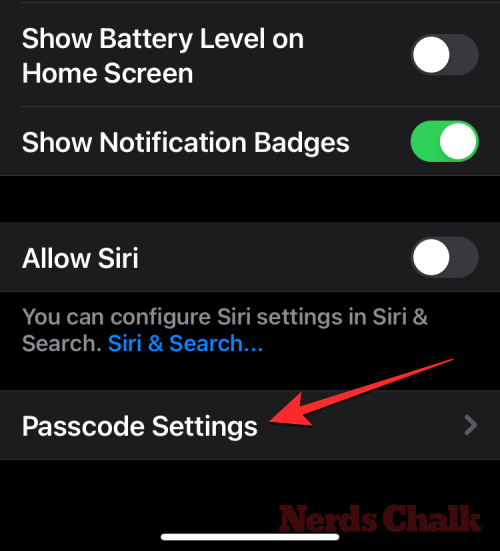
Show Battery Level on Home Screen: Assistive Access’ residence display screen solely reveals app icons and names. You can activate this toggle to moreover see the battery ranges from the house display screen.
Show Notification Badges: When you obtain a notification on an app with Assistive Access enabled, you’ll see a “New” labeled notification badge on the app icon. To forestall seeing this badge, you’ll be able to flip off the Show Notification Badges toggle.
Allow Siri: If you configured Siri through the Assistive Access setup, this toggle will likely be enabled. If you didn’t, you’ll be able to activate the Allow Siri toggle to allow the digital assistant on the device when Assistive Access is lively.
Change Assistive Access passcode
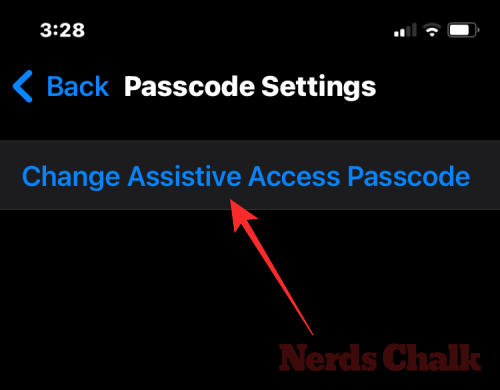
When you arrange Assistive Access, iOS will ask you to create a brand new passcode that will likely be essential to enter and exit Assistive Access sooner or later. You can change this passcode to one thing else from the Assistive Access settings by scrolling all the way down to the underside and tapping on Passcode Settings.
On the following display screen, faucet on Change Assistive Access Passcode.
You will now must enter and re-enter your new passcode for Assistive Access within the subsequent steps.
How do I flip off Assistive Access on iPhone
When you’re carried out using Assistive Access on an iPhone, you’ll be able to change to the common iOS interface simply. For that, triple-press the Side button on the iPhone. This will immediate the Assistive Access display screen on the iPhone. To flip off Assistive Access, faucet on Exit Assistive Access from the listing of choices.
Your device will now ask you to enter the Assistive Access passcode.

When you try this, the display screen will go black and can learn the “Exiting Assistive Access” message. Within seconds, you’ll return to the common iOS interface you might be aware of.

That’s all it’s essential find out about using the Assistive Access function on the iPhone.
Check out more article on – How-To tutorial and latest highlights on – Technical News