
How do I Change Standard Account to Admin Account on Windows 11.
Being caught with minimal privileges on a normal account will be tough. You don’t have entry to many settings, system folders, and a large number of issues that Administrator accounts take without any consideration. However, though Microsoft doesn’t need you to realize it, there’s a comparatively easy approach of granting your self admin privileges with out contacting the administrator of your system, Here’s every little thing it’s essential to know to alter your commonplace account to an admin account on Windows 11.
How do I modify Standard account to Admin account on Windows 11
There are a number of restrictions and hurdles that Windows locations to make sure that the usual account can not change its personal account sort. However, when you’ve got the appropriate instruments and observe the information beneath carefully, this may be finished.
Requirements
Once you may have these two issues, observe the information beneath,
Step 1: Create a bootable USB drive
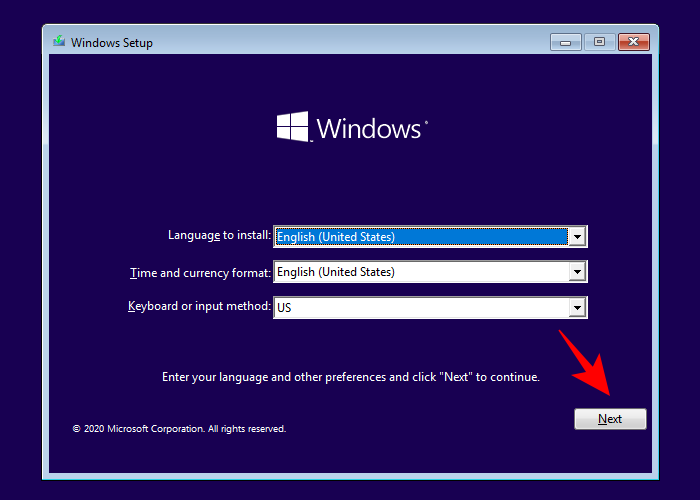
- Plug in your USB flash drive and run the Windows Installation Media setup.

- On the Windows 11 Setup window, click on Accept.

- Click Next.

- With the USB flash drive possibility chosen, click on Next.

- Wait for the method to finish.

- Once the method finishes, click on on Finish.

Step 2: Start Windows Installation Setup
Now, let’s guarantee you can boot out of your USB. Here’s how:
- Restart your pc. When your system is loading back up, earlier than the Windows emblem seems, press F8 to get to BIOS.
Note: The BIOS key could differ primarily based in your pc producer. It could possibly be F10, F11, F1, or F2, or F8. - In BIOS, discover the Boot choices Menu and choose the suitable Boot Media Device (USB/Flash drive). Save the modifications and Exit.
- With the bootable USB plugged in, restart your pc. When your system is loading back up, earlier than the Windows emblem seems, watch for the message about urgent a key to pick out Boot Device.
- When you get the next message, press any key to begin your system from the Windows Installation Setup.

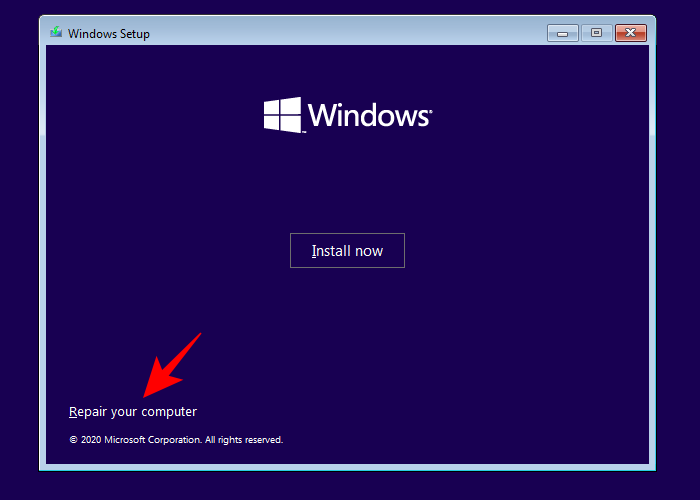
- On the next display, press Shift + F10 to launch Command Prompt. Alternatively, click on Next.
- Then Repair your Computer.
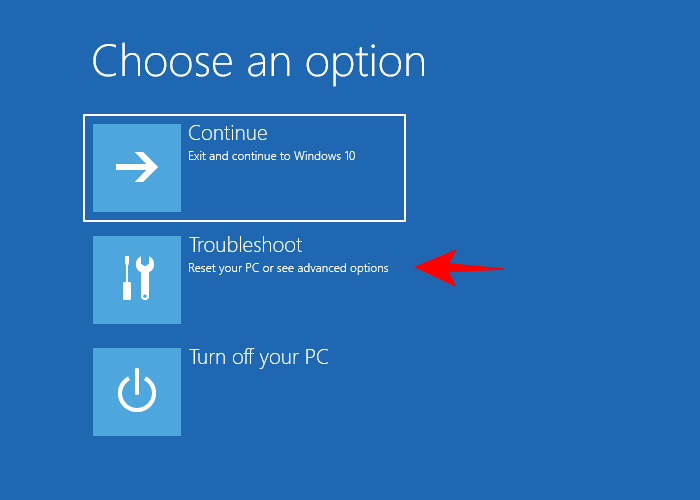
- Then click on on Troubleshoot.
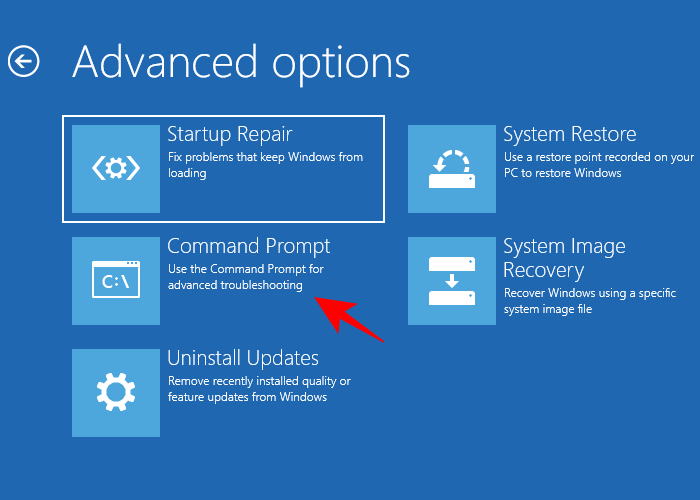
- Select Command Prompt.
Step 3: Modify Registry values
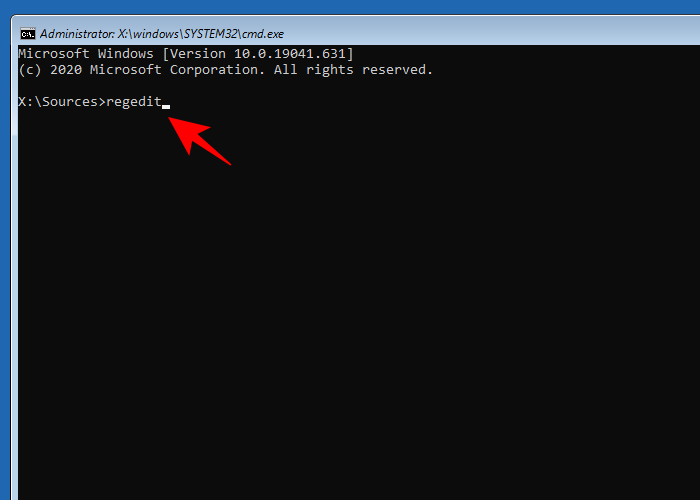
- With the command immediate opened up, sort regedit and press Enter.
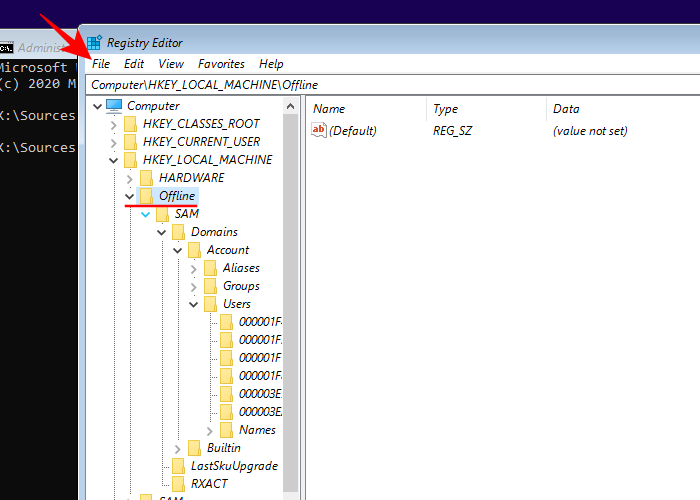
- This will deliver up the “Registry Editor”. Now choose HKEY_LOCAL_MACHINE, then click on on File.
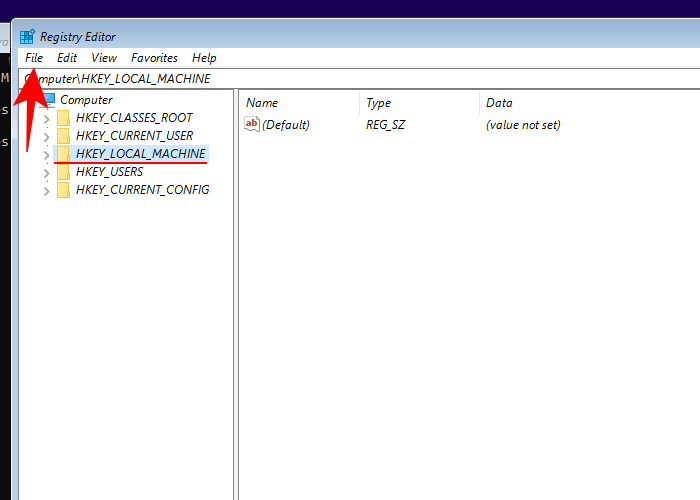
- Click Load Hive.

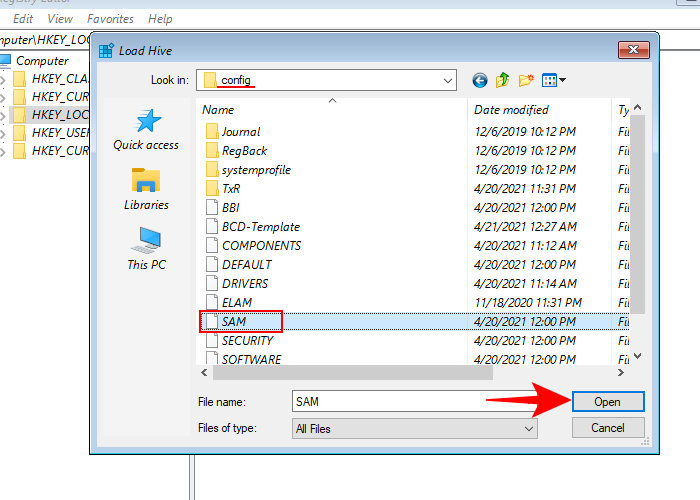
- Now, click on on the sphere next to “Look in:”
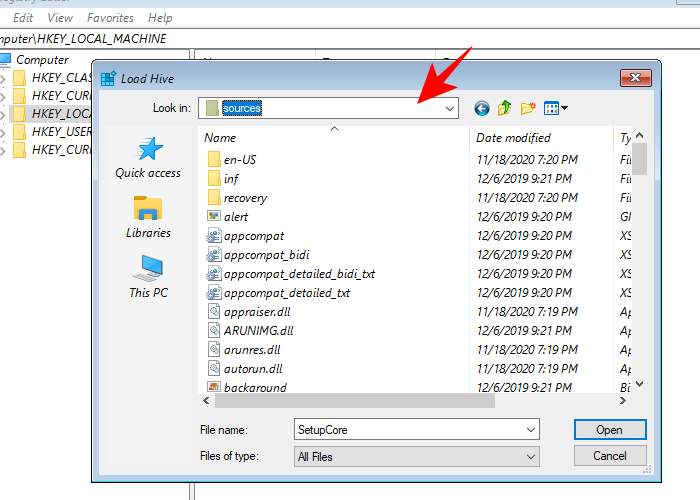
- Then navigate to the next folder:
C:Windowssystem32config - Here, choose the SAM file and click on Open.
- In the “Key Name” discipline, sort Offline and click on OK.
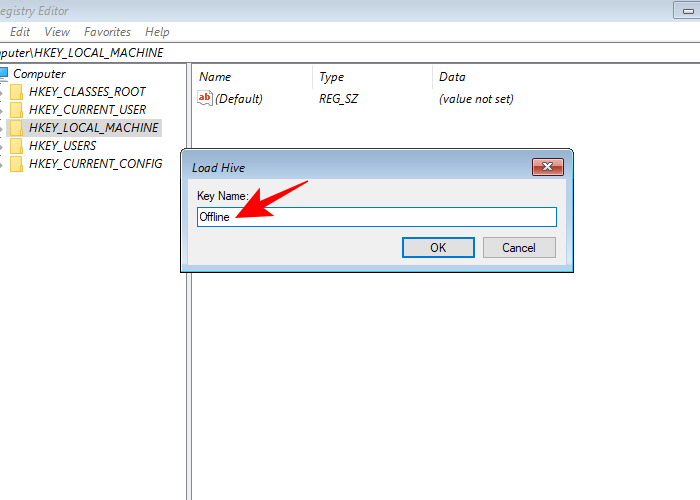
- This will create a brand new key by the title ‘Offline’.
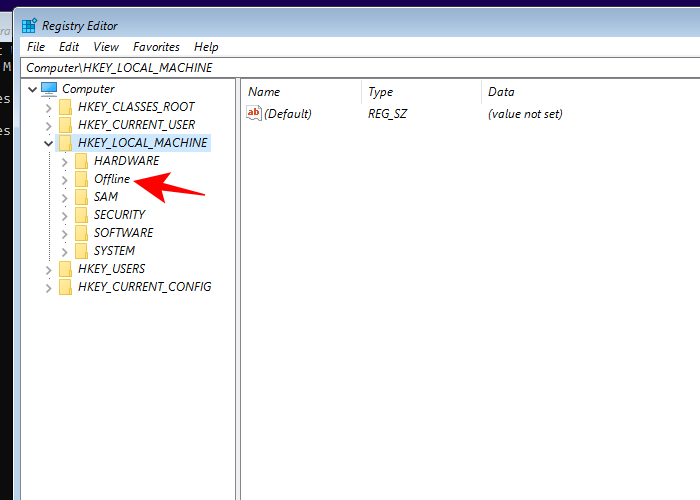
- Now, navigate to the next key:
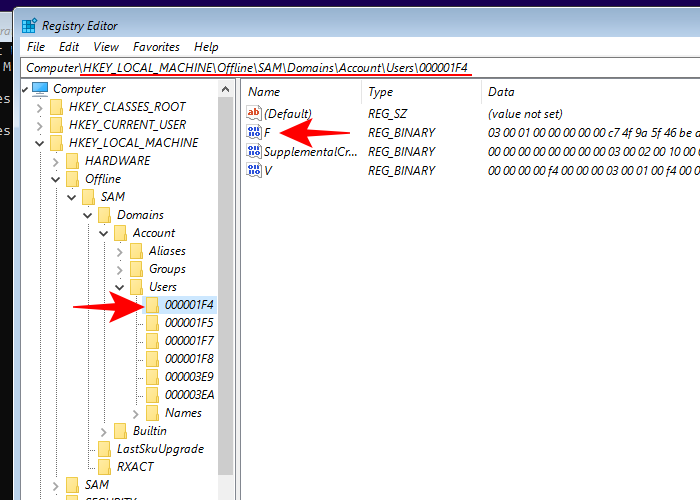
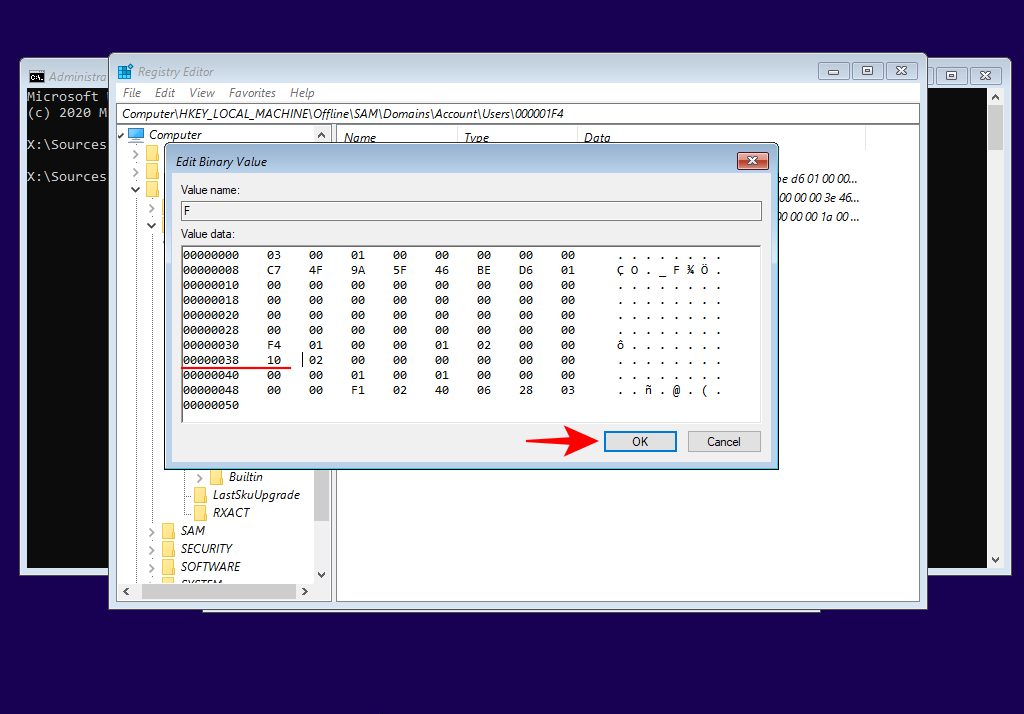
HKEY_LOCAL_MACHINEOfflineSAMDomainsAccountUsers 00001F4 - Then, in the appropriate panel, double-click the F key.
- Use the down arrow key to navigate to the 00000038 line. With your cursor earlier than 11, press the Delete key as soon as.
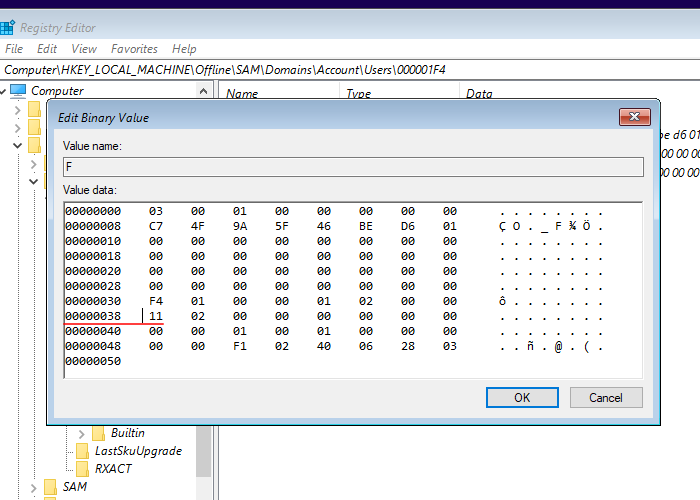
- In its place, sort 10 after which click on OK.
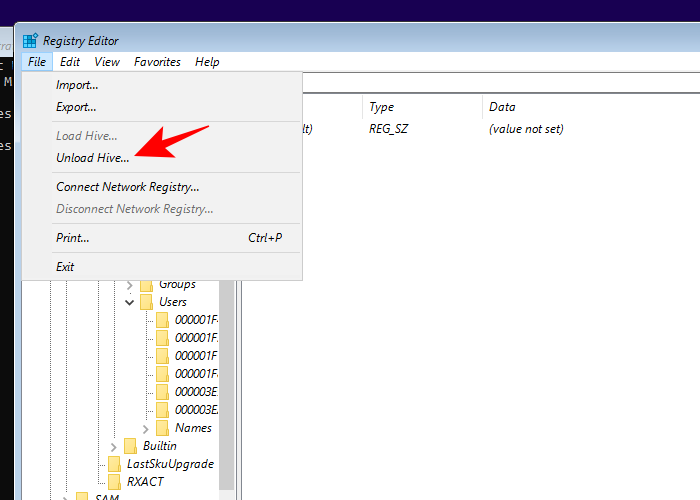
- Once the hot button is modified, click on to pick out the Offline key after which File.
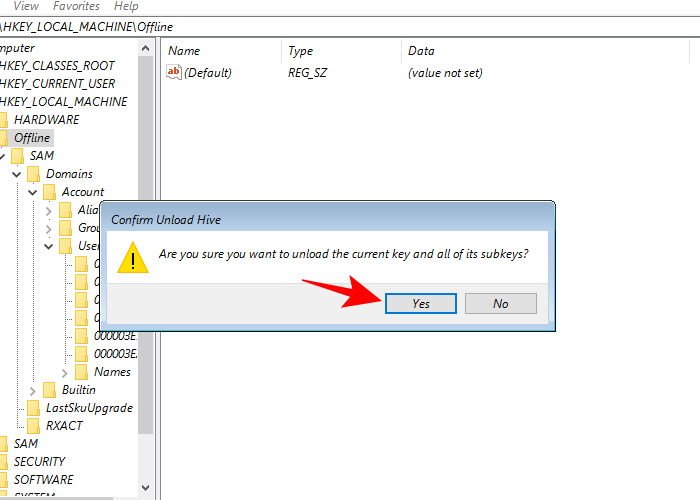
- Click Unload Hive.
- When prompted, click on Yes.
- Now, shut all windows and restart your pc.
Step 4: Use the short-term Admin account to present your self account admin rights
- Once Windows boots up, choose the Administrator account to log in (that is the brand new admin account and doesn’t have any password)

- Wait for Windows to arrange the Admin account.
- Once you’re logged in, press
Win+Rto open the RUN field, sort netplwiz, and hit Enter.
- Select your Standard account and click on on Properties.

- Move over to the ‘Group Membership’ tab. Then change the account sort to Administrator and click on Apply > OK.

You have now efficiently modified your Standard account to an Administrator account.
Step 5: Disable the short-term Admin account
Once you may have given your self administrator privileges, it is suggested to disable this administrator account. Here’s how:
- From your (now administrator) account, open the command immediate from the Start menu.
- Then sort the next command:
internet person administrator /lively:no
- Hit Enter. Once the command is accomplished efficiently, the short-term admin account will disappear.

This will clear all traces of the short-term account and you can be left along with your account that now has administrator privileges.
FAQ
Let’s think about just a few generally requested questions on altering a normal account to an admin account.
Can my admin see which account sort I’ve?
Yes, any administrator can test the account varieties on their system.
Can I modify from a normal account to an administrator on Windows 10?
Yes, the information given above works precisely the identical for Windows 10 as effectively. Just be sure that to obtain a Windows 10 Installation Media file.
Although altering from an administrator account to a normal account is simple sufficient, not many individuals understand how to alter from a normal account to an admin account, particularly in the event that they don’t have entry to the admin or the admin’s password. We hope this information helped shine a lightweight on this course of. Until next time!
Check out more article on – How-To tutorial and latest highlights on – Technical News