“MSI Afterburner Overclocking: A Step-by-Step Guide”.
MSI Afterburner enables you to monitor and handle your GPU clock, reminiscence clock, core voltage, fan pace, and more, all from a single intuitive interface. It’s no fluke that it’s the popular GPU overclocking software for many customers.
To overclock your GPU with MSI Afterburner, you begin by elevating the core clock by a small quantity (e.g., 10 MHz). You check this overclock and keep making small increments till you encounter visible artifacts or crashes. At that time, you dial down the overclock by a step or two.
You repeat this similar course of to discover the max secure reminiscence clock in your GPU. Then, you place this overclock by way of stress assessments and your typical workload to confirm it’ll work nicely for you.
While this can be a respectable overview, you’ll cope with much more variables throughout the precise overclocking course of (voltage, temperatures, benchmarks, and so forth).
So, I’ll overclock my very own GTX 1060 and RX 570 playing cards and can stroll you thru your complete course of on this article.
Prerequisites for Overclocking GPU
Before you start, you’ll wish to obtain and set up the required instruments first. I’ve used the next applications for this information:
When you’re prepared, you should utilize the OC Scanner software in MSI Afterburner to discover a good place to begin. Remember to max out the facility and temp limits for this.

For reference, it recommended a 113 MHz core overclock and 200 MHz reminiscence overclock for my GTX 1060. Compared to ranging from zero, this helped me discover my max overclock of 150 MHz/550 MHz a lot faster.
The software does take some time to run, although (often 20-Half-hour). If you don’t wish to wait, one other various is to lookup overclocks in your precise card on-line. You’ll get an thought of the common OC in your card. You can then begin testing with values barely decrease than common.
Now, launch the three applications I discussed earlier to get began.
Finding the Max Core Clock
We’ll cope with the core clock first, because it has the most important influence on GPU efficiency.
Set Core Clock In Afterburner
- In Afterburner, click on on the Settings cog. Enable the voltage choices and press OK to use the modifications and restart the app.

- Max out the Power and Temp limits.

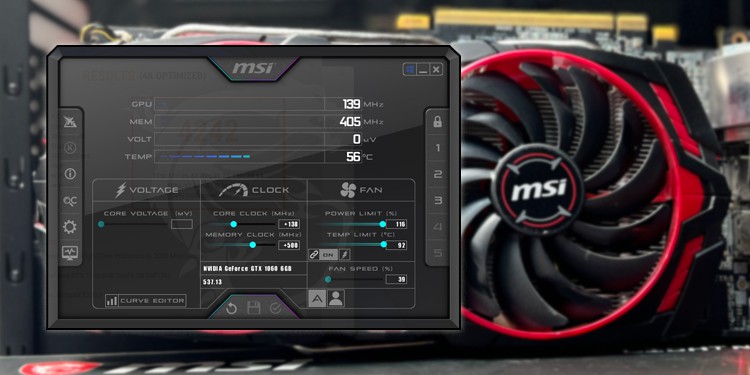
- Then, set the Core Clock to the beginning worth that you just decided earlier. For my GTX 1060, this was 113 MHz.

- Press the Apply button to save lots of this new config. The change needs to be seen in GPU-Z.

Test New Core Clock
We’ll use Unigine’s Superposition for the benchmark check. If you favor another applications like Unigine Heaven, MSI Kombustor, Furmark, 3DMark, and so forth., be happy to make use of these.
I simply choose Superposition as most different choices are both outdated or don’t match my wants nicely.
- In Superposition, Benchmark > Performance needs to be chosen. Set the preset to the very best setting with out overloading your VRAM. My GTX 1060 has 6 GB VRAM, so 4K Optimized is right for me. 8K Optimized requires 6.2 GB VRAM, which my card can’t deal with.

- Click on Run to begin the benchmark.
- Confirm that there are not any visible artifacts throughout the check. It ought to end in just a little underneath 5 minutes.

- After the check, observe the common/max FPS, max GPU temperature, and the benchmark rating. You can screenshot or save the outcomes as you favor.

Increase Core Clock
- In Afterburner, add the suitable increment to the core clock:
AMD GPUs - 10 MHzNVIDIA 1000 sequence and older - 12.5 MHz/ 13 MHzNVIDIA 2000 sequence and newer - 15 MHz
- So, my GTX 1060 which began out at 113 MHz is now set to 125 MHz.

- Save this core clock and run the benchmark in superposition.
- Note the FPS, temps, and rating as talked about earlier, and keep repeating steps 1 – 4 till you encounter artifacts or crashes.
- My 1060 was secure till 138 MHz. I noticed some artifacts at 150 MHz, so I dropped back all the way down to 138 MHz.
Takeaway: My max secure core overclock is +138 MHz in the meanwhile. Find and observe down yours in the identical method.
Finding the Max Memory Clock
Now, we’ll use the identical course of for probably the most part to search out our max reminiscence clock. You can use increments of fifty MHz for this one.

For my GTX 1060, I began at 200 MHz and examined 250 MHz, 300 MHz, 350 MHz, and so forth. My GPU crashed at 550 MHz, so I reverted back to 500 MHz, retested it for good measure, and it was secure.
Plotting a Fan Curve
Depending on how good your cooling setup is, your GPU in all probability ran between 60-80°C when benchmarking. The followers needs to be pretty quiet on the decrease finish of this vary. In this case, you possibly can skip forward to the subsequent part if you would like.
But on some methods, Auto fan management tends to max out the fan pace fairly shortly at increased temps. If you don’t care about noise and wish to push for max efficiency, Auto is as soon as once more nice.
But I like quieter methods and don’t need my GPU sounding prefer it’s about to take off. For anybody in an identical spot, making a customized fan curve can assist.
- To begin, test the fan speeds between 50-90% to see what pace/noise stage you’re comfy with. For instance, I don’t like my followers going over 70% pace except obligatory.

- Track the common GPU temperature throughout your typical utilization. I primarily use my PC for searching, working, and enjoying video games like League of Legends and RDR2. So, my GPU temp is often between 55-60°C.
- Now, click on on the User-defined fan management button. You may entry the fan curve from Settings > Fan.

- I’ve set my foremost fan curve node to 70% at 65°C and set the others accordingly. This ensures the followers stay underneath 70% throughout regular utilization and solely go increased if required. You can create a fan curve for your self in an identical method.

Adjusting the Core Voltage
Remember how we unlocked the voltage modifiers firstly? These allow you to monitor and alter the core voltage (sometimes by round 100-200 mV). Once once more, your cooling is a vital issue right here.
A full 100 mV (i.e. 0.1V) enhance will allow you to run an overlock 1-2 tiers increased. But the temperature bump may even be vital. In my case, maxing out the core voltage offset let me run my GTX 1060 at +150MHz/550MHz. But the GPU temp additionally rose from 70°C to 75°C.

So, I reset the voltage offset to 0 and used the +138MHz/500MHz overclock as a substitute. I most popular this as I wished a cooler and quieter system. Someone else would possibly’ve gone for the opposite possibility on this scenario if efficiency was the precedence.
Basically, if the temperature and energy provide necessities are fulfilled, you possibly can (optionally) enhance the core voltage. This will allow you to get a barely increased overclock at the price of barely increased temps. I like to recommend making an attempt increments of 35 mV (0.035V) on this case.
On the opposite hand, you possibly can look into undervolting your GPU in the event you’re dealing with heating points. You’ll keep the default clock pace however use decrease voltages, which’ll result in decrease temps.
Temps above 80°C aren’t good in your GPU in the long run (the decrease the higher). So, from a long life perspective, undervolting is sort of helpful and in style.
Testing Your Best Overclock
At this level, it is best to have a secure overclock that you just’re pleased with. In my case, I took efficiency, cooling, noise, and longevity into consideration and settled on a +138 MHz core overlock and +500 MHz reminiscence overclock for my GTX 1060. You’ll have an identical worth in your card.
The closing step is to take this overclock and put it by way of different stress-testing instruments in addition to your typical workload (modifying, video games, and whatnot). If the system stays secure, then you definately’ve efficiently overclocked your GPU!
- Click on the Save icon to save lots of these settings to a profile. You could have to press the lock to unlock the profiles.

- You may allow Start with Windows and Start Minimized from the Settings tab to mechanically apply the overclock at startup.

If you’re ever locked out after enabling these because of fixed crashes, you possibly can maintain Ctrl whereas Windows is loading to skip beginning Afterburner at startup. Alternatively, you possibly can boot to protected mode.
Note: If you observe the method I described, you shouldn’t expertise any artifacts, glitches, or crashes. But I’ve seen circumstances the place the GPU will face these points with sure video games solely.
In such eventualities, you possibly can downgrade the overclock by a tier. Or, even higher, you may make use of the MSI profiles. Save the decrease overclock to the second profile and change between the profiles as required.
My Overclocking Results
I’ve principally talked concerning the GTX 1060 to date, however I discussed firstly that I additionally overclocked my RX 570. I’ll summarize my outcomes for each playing cards now.
GTX 1060
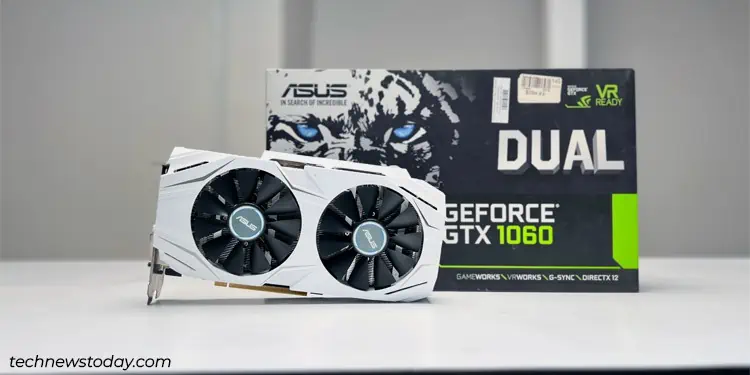
So, listed here are the stats for my ASUS GeForce GTX 1060 6GB Dual OC:
| Stock | Overclocked | Gain (MHz) | |
| Core Clock | 1569 MHz | 1707 MHz | +138 MHz |
| Boost Clock | 1785 MHz | 1923 MHz | +138 MHz |
| Memory Clock | 2002 MHz | 2252 MHz | +500 MHz |
My Superposition benchmark rating for the 4K Optimized check improved from 4019 to 4242 after overclocking. The common FPS elevated from 30.06 to 31.73.

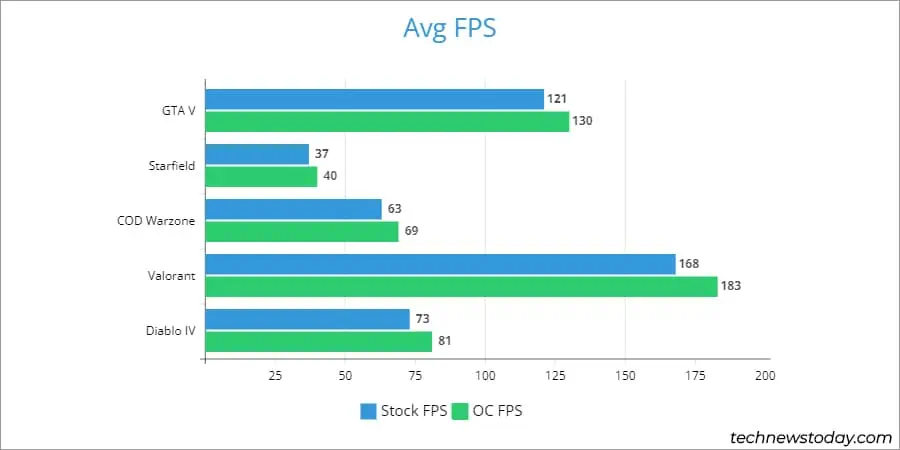
And listed here are the FPS stats from a number of the video games that I examined. Keep in thoughts that a number of the video games like Valorant have been set to the very best settings whereas others like Starfield have been set to low based mostly alone playstyle:
RX 570
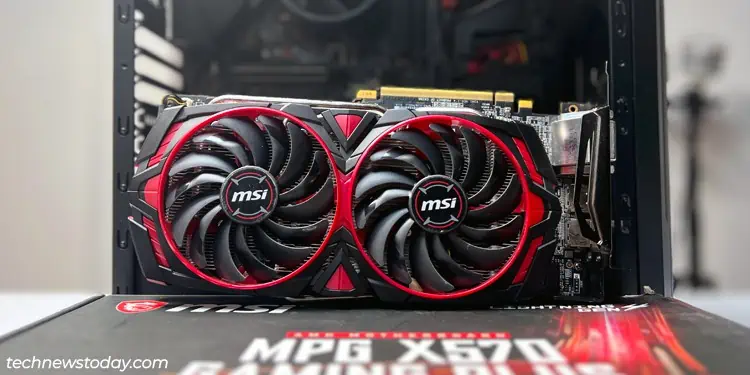
Here are the stats for the MSI Radeon RX 570 ARMOR MK2 8G OC:
| Stock | Overclocked | Gain (MHz) | |
| Core Clock | 1268 MHz | 1418 MHz | +150 MHz |
| Memory Clock | 1750 MHz | 2150 MHz | +400 MHz |
For the 8K Optimized benchmark check, my rating improved from 1318 to 1459 with the ultimate overclock. The common FPS improved from 9.86 to 10.91.

Finally, listed here are the gaming FPS stats for the RX 570:

I’m out to get pleasure from my candy 3 FPS gainz on Starfield now. Happy overclocking!
Check out more article on – How-To tutorial and latest highlights on – Gaming News