How To Setup Your Gigabyte BIOS.
After constructing a brand new system and even simply altering some main element, it’s vital to arrange the BIOS correctly. For instance, far too many individuals set up high-end RAM modules however find yourself working them at low speeds as a result of they overlook to activate XMP within the BIOS.
The Gigabyte BIOS/UEFI interface enables you to modify varied {hardware} configurations from overclocking your CPU and RAM to managing the boot order and updating the BIOS model.
The better part is that probably the most helpful settings additionally are usually very accessible for novices. If you’ll be able to simply squeeze out more efficiency out of your Gigabyte system, or customise it in response to your preferences, would possibly as properly give it a go.
Accessing the Gigabyte BIOS
When powering in your PC, repeatedly press F2 or Del to enter the Gigabyte BIOS.

You also can immediately entry different BIOS options from the POST display:
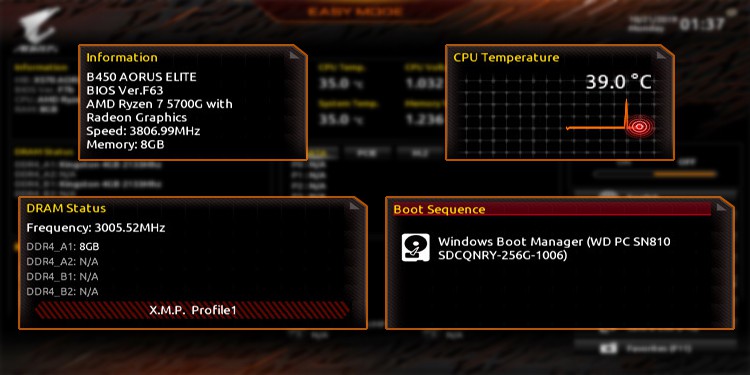
- F9: View a abstract of the system data.
- F12: Select the device as well from.
- End: Access the Q-Flash utility to update the BIOS model.
If the BIOS key doesn’t work, you may as well use the restart button to reboot your PC 3 instances in a row. This ought to boot your system into the recovery surroundings. There, you’ll be able to choose Troubleshoot > Advanced Options > UEFI Firmware Settings.
Gigabyte BIOS Interfaces
Older Gigabyte boards use the basic Black-and-Red interface whereas the most recent boards include the revamped Orange/Yellow BIOS UI.

As the basic UI is more generally used in the meanwhile, I’ll use it for demonstration on this article. For probably the most part, solely the placement of the settings differs between the 2. So, even when your system makes use of the up to date UI, you’ll be able to nonetheless comply with this information to arrange the BIOS.
Moving on, each of the UI variations have two modes – Easy and Advanced. You can press F2 to change between these.

Easy Mode makes probably the most used BIOS settings and stats accessible from a single web page. And when it’s good to configure something not out there there, you’ll be able to swap to Advanced Mode.
Finding the System Info
The System tab shows vital system particulars just like the motherboard mannequin and BIOS model.

You also can verify and configure settings just like the System Language and Time from right here.
This often isn’t vital as most techniques sync the time to a web based server. But when an web connection isn’t out there, your system will use the BIOS date and time.
Overclocking Your System
While overclocking is an fanatic’s domain, even novices can use the preset profiles within the Gigabyte BIOS. These will safely enhance system efficiency on the click on of a button. To verify these out, go to the M.I.T. tab.

RAM Profiles (XMP)
The most helpful one is Extreme Memory Profile (XMP) within the Advanced Memory Settings part. By default, most RAM modules run at decrease frequencies than marketed. XMP enables you to use secure and examined overclock values to run the modules at greater speeds.

Fan Speed Control
You can use Smart Fan 5 to pick out totally different fan profiles and run your system followers at totally different speeds. If you don’t push your system too onerous, you’ll be able to choose the Silent profile to run the followers quietly.
On the opposite hand, I often use my system for intensive duties. So, I choose to run the followers at full pace as that forestalls my system from overheating and improves the element lifespan.

BIOS Update (Q-Flash)
Q-Flash, Gigabyte’s proprietary BIOS flash utility, can be positioned on this tab. You can comply with my information to update the BIOS model using Q-Flash should you ever want it.
If your board helps DualBIOS, you’ll be able to even update the backup BIOS using Q-Flash.

Virtualization
Lastly, you may as well allow {hardware} virtualization (SVM or VT-x) from Advanced Frequency Settings > Advanced CPU Settings.

This is critical for working a 64-bit visitor OS. Without it, you’ll encounter errors like AMD-V Is Disabled In The BIOS. Even the 32-bit company that do work received’t carry out very properly with out {hardware} virtualization.
Configuring Boot Options
The BIOS tab incorporates boot-related settings such because the boot precedence order, quick boot, CSM, and so on.
Boot Order
The Boot Option Priority is especially vital for novices. If you’re working a dual-boot setup, or it’s good to boot from a USB, you’ll be able to choose the specified boot entry as the primary precedence from right here.

CSM
CSM Support might be situationally vital. You’ll have to allow this compatibility function as well from a legacy MBR-partitioned drive. On the opposite hand, if you’d like trendy UEFI options like Secure Boot, you should disable this.
Fast Boot
Next, there’s Fast Boot. It accelerates your boot time by skipping or delaying sure POST checks. This is an particularly helpful function on lower-end techniques as it could possibly enhance the boot time lots.
But it could possibly additionally trigger sure complications like stopping you from getting into the BIOS or booting from a USB whereas it’s enabled. So, you’ll have to present it a attempt to resolve whether or not it’s price enabling.
Improving System Security
Gigabyte boards present safety features like Secure Boot, TPM, BIOS passwords, and so on.
Secure Boot
You can configure Secure Boot from the identical BIOS tab. If enabled, the system will solely boot from gadgets with legitimate digital signatures. Any unsigned drives or OS drivers received’t be chosen as boot gadgets, thus enhancing safety.

BIOS Password
Similarly, the Admin and User Passwords are additionally optionally available however helpful options for managing entry ranges. If a number of folks use a system, the admin can set the admin password. Then, customers can individually set the person passwords.

After doing so, you’ll have to enter the admin or person password at system startup or when getting into the BIOS. When you entry the BIOS with the person password, you’ll be able to solely configure some settings just like the boot choices, quick boot, CSM, and so on. The relaxation might be greyed out and solely accessible in Admin mode.
TPM
Finally, you’ll discover the TPM choice (fTPM or PTT) within the Peripherals tab. Besides TPM 2.0 being an official requirement for Windows 11, you could wish to allow TPM for safety advantages like measured boot and brute-force safety.

Managing Display Preferences
Continuing within the Peripherals tab, you’ll discover the Initial Display Output choice. This lets you choose which GPU (built-in or exterior card on a selected PCIe slot) to make use of as the primary show.

If you turn to the Chipset tab, you’ll be capable to configure Integrated Graphics.

If you don’t have a devoted GPU, otherwise you want more show ports in your multi-monitor setup, you’ll wish to allow this function. When enabled, you’ll even have entry to further settings like UMA Frame Buffer Size (iGPU reminiscence) and show decision.
Alternatively, should you do have a devoted GPU and don’t wish to hassle setting which GPU every program ought to use, it’ll be handy to only disable the iGPU.
Setting Storage Modes
The storage-related settings are scattered throughout totally different tabs. If CSM is enabled, you can begin within the BIOS tab. The Storage Boot Option Control enables you to use both UEFI drives, Legacy drives, or each as usable boot choices.

In the Peripherals tab, you’ll be able to configure USB Mass Storage Driver Support. If it’s disabled, USB storage gadgets received’t be supported.

Users usually can’t boot from sure gadgets as they’re not detected. If you ever face this drawback your self, these are the 2 settings to verify first.
Besides this, you have got your SATA and NVMe operation modes within the Chipset tab.

As a newbie, you’ll be able to simply go away this to default. But should you ever wish to construct RAID arrays, that is the place you’ll be able to configure onboard RAID from. Just one thing price figuring out.
Managing Power Preferences
The Power tab enables you to configure quite a lot of low-impact optionally available preferences like powering on the system with a keystroke, by means of mouse motion, using a password, and so forth.

I personally use the Resume by Alarm function to mechanically energy on my PC initially of the workday. I additionally use Wake on LAN to network boot my laptop computer typically. As I mentioned, low-impact, however the few seconds these save have a tendency so as to add up over time.
Saving & Resetting BIOS Settings
The Save & Exit tab must be self-explanatory. You can save the adjustments made to date and exit the BIOS. The F10 key additionally works as a shortcut for this.
Or, you’ll be able to Exit the BIOS with out saving something. You can press Esc a number of instances should you choose using the shortcut.

The Boot Override function is just like the Boot Options menu in that it lets you choose the device to right away begin the subsequent session with. It’s a one-time choice.
You also can choose Load Optimized Defaults to reset the BIOS settings to manufacturing unit defaults. On that word, remember the fact that resets aren’t all the time voluntary.
When my CMOS battery died, my BIOS settings reset and I misplaced the configs together with my overclock. You might be taught from my expertise and save the BIOS profile to a storage device, then merely load it when required.
Check out more article on – How-To tutorial and latest highlights on – Gaming News