How To Install CPU Fan On Your Motherboard.
After you put in your CPU into the motherboard, the subsequent factor you do is set up a CPU fan to maintain the processor cool. It stays legitimate no matter whether or not you’re constructing a brand new PC or if it’s essential reinstall one other fan when your previous one now not fits your wants or is failing.
While you will see several types of CPU followers available in the market, they’re all simple to put in and comply with the identical basic course of. You merely want to position them above the processor and lock them in place using the cooler’s locking mechanism (screws, retention clips or push pins).
Here, I’ll solely be speaking concerning the CPU followers that come hooked up to a heatsink. Other kinds of air coolers that use radiator followers additionally use comparable processes. You simply want to make use of corresponding brackets relying on the socket sort.
Note: You want to make use of an antistatic wrist band and floor your self earlier than putting in a CPU fan. Static electrical energy can construct up in your physique because of friction with garments or carpet and touching any digital elements when charged can harm them.
You may also periodically dissipate any potential static cost by touching a grounded metallic floor.
Prepare the CPU and CPU Fans
Before you start, guarantee that you’ve got a CPU fan that’s suitable along with your motherboard or CPU. Then, it’s essential make the next preparations to have the ability to set up the CPU followers with none points.
- Make certain that you’ve got put in a correct CPU into the motherboard’s socket. You can take a look at our guides on putting in AMD CPU in addition to putting in Intel CPU should you want any assist.

- Now, take out the CPU fan from its bundle and take away the plastic lid masking its decrease portion together with any stickers on the bottom. Make certain to not contact the thermal compound there.

You might also want to scrub and apply the thermal paste on the CPU, relying in your state of affairs.
- If you are attempting to put in a CPU fan after eradicating one other, it’s essential clear the residual thermal paste on the CPU. You can use microfiber material with isopropyl alcohol to take action.

- A brand new fan ought to have already got a thermal compound layer utilized to it, so it may not be essential to apply the extra paste to the CPU. But I like to recommend you clear that compound and change it with a better-quality thermal paste as an alternative.
- But if you’re putting in an previous fan, first clear up the messy or dried-up paste on the cooler’s heatsink and apply an appropriate quantity of the paste to the CPU whereas using a correct sample.

- If you’re making use of any new thermal paste, be sure to make use of solely larger high quality ones. Cheaper ones gained’t permit the fan to dissipate warmth correctly and so they dry out fairly rapidly.


Install CPU Fan
Depending on the kind of CPU fan in addition to the motherboard it’s suited to, your fan could have considered one of three locking mechanisms— spring screws, push pins, and retention clip.
You want to make use of totally different procedures to put in these followers into your motherboard.
Installing CPU Fan with Push Pins
Most CPU followers for Intel motherboards come as push pin followers. These embrace inventory coolers for motherboards with LGA115X, LGA1200, and many others., sockets in addition to Intel Laminar RS1/RM1 coolers.
This sort of fan makes use of 4 strain pins (not screws) to carry itself to the motherboard. The pins include caps which you’ll flip in numerous instructions to lock or unlock the fan.
- On the fan, flip all of the push pin 90° anticlockwise using your fingers or a flathead screwdriver to unlock them. Most sources, together with the official ones, will inform you that you simply don’t want to take action, as you’ll be able to push them inside and lock the pins. However, it will possibly put on down the pins, so I personally unlock them earlier than putting in.

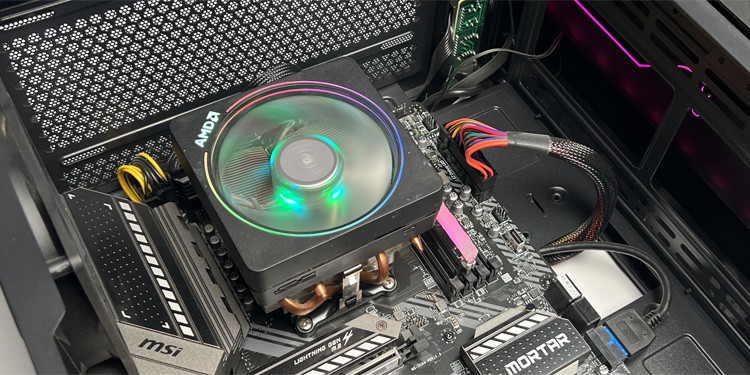
- Now, place the fan/warmth sink onto the CPU whereas aligning all of the pins to the respective holes on the motherboard. Orient the fan in such a manner that the fan cable simply reaches the CPU_FAN header. Also, be sure that the fan doesn’t entice the cable.

- Push all of the pins gently whereas ensuring they’re straight to get them contained in the holes. Then, flip the pins 90° clockwise to lock them in place. Make certain to turning them in diagonal order (as I’ve proven under) to stop any alignment points.

- Try pulling up the cooler to verify when you’ve got correctly locked all of the pins.


Installing CPU Fan with Spring Screws
Most followers for AMD motherboards and a few followers that concentrate on Intel motherboards (Intel Laminar RH1, RTS2011AC, and so forth) use spring screws. To set up these followers, it’s essential connect the spring screws to a CPU backplate via the motherboard.
- Insert the CPU backplate (that comes with the motherboard or the fan) on the motherboard’s screw holes for the fan from the back facet and maintain it in place. You may also get assist from another person to carry it.

- In some motherboards, the backplate may come pre put in together with CPU retention brackets. You must unscrew these brackets and maintain the backplate in place in such eventualities.

- Place the fan onto the CPU whereas aligning all of the spring screws to the respective holes on the backplate. Orient the fan in such a manner that the fan cable simply reaches the CPU_FAN header. Also, be sure that the fan doesn’t entice the fan cable.

- Rotate all of the screws somewhat bit clockwise to insert them barely into the holes and have them within the correct place. It’s higher to rotate the screws on one diagonal at a time to stop any alignment points.

- Then, tighten all of the screws securely using the identical diagonal sample till you’ll be able to’t flip them anymore.
- You may also affirm when you’ve got correctly locked all of the screws by pulling up the CPU fan barely.


Installing CPU Fan with Retention Clips
CPU followers for AMD motherboards (like Wraith Prism) may also include retention clips as an alternative of spring screws. These followers are a lot simpler to put in and take away however it’s essential use separate CPU brackets to carry the fan.
- If your motherboard already comes with pre-installed CPU retention brackets, you’ll be able to instantly go to the subsequent step. Otherwise,
- Insert the CPU backplate on the motherboard’s screw holes for the fan from the back facet and maintain it in place. The backplate ought to include the motherboard or the fan.
- Then align the CPU retention brackets from the motherboard’s bundle in place and screw them securely.

- Now, place the CPU fan above the processor whereas aligning the retention clips to the mounting clips on the brackets.

- Press down the clips to hook them in place. You may also hook one clip at a time. If every other elements just like the RAM obstructs you, it’s higher to briefly take away them till you end the fan set up.

- Then, pull the cam lever to the opposite facet and press it downwards to lock the cooler.


Connect CPU Fan Cables to the Motherboard
Now it’s essential join the fan energy cable to the CPU_FAN header. It is feasible to attach the cable even when the variety of pins on the fan cable and the motherboard header don’t match. Use the plastic guides on the header and the fan cable’s connector to find out how it’s essential join the cable.

If your fan comes with RGB, you’ll have to join the RGB cable to the right 4-pin RGB headers to have the ability to management them. They often present labels with +12V, G, R, B. You must search for an arrow signal in your cable connector and be sure that it goes to the +12V pin.

You can equally join the 7-pin USB cable (if accessible) to any of the free USB headers on the motherboard. For some followers, these further cables come as modular items and it’s essential plug them into the fan as nicely.

You may also verify the person handbook for the motherboard or verify its on-line platform should you can’t discover the RGB and USB headers.
After putting in the fan (and ending constructing your PC), it’s at all times a good suggestion to get to your motherboard’s BIOS and customise the fan pace per your desire.
Check out more article on – How-To tutorial and latest highlights on – Gaming News