How To Enable Virtualization In MSI BIOS.
I as soon as acquired the AMD-V is disabled within the BIOS error after I tried to launch a VM. I additionally usually see folks unable to assign a number of cores to their VMs. These are widespread issues that occur as a result of {hardware} virtualization isn’t enabled within the BIOS.
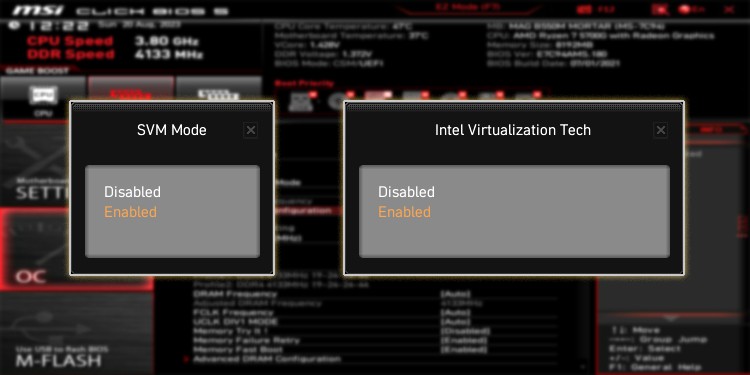
On most MSI boards, you may allow AMD’s virtualization tech (SVM) from the Advanced CPU Configuration tab. Similarly, you’ll discover Intel’s virtualization tech (VT-x) within the CPU Features part of the MSI BIOS.
These choices’ places within the BIOS can differ on sure MSI boards/BIOS variations, which might complicate issues for some customers. So, I’ll cowl all the course of for enabling virtualization within the MSI BIOS on this article.
Boot to MSI BIOS
You’ll have to entry the MSI BIOS interface to configure virtualization. The easiest method to do that is by urgent the BIOS key (Del/F2) at boot.

If the BIOS key doesn’t work (a typical disadvantage of Fast Boot), you should utilize the Restart button to reboot your PC 3 occasions in a row. This’ll boot your system to WinRE.
There, you may choose See superior restore choices > Troubleshoot > Advanced Options > UEFI Firmware Settings to enter the MSI BIOS.
Enable Virtualization In BIOS
First, make sure you’re within the Advanced Mode of the MSI BIOS (press F7 to change).
AMD Virtualization
- On AMD programs, go to Overclocking settings (OC) > Advanced CPU Configuration.

- Set SVM Mode to Enabled.

- You can even optionally allow IOMMU from the AMD CBS tab. This can enhance the efficiency of your PCIe gadgets (like GPU) in VMs by letting them operate like they’re immediately linked to the visitor machine.

- Press F10 and choose Yes to avoid wasting the brand new settings and exit the BIOS.


Intel Virtualization
- On Intel programs, go to Overclocking settings (OC) > CPU Features.

- Set Intel Virtualization Tech (VT-x) to Enabled.

- You can even activate the PCIe passthrough characteristic by enabling Intel VT-D from the identical web page. As with AMD, this expertise can enhance PCIe device efficiency with VMs.

- Finally, press F10 to avoid wasting the modifications and exit the BIOS.


Check Virtualization Status In Windows
After exiting the BIOS, the PC ought to boot to Windows. You have a number of methods to substantiate that you just correctly enabled {hardware} virtualization.
- You can launch Task Manager (Ctrl + Shift + Esc) and go to Performance > CPU.

- You can open any system profiling software you utilize (e.g., CPU-Z). Look for CPU instruction flags like AMD-V or VT-x.

- And clearly, it’s also possible to launch a 64-bit VM or assign a number of cores to it. Assuming virtualization is enabled, you’ll not encounter errors like VT-x is disabled within the BIOS.


And earlier than I finish, we’ve acquired in-depth articles on subjects like putting in Windows 11 on VirtualBox or using VMware typically. If you’re simply getting began with virtualization, these are value a learn.
Check out more article on – How-To tutorial and latest highlights on – Gaming News