How To Enable Virtualization In BIOS.
If you wish to run a multi-core digital machine or resolve errors like VT-x is disabled, you will need to allow hardware-assisted virtualization within the BIOS.
AMD labels this characteristic as SVM, whereas Intel names it VT-x.
You can allow these {hardware} virtualization options from the Advanced CPU Configuration part within the BIOS.
I’ll allow virtualization in my MAG B550M Mortar’s BIOS to show this course of.
To do the identical, your first step must be to enter the BIOS.
Get to the BIOS/UEFI
The BIOS key will likely be proven on the display screen throughout POST. After you energy on or restart your PC, repeatedly press this key to entry the BIOS Setup utility.

The Delete key works on most desktops. Laptops have a bit more variation as totally different Function keys and key combos work relying on the model and mannequin.
Check the desk under when you’re uncertain what your system’s BIOS secret is:
| Manufacturer | BIOS Key |
| MSI | Del |
| ASUS | Del, F2, F9 |
| Gigabyte | Del, F2 |
| ASRock | Del , F2 |
| Dell | Del, F1, F2, F3, F12, Ctrl + Alt + Enter |
| Lenovo | F2, F12, Fn + F2, Fn + F12 |
| Samsung | F2, F10, F12 |
| HP | Del, F1, F2, F10, F12 |
Find Virtualization Option in Advanced Mode
The BIOS masses in Easy Mode by default. This interface gives easy accessibility to the principle BIOS settings. To configure superior settings like virtualization, you will need to swap to Advanced Mode. Here’s how you are able to do this:
- Press the important thing proven on the display screen (often on the high or backside) to modify to Advanced Mode. In my MSI BIOS, this secret is F7.

- Look for Advanced CPU Configuration or an analogous part.
- Locate the virtualization possibility there.
- AMD’s virtualization tech known as SVM.

- Intel boards both name it VT-x or use the complete title (Intel Virtualization Technology).

- AMD’s virtualization tech known as SVM.
- If you’re having problem discovering these settings, verify your consumer handbook or BIOS Setup information.


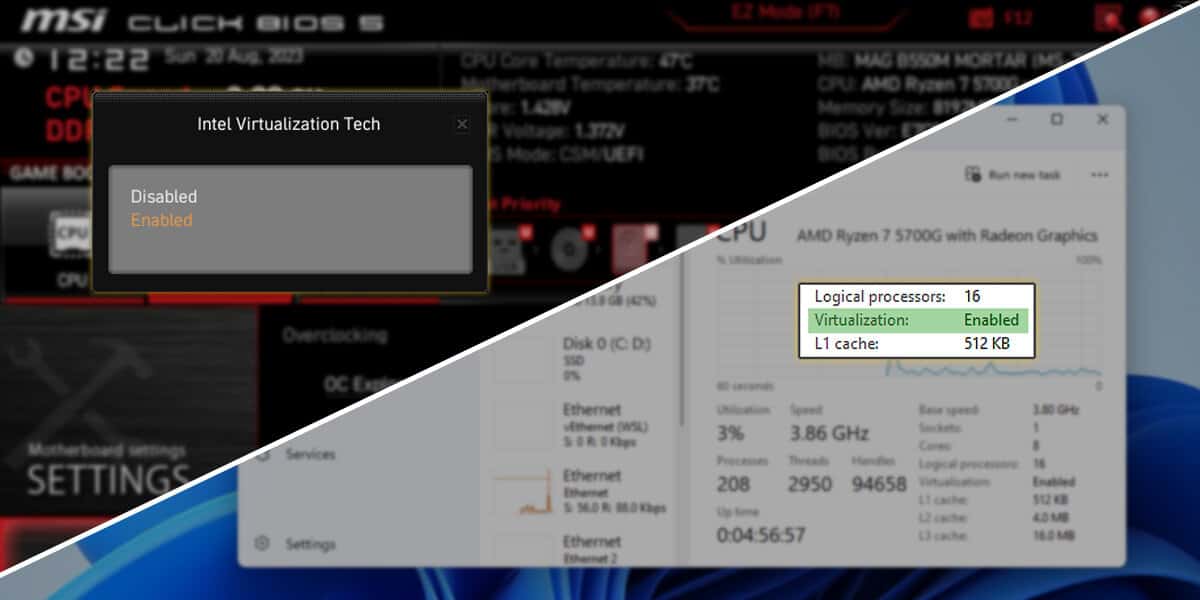
Enable Virtualization in BIOS
Once you find the virtualization possibility, merely choose it and set it to Enabled.
If you encounter any issues at this level, you may check with our detailed guides for enabling virtualization on MSI, ASUS, and Gigabyte boards.
If supported, it’s also possible to allow different virtualization options like PCIe passthrough. This particular tech lets VMs straight entry PCIe gadgets like graphics playing cards, network playing cards, and so on. which may enhance efficiency. Intel calls it their Directed I/O expertise (VT-d) whereas AMD calls it IOMMU.

Finally, press F10 to avoid wasting the modifications and exit the BIOS.
Verify Virtualization Status
After enabling virtualization and exiting the BIOS, your PC ought to reboot to Windows. There are a number of methods to confirm the virtualization standing in Windows.
- You can press Ctrl + Shift + Esc to open the Task Manager. You’ll discover the virtualization standing within the Performance > CPU tab.

- System profiling instruments like CPU-Z may also present you the virtualization standing. Check for instruction flags like VT-x or AMD-V.

- Or, you may simply attempt to launch a VM. You ought to not see errors like AMD-V is disabled.


At this level, you’re free to mess around with totally different hypervisors, VMs, and working methods. If you are feeling misplaced relating to the place to begin, we have now quite a few virtualization guides geared towards inexperienced persons:
Check out more article on – How-To tutorial and latest highlights on – Gaming News