How To Enable Integrated Graphics On Gigabyte.
If you’ve run out of output ports in your exterior GPU, otherwise you’re not using an exterior GPU in any respect, you’ll wish to make the most of your onboard graphics.
You can allow/disable built-in graphics from the Chipset or IO Ports part in your Gigabyte BIOS. Sometimes, this selection could also be lacking although, as was the case on one in every of our older Gigabyte methods.
So, I’ll clarify how to configure built-in graphics on Gigabyte, and what you are able to do if built-in graphics is just not supported on this article.
Verify Integrated Graphics Support
Users usually inquire whether or not their motherboard helps built-in graphics or not however that is an outdated concept. Most trendy motherboards truly implement onboard graphics by way of the CPU.
AMD
AMD makes use of the time period APU (Accelerated Processing Unit) for such processors. Their G collection APUs are those with built-in graphics (e.g., Ryzen 3400G, Ryzen 5700G, and so on.).
There is one exception to this rule. Their skilled line of processors (6000 and 7000 collection – e.g., Ryzen 9 PRO 7945) additionally embody Radeon Graphics however they don’t have the G suffix within the title.
Intel
Identifying Intel processors is a bit trickier. I like to recommend going by way of Intel’s processor record as that’s the best methodology.

If your processor helps built-in graphics, it’ll be famous within the Processor Graphics part. The Processor Graphics specs may even be listed intimately on the Product Specifications web page.
Boot to Gigabyte BIOS
Assuming your processor helps built-in graphics, you’ll have the ability to allow or disable it out of your firmware interface.
Power in your PC and repeatedly press Del/F2 to entry the BIOS/UEFI setup utility.

This methodology could not work when you’ve enabled Fast Boot.
In that case, you may restart your PC 3 occasions in a row as well to the recovery surroundings. There, choose Troubleshoot > Advanced Options > UEFI Firmware Settings.
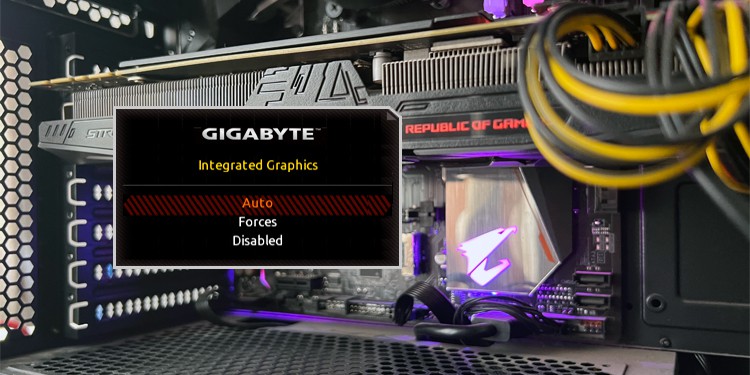
Enable/Disable Integrated Graphics
After booting to the BIOS, press F2 (if required) to modify to Advanced Mode. In the Chipset tab, set Integrated/Internal Graphics to the popular mode:
- Auto – This is the default choice. The BIOS routinely permits or disables Integrated Graphics relying on whether or not an exterior GPU is put in.
- Forces – Enable Integrated Graphics.
- Disabled – Disable Integrated Graphics.

On boards with the brand new BIOS UI, you are able to do the identical from Settings > IO Ports > Internal Graphics.
Finally, press F10 to save lots of the adjustments and exit.

Advanced Configuration & Troubleshooting
The Integrated Graphics choice lacking completely from the BIOS appears to be the most typical downside amongst customers. This occurs both as a result of your CPU doesn’t assist built-in graphics, or as a result of your BIOS model is outdated.
For instance, I used a system with a B450 Aorus Elite board and a Ryzen 5 5600G APU for this text. This board solely launched built-in graphics assist for newer Ryzen CPUs just like the 5600G with BIOS model F40. On older BIOS variations, the built-in graphics choice could be lacking.

You can confirm that there’s no such incompatibility in your case from the BIOS listings in your board producer’s web site. Then, if required, you may update the BIOS model.
Moving on, I’ve principally seen two widespread queries when it comes to additional configuration.
Increasing Memory Allocated to iGPU
iGPUs are based mostly on the UMA expertise, which means they work by borrowing a number of the system reminiscence. This quantity is named the UMA body buffer measurement. Generally, setting this to Auto (default) works wonderful as the scale scales based mostly on obtainable system reminiscence.
But in uncommon circumstances, you would possibly encounter GPU-related errors or points like lacking textures in video video games. In such situations, you may manually improve the buffer measurement.
After setting Integrated Graphics to Force, the UMA Mode turns into configurable. Set it to UMA Specified and choose the UMA Frame Buffer Size.

Before saving the adjustments (F10), ensure you haven’t overallocated reminiscence to the UMA buffer to the purpose the place your total system efficiency could also be compromised. For instance, allocating 2GB on a system with 8GB RAM is okay, however doing so on a system with 4 GB RAM is a foul concept.
Configuring Default Output
The second question is about choosing the default show output when you’re using an exterior GPU with the iGPU, or if in case you have a multi-monitor setup. You want to switch a few settings for this.
- Go to the Peripherals tab and choose Initial Display Output. This helps you to choose the onboard graphics or an exterior GPU on a particular PCIe slot as the primary show.

- When booting in UEFI mode with CSM disabled, you can too configure the Graphic Output Protocol (GOP) Policy. This helps you to choose the precise output to make use of out of your GPU.


Check out more article on – How-To tutorial and latest highlights on – Gaming News