How To Download And Install RAID Drivers ( AMD & Intel ).
After establishing {hardware} or software program RAID, it’s essential to obtain the devoted drivers for correct performance. Without them, the OS gained’t acknowledge your storage drives within the array.
In order to put in the RAID driver, first navigate to Intel or AMD’s assist web page. Find SATA/NVMe driver that’s suitable together with your chipset, working system, RAID stage, and processor era. Download and replica this into your thumb drive. Finally, load the devoted driver within the Windows Setup wizard or immediately execute the setup file.
Here’s an in depth information to obtain and set up RAID drivers on each Intel and AMD motherboards.
Identifying RAID Drivers
Before continuing, it is advisable know the suitable RAID drivers required in your platform. Here are the important thing factors to contemplate:
- The RAID drivers are CPU-specific. You can discover the related
.infinformation on each Intel and AMD’s assist pages. - While you’re at it, guarantee to put in the drivers akin to your chipset, processor’s era, and working system. Similar ones specified for various chipsets won’t work.
- Also, the drivers you’re looking for to obtain must assist the RAID stage you may have configured.
- No matter the kind of RAID (SATA or NVMe), producers bundle the related drivers in a single bundle. Therefore, the identical drivers needs to be relevant for each.
- If you created a RAID set using Intel or AMD’s Windows Desktop utility, the required drivers needs to be robotically put in. In that case, there’s no must trouble about downloading further drivers.
- Lastly, the drivers for {hardware} controllers and software program/Fake RAID additionally fluctuate.
Installing RAID Drivers on AMD Motherboards
RAIDXpert2 is the newest know-how from AMD that allows you to prepare your suitable storage drives in a RAID array. After setting this up out of your BIOS utility, you require handbook set up of the drivers, whether or not it’s throughout OS set up or for a non-bootable RAID drive.
Download Appropriate Drivers
The first step entails downloading the devoted driver from the official AMD assist web page. As talked about earlier, you must consider the supported chipset and processor:
- Start by navigating to the official AMD Drivers and Support webpage.
- Under ‘Select your product from the list’, select Chipsets.
- Move to the suitable and choose the socket. This ought to additional provide you with one other choice field.
 1")
- Now, choose the chipset and hit the Submit button.
- Next, develop the Windows model and an inventory of drivers needs to be listed.
- Look for AMD RAID Driver (SATA, NVMe RAID).
 2")
- Expand Driver Details and examine whether or not it helps your processor, chipset, and RAID stage to be tremendous positive.
 3")
- Once confirmed, hit the Download button.
 1")
 2")
 3")
Note: For non-bootable OS drives, obtain AMD RAID Installer (SATA, NVMe RAID) and run the setup file. Proceed with the on-screen directions and this could set up the related drivers in your RAID set.
Copy Drivers to USB Drive
 4")
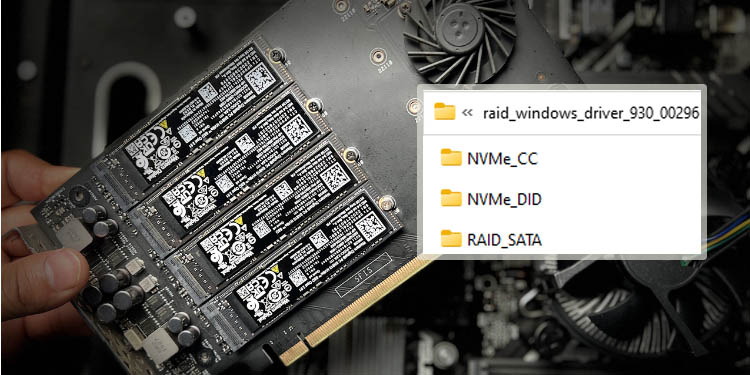
Once the obtain is full, navigate to the vacation spot folder and unzip it. When you progress into the OS listing (additional contained in the structure sub-directory), you’ll discover three folders–NVMe_CC, NVMe_DID, and RAID_SATA.
Depending in your RAID set (NVMe or SATA), ship the respective folder to a USB flash drive. While RAID_SATA is self-explanatory, the NVMe_CC and NVMe_DID rely upon the Ryzen processor. The beneath listing ought to assist you choose the suitable folder:
| Ryzen Processors | NVMe Folder Selection |
| 1000 sequence | NVMe_CC |
| 2000 sequence | NVMe_CC |
| 2000 sequence with Radeon Graphics | NVMe_CC |
| 3000 sequence | NVMe_CC |
| 3000 sequence with Radeon Graphics | NVMe_DID |
| 4000 sequence with Radeon Graphics | NVMe_DID |
| 5000 sequence | NVMe_CC |
| 5000 sequence with Radeon Graphics | NVMe_DID |
| 1st Gen Threadripper | NVMe_CC |
| 2nd Gen Threadripper | NVMe_DID |
| third Gen Threadripper | NVMe_DID |
| A Series (seventh Gen) | NVMe_CC |
Load Drivers During Windows Installation
After making a SATA or NVMe RAID set, you could exit BIOS mode out of your ASUS PC. Insert the bootable flash drive and proceed to put in Windows. However, you’re possible not going to get any configured drives through the course of on account of lacking drivers:
- In the ‘Where do you want to install Windows?’ part, click on on the Load driver possibility.
 5")
- Then, hit the Browse button and search for the folder that you just had copied earlier.
 6")
- Load every of those information in succession–rcbottom, rccfg, and rcraid. For every, load the primary driver on the display.
 7")
- If that didn’t assist, strive the second driver.
 8")
- Repeat the method (if required) till your RAID disk exhibits up on the preliminary drive set up window.
 9")
- By default, the ‘Hide drivers that aren’t suitable with this laptop’s {hardware}’ possibility is checked. In case you didn’t see any driver listed, uncheck this and take a look at once more.
 10")
- Once you may have loaded the drivers, transfer forward and full your Windows set up course of.
 5")
 6")
 7")
 8")
 9")
 10")
Installing RAID Drivers on Intel Motherboards
Once you may have created a RAID 0, RAID 1, RAID 5, or RAID 10 configuration using the Intel Rapid Storage Technology, the subsequent step is to put in the drivers. The course of is much like AMD with slight variations.
You may need observed that Intel offers only a tad of choices on its web site, making it troublesome to search out the related drivers. But with my step-by-step information beneath, you must be capable to do it with none trouble.
Download Appropriate Drivers
While you may navigate to the official Intel assist web page to seek for the Intel RST drivers, this isn’t as easy as you may assume. Instead, observe my directions beneath to search out the suitable drivers in your RAID set:
- Go to the official Support for Intel Rapid Storage Technology (Intel RST) web page.
- Select Drivers & Software.
 11")
- Now, search for User Interface and Driver and click on on View Details.
 12")
- Get to the Detailed Description part and examine whether or not it helps the configured RAID stage, your OS, and processor era.
 13")
- From the Available Downloads part, press the Download
SetupRST.exebutton. 14")
 11")
 12")
 13")
 14")
Copy Drivers to USB Drive
I like to arrange the drivers earlier than configuring a RAID array. But if in case you have already began the Windows set up course of, use one other working laptop to obtain the associated drivers and replica them into your flash drive.
For non-bootable RAID arrays, immediately open the .exe file and proceed with the on-screen instruction. However, to load the drivers throughout Windows OS set up, you may’t extract the .exe file immediately. Instead, observe the beneath steps:
- First, navigate to the vacation spot folder the place the file bought downloaded.
- Right-click wherever on the empty house and choose Open in Terminal. This ought to launch Windows Powershell.
 15")
- Here, paste the next cmdlet and hit Enter. Change SetupRST_extracted if its file title is totally different.
./SetupRST.exe -v EXTRACTDRIVERS=SetupRST_extracted 16")
- Hit Yes as soon as the User Account Control immediate pops up.
 17")
- All the content material contained in the
SetupRST.exefile now will get extracted into a brand new folder. Send this to your USB flash drive. 18")
 15")
 16")
 17")
 18")
Load Drivers During Windows Installation
Then, you may proceed with the Windows set up (don’t neglect to insert the USB drive with the ready RAID drivers). I’m fairly positive you’re not going to search out your drive within the ‘Where do you want to install Windows?’ display until loading the related driver:
- Hit the Load driver possibility within the drive choice window.
- Next, click on the Browse button within the Load driver immediate.
- Navigate to the motive force folder and begin by loading the
iaStorAC.inffile. 19")
- A listing of drivers may be proven. Start by choosing the primary one and continuing with the others (if the previous didn’t work).
 20")
- In case that didn’t assist, strive loading the
iaStorSW.infandiaStorExt.infsimilarly. 21")
- Also, strive with the ‘Hide drivers that aren’t suitable with this laptop’s {hardware}’ possibility unchecked. While this isn’t a really helpful possibility, it may possibly typically do the trick.
- Pick the unallocated house (noting the entire storage of your RAID setup) and full the Windows set up.
 19")
 20")
 21")
Troubleshooting RAID Drivers
Did the RAID drivers not load otherwise you met with some type of error message through the Windows set up course of? We’ve been there too.
Our crew did not load the Intel RST drivers after we created RAID arrays on a few of our ASUS and Gigabyte motherboards. But the difficulty didn’t arouse with a lot of the ASRock fashions. Here are some troubleshooting suggestions that ought to remedy some command points with RAID drivers:
Download From Motherboard’s Support Page
 22")
Once our crew couldn’t bypass the ‘We couldn’t discover any drives’ web page even after loading the RAID drivers that we bought from Intel. Later, we downloaded from the PRIME B660-Ok D4 motherboard’s assist part and this one labored for us.
Your motherboard producer has an inventory of all of the drivers corresponding to every mannequin. Navigate to their official assist web page and obtain the related RAID drivers:
- Get to the Downloads or Drivers & Utilities part.
- Select the applicable OS.
- Look for SATA/RAID driver or floppy image (the choice varies for each producer) and obtain it.
- Extract the zipped folder and copy it to your USB flash drive.
- Load the related drivers within the Windows Setup display, as demonstrated earlier.
Update Drivers on Device Manager
Sometimes, through the non-OS RAID configuration, the respective drivers won’t be acknowledged on the Device Manager or a yellow exclamation mark may seem. In such circumstances, undergo the next steps to update it:
- Press Windows + X and select Device Manager from the listing.
- Look in your RAID driver below Storage Controllers, Other Devices, or Disk Drives part.
- Right-click and choose Update driver.
 23")
- Pick Browse my computer systems for drive.
 24")
- Next, press the Browse button, navigate to the downloaded folder, and choose the related driver.
 25")
- Wait for the update to finish and your downside needs to be solved.
 23")
 24")
 25")
Other Fixes
If you’re but experiencing points with the RAID driver set up/update, listed here are different stuff you may wish to strive:
- Recheck whether or not the downloaded drivers are suitable with the chipsets, processor era, and configured RAID stage.
- Get to your BIOS and make sure the drives are configured to RAID. Also, word that CSM is disabled.
- If you may have the motherboard’s DVD, you must discover the devoted drivers right here. Copy them to a USB drive and cargo them as prescribed above.
- In case you’re getting the INACCESSIBLE_BOOT_DEVICE BSOD error (when making a non-bootable array with SATA drives and you’ve got OS put in on an NVMe drive), make sure you disable the RAID mode for NVMe.
Check out more article on – How-To tutorial and latest highlights on – Gaming News