How To Clean Thermal Paste Off CPU.
After my CPU’s thermal paste dried out, I skilled a drastic drop in efficiency when using nearly any program, regardless of my rig’s specs all the time being far above the minimal necessities.
If you, too, are experiencing comparable points, chances are high, it’s time to reapply the thermal paste. It’s additionally a good suggestion to exchange it each 2-3 years because the paste degrades with time.
To exchange the thermal paste off your CPU, first, take away the cooler out of your PC. Then, clear off the paste using isopropyl alcohol. Next, apply a brand new layer and reassemble all the things back collectively.
In this in-depth information, we’ll go over precisely how to scrub thermal paste off the CPU safely and reapply it.
Gather the Tools
Before beginning, it’s best to examine whether or not you have got all the required instruments you’ll want in the course of the course of. These embrace,
- Screwdriver toolkit for the disassembly and reassembly
- Microfiber or any lint-free material
- Q-tips or Microfiber swabs
- 70%-90% Isopropyl Alcohol for normal thermal paste, 91%+ one for liquid steel
- Excellent high quality thermal paste
- Anti-static wristband. You want it to floor your self. This avoids any harm to the PC parts as a result of electrostatic discharge.
If your PC and cooler are dusty, get a can of compressed air as effectively. You also needs to ensure your workspace is clear (no lint, mud, or particles).
After all these preps, let’s start.
Open PC Case
You should open the PC case with the intention to take away the cooler. But earlier than that, Power in your PC and run it for a few minutes. It will warmth up the paste, making it simpler to take away the cooler. Then,
- Now, Power off your PC and take out the facility cable. After that, unplug all different related peripherals.

- Press the facility button and maintain it for 2-3 seconds. This will energy cycle the pc and drain any remaining cost.

- Take out the aspect panel out of your PC case. In most PCs merely unfasten the screws and slide out the panel.


Remove CPU Cooler
Now, take away the CPU cooler from the motherboard. Based on its sort, you possibly can both unscrew or unlock its clip.
But first, examine if any increased profile parts like RAM or GPU are obstructing you from attending to the bottom of the CPU cooler. If sure, you must take away them as effectively. After that,
- Unplug the fan in addition to RGB cables first. If you might be using any zip or velcro ties to handle these cables, unlock them to take away the cooler.

- Now, unlock the locking mechanism of the CPU cooler to free it. In common,
- Take out the CPU cooler. Pull it by twisting it barely if it seems caught.
- For AIO coolers, you received’t must take away the radiator except it obstructs the cleansing course of.

Clean Thermal Paste
After eradicating the cooler, clear off the thermal paste earlier than reapplying it.
Even if the paste has not dried off, it received’t have the right construction of a brand new paste. Using the identical paste or making use of a brand new paste above the previous one will create pockets of air within the paste layer and have an effect on thermal dissipation.
You can use isopropyl alcohol with a microfiber material and Q-tips to scrub the paste. For that,
- Take a bit of little bit of microfiber or lint-free material and dip it in isopropyl alcohol. Then, wipe the paste off the CPU and the cooler base. Make positive to maintain this stuff in thoughts, although.
- If there’s a bigger quantity of thermal paste, wipe it with a dry material first to take away most of it.
- You may even use a paper towel. Just be sure you don’t rub it too exhausting and depart behind its residue on the motherboard. However, strive using a lint-free material every time potential.

- Do not use some other solvents than isopropyl alcohol. They could also be more corrosive or include contaminants like natural oils that aren’t appropriate for cleansing PC parts.
- If the paste will get to the sides of the CPU, use a cotton swab dipped in isopropyl alcohol and clear it. Ideally, there ought to be no seen residue of the paste on the CPU and the heatsink after you might be executed.
- If you had used liquid metal-based thermal paste and it oxidized the floor of IHS or the warmth sink, it will be barely tougher to scrub. In common,
- Use 91% or stronger isopropyl alcohol on each warmth sink and CPU.
- For the warmth sink, strive using sandpaper with the alcohol to rub out the oxidized layer.
- For the CPU’s IHS, you shouldn’t use sandpaper as it should take away all of the textual content on the chip, which can void your guarantee. Simply keep wiping it using the isopropyl alcohol and a lint-free material till the layer goes away.
- If you have got delidded your CPU, the liquid steel mustn’t have an effect on the CPU die. So it ought to be simpler to scrub.

After cleansing the paste, I like to recommend cleansing your CPU cooler whether it is dusty. You also needs to clear any mud off your PC in order that it doesn’t hamper the cooling course of afterwards.
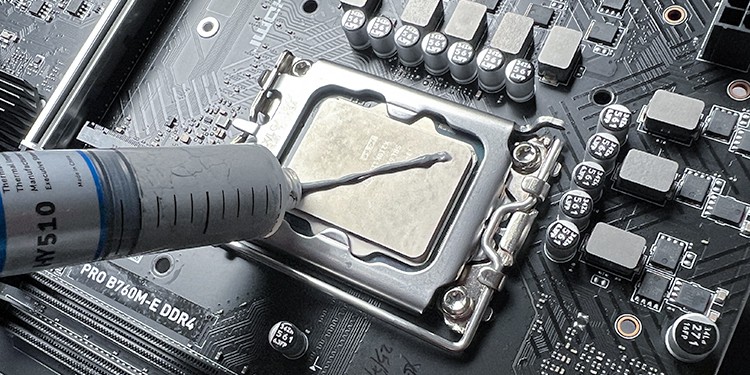
Reapply Thermal Paste
Without thermal paste, your CPU is susceptible to overheating. This can trigger a complete host of efficiency issues and even shorten your pc’s lifespan. So you must apply it earlier than reinstalling the CPU cooler.
Applying the paste is fairly simple. But there are some things you must take into account:
- Make positive that every one the isopropyl alcohol has dried off from the warmth sink and CPU.
- You want to use an appropriate quantity of paste to the CPU. If it isn’t sufficient, it received’t unfold throughout all of the CPU floor; whether it is an excessive amount of, it could leak to the motherboard.

- You can use any sample you need. Just be sure that the paste spreads evenly.
- A greater high quality paste lasts more years and supplies higher thermal conductivity. So strive using these as a substitute of low-cost, low-quality ones.
- Most thermal pastes sometimes have a shelf lifetime of round 5 years. However, this could range relying on the model and manufacturing date. So, when you have an previous thermal paste, examine its expiration date beforehand.

It’s additionally higher to examine the thermal paste’s person handbook earlier than making use of it in case it comes with particular directions.
Note:
I don’t suggest using something aside from thermal paste on the CPU after cleansing it. I’ve had some success whereas experimenting with some toothpaste.
But it solely labored effectively for a couple of days, after which the CPU temperature elevated drastically. So don’t use some other alternate options except you urgently want a thermal interface materials, and even then, solely achieve this briefly.
Reinstall CPU Cooler
After reapplying the bottom, it’s time to reinstall the CPU cooler and reassemble all the things.
- If you might be using a CPU cooler with spring screws, ensure to place the backplate in place correctly.
- Place the cooler above the CPU within the right orientation whereas guaranteeing that it isn’t urgent onto the fan cables.

- Then, lock the cooler in place using its locking mechanism. You can reverse the unlocking course of to take action.
- Reconnect the required cables on the motherboard’s AIO_PUMP header or CPU_FAN header. In case you have got an RGB cooler, join it to the RGB header.

- Re-attach the panel. Then, join the facility cable and all different peripherals to the PC.


After that, it’s all the time a good suggestion to watch the CPU temperature to see if there are any modifications.
Check out more article on – How-To tutorial and latest highlights on – Gaming News