How To Apply Thermal Paste To GPU.
Thermal Paste on a GPU often lasts for five+ years, however with time, it should ultimately dry out. This degradation course of accelerates whenever you overclock your GPU or run it below a excessive workload. If your GPU’s temperature stays above 70°C more often than not, it’s best to interchange its thermal paste.
To apply thermal paste to your GPU, detach the heatsink from the graphics card, clear the paste, and apply a brand new layer. It’s additionally a good suggestion to substitute the thermal pads for the VRMs and VRAMs if they’re broken.
However, it is best to take just a few precautions earlier than making use of thermal paste to a GPU. It’s a little bit totally different from doing it on a CPU as a result of it’s a must to take the cardboard aside.
Make positive you perceive how to take your card aside earlier than you begin. You could must search for a teardown video or examine your guide. Don’t comply with the directions from one other card or one made by a special producer.
Now let’s transfer on to the precise course of.
Prepare Necessary Materials
You must have sure supplies and gear prepared beforehand to wash and apply thermal paste to your GPU correctly.
- Isopropyl Alcohol (70%-90%), 91%+ in the event you use liquid steel
- Microfiber or lint-free fabric
- Q-tips or cotton swabs
- Compressed air spray can (to wash the heatsink and GPU followers)
- Appropriate screwdrivers
- Good high quality thermal paste
Make positive you employ an Anti-static wristband to floor your self and forestall any electrostatic discharge injury to the pc {hardware}. Alternatively, you can too discharge any built-up static cost by often touching a steel floor.
Then you can begin with taking out the graphics card or separating its warmth sink.
Remove the Graphics Card from the PC
If you wish to substitute the thermal paste on a devoted graphics card you will have already put in, it’s a must to first take out the cardboard from its PCIe slot. To accomplish that,
- Shutdown your PC and take away the ability cable. Disconnect all different peripherals as nicely.

- Press and maintain the ability button for just a few seconds to energy cycle the PC and drain any extra cost.
- Now open your PC Case. For that, take away the aspect panel. You have to unscrew and slide it out for many PCs.

- Place the PC case on its different aspect to make it simpler to take away the graphics card.
- Disconnect the energy connector cable from the graphics card.

- Now, unscrew the graphics card’s mounting bracket from the rear panel of the PC case.

- Most PC instances additionally use an extra bracket to safe the PCIe gadgets. You have to unscrew and take away it first.

- Pull down the locking clip on the PCIe slot with the graphics card.

- Pull out the graphics card from the slot.


Detach the Heatsink and Graphics Card
Now that you’ve got taken out the graphics card, you could detach its heatsink to show the graphics processor. For that,
- Take your graphics card to a clear workspace the place you may place the elements and screws with out dropping or damaging them.
- Use a screwdriver to take away all of the retaining screws which are attaching the heatsink and the heatsink cowl to the graphics card. Keep the next issues in thoughts whereas doing so:
- The variety of screws you could take away will depend on the mannequin of the graphics card.
- For some, you solely have to take away the 4 screws within the center. For others, more screws could have been used, so take away all of them.

- Just Keep in thoughts that one of many 4 foremost screws is roofed by a sticker, and eradicating it’d void the guarantee. It’s higher to examine the official guarantee particulars to verify this info.
- You don’t have to take away the screws connecting the cardboard to the protect plates on the within.
- For most video playing cards, the screws on the entrance are solely connecting the heatsink to its cowl, so that you gained’t have to unscrew them.
- Also, some graphics playing cards have a separate backplate that you could be have to take away earlier than you may entry the retaining screws.
- You can take a look at the GPU from the edges and take a look at checking the place all of the screws go to find out which of them you could take away. Alternatively, you may examine the cardboard’s consumer guide to get this info.

- Some fashions additionally use plastic clips to connect the heatsink to the cardboard. You can use needle nostril pliers to unlock them.
- Slowly pull aside the cardboard from the warmth sink. Make positive to not use an excessive amount of drive, because the GPU fan cables are nonetheless linked. You might also rip out the thermal pads or different inside elements if you’re forceful.

- If the cardboard is caught to the heatsink, gently strive pulling it out from one aspect whereas wiggling the cardboard. Take your time and be affected person.
- When the video card comes considerably free, and you’ll entry the fan cables, disconnect them from the cardboard’s fan header. Then, end detaching the cardboard.
If you will have just one fan cable, you may take away it afterward as nicely.


Clean Thermal Paste
You have to wash the previous paste correctly earlier than making use of a brand new layer. If the previous paste has dried, it should have massive pockets of air that may’t be crammed. Even when not dry, it gained’t retain its correct construction, and a few air pockets will nonetheless stay.
These air pockets will improve the general thermal resistivity of the interface and have an effect on the cooling course of, thus the necessity for cleansing. To do it,
- Soak a microfiber fabric or any lint-free fabric on isopropyl alcohol and use it to wash the paste off of the GPU and the heatsink.
You also can use a paper towel so long as you’re cautious to not go away behind any lint. Just be sure to spray compressed air on the graphics card afterwards to account for unintentional lints.
- Then use cotton swabs dipped in isopropyl alcohol to wash all the surplus paste on the sides of the processor and the circuit.

- Let the isopropyl alcohol on the CPU and heatsink dry out correctly earlier than making use of the brand new paste.
- If the GPU followers and the heatsink are dusty, you can too clear them by giving a few sprays of compressed air. Make positive to maintain the air can in an upright place with out shaking it an excessive amount of, and use a number of angles to blow the air.


Replace Thermal Pads (Optional)
If you see some deformations on the thermal pads, it is best to substitute them as nicely. You gained’t want to take action if they’re in good situation except your GPU begins overheating, even with correct thermal paste.
Regardless, right here’s what it is best to do:
- You will often discover thermal pads for the Voltage Regulator Module (VRM) and Video Random Access Memory (VRAM). If some protect plates are overlaying the thermal pads, you could take away them.
- Peel out one of many thermal pads whereas remembering its thickness. You can use an digital caliper to measure the thickness.

- Then, minimize out a brand new thermal pad with the similar thickness and use it there. You also can examine official sources or on-line boards to verify the precise thermal pad thickness you want.
- Do so for all of the pads. You also can take an image of the pads, take away all of them, and reapply new ones in accordance with the photograph.
- Sometimes, second-hand graphics playing cards or these you bought from third-party suppliers could not have the mandatory thermal pads in sure spots. You can examine on the official sources and add the suitable pads if mandatory.
- Reattach the protect plate in the event you had eliminated it earlier.

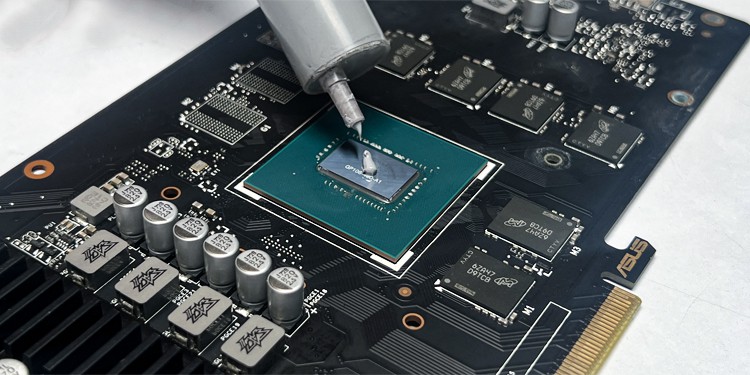
Apply Thermal Paste
The GPU processor is often a lot smaller than a CPU (except it comes with an IHS), so that you solely want a small quantity of paste. Most of the patterns you need to use for a CPU are additionally not really helpful on this case.
The backside line is that you just want sufficient paste to unfold all around the processor chip however not into the encompassing circuit.

I really suggest spreading it with a spreader earlier than reattaching the heatsink to it if you’re new to this.
But if you’re skilled sufficient to have the ability to eyeball the quantity of paste mandatory, you may place it as a single dot within the center. Installing the heatsink will unfold it higher in comparison with a spreader.
You also needs to use a good high quality paste as they final for much longer and are more environment friendly.
Reassemble Everything
Now that you’re accomplished with changing the paste, it’s time to reinstall the graphics card and reassemble your PC back collectively. Simply reverse all of the steps above. You also can clear your PC earlier than reassembling it, simply in case.
After changing the paste, it is best to discover a important enchancment in your gaming or some other GPU-intensive actions.
For instance, once I obtained my 1080 TI from EVGA, I ordered it from the B Stock as a result of I knew I might in all probability repair any points with it.
When it arrived, a take a look at revealed that it will shut down when attempting to play video games like ARK on excessive graphics. The GPU temperatures would zoom as much as over 85 levels earlier than the sport shut down – all inside moments of beginning the sport.
After replaing the thermal paste, we ran a stress take a look at and confirmed that it will work. When taking part in the identical recreation, the temperatures remained below 80 levels, and I had no heat-related points with it.
It isn’t my main GPU anymore, however I nonetheless use it often, and it really works fantastically years after making use of that thermal paste.
Check out more article on – How-To tutorial and latest highlights on – Gaming News